NeuroExplorer Manual
Copyright © 1998-2021 Nex Technologies
Revision: 5.306. Date: 4/16/2021.
Table of Contents
1. Getting Started 9
1.1. Getting Started with NeuroExplorer 10
1.2. Working with Sentinel Keys 11
1.3. NeuroExplorer Screen Elements 13
1.4. NeuroExplorer Menu Commands 16
1.5. Opening Files and Importing Data 25
1.6. Importing Files Created by Data Acquisition Systems 26
1.7. Importing Data from Text Files 28
1.8. Importing Data from Spreadsheets 30
1.9. Importing Data from Matlab 31
1.10. Reading and Writing NeuroExplorer Data Files 32
1.11. 1D Data Viewer 33
1.12. Analyzing Data 34
1.13. Selecting Variables for Analysis 35
1.14. How to Select Variables for Existing Window 36
1.15. How to Select Variables in Variables Panel 38
1.16. Adjusting Analysis Properties 39
1.17. Analysis Templates 41
1.18. Numerical Results 42
1.19. Post-processing 43
1.20. Saving Graphics 44
1.21. Saving Results as PowerPoint Slides 45
1.22. Working with Results Files 46
1.23. Working with Matlab 48
1.24. Working with Excel 50
1.25. Working with R-project 51
2. NeuroExplorer User Interface 55
2.1. NeuroExplorer Screen Elements 58
2.2. NeuroExplorer Menu Commands 61
3. Analysis Reference 70
3.1. Data Types 72
3.1.1. Spike Trains 73
3.1.2. Events 75
3.1.3. Intervals 76
3.1.4. Markers 78
3.1.5. Population Vectors 80
3.1.6. Waveforms 81
3.1.7. Continuously Recorded Data 83
3.2. Data Selection Options 84
3.3. Post-Processing Options 85
3.4. Matlab Options 87
3.5. Excel Options 88
3.6. Confidence Limits for Perievent Histograms 89
3.7. Cumulative Sum Graphs 91
3.8. Rate Histograms 92
3.9. Interspike Interval Histograms 94
3.10. Autocorrelograms 97
Page 1
3.11. Perievent Histograms 100
3.12. Crosscorrelograms 105
3.13. Shift-Predictor for Crosscorrelograms 111
3.14. Rasters 113
3.15. Perievent Rasters 114
3.16. Joint PSTH 117
3.17. Cumulative Activity Graphs 119
3.18. Instant Frequency 120
3.19. Interspike Intervals vs. Time 121
3.20. Poincare Maps 122
3.21. Synchrony vs. Time 123
3.22. Trial Bin Counts 125
3.23. Power Spectral Densities 127
3.24. Burst Analysis 131
3.25. Principal Component Analysis 135
3.26. PSTH Versus Time 137
3.27. Correlations with Continuous Variable 139
3.28. Regularity Analysis 141
3.29. Place Cell Analysis 143
3.30. Reverse Correlation 147
3.31. Epoch Counts 150
3.32. Coherence Analysis 152
3.33. Spectrogram Analysis 155
3.34. Perievent Spectrograms 158
3.35. Joint ISI Distribution 161
3.36. Autocorrelograms Versus Time 163
3.37. Perievent Rasters for Continuous 165
3.38. Power Spectra for Continuous 167
3.39. Coherence for Continuous 172
3.40. Analysis of Head Direction Cells 175
3.41. Single Trial Spectrum Analysis 177
3.42. Phase Analysis via Hilbert Transform 180
3.43. Waveform Comparison 182
3.44. Hazard Analysis 184
3.45. Perievent Firing Rates 186
3.46. Find Oscillations 190
3.47. Firing Phase 193
3.48. Detect Spikes 195
3.49. Python-based Analysis 197
3.50. CV2 Analysis 200
3.51. Firing Rates Analysis 202
3.52. Band Energy versus Time Analysis 203
4. Working with Graphics 205
4.1. NeuroExplorer Graphics 206
4.2. Graphics Modes 207
4.3. Positioning the Graphics Objects 209
4.4. Text Labels 211
4.5. Lines 213
4.6. Rectangles 214
Page 2
5. Working with 3D Graphics 215
5.1. Viewing Multiple Histograms in 3D 216
5.2. 3D Graphics Parameters 217
5.3. Viewing the Neuronal Activity "Movie" 218
5.4. Activity Animation Parameters 220
6. Programming with Python and NexScript 221
6.1. Script Variables 224
6.2. File Variables 225
6.3. Expressions 229
6.4. Flow Control 230
6.5. Functions 232
6.5.1. File Read and Write Functions 233
6.5.1.1. GetFileCount 234
6.5.1.2. GetFileName 236
6.5.1.3. OpenFile 238
6.5.1.4. CloseFile 240
6.5.1.5. ReadLine 241
6.5.1.6. WriteLine 243
6.5.1.7. OpenDocument 244
6.5.1.8. GetActiveDocument 245
6.5.1.9. NewDocument 246
6.5.1.10. CloseDocument 247
6.5.1.11. SaveDocument 248
6.5.1.12. SaveDocumentAs 249
6.5.1.13. SaveNumResults 250
6.5.1.14. SaveNumSummary 251
6.5.1.15. SaveAsTextFile 252
6.5.1.16. MergeFiles 253
6.5.1.17. ReadBinary 255
6.5.1.18. FileSeek 256
6.5.1.19. SelectFile 258
6.5.1.20. SelectFiles 259
6.5.1.21. OpenSavedResult 261
6.5.2. Document Properties Functions 262
6.5.2.1. GetDocPath 264
6.5.2.2. GetDocTitle 265
6.5.2.3. GetTimestampFrequency 266
6.5.2.4. GetDocEndTime 267
6.5.2.5. SetDocEndTime 268
6.5.2.6. GetDocComment 269
6.5.2.7. NeuronNames 270
6.5.2.8. EventNames 273
6.5.2.9. IntervalNames 276
6.5.2.10. WaveNames 279
6.5.2.11. MarkerNames 282
6.5.2.12. ContinuousNames 285
6.5.2.13. NeuronVars 288
6.5.2.14. EventVars 291
6.5.2.15. IntervalVars 294
6.5.2.16. WaveVars 297
6.5.2.17. MarkerVars 300
6.5.2.18. ContinuousVars 303
6.5.2.19. GetSelVarNames 306
6.5.2.20. GetDocStartTime 307
Page 3
6.5.2.21. SetDocStartTime 308
6.5.3. Document Variables Functions 309
6.5.3.1. GetVarCount 312
6.5.3.2. GetVarName 313
6.5.3.3. GetVarSpikeCount 314
6.5.3.4. GetVar 315
6.5.3.5. DeleteVar 316
6.5.3.6. Delete 318
6.5.3.7. GetVarByName 319
6.5.3.8. NewEvent 320
6.5.3.9. NewIntEvent 321
6.5.3.10. NewPopVector 322
6.5.3.11. GetContNumDataPoints 323
6.5.3.12. NewContVar 324
6.5.3.13. CopySelectedVarsToAnotherFile 326
6.5.3.14. NewContVarWithFloats 327
6.5.3.15. ContVarStoreValuesAsFloats 329
6.5.3.16. CreateWaveformVariable 331
6.5.3.17. ContMin 332
6.5.3.18. ContMax 333
6.5.3.19. ContMean 334
6.5.3.20. ContAdd 335
6.5.3.21. ContMult 336
6.5.3.22. ContAddCont 337
6.5.3.23. GetName 338
6.5.3.24. GetSpikeCount 339
6.5.3.25. AddTimestamp 340
6.5.3.26. SetNeuronType 341
6.5.3.27. AddContValue 342
6.5.3.28. AddInterval 343
6.5.3.29. Name 344
6.5.3.30. Name 345
6.5.3.31. SamplingRate 346
6.5.3.32. NumPointsInWave 347
6.5.3.33. Timestamps 348
6.5.3.34. Intervals 349
6.5.3.35. ContinuousValues 350
6.5.3.36. FragmentTimestamps 351
6.5.3.37. FragmentCounts 352
6.5.3.38. WaveformValues 353
6.5.3.39. Markers 354
6.5.3.40. MarkerFieldNames 355
6.5.3.41. SetContVarTimestampsAndValues 356
6.5.3.42. SetTimestamps 357
6.5.3.43. SetNeuronPosition 358
6.5.4. Variable Selection Functions 359
6.5.4.1. IsSelected 360
6.5.4.2. Select 361
6.5.4.3. Deselect 362
6.5.4.4. SelectVar 363
6.5.4.5. DeselectVar 364
6.5.4.6. Select 365
6.5.4.7. Deselect 366
6.5.4.8. SelectAll 367
6.5.4.9. DeselectAll 368
Page 4
6.5.4.10. SelectAllNeurons 369
6.5.4.11. SelectAllEvents 370
6.5.4.12. EnableRecalcOnSelChange 371
6.5.4.13. DisableRecalcOnSelChange 372
6.5.5. Analysis Functions 373
6.5.5.1. ApplyTemplate 374
6.5.5.2. ApplyTemplateToWindow 376
6.5.5.3. PrintGraphics 378
6.5.5.4. Dialog 379
6.5.5.5. ModifyTemplate 381
6.5.5.6. GetTemplateParValue 384
6.5.5.7. RecalculateAnalysisInWindow 386
6.5.5.8. EnableRecalcOnSelChange 387
6.5.5.9. DisableRecalcOnSelChange 388
6.5.5.10. SendGraphicsToPowerPoint 389
6.5.5.11. SaveGraphics 390
6.5.5.12. ExecuteMenuCommand 391
6.5.5.13. SaveResults 393
6.5.5.14. SelectVariablesIn1DView 394
6.5.5.15. SetProperty 395
6.5.5.16. GetPostProcessingScriptParameter 400
6.5.5.17. GetAllAnalysisParameters 401
6.5.5.18. ActivateWindow 402
6.5.5.19. CloseWindow 403
6.5.6. Numerical Results Functions 404
6.5.6.1. GetAllNumericalResults 406
6.5.6.2. GetAllNumResSummaryData 407
6.5.6.3. SetProperty 408
6.5.6.4. GetNumRes 413
6.5.6.5. GetNumResNCols 415
6.5.6.6. GetNumResNRows 416
6.5.6.7. GetNumResColumnName 417
6.5.6.8. SendResultsToExcel 418
6.5.6.9. GetNumResSummaryNCols 420
6.5.6.10. GetNumResSummaryNRows 421
6.5.6.11. GetNumResSummaryColumnName 422
6.5.6.12. GetNumResSummaryData 423
6.5.6.13. SendResultsSummaryToExcel 424
6.5.6.14. SaveNumResults 426
6.5.6.15. SaveNumSummary 427
6.5.6.16. GetNumResSummaryColumnNames 428
6.5.6.17. GetNumResColumnNames 429
6.5.6.18. GetAllNumericalResultsAsCOM 430
6.5.7. Operations on Variables Functions 431
6.5.7.1. Rename 433
6.5.7.2. Join 434
6.5.7.3. Sync 435
6.5.7.4. NotSync 436
6.5.7.5. FirstAfter 437
6.5.7.6. FirstNAfter 438
6.5.7.7. LastBefore 439
6.5.7.8. IntervalFilter 440
6.5.7.9. SelectTrials 441
6.5.7.10. SelectRandom 442
6.5.7.11. SelectEven 443
Page 5
6.5.7.12. SelectOdd 444
6.5.7.13. ISIFilter 445
6.5.7.14. FirstInInterval 446
6.5.7.15. LastInInterval 447
6.5.7.16. StartOfInterval 448
6.5.7.17. EndOfInterval 449
6.5.7.18. MakeIntervals 450
6.5.7.19. MakeIntFromStart 451
6.5.7.20. MakeIntFromEnd 452
6.5.7.21. IntOpposite 454
6.5.7.22. IntOr 455
6.5.7.23. IntAnd 456
6.5.7.24. IntSize 457
6.5.7.25. IntFind 458
6.5.7.26. MarkerExtract 459
6.5.7.27. Shift 461
6.5.7.28. NthAfter 462
6.5.7.29. PositionSpeed 463
6.5.7.30. FilterContinuousVariable 465
6.5.7.31. LinearCombinationOfContVars 467
6.5.7.32. AbsOfContVar 469
6.5.7.33. DecimateContVar 470
6.5.7.34. ContAdd 471
6.5.7.35. ContMult 472
6.5.7.36. ContAddCont 473
6.5.8. Matlab Functions 474
6.5.8.1. SendSelectedVarsToMatlab 475
6.5.8.2. ExecuteMatlabCommand 476
6.5.8.3. GetVarFromMatlab 477
6.5.8.4. GetContVarFromMatlab 478
6.5.8.5. GetContVarWithTimestampsFromMatlab 479
6.5.8.6. GetIntervalVarFromMatlab 480
6.5.9. Excel Functions 481
6.5.9.1. SetExcelCell 482
6.5.9.2. CloseExcelFile 483
6.5.10. PowerPoint Functions 484
6.5.10.1. SendGraphicsToPowerPoint 485
6.5.10.2. ClosePowerPointFile 486
6.5.11. Running Script Functions 487
6.5.11.1. RunScript 488
6.5.11.2. Sleep 490
6.5.12. Math Functions 491
6.5.12.1. seed 493
6.5.12.2. expo 494
6.5.12.3. floor 495
6.5.12.4. ceil 496
6.5.12.5. round 497
6.5.12.6. abs 498
6.5.12.7. sqrt 499
6.5.12.8. pow 500
6.5.12.9. exp 501
6.5.12.10. min 502
6.5.12.11. max 503
6.5.12.12. log 504
6.5.12.13. sin 505
Page 6
6.5.12.14. cos 506
6.5.12.15. tan 507
6.5.12.16. acos 508
6.5.12.17. asin 509
6.5.12.18. atan 510
6.5.12.19. RoundToTS 511
6.5.12.20. GetFirstGE 512
6.5.12.21. GetFirstGT 513
6.5.12.22. GetBinCount 514
6.5.12.23. BitwiseAnd 515
6.5.12.24. BitwiseOr 516
6.5.12.25. GetBit 517
6.5.13. String Functions 518
6.5.13.1. Left 519
6.5.13.2. Mid 520
6.5.13.3. Right 521
6.5.13.4. Find 522
6.5.13.5. StrLength 523
6.5.13.6. NumToStr 524
6.5.13.7. StrToNum 525
6.5.13.8. GetNumFields 526
6.5.13.9. GetField 527
6.5.13.10. CharToNum 528
6.5.13.11. NumToChar 529
6.5.14. Debug Functions 530
6.5.14.1. Trace 531
6.5.14.2. MsgBox 532
7. COM/ActiveX Interfaces 533
7.1. Application 534
7.1.1. ActiveDocument Property 535
7.1.2. DocumentCount Property 536
7.1.3. Version Property 537
7.1.4. Visible Property 538
7.1.5. OpenDocument Method 539
7.1.6. Document Medhod 540
7.1.7. Sleep Method 541
7.1.8. RunNexScript Method 542
7.1.9. RunNexScriptCommands Method 543
7.2. Document 544
7.2.1. Path Property 546
7.2.2. FileName Property 547
7.2.3. Comment Property 548
7.2.4. TimestampFrequency Property 549
7.2.5. StartTime Property 550
7.2.6. EndTime Property 551
7.2.7. VariableCount Property 552
7.2.8. NeuronCount Property 553
7.2.9. EventCount Property 554
7.2.10. IntervalCount Property 555
7.2.11. MarkerCount Property 556
7.2.12. WaveCount Property 557
7.2.13. ContinuousCount Property 558
Page 7
7.2.14. Variable Method 559
7.2.15. Neuron Method 560
7.2.16. Event Method 561
7.2.17. Interval Method 562
7.2.18. Marker Method 563
7.2.19. Wave Method 564
7.2.20. Continuous Method 565
7.2.21. DeselectAll Method 566
7.2.22. SelectAllNeurons Method 567
7.2.23. SelectAllContinuous Method 568
7.2.24. ApplyTemplate Method 569
7.2.25. GetNumericalResults Method 570
7.2.26. Close Method 571
7.3. Variable 572
7.3.1. Name Property 573
7.3.2. TimestampCount Property 574
7.3.3. Timestamps Method 575
7.3.4. IntervalStarts Method 576
7.3.5. IntervalEnds Method 577
7.3.6. FragmentTimestamps Method 578
7.3.7. FragmentCounts Method 579
7.3.8. ContinuousValues Method 580
7.3.9. MarkerValues Method 581
7.3.10. WaveformValues Method 582
7.3.11. SamplingRate Property 583
7.3.12. Select Method 584
7.3.13. Deselect Method 585
Page 8
•
•
•
•
•
•
•
•
•
•
•
•
1. Getting Started
Installation
Before you can use NeuroExplorer, you must install NeuroExplorer program files, Sentinel system drivers
and install the Sentinel hardware key.
Running NeuroExplorer Setup
Before you begin installing NeuroExplorer and its components, please exit all currently running
applications. Please follow the following steps to install NeuroExplorer:
Download NeuroExplorer setup file from NeuroExplorer Web site. For 64-bit systems, download
https://www.neuroexplorer.com/downloads/NeuroExplorer5Setup64.exe For 32-bit Windows,
download https://www.neuroexplorer.com/downloads/NeuroExplorer5Setup32.exe
Double-click the downloaded file. NeuroExplorer Version 5 setup screen appears
Follow the prompts of the setup dialogs and complete the installation
At the end of the installation process, Sentinel System Driver Setup will start automatically
Follow Sentinel Driver Setup prompts and complete the installation of Sentinel Drivers
Reboot your computer
NeuroExplorer Setup will create the following directory structure:
The main NeuroExplorer directory: C:\Program Files\Nex Technologies\NeuroExplorer 5
SentinelDrivers subdirectory: C:\Program Files\Nex Technologies\NeuroExplorer 5\SentinelDrivers.
If you need to reinstall Sentinel Drivers, you can run SentinelSetup.7.5.8.exe program in this
directory.
By default, additional NeuroExplorer files are copied to 'NeuroExplorer 5' directory in the current
user Documents folder. You can also specify custom directory for scripts, templates and other files
when running NeuroExplorer setup.
Installing Hardware Key
Before you can use NeuroExplorer, you need to install provided Sentinel Hardware Key on your
computer.
To install the USB key:
Make sure to run the NeuroExplorer setup and reboot the computer after installing NeuroExplorer
Attach the key to the available USB port
If the New Hardware Found wizard is shown, accept the defaults in the wizard
Page 9
•
•
•
•
•
•
•
•
•
•
•
•
•
•
•
•
•
•
•
•
1.1. Getting Started with NeuroExplorer
This section, Getting Started with NeuroExplorer, describes the basics of using NeuroExplorer:
Working with Sentinel keys
NeuroExplorer Screen Elements
Opening Files and Importing Data
Importing Files Created By Data Acquisition Systems
Importing Data from Text Files
Importing Data from the Spreadsheets
Analyzing Data
Selecting Variables for Analysis
Adjusting Analysis Properties
Analysis Templates
Numerical Results
Post-processing
Working with Results Files
Working with Matlab
Working with Excel
Saving Graphics
Working with R-project
Additional information is available in the following sections:
Working with Graphics
NeuroExplorer Analysis Reference
Programming with Python and NexScript
NeuroExplorer Technical Support
NeuroExplorer users can get help via e-mail: [email protected]. Please visit NeuroExplorer
Web site https://www.neuroexplorer.com for program updates and latest information about
NeuroExplorer.
NeuroExplorer Updates
To get the latest version of NeuroExplorer, download the file
https://www.neuroexplorer.com/downloads/NeuroExplorer5Setup64.exe.
This setup file will execute the complete install - it will create folders, menu items in Start\Programs and
create a desktop icon for NeuroExplorer.
Page 10
1.2. Working with Sentinel Keys
NeuroExplorer requires a Sentinel key to operate. Sentinel drivers need to be installed so that
NeuroExplorer can communicate with the Sentinel keys. These drivers are installed when you run
NeuroExplorer setup (NeuroExplorer5Setup64.exe).
Error Messages and Troubleshooting
1. Unable to initialize Sentinel library
Make sure that Sentinel drivers version 7.5.8 or later are installed:
- Open Control Panel | Uninstall a program and verify that Sentinel System Driver Installer 7.5.8 is
listed in Currently Installed Programs.
- If an older version (prior to 7.5.8) of Sentinel Driver installer is listed, remove this version and reboot
the computer.
To install Sentinel 7.5.8 drivers, run the driver installer:
C:\Program Files\Nex Technologies\NeuroExplorer 5\SentinelDrivers\SentinelSetup.7.5.8.exe
- Reboot the computer after installing the drivers.
2. Unable to find Sentinel key
1) Verify that you are using a NeuroExplorer key. The code SRB10491 or JKFZZ should be printed on
the key. The newer keys also have Neuroexplore printed on them.
2) Make sure that Sentinel drivers version 7.5.8 or later are installed.
- Open Control Panel | Uninstall a program and verify that Sentinel System Driver Installer 7.5.8 is
listed in Currently Installed Programs.
- If an older version (prior to 7.5.8) of Sentinel Driver installer is listed, remove this version and reboot
the computer.
To install Sentinel 7.5.8 drivers, run the driver installer:
C:\Program Files\Nex Technologies\NeuroExplorer 5\SentinelDrivers\SentinelSetup.7.5.8.exe
- Reboot the computer after installing the drivers.
3) If the problem persists, you may need to use the Cleanup utility.
- Uninstall NeuroExplorer and all the Sentinel software items listed in Control Panel | Uninstall a
program
- Download Sentinel cleanup utility:
https://www.neuroexplorer.com/downloads/ssdcleanup.zip
- Unzip and run the utility. Make sure you let the utility finish running. It may take several minutes.
- Reboot the computer
- Run NeuroExplorer setup. Make sure not to cancel Sentinel Driver Setup. Accept defaults in
Sentinel Driver Setup.
- Reboot the computer
4) If you still have problems with the Sentinel key, run Sentinel Advanced Medic:
C:\Program Files\Nex Technologies\NeuroExplorer 5\SentinelDrivers\SentinelMedic.exe
Page 11
It will extract Sam1.3.1.exe.
Run Sam1.3.1.exe:
- Click Enable Logging
- Click Troubleshoot at the bottom of the dialog
- Click Acknowledge at the bottom of the dialog. You may need to click Acknowledge several times.
The program may crash, but it will create the log file SentinelLog.txt
E-mail the log file to [email protected]
Contact NeuroExplorer technical support ( [email protected] ) if you still have problems
with the Sentinel key.
3. Unable to read Sentinel key data
Contact NeuroExplorer technical support ( [email protected] ). Sentinel key may be
damaged.
4. Sentinel key does not have version 5 license
You are using NeuroExplorer version 3 or version 4 Sentinel key.
If you purchased NeuroExplorer version 5, contact NeuroExplorer technical support (
If you would like to upgrade to NeuroExplorer version 5, contact NeuroExplorer support (
the NeuroExplorer web site.
Page 12

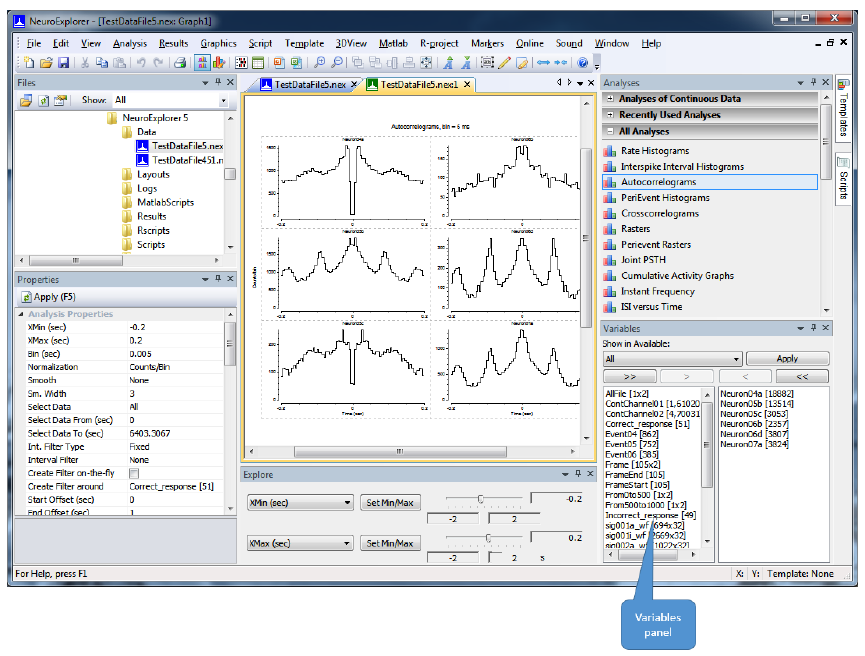
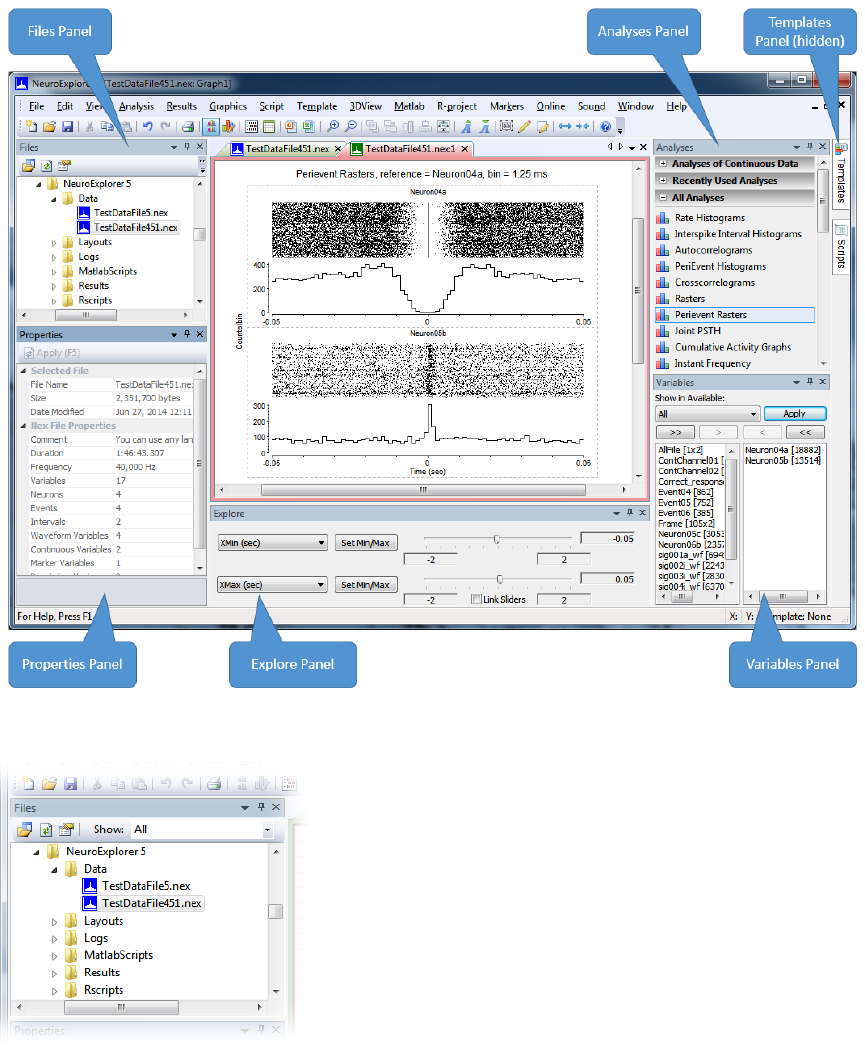
1.3. NeuroExplorer Screen Elements
NeuroExplorer user interface consists of the main window surrounded by several panels. These panels
allow you to select files, select analyses and specify analysis properties. The figure below shows the
default layout of NeuroExplorer window. Files, Properties, Analyses, Variables and Explore panels are
visible and Templates and Scripts panels are hidden. To view a hidden panel, click at the panel tab or
use View menu command.
You can reposition panels by dragging them with your mouse and you can save and restore window
layouts using Window menu commands.
Files Panel
Page 13

This view allows you to quickly browse through your data files. When you select (single-click) one of the
data files, NeuroExplorer displays the file header information in the Properties panel. To open the data
file, simply double-click the file name.
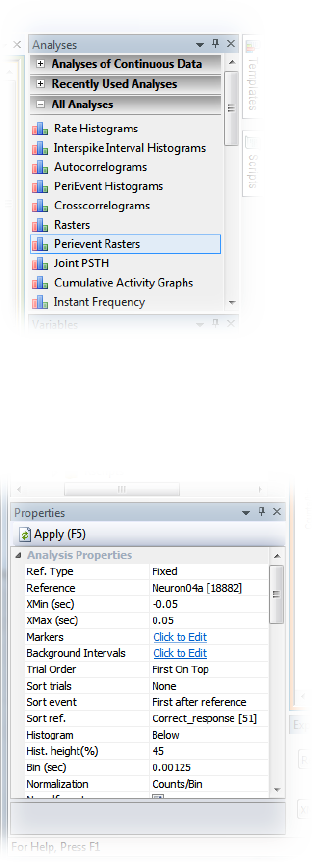
Analyses Panel
This view allows you to quickly select one of the analyses available in NeuroExplorer. To apply analysis
to the active data file, click at the analysis name.
Properties Panel
The left column of the Properties Panel lists the names of adjustable parameters for the selected object.
The right column contains various controls that can be used to change the parameter values. To apply
the changes, press the Apply button or hit the F5 key.
Templates Panel
The Templates View can be used to quickly execute an Analysis Template. Double-click the template
name and the corresponding template will be immediately executed.
You can create subfolders in your template directory and then NeuroExplorer will allow you to navigate
through the templates tree within the Templates View.
Variables Panel
Page 14

•
•
•
You can analyze all the variables in your data file, a subset of the variables, or may be just one variable.
Variables Panel allows you to quickly select and deselect the variables used for analysis:
The left column shows the variables that are not currently selected; the right column shows the selected
variables. To move variables from column to column, first select them, then press ">" (Select) or "<"
(Deselect) buttons.
Scripts Panel
This panel can be used to select a script to be executed. Double-click the script name to run the selected
script.
You can create subfolders in your script directory and then NeuroExplorer will allow you to navigate
through the scripts tree within the Scripts View.
Explore Panel
Explore panel allows you to quickly explore analysis parameter ranges. Select a parameter you want to
explore from a list and drag a slider. NeuroExplorer will keep recalculating analysis with the new
parameter values while you drag the slider, thus creating an 'analysis animation'.
One of the best uses for this panel is to explore analysis properties over a sliding window within your file:
Specify Use Time Range using Analysis | Edit menu command, then Data Selection tab
Select 'Select Data From' and 'Select Data To' parameters in the list boxes of the Explore panel
Click on Link Sliders check box
Now, when you drag one of the sliders, the other one will follow allowing you to visualize analysis results
over a sliding window in time.
See Also
NeuroExplorer Menu Commands
Page 15

1.4. NeuroExplorer Menu Commands
The following menu commands are available in NeuroExplorer
Menu Command Description
File | New Create a new document
File | Open... Open an existing document
File | Restore Last Analysis Restore lasts analysis
File | Close Close the active document
File | Save Save the active document
File | Save As .NEX File... Save the active document with a new name
File | Save As .NEX5 File... Save the active document with a new name
File | Import Data | Plexon PLX,
PL2 or DDT File...
Import data from Plexon .plx file
File | Import Data | Plexon SPK
File...
Import data from Plexon .spk file
File | Import Data | Alpha Omega
Data File...
Import data from Alpha-Omega file
File | Import Data | Blackrock
Microsystems File...
Import data from Blackrock Microsystems file
File | Import Data | CED Spike-2
Data File...
Import data from CED Spike-2 file
File | Import Data | CORTEX Data
File...
Import data from CORTEX data file
File | Import Data | DataWave
File...
Import data from DataWave file
File | Import Data | Multichannel
Systems Data File...
Import data from Multichannel Systems file
File | Import Data | Neuralynx Data
File...
Import data from Neuralynx file(s)
File | Import Data | RC Electronics
Data File...
Import data from RC Electronics file
File | Import Data | Stranger Data
File...
Import data from Stranger file
File | Import Data | Text File... Import data from a text file
File | Import Data | Text File with
Continuous Variables...
Import continuous variables from a text file
File | Import Data | Axon
Instruments ABF File...
Import data from Axon Instruments ABF file
File | Import Data | Axion Data Import data from Axion data file
Page 16

File...
File | Import Data | MED64 Mobius
Native Format Data File...
Import data from MED64 Mobius file
File | Import Data | MED64 Mobius
.csv Spike Time File...
Import data from MED64 .csv file
File | Import Data | European Data
Format File...
Import data from European Data Format .edf or .bdf file
File | Import Data | KlustaSuite
.kwik File...
Import data from KlustaSuite .kwik file
File | Import Data | Open Ephys
Files...
Import data from Open Ephys files (.continuous, .spikes and
.events)
File | Import Data | Intan Data
File...
Import data from Intan data file
File | Import Data | Ripple Data
File...
Import data from Ripple data file
File | Import Data | 3Brain Data
File...
Import data from 3Brain data file
File | Export Data | As a Text File... Export Timestamps As a Text File
File | Merge Files... Merge several similar data files into one
File | Connect to Plexon Server Connect to Plexon Server
File | Print... Change the printer and printing options
File | Print Preview Display full pages
File | Print Setup... Change the printer and printing options
File | Page Setup... Open a dialog to edit page elements
File | Save NeuroExplorer State... Save NeuroExplorer State
File | Restore NeuroExplorer
State...
Restore NeuroExplorer State
File | Exit Quit the application; prompts to save documents
Edit | Undo Undo the last action
Edit | Redo Redo the previously undone action
Edit | Cut Cut the selection and put it on the Clipboard
Edit | Copy Copy the selection and put it on the Clipboard
Edit | Paste Insert Clipboard contents
Edit | Edit Graphics | Switch to
Page Layout Mode
Edit the layout of the whole page
Edit | Edit Graphics | Switch to
Graph Layout Mode
Edit the layout of each graph
Page 17

Edit | Edit Graphics | Block
Properties...
Edit the properties of the block of graphs
Edit | Edit Graphics | Graph
Properties...
Edit graph properties
Edit | Edit Graphics | X Axis
Properties...
Edit X axis properties
Edit | Edit Graphics | Y Axis
Properties...
Edit Y axis properties
Edit | Edit Graphics | Page
Labels...
Edit text elements of the page
Edit | Edit Graphics | Graph
Labels...
Edit text elements of each graph
Edit | Edit Markers | Split Into
Multiple Events...
Split marker variable into multiple event variables
Edit | Edit Markers | Extract
Events...
Extract events according to the specified conditions
Edit | Edit Markers | Extract
Position Variables...
Extract position variables
Edit | Delete Variables... Open a dialog to select the variables you would like to delete
Edit | Copy Selected Variables to
Another File...
Copy selected variables to another file
Edit | Operations on Data
Variables...
Open Operations on Data Variables dialog
Edit | Add Interval Variable... Add an interval variable to the current document
Edit | Add Population Vector... Open a dialog to add a population vector to current document
Edit | Set Positions of the
Neurons...
Set positions of the neurons
Edit | Digital Filter Continuous
Variable...
Digital filter continuous variable
Edit | Convert Video-Based
Continuous Variables...
Open a dialog to convert video-based variable to a cont. variable
View | Toolbar Show or hide the toolbar
View | Status Bar Show or hide the status bar
View | 1D Data Viewer Window Open a one-dimensional data viewer
View | Numerical Results Window Open numerical results window
View | Files Panel View Files panel
View | Analyses Panel View Analyses panel
View | Properties Panel View Properties panel
View | Variables Panel View Variables panel
Page 18
View | Templates Panel View Templates panel
View | Scripts Panel View Scripts panel
View | Explore Panel View Explore panel
View | Restore Default Layout... Restore default panel layout
View | Options... Open NeuroExplorer Options dialog
View | Data Import Options... Open Data Import Options dialog
View | Average/Overlay Chart
Window
Open Average/Overlay Chart window
View | Results Folder Summary Open results folder summary window
View | History Thumbnails... Open History Thumbnails dialog
View | History Script... Open History Script in NexScript editor
Analysis | Edit Parameters... Open the dialog to edit the current analysis parameters
Analysis | Select Variables ... Select Variables for Analysis
Analysis | Increase X Range Increase X Range in the current analysis
Analysis | Decrease X Range Decrease X Range in the current analysis
Analysis | Restore Last Analysis Restore lasts analysis
Results | Graphical Results | Copy
Graphics to the Clipboard
Copy all the block graphics to the clipboard
Results | Graphical Results | Save
Graphics in WMF File...
Saves graphics in a Windows Metafile
Results | Graphical Results | Save
Graphics in PNG File...
Save graphics in a .png file
Results | Graphical Results | Save
Graphics in SVG File...
Save graphics in a .svg (Scalable Vector Graphics) file
Results | Graphical Results | Send
Graphics to PowerPoint...
Send graphics to PowerPoint
Results | Numerical Results | View
Numerical Results Window
Open numerical results window
Results | Numerical Results | Copy
Numerical Results to the Clipboard
Copy Numerical Results to the clipboard
Results | Numerical Results | Save
Numerical Results in a Text File...
Save numerical results as a text file
Results | Numerical Results | Save
Summary of Numerical Results in a
Text File....
Save summary of numerical results in a text file
Results | Numerical Results | Send
Numerical Results to Excel...
Send Numerical Results To Excel
Results | Numerical Results | Send Send Numerical Results to Matlab
Page 19
Numerical Results to Matlab
SavedResults | Set Results
Folder...
Sets current saved results folder
SavedResults | Open Saved
Results File...
Open saved results file
SavedResults | Open Data File
Referenced in Result
Open data file referenced in result
SavedResults | Restore Analysis in
NeuroExplorer
Restore analysis in NeuroExplorer
SavedResults | Quick Save Results Quick save results
SavedResults | Save Current
Analysis Results in Results File...
Save current analysis results in results File
SavedResults | Results Folder
Summary
Open results folder summary window
SavedResults | Add Slides with
Selected Results...
Add Slides with Selected Results
Graphics | Edit Graphics | Switch to
Page Layout Mode
Edit the layout of the whole page
Graphics | Edit Graphics | Switch to
Graph Layout Mode
Edit the layout of each graph
Graphics | Edit Graphics | Block
Properties...
Edit the properties of the block of graphs
Graphics | Edit Graphics | Graph
Properties...
Edit graph properties
Graphics | Edit Graphics | X Axis
Properties...
Edit X axis properties
Graphics | Edit Graphics | Y Axis
Properties...
Edit Y Axis properties
Graphics | Edit Graphics | Color
Scale Properties...
Edit color scale properties
Graphics | Edit Graphics | Page
Labels...
Edit text elements of the page
Graphics | Edit Graphics | Graph
Labels...
Edit text elements of each graph
Graphics | Export Graphics | Copy
Graphics to the Clipboard
Copy all the block graphics to the clipboard
Graphics | Export Graphics | Save
Graphics in WMF File...
Saves graphics in a Windows Metafile
Graphics | Export Graphics | Save
Graphics in PNG File...
Save graphics in a .png file
Graphics | Export Graphics | Send Send Graphics to PowerPoint
Page 20

Graphics to PowerPoint...
Graphics | Fonts | Enable Font
AutoScale
Allow NeuroExplorer to reduce font sizes if there are too many
graphs
Graphics | Fonts | Increase font
size
Increase font size
Graphics | Fonts | Decrease font
size
Decrease font size
Graphics | Zoom | Zoom In Zoom In
Graphics | Zoom | Zoom Out Zoom Out
Graphics | Zoom | Fit to Window Scale Block so that it fits the screen
Graphics | Insert | Insert Text Insert text into figure
Graphics | Insert | Insert Line Add line
Graphics | Insert | Insert Rectangle Add rectangle to the figure
Graphics | Insert | Insert Text Label
with the Variable Name
Insert text element with the variable name to each graph
Graphics | Bring to front Bring selected object to front
Graphics | Send to back Send to back
Script | New Script Open a script window
Script | Open Script... Open existing script
Script | History Script... Open history script
Script | Script Options... Open Script Options dialog
Template | Save Template ... Save Template
Template | Save As New Template
...
Save As New Template
Template | Save As Default
Template
Saves the current configuration as a default template for this
analysis
Template | Open Template and
Run Analysis From Template...
Opens a File Open dialog to select the template
Template | View Template
Properties...
View Template Properties
3DView | View Histograms in 3D Show the results in 3D Viewer
3DView | View Histogram
Variations in 3D
View Histogram Z-scores in 3D
3DView | 3D Activity Animation Opens a 3D activity viewer
3DView | Graphics Parameters... Opens a dialog to edit this window's graphics parameters
3DView | Save As New 3D
Template...
Save current graphics parameters as a new 3D template
Page 21

3DView | Save Current 3D
Template
Save current graphics parameters as a new 3D template
3DView | Save As New Animation
Template...
Save current animation template as a new template
3DView | Save Current Animation
Template
Save current animation template
Matlab | Matlab Options... Matlab Options
Matlab | Get Data From Matlab |
Get Timestamp Variables...
Get timestamp variables from Matlab
Matlab | Get Data From Matlab |
Get Continuous Variables...
Get continuous variables from Matlab
Matlab | Get Data From Matlab |
Get Continuous Variables with
Timestamps...
Get continuous variables with timestamps from Matlab
Matlab | Get Data From Matlab |
Get Interval Variables...
Get interval variables from Matlab
Matlab | Get Data From Matlab |
Open Matlab As Engine
Open Matlab as engine
Matlab | Send Selected Variables
to Matlab
Send selected variables to Matlab
Matlab | Send Numerical Results to
Matlab
Send numerical results to Matlab
R-project | Settings for running R-
project via command line...
Open a dialog to specify R-project options
Markers | Split Into Multiple
Events...
Split marker variable into multiple event variables
Markers | Extract Events... Extract events according to the specified conditions
Markers | Extract Position
Variables...
Extract position variables
Online | Connect to Plexon Server Connect to Plexon online data server
Online | Connect to Cerebus
Server
Connect to Cerebus online data server
Online | Connect to Neuralynx
Server
Connect to Neuralynx online data server
Online | Connect to AlphaMap
Server
Connect to AlphaMap online data server
Online | Pause Online Data Server
Updates
Pause online data server Updates
Online | Reset Online Data File Restart the data collection
Online | Disconnect from Online
Data Server
Disconnect from online data server
Page 22

Online | Plexon Online Options... Plexon online options
Online | Cerebus Online Options... Cerebus online options
Online | Neuralynx Online
Options...
Neuralynx online options
Online | AlphaMap Online
Options...
AlphaMap online options
Sound | Play Continuous Variable
as Sound
Play continuous variable as sound
Window | Cascade Arrange windows so they overlap
Window | Tile Horizontally Arrange windows as non-overlapping tiles
Window | Tile Vertically Arrange windows as non-overlapping tiles
Window | Arrange Icons Arrange icons at the bottom of the window
Window | Numerical Results
Window
Open numerical results window
Window | Close All Windows Close all child windows
Window | Close All Windows
Except Currently Active Window
Close all windows except currently active window
Window | Files Panel View Files panel
Window | Analyses Panel View Analyses panel
Window | Parameters Panel View Properties panel
Window | Variables Panel View Variables panel
Window | Templates Panel View Templates panel
Window | Scripts Panel View Scripts panel
Window | Explore Panel View Explore panel
Window | Restore Default Layout... Restore default panel layout
Window | Save Current Layout in a
File...
Saves current panel layout
Window | Restore Layout from a
File...
Restore panel layout from a file
Help | Help Topics List Help topics
Help | NeuroExplorer Web Site Open NeuroExplorer web site home page in the default browser
Help | NeuroExplorer Blog Open NeuroExplorer Blog page in the default browser
Help | Check for Updates... Check for the updates
Help | Update Sentinel Key to
Enable Version 5...
Update Sentinel key
Help | About NeuroExplorer... Display program information, version number and copyright
Page 23
•
•
1.5. Opening Files and Importing Data
NeuroExplorer can read native data files created by popular data acquisition systems (Alpha Omega,
CED Spike-2, Cortex, Blackrock Microsystems, Intan Technologies, Multi Channel Systems, Neuralynx,
Plexon and many others. See Importing Files Created By Data Acquisition Systems for more
information).
NeuroExplorer can also import data from text files (see Importing Data from Text Files ).
You can import the data from spreadsheets using the clipboard (see Importing Data from Spreadsheets ).
NeuroExplorer has its own data format and by default saves the data in the binary file with the extension
.nex or.nex5.
To open a NeuroExplorer data file,
press File Open toolbar button , or
select File | Open... menu command.
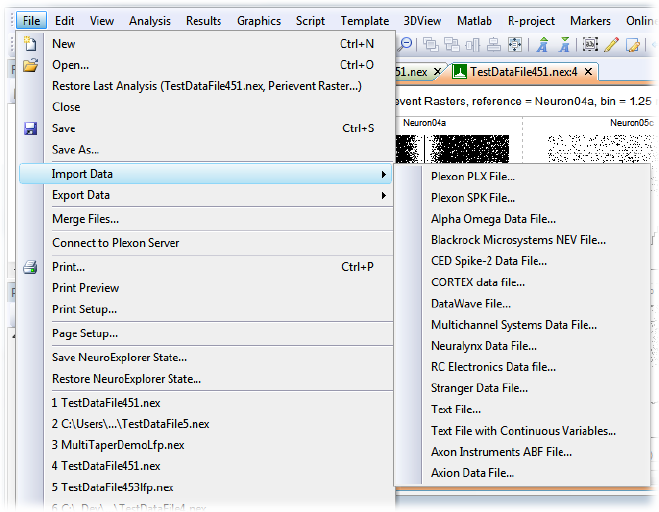
To import data in any of the supported file formats, select the corresponding File | Import command:
You can also paste data directly into Data View. See Importing Data from the Text Files and Importing
Data from Spreadsheets for more information.
Page 25
1.6. Importing Files Created by Data Acquisition Systems
NeuroExplorer can read native data files created by many popular data acquisition systems (see table
below).
In addition, several companies have implemented export of recorded data as .nex or .nex5 files.
NeuroExplorer can also analyze data online during recording session. Plexon, Neuralynx, Alpha Omega
and Blackrock recording systems are supported in the online mode.
Data acquisition system Files with these extensions that can be opened in
NeuroExplorer
3Brain .brw, .bxr
Alpha Omega Engineering .isi, .lsm, .map, .mat, .mpx, .nda
Axion Biosystems .raw
Axon Instruments .abf
Blackrock Microsystems .nev, .ns1, .ns2, .ns3, .ns4, .ns5, .ns6, .ns7, .ns8, .ns9
CED Spike-2 .smr, .smrx
Cortex (no specified extension, use File | Import | Cortex menu
command)
DataWave Technologies .act, .cut, .dat, .edt, .uff
European Data Format .edf, .bdf
g.Tec Medical Engineering g.Recorder .hdf5
Intan Technologies .rhd, .rhs (time.dat, amplifier.dat and other .dat files are
loaded automatically when .rhd or .rhs file is open)
KlustaSuite spike sorting software .kwik
MED64 (Panasonic, Alpha MED
Scientific)
.csv, .modat
Multichannel Systems .mcd, .msrd
Neuralynx .dat, .nev, .ncs, .nse, .nst, .nts, .ntt, .nvt, .t
NeuroExplorer .nex, .nex5
Open ePhys .continuous, .events, .spikes
Plexon .ddt, .pl2, .plx, .spk
RC Electronics .prm
Ripple Neuro .nev, .nf1, .nf2, .nf3, .nf4, .nf5, .nf6, .nf7, .nf8, .nf9
Thomas Recording WAV file .wav
Tucker-Davis Technologies .sev, .tbk, .tdx, .tev, .tin, .tnt, .tsq
Text file with timestamps .txt
Text file with continuous data .txt
Page 26
File Import Options
File import options can be set in the Data Import dialog (use View | Data Import Options menu
command to invoke the dialog).
Page 27
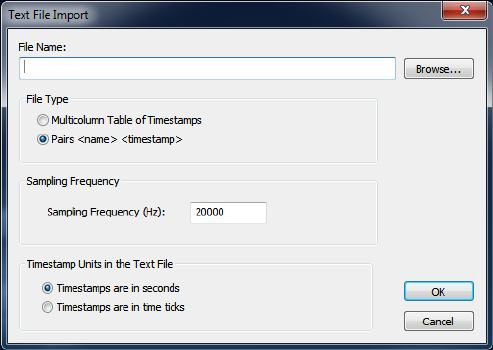
1.7. Importing Data from Text Files
You can specify text import options in the Text Import dialog:
Sampling Frequency - this parameter defines the internal representation of the timestamps that
NeuroExplorer will use for this file. Internally, the timestamps are stored as integers representing the
number of time ticks from the start of the experiment. The time tick is equal to
1./ Sampling_Frequency
Timestamp Units - this parameter defines how the numbers representing the timestamps are treated by
NeuroExplorer. If the timestamps are in time ticks, they are stored internally exactly as they are in the
text file. If the timestamps are in seconds, NeuroExplorer converts them to time ticks:
Internal_Timestamp = Timestamp_In_Seconds * Sampling_Frequency
NeuroExplorer can import timestamped data stored in the following text formats:
1. Multicolumn table of timestamps
In this format, each column in the text file contains the timestamps of a neuron. The first element in each
column is a neuron name, that is the first line of the file contains names of all the variables.
Each name should be less than 64 characters long and should contain only letters, digits or the
underscore sign. The first character of the name should be a letter. The timestamps are numbers
representing the neuron firing time (or event time) in seconds or in time ticks. NeuroExplorer assumes
that the columns are separated by tabs.
Here is an example of a text file with the timestamps represented in seconds:
Neuron01 Neuron02
0.01 0.001
0.3 0.05
0.5 0.1
0.4
0.6
NeuroExplorer can also export data in this format (use File | Save Data | As a Text File menu
command).
2. Pairs <name> <timestamp>
The text file in this format should contain the pairs of the type
<name><timestamp>
Page 28
where
<name> is a character string that is less than 64 characters long and contains only letters, digits and the
underscore sign. The first character of the name should be a letter. If the number is used for the name,
NeuroExplorer will add "event" at the beginning of the name.
<timestamp> is a number representing the neuron firing time (or event time) in seconds or in time ticks.
Here is an example of a text file with the timestamps represented in seconds:
Neuron01 0.01
Neuron01 0.3
Neuron02 0.001
Neuron02 0.05
Neuron01 0.5
Neuron02 0.1
Neuron02 0.4
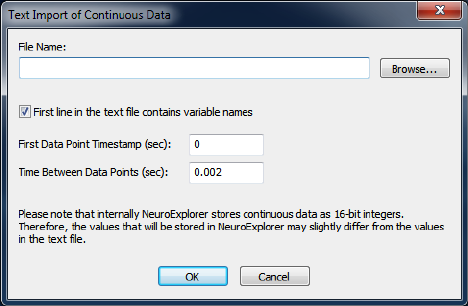
3. Multicolumn text files with continuous data
NeuroExplorer can also import continuous data from a multicolumn text file where each column
corresponds to a continuous variable:
ContChannel1 ContChannel2
114.74609 -63.47656
56.15234 -358.88672
-187.98828 -63.47656
-48.82813 388.18359
-26.85547 285.64453
The columns may be separated by any number of spaces, tabs or commas.
When you import continuous data from text files, the following dialog is shown:
First line contains variable names - if this option is selected, the fields of the first line of the text file are
used as variable names. The second line in the file is the first row of data.
First Data Point Timestamp specifies the timestamp of the first data point in each continuous variable.
Time Between Data Points specifies the time step used in calculation of the timestamp for each row of
data. For data row N (N = 1, 2, ...) in the text file, the timestamp is calculated using the following formula:
DataRowTimestamp = FirstDataPoint + (N-1)*TimeBetweenDataPoints
Page 29
•
•
•
•
•
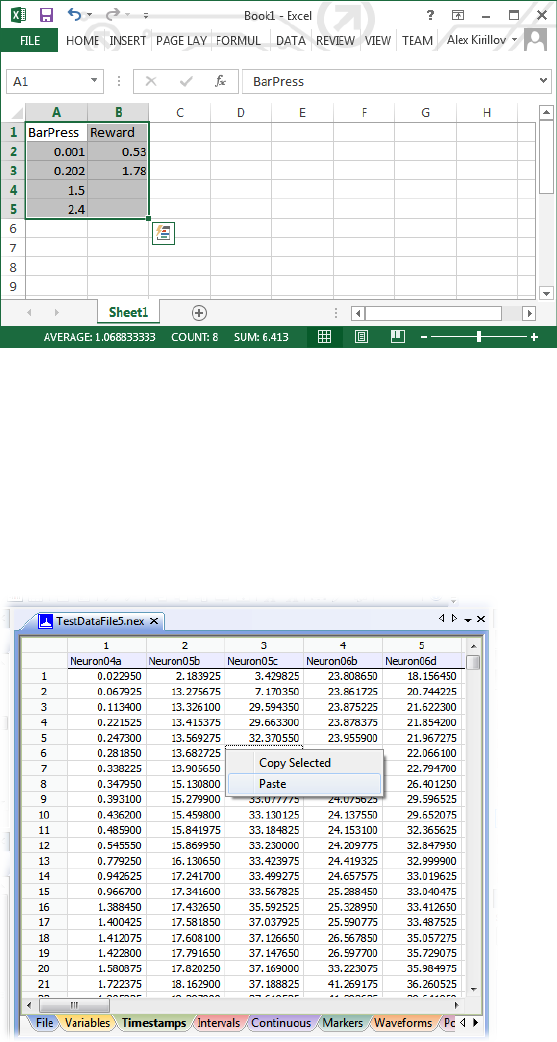
1.8. Importing Data from Spreadsheets
Timestamped data can be pasted directly into the NeuroExplorer data table. To paste the following two
timestamped variables (BarPress and Reward) from a spreadsheet to NeuroExplorer:
In Excel:
Using the mouse, select the cell range with both variables (A1 to B5)
Select Edit | Copy menu command
In NeuroExplorer:
Select Data view of the file in NeuroExplorer
Select the Timestamps tab of the Data view
Right-click and select Paste menu command:
NeuroExplorer will create two new Event variables and add them to the file. You need to save the file
(use File | Save or File | SaveAs menu command) to make this change permanent.
Page 30
•
•
•
•
•
•
•
1.9. Importing Data from Matlab
You can create spike trains (1xN or Nx1 matrices with timestamps in seconds) or continuous variables in
Matlab and transfer them to NeuroExplorer on the fly. Here is how to do this:
Select File | New menu command.
Select Matlab | Get Data From Matlab | Open Matlab As Engine menu command. NeuroExplorer
will open Matlab as engine.
In opened Matlab, run your Matlab scripts and create (or load from file) spike train variables or
continuous variables.
To import timestamp variables, in NeuroExplorer, select Matlab | Get Data From Matlab | Get
Timestamp Variables... menu command. NeuroExplorer will open a dialog with the list of available
Matlab variables.
In the dialog, select the variables you want to transfer to NeuroExplorer and press OK.
To import continuous variables, in NeuroExplorer, select Matlab | Get Data From Matlab | Get
Continuous Variables... menu command. NeuroExplorer will open a dialog with the list of available
Matlab variables.
In the dialog, select one of the variables you want to transfer to NeuroExplorer and press OK.
NeuroExplorer will open a dialog where you will specify the variable import options.
Page 31
1.10. Reading and Writing NeuroExplorer Data Files
NeuroExplorer Data file has the following structure:
file header
variable header 1
variable header 2
...
data for variable i
data for variable j
...
Each variable header contains the size of the array that stores the variable data as well as the location of
this array in the file.
The pseudo-code for reading NeuroExplorer data file looks like this:
open file in binary mode
read file header
for each variable
read variable header
end for
for each variable header
seek to the file offset specified in the variable header
read variable data
end for
The C++ source code of the program that reads and writes NeuroExplorer data files is available at
NeuroExplorer web site:
https://www.neuroexplorer.com/downloads/HowToReadAndWriteNexFiles.zip
There are also Matlab scripts to read and write NeuroExplorer data files:
https://www.neuroexplorer.com/downloads/HowToReadAndWriteNexFilesInMatlab.zip
Page 32

•
•
•
1.11. 1D Data Viewer
NeuroExplorer provides a window that displays graphically all the selected variables. To open this
window, use View | 1D Data Viewer Window menu command.
You can also use 1D view to manually add events to the data file. Simply press the left mouse button
when the pointer is in the 1D view and NeuroExplorer will add a new timestamp to the variable
ManualEvent. You can also specify to what Event variable NeuroExplorer will add timestamps when you
click in 1D view (use On mouse click parameter in the Properties Panel).
Mouse wheel can be used to quickly navigate in 1D View:
Click in 1D View so set 1D View as an active window in NeuroExplorer
Press Shift and rotate mouse wheel to shift 1D View horizontally
Press Ctrl and rotate mouse wheel to increase time range (zoom out) and decrease time range
(zoom in)
Page 33
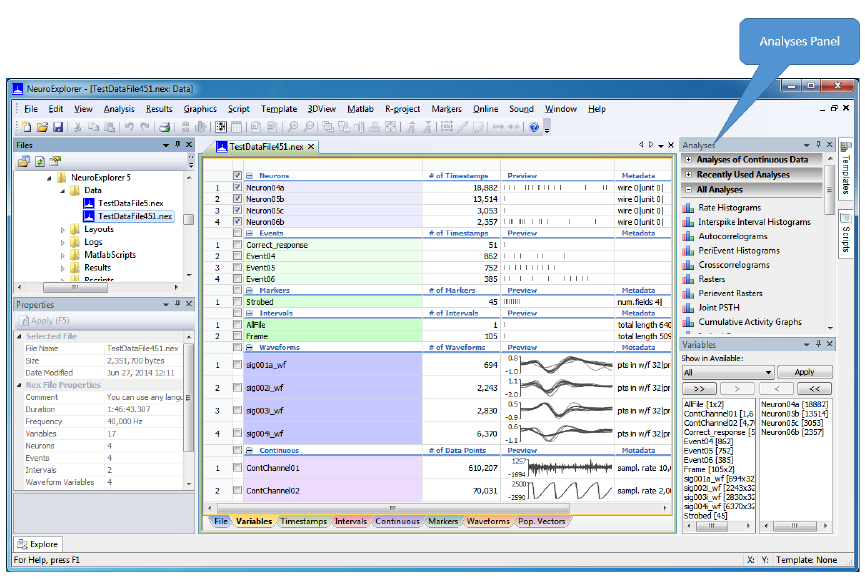
1.12. Analyzing Data
NeuroExplorer provides a variety of spike train analysis methods. Each method has a number of
parameters and options. You can apply any available analysis by clicking at the corresponding analysis
in the Analyses Panel (you can also use Analysis | Select Analysis menu commands):
After you click at one of the analysis items, NeuroExplorer will open a dialog that will allow you to edit the
analysis parameters. When you click OK in this dialog, NeuroExplorer will apply the specified analysis to
all the selected variables.
Any combination of analysis parameters and options (together with all the graphics options) can be
saved as a template. To save the current configuration as a template, right-click in the Graph Window
and select Save As New Template menu command. The template names are shown in the Templates
view of the control panel.
When you open a new data file, you can simply double-click on the template name to apply the specific
analysis with the selected parameter values.
Page 34
•
•
•
1.13. Selecting Variables for Analysis
NeuroExplorer can analyze at once any group of variables in the file.
To select the variables to be analyzed, use one of the following methods:
Select the variables using the Variable Panel (see How to select variables using Variables Panel )
Select the variables using Analysis | Select Variables menu command. This command will invoke
the Variable Selection dialog similar to Variables Panel.
Select the variables directly in the Variables Window by using the check boxes located next to the
variable names. Please note that variable selection in Variables Window is applied only when
a new Graph Window or 1D View is created. To change the list of selected variables in
existing Graph Window, use Variables Panel or Analysis | Select Variables menu command.
See How to Select Variables for Existing Analysis Window for details.
Page 35
•
•
•
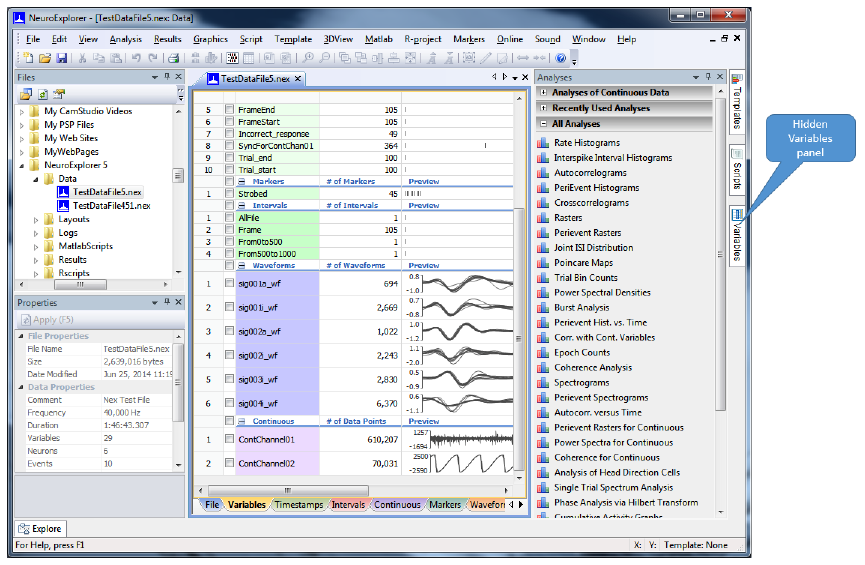
1.14. How to Select Variables for Existing Window
Variables selected in the Variables spreadsheet of data window are used to populate variables lists of
new analysis windows.
If you would like to change the list of variables for existing analysis window, please follow these steps:
Click anywhere in analysis window to activate it
If Variables panel is visible, make changes in selected variables list ( how? ) and press Apply
button:
If Variables panel is hidden, click at panel tab to open it:
Page 36
•
•
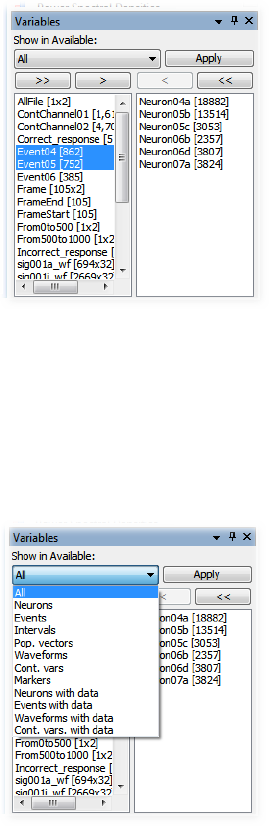
1.15. How to Select Variables in Variables Panel
Select variables for analysis by moving them from the left (available) to the right (selected) list box. In the
figure below, 6 variables (Neuron04a, Neuron05b, ..., Neuron07a) are selected for analysis:
To move variables from one listbox to another:
Select variables using the mouse (in the figure above two variables in Available listbox are selected
-- ContChannel01 and ContChannel02)
Press one of four buttons just above the listboxes
The drop-down box above the buttons can be used to specify what kind of variables are shown in the
available window:
Page 38
•
•
•
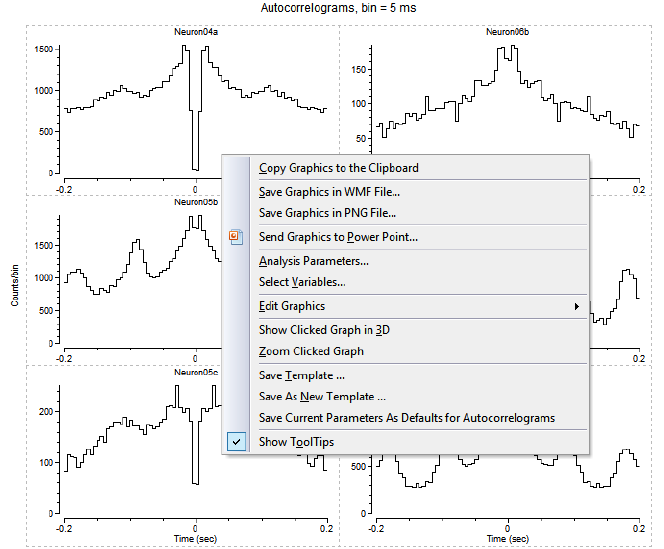
1.16. Adjusting Analysis Properties
There are several methods to adjust the analysis parameters:
Use Analysis | Edit Parameters menu command to invoke the Analysis Parameters dialog
Right-click in the Graph Window and choose Analysis Parameters item in the floating menu
Single-click in the graph area of the Graph Window and adjust parameters in the Properties Panel
The floating menu is the fastest way to adjust any analysis or graphics parameters. Double-click (or right-
click) anywhere in the Graph Window to invoke this menu:
This menu allows you to go directly to analysis properties, graph properties, axes properties, etc. You
can also use it to save the current template and save the current analysis configuration as a new
template.
You can also single-click in the graph area of the Graph Window and adjust parameters in the Properties
Panel:
Page 39
Page 40
•
•
•
•
•
•
•
1.17. Analysis Templates
In any analysis in NeuroExplorer, you can adjust a large number of parameters:
Analysis type (Rate Histograms, IIH, etc)
Analysis parameters (Bin, XMin, XMax, etc.)
Graph parameters (graph type, graph color, grid lines, etc)
Parameters of X and Y axes (labels, numerics, lines, colors, etc.)
Graph and page labels and other elements
NeuroExplorer allows you to save all these parameters so that when you open another data file, you can
easily reproduce exactly the same analysis with the same axes, labels and so on.
The set of all the analysis parameters is called the Template.
To save the current analysis as a template:
Select the menu command Template | Save As New Template, or
Right-click in the graph and choose the Save As New Template command in the floating menu.
After you saved the template, the name of the template appears in the Templates Window (see
NeuroExplorer Screen Elements ). You can apply the template to the currently opened file by double-
clicking the template name in the Templates Window.
You can specify templates directory by selecting Templates | Template Properties... menu command.
Page 41

1.18. Numerical Results
To view the analysis numerical results, select View | Numerical Results Window menu command.
NeuroExplorer will open Numerical Results Window:
Note that the window has two Excel-style sheets -- the Results sheet and the Summary sheet. The
Results sheet usually contains the bin counts or other histogram values. The Summary sheet contains
summary statistics of the analyses such as the mean firing rate, the number of spikes used in the
analysis, etc.
Page 42

1.19. Post-processing
For the histogram-style analyses, NeuroExplorer has an optional Post-Processing analysis step. You
can select post-processing options using Post-processing tab in the Analysis Parameters dialog (double-
click in Graph window and select Analysis Parameters menu item):
You can smooth the resulting histogram with Gaussian or Boxcar filters. You can also add bin information
to the matrix of results. See Post-processing Options for details.
See Saving Results as PowerPoint Slides, Working with Matlab and Working with Excel for more
information on NeuroExplorer post-processing options.
Page 43
1.20. Saving Graphics
NeuroExplorer can save the contents of the Graph window in a file using the Windows Metafile format.
The file can then be opened in any program that can use the.wmf format files (a word processor,
graphics editor, etc.).
To save the graphics in a metafile, use Graphics | Export Graphics menu commands.
You can also copy the graphics to the clipboard and then paste in another application. To copy the
graphics, single-click in the graph area and then select Edit | Copy menu command.
See also Saving Results as PowerPoint Slides.
Page 44
•
•
•
•
•
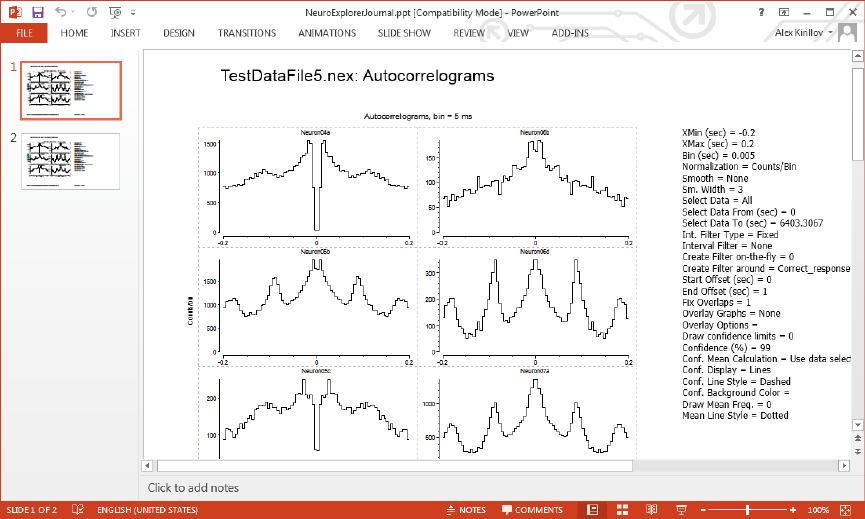
1.21. Saving Results as PowerPoint Slides
NeuroExplorer version 3 provides a powerful new option that allows you to save graphics, analysis
parameters and your annotations as slides in a PowerPoint Presentation.
To save your results to PowerPoint, press a toolbar button , or select Graphics | Export Graphics |
Export to PowerPoint menu command. NeuroExplorer will start PowerPoint if PowerPoint is not
running, and will add a new slide to the specified presentation file. The slide will contain:
Copy of the graphics
Analysis parameters
Your comment
Data file name
Current date and time
PowerPoint presentation then becomes your lab notebook where you can save your NeuroExplorer
analysis results.
Page 45
•
•
•
•
•
1.22. Working with Results Files
NeuroExplorer can save both graphical and numerical results of the analysis in a NeuroExplorer results
file. Since each result has both graphics and numerical values, the results are saved in a set of files with
common file name and different extensions.
You can use Saved Results | Quick Save Results menu command to save all the current results.
For example, if you run Aurocorrelograms analysis on data file TestDataFile54.nex and select Quick
Save Results, the results will be saved in the following 5 files:
TestDataFile54_nex Autocorrelograms.nexresult (text file with links to other files of this result)
TestDataFile54_nex Autocorrelograms numres.txt (text file with numerical results)
TestDataFile54_nex Autocorrelograms numres summary.txt (text file with the summary of numerical
results)
TestDataFile54_nex Autocorrelograms.png (.png file with graphical analysis results)
TestDataFile54_nex Autocorrelograms.ntp (template file with analysis parameters)
By default, these files be saved in the folder: C:\Users\<your_user_name>\Documents\NeuroExplorer
5\Results. You can also specify a custom results directory using Saved Results | Set Results Folder
menu command.
The .nexresult file is the file containing description of the analysis and the links to other result files. You
can open this file in NeuroExplorer using Saved Results | Open Saved Results File menu command.
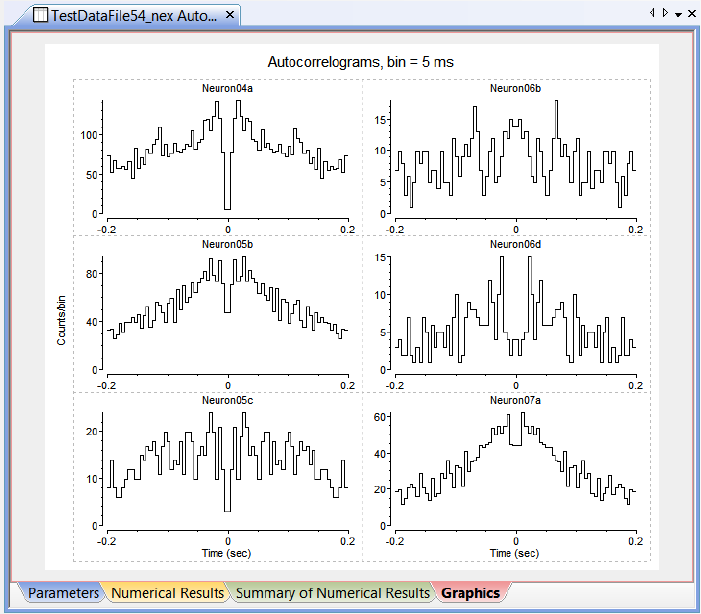
When you open results file, NeuroExplorer loads graphics and numerical results files and shows a
window with 4 tabs:
This window looks similar to the Graphical results window, but the results are not 'live' -- you cannot
adjust analysis parameters and recalculate the results.
Page 46
•
•
•
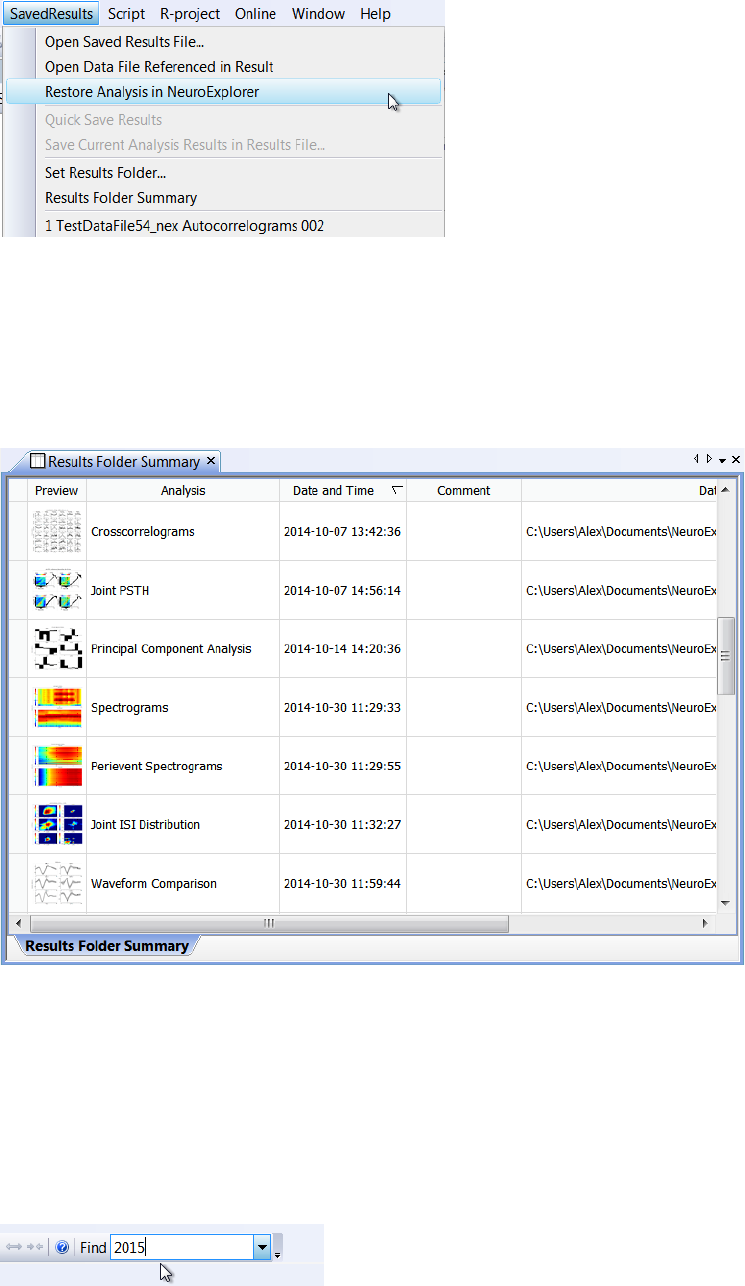
However, you can restore the analysis saved in the results file. Use Saved Results | Restore Analysis
in NeuroExplorer menu command:
NeuroExplorer will do the following:
Open data file used in the calculation of results
Select variables for analysis exactly as they were selected in the saved results
Run the analysis used in the calculation of results (using the same analysis parameters)
You can also use Saved Results | Results Folder Summary menu command to view all the saved
results in a grid:
In this Results Folder Summary View you can:
- Sort results by any of the columns by clicking at the column header
- Open results file by double-clicking the row representing the file
- Convert selected results to PowerPoint slides using right-click and selecting Add Slides... context
menu command
- Select results using Find combo box in the NeuroExplorer toolbar. The text in all the columns will be
used when filtering the results. For example, to view only results saved in 2015, type 2015 in Find box:
Page 47
•
•
•
•
1.23. Working with Matlab
NeuroExplorer can interact with Matlab via COM interface using Matlab as a powerful post-processing
engine. Matlab can also control NeuroExplorer and exchange data with NeuroExplorer via NeuroExplorer
COM interfaces. See COM/ActiveX Interfaces for details.
Immediately after calculating the histograms, NeuroExplorer can send the resulting matrix of histograms
to Matlab and then ask Matlab to execute any series of Matlab commands.
Use the Matlab tab in the Analysis parameters dialog to specify the matrix name and the Matlab
command string.
NeuroExplorer can also send its data variables to Matlab. To transfer the variables to Matlab, use Matlab
| Send Selected Variables to Matlab menu command.
In general, a continuous variable may contain several fragments of data. Each fragment may be of a
different length. NeuroExplorer does not store the timestamps for all the A/D values since they would use
too much space. Instead, for each fragment, it stores the timestamp of the first A/D value in the fragment
and the index of the first data point in the fragment. Therefore, for a continuous variable (named
ContVar1), the following 3 vectors will be created in Matlab:
ContVar1 - vector (or matrix with 2 columns) of all A/D values in milliVolts. If "Optimize transfer for
small amounts of data" is selected in View | Options | Matlab, Contvar1 is a matrix with 2 columns:
the first column contains A/D values in millivolts, the second column contains timestamps in
seconds.
ContVar1_ts - vector of fragment timestamps in seconds. Each timestamp is for the first A/D value
of the fragment.
ContVar1_ind - array of indexes. Each index is the position of the first data point of the fragment in
the A/D array. If ContVar1_ind (2) = 201, it means that the second fragment is ContVar1 [201],
ContVar1 [202], etc.
ContVar1_ts_step - digitizing step in seconds.
You can generate all the timestamps for continuous variable using this Matlab script:
function [ ts ] = MakeTs( fragmentInd, fragmentTs, numValues, step )
% MakeTs: makes timestamps for continuous variable based on the fragment
% information
% INPUT: fragmentInd - vector of fragment indexes
% fragmentTs - vector of fragment timestamps
% numValues - total number of values in all fragments
% step - digitizing step of continuous variable
%
% Example: NeuroExplorer sent continuous variable FP01 via file transfer
% The following values were sent:
% FP01 - vector of continuous values
% FP01_ind - fragment indexes
% FP01_ts - fragment timestamps
% FP01_ts_step - digitizing step
%
% to generate all timestamps for FP01, use:
%
% ts = MakeTs(FP01_ind, FP01_ts, size(FP01,1), FP01_ts_step);
%
ts = [];
numFr = size(fragmentTs);
Page 48
% add fake index for the last fragment
fragmetInd = [fragmentInd; numValues+1];
for i=1:numFr
valuesInFragment = fragmetInd(i+1)-fragmentInd(i);
ts = [ts; (fragmentTs(i) + (0:(valuesInFragment-1))*step)'];
end
end
You can also import timestamped and continuous variables directly from Matlab. See Importing Data
From Matlab for details.
See Also
Importing Data From Matlab
COM/ActiveX Interfaces
Page 49
•
•
•
•
1.24. Working with Excel
The easiest way to transfer data and numerical results from NeuroExplorer to Excel is by using the
clipboard:
select a range of cells in NeuroExplorer and choose Edit| Copy
switch to Excel and use the Paste command (select a cell and choose Edit | Paste ).
NeuroExplorer can also send numerical results directly to Excel. There two ways to send the results to
Excel:
Use Send to Excel button on the toolbar or menu command Results | Numerical Results | Send
Numerical Results to Excel
Use Excel tab in the Analysis Parameters dialog to specify what to transfer to Excel and the location
of the top-left cell for the data from NeuroExplorer.
Page 50
•
•
•
•
1.25. Working with R-project
NeuroExplorer can use R-project via R-project command line interface. You need to download (free
download from www.r-project.org) and install R-project to be able to use this functionality of
NeuroExplorer.
The R-project scripts should be saved in the folder:
C:\Users\<your_user_name>\Documents\NeuroExplorer 5\Rscripts.
All the R scripts in this folder (except for the scripts with the script names beginning with underscore) will
be shown as menu commands of the R-project menu. NeuroExplorer Setup installs several scripts in
this folder. You can also add your own scripts.
The scripts can be used to run additional statistical analysis on numerical results. When you select an R-
script to run, NeuroExplorer does the following:
Saves numerical results in a text file
Runs RScript.exe (a command-line interface for R-project) with the specified R-project script file and
provides the script file with the name of the results text file
The R-project script file saves its numerical results in a text file and its graphical results in a .png file
NeuroExplorer then shows numerical and graphical results of the R-project script in a new window
Each R script can contain script specifications in the comment lines at the start of the script. Here is a
script description block from the t-test R-project script:
#Description:calculates t-test p-values for numerical results
# of the active analysis results view
# assumes that there are multiple result columns
# per NeuroExplorer document variable
# for example: multiple interval filters are used in analysis
#Input:numerical results;multiple columns per variable
#Output:summary
#Parameter:name=usePairedTest;type=boolean;default=FALSE
#Parameter:name=pValueMin;type=number;default=0.05
This description specifies that the script will use numerical results and the script requires that numerical
results contains multiple columns per NeuroExplorer document variable (the #Input line).
The script also specifies two parameters: usePairedTest and pValueMin. Each parameter is specified by
a line beginning with #Parameter. Each line should contain three name=value pairs separated by
semicolons.
The fist pair specifies parameter name (for example, name=usePairedTest).
The second pair specifies parameter type (for example, type=boolean). There are three valid parameter
types: number, boolean and string.
The third pair specifies the default parameter value.
When you run R script, NeuroExplorer displays a dialog to edit parameter values:
Page 51

Here is how you would use this script to evaluate the statistical significance of changes in neuron firing
rates over two time intervals (for example, from zero to 1000s and from 1000s to 2000s):
- Run Rate Histograms analysis and specify 'Multiple pairs of XMin, XMax...' option:
- Click on Table.. button and specify time intervals:
Page 52
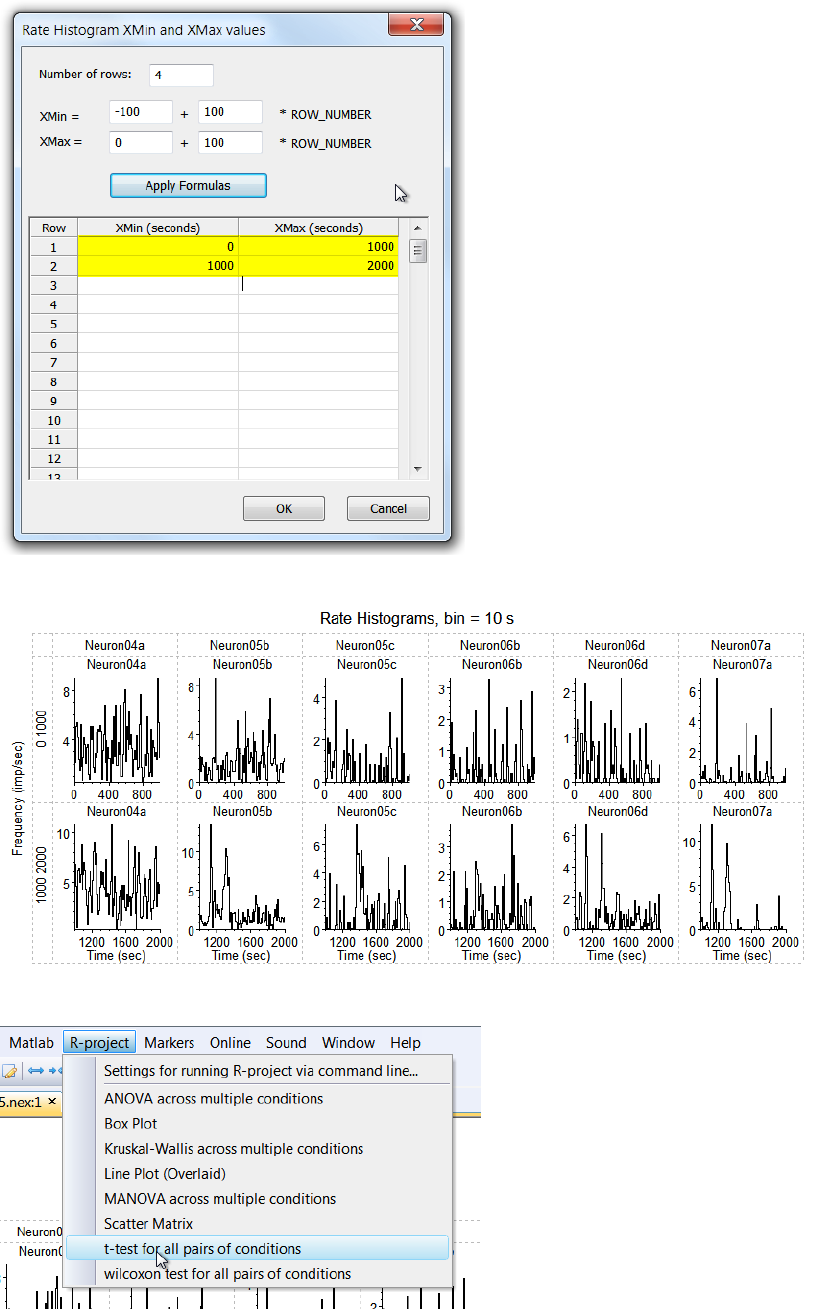
- Click on OK in dialogs and run Rate Histograms analysis:
- Select R-scripts | t-test menu command:
Page 53

The following R-script results will be shown:
Page 54

2. NeuroExplorer User Interface
NeuroExplorer user interface consists of the main window surrounded by several panels. These panels
allow you to select files, select analyses and specify analysis properties. The figure below shows the
default layout of NeuroExplorer window. Files, Properties, Analyses, Variables and Explore panels are
visible and Templates and Scripts panels are hidden. To view a hidden panel, click at the panel tab or
use View menu command.
You can reposition panels by dragging them with your mouse and you can save and restore window
layouts using Window menu commands.
Files Panel
Page 55

This view allows you to quickly browse through your data files. When you select (single-click) one of the
data files, NeuroExplorer displays the file header information in the Properties panel. To open the data
file, simply double-click the file name.
Analyses Panel
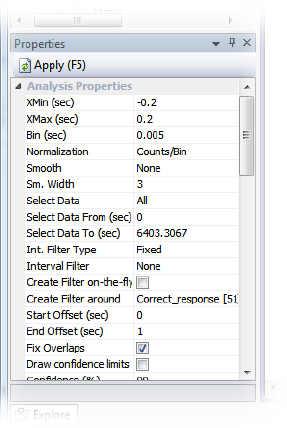
This view allows you to quickly select one of the analyses available in NeuroExplorer. To apply analysis
to the active data file, click at the analysis name.
Properties Panel
The left column of the Properties Panel lists the names of adjustable parameters for the selected object.
The right column contains various controls that can be used to change the parameter values. To apply
the changes, press the Apply button or hit the F5 key.
Templates Panel
The Templates View can be used to quickly execute an Analysis Template. Double-click the template
name and the corresponding template will be immediately executed.
You can create subfolders in your template directory and then NeuroExplorer will allow you to navigate
through the templates tree within the Templates View.
Variables Panel
Page 56

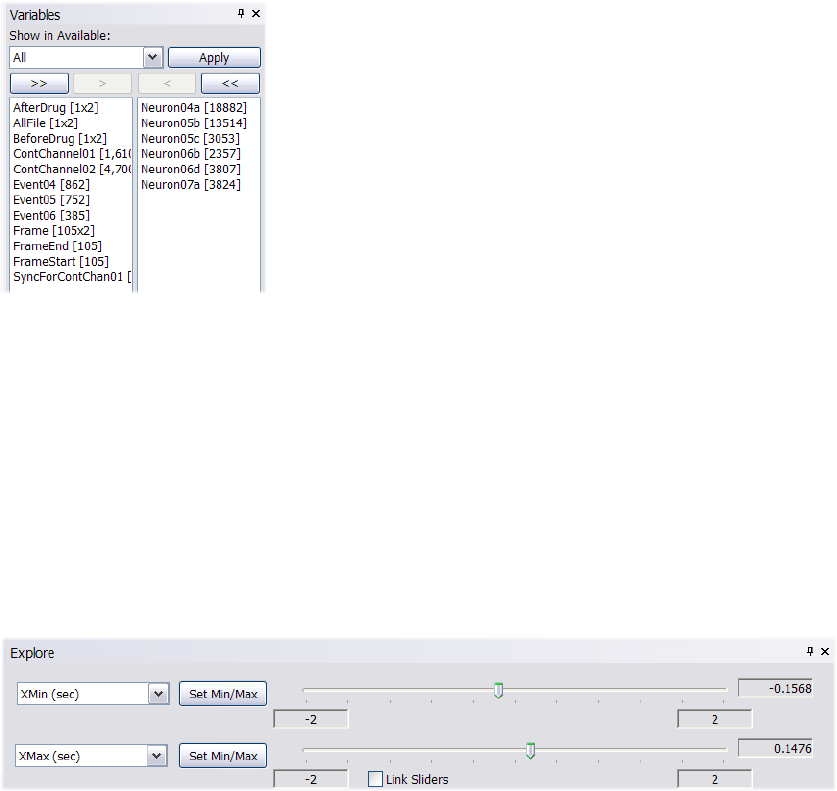
•
•
•
You can analyze all the variables in your data file, a subset of the variables, or may be just one variable.
Variables Panel allows you to quickly select and deselect the variables used for analysis:
The left column shows the variables that are not currently selected; the right column shows the selected
variables. To move variables from column to column, first select them, then press ">" (Select) or "<"
(Deselect) buttons.
Scripts Panel
This panel can be used to select a script to be executed. Double-click the script name to run the selected
script.
You can create subfolders in your script directory and then NeuroExplorer will allow you to navigate
through the scripts tree within the Scripts View.
Explore Panel
Explore panel allows you to quickly explore analysis parameter ranges. Select a parameter you want to
explore from a list and drag a slider. NeuroExplorer will keep recalculating analysis with the new
parameter values while you drag the slider, thus creating an 'analysis animation'.
One of the best uses for this panel is to explore analysis properties over a sliding window within your file:
Specify Use Time Range using Analysis | Edit menu command, then Data Selection tab
Select 'Select Data From' and 'Select Data To' parameters in the list boxes of the Explore panel
Click on Link Sliders check box
Now, when you drag one of the sliders, the other one will follow allowing you to visualize analysis results
over a sliding window in time.
See Also
NeuroExplorer Menu Commands
Page 57
2.1. NeuroExplorer Screen Elements
NeuroExplorer user interface consists of the main window surrounded by several panels. These panels
allow you to select files, select analyses and specify analysis properties. The figure below shows the
default layout of NeuroExplorer window. Files, Properties, Analyses, Variables and Explore panels are
visible and Templates and Scripts panels are hidden. To view a hidden panel, click at the panel tab or
use View menu command.
You can reposition panels by dragging them with your mouse and you can save and restore window
layouts using Window menu commands.
Files Panel
Page 58
This view allows you to quickly browse through your data files. When you select (single-click) one of the
data files, NeuroExplorer displays the file header information in the Properties panel. To open the data
file, simply double-click the file name.
Analyses Panel
This view allows you to quickly select one of the analyses available in NeuroExplorer. To apply analysis
to the active data file, click at the analysis name.
Properties Panel
The left column of the Properties Panel lists the names of adjustable parameters for the selected object.
The right column contains various controls that can be used to change the parameter values. To apply
the changes, press the Apply button or hit the F5 key.
Templates Panel
The Templates View can be used to quickly execute an Analysis Template. Double-click the template
name and the corresponding template will be immediately executed.
You can create subfolders in your template directory and then NeuroExplorer will allow you to navigate
through the templates tree within the Templates View.
Variables Panel
Page 59
•
•
•
You can analyze all the variables in your data file, a subset of the variables, or may be just one variable.
Variables Panel allows you to quickly select and deselect the variables used for analysis:
The left column shows the variables that are not currently selected; the right column shows the selected
variables. To move variables from column to column, first select them, then press ">" (Select) or "<"
(Deselect) buttons.
Scripts Panel
This panel can be used to select a script to be executed. Double-click the script name to run the selected
script.
You can create subfolders in your script directory and then NeuroExplorer will allow you to navigate
through the scripts tree within the Scripts View.
Explore Panel
Explore panel allows you to quickly explore analysis parameter ranges. Select a parameter you want to
explore from a list and drag a slider. NeuroExplorer will keep recalculating analysis with the new
parameter values while you drag the slider, thus creating an 'analysis animation'.
One of the best uses for this panel is to explore analysis properties over a sliding window within your file:
Specify Use Time Range using Analysis | Edit menu command, then Data Selection tab
Select 'Select Data From' and 'Select Data To' parameters in the list boxes of the Explore panel
Click on Link Sliders check box
Now, when you drag one of the sliders, the other one will follow allowing you to visualize analysis results
over a sliding window in time.
See Also
NeuroExplorer Menu Commands
Page 60
2.2. NeuroExplorer Menu Commands
The following menu commands are available in NeuroExplorer
Menu Command Description
File | New Create a new document
File | Open... Open an existing document
File | Restore Last Analysis Restore lasts analysis
File | Close Close the active document
File | Save Save the active document
File | Save As .NEX File... Save the active document with a new name
File | Save As .NEX5 File... Save the active document with a new name
File | Import Data | Plexon PLX,
PL2 or DDT File...
Import data from Plexon .plx file
File | Import Data | Plexon SPK
File...
Import data from Plexon .spk file
File | Import Data | Alpha Omega
Data File...
Import data from Alpha-Omega file
File | Import Data | Blackrock
Microsystems File...
Import data from Blackrock Microsystems file
File | Import Data | CED Spike-2
Data File...
Import data from CED Spike-2 file
File | Import Data | CORTEX Data
File...
Import data from CORTEX data file
File | Import Data | DataWave
File...
Import data from DataWave file
File | Import Data | Multichannel
Systems Data File...
Import data from Multichannel Systems file
File | Import Data | Neuralynx Data
File...
Import data from Neuralynx file(s)
File | Import Data | RC Electronics
Data File...
Import data from RC Electronics file
File | Import Data | Stranger Data
File...
Import data from Stranger file
File | Import Data | Text File... Import data from a text file
File | Import Data | Text File with
Continuous Variables...
Import continuous variables from a text file
File | Import Data | Axon
Instruments ABF File...
Import data from Axon Instruments ABF file
File | Import Data | Axion Data Import data from Axion data file
Page 61
File...
File | Import Data | MED64 Mobius
Native Format Data File...
Import data from MED64 Mobius file
File | Import Data | MED64 Mobius
.csv Spike Time File...
Import data from MED64 .csv file
File | Import Data | European Data
Format File...
Import data from European Data Format .edf or .bdf file
File | Import Data | KlustaSuite
.kwik File...
Import data from KlustaSuite .kwik file
File | Import Data | Open Ephys
Files...
Import data from Open Ephys files (.continuous, .spikes and
.events)
File | Import Data | Intan Data
File...
Import data from Intan data file
File | Import Data | Ripple Data
File...
Import data from Ripple data file
File | Import Data | 3Brain Data
File...
Import data from 3Brain data file
File | Export Data | As a Text File... Export Timestamps As a Text File
File | Merge Files... Merge several similar data files into one
File | Connect to Plexon Server Connect to Plexon Server
File | Print... Change the printer and printing options
File | Print Preview Display full pages
File | Print Setup... Change the printer and printing options
File | Page Setup... Open a dialog to edit page elements
File | Save NeuroExplorer State... Save NeuroExplorer State
File | Restore NeuroExplorer
State...
Restore NeuroExplorer State
File | Exit Quit the application; prompts to save documents
Edit | Undo Undo the last action
Edit | Redo Redo the previously undone action
Edit | Cut Cut the selection and put it on the Clipboard
Edit | Copy Copy the selection and put it on the Clipboard
Edit | Paste Insert Clipboard contents
Edit | Edit Graphics | Switch to
Page Layout Mode
Edit the layout of the whole page
Edit | Edit Graphics | Switch to
Graph Layout Mode
Edit the layout of each graph
Page 62
Edit | Edit Graphics | Block
Properties...
Edit the properties of the block of graphs
Edit | Edit Graphics | Graph
Properties...
Edit graph properties
Edit | Edit Graphics | X Axis
Properties...
Edit X axis properties
Edit | Edit Graphics | Y Axis
Properties...
Edit Y axis properties
Edit | Edit Graphics | Page
Labels...
Edit text elements of the page
Edit | Edit Graphics | Graph
Labels...
Edit text elements of each graph
Edit | Edit Markers | Split Into
Multiple Events...
Split marker variable into multiple event variables
Edit | Edit Markers | Extract
Events...
Extract events according to the specified conditions
Edit | Edit Markers | Extract
Position Variables...
Extract position variables
Edit | Delete Variables... Open a dialog to select the variables you would like to delete
Edit | Copy Selected Variables to
Another File...
Copy selected variables to another file
Edit | Operations on Data
Variables...
Open Operations on Data Variables dialog
Edit | Add Interval Variable... Add an interval variable to the current document
Edit | Add Population Vector... Open a dialog to add a population vector to current document
Edit | Set Positions of the
Neurons...
Set positions of the neurons
Edit | Digital Filter Continuous
Variable...
Digital filter continuous variable
Edit | Convert Video-Based
Continuous Variables...
Open a dialog to convert video-based variable to a cont. variable
View | Toolbar Show or hide the toolbar
View | Status Bar Show or hide the status bar
View | 1D Data Viewer Window Open a one-dimensional data viewer
View | Numerical Results Window Open numerical results window
View | Files Panel View Files panel
View | Analyses Panel View Analyses panel
View | Properties Panel View Properties panel
View | Variables Panel View Variables panel
Page 63

View | Templates Panel View Templates panel
View | Scripts Panel View Scripts panel
View | Explore Panel View Explore panel
View | Restore Default Layout... Restore default panel layout
View | Options... Open NeuroExplorer Options dialog
View | Data Import Options... Open Data Import Options dialog
View | Average/Overlay Chart
Window
Open Average/Overlay Chart window
View | Results Folder Summary Open results folder summary window
View | History Thumbnails... Open History Thumbnails dialog
View | History Script... Open History Script in NexScript editor
Analysis | Edit Parameters... Open the dialog to edit the current analysis parameters
Analysis | Select Variables ... Select Variables for Analysis
Analysis | Increase X Range Increase X Range in the current analysis
Analysis | Decrease X Range Decrease X Range in the current analysis
Analysis | Restore Last Analysis Restore lasts analysis
Results | Graphical Results | Copy
Graphics to the Clipboard
Copy all the block graphics to the clipboard
Results | Graphical Results | Save
Graphics in WMF File...
Saves graphics in a Windows Metafile
Results | Graphical Results | Save
Graphics in PNG File...
Save graphics in a .png file
Results | Graphical Results | Save
Graphics in SVG File...
Save graphics in a .svg (Scalable Vector Graphics) file
Results | Graphical Results | Send
Graphics to PowerPoint...
Send graphics to PowerPoint
Results | Numerical Results | View
Numerical Results Window
Open numerical results window
Results | Numerical Results | Copy
Numerical Results to the Clipboard
Copy Numerical Results to the clipboard
Results | Numerical Results | Save
Numerical Results in a Text File...
Save numerical results as a text file
Results | Numerical Results | Save
Summary of Numerical Results in a
Text File....
Save summary of numerical results in a text file
Results | Numerical Results | Send
Numerical Results to Excel...
Send Numerical Results To Excel
Results | Numerical Results | Send Send Numerical Results to Matlab
Page 64

Numerical Results to Matlab
SavedResults | Set Results
Folder...
Sets current saved results folder
SavedResults | Open Saved
Results File...
Open saved results file
SavedResults | Open Data File
Referenced in Result
Open data file referenced in result
SavedResults | Restore Analysis in
NeuroExplorer
Restore analysis in NeuroExplorer
SavedResults | Quick Save Results Quick save results
SavedResults | Save Current
Analysis Results in Results File...
Save current analysis results in results File
SavedResults | Results Folder
Summary
Open results folder summary window
SavedResults | Add Slides with
Selected Results...
Add Slides with Selected Results
Graphics | Edit Graphics | Switch to
Page Layout Mode
Edit the layout of the whole page
Graphics | Edit Graphics | Switch to
Graph Layout Mode
Edit the layout of each graph
Graphics | Edit Graphics | Block
Properties...
Edit the properties of the block of graphs
Graphics | Edit Graphics | Graph
Properties...
Edit graph properties
Graphics | Edit Graphics | X Axis
Properties...
Edit X axis properties
Graphics | Edit Graphics | Y Axis
Properties...
Edit Y Axis properties
Graphics | Edit Graphics | Color
Scale Properties...
Edit color scale properties
Graphics | Edit Graphics | Page
Labels...
Edit text elements of the page
Graphics | Edit Graphics | Graph
Labels...
Edit text elements of each graph
Graphics | Export Graphics | Copy
Graphics to the Clipboard
Copy all the block graphics to the clipboard
Graphics | Export Graphics | Save
Graphics in WMF File...
Saves graphics in a Windows Metafile
Graphics | Export Graphics | Save
Graphics in PNG File...
Save graphics in a .png file
Graphics | Export Graphics | Send Send Graphics to PowerPoint
Page 65

Graphics to PowerPoint...
Graphics | Fonts | Enable Font
AutoScale
Allow NeuroExplorer to reduce font sizes if there are too many
graphs
Graphics | Fonts | Increase font
size
Increase font size
Graphics | Fonts | Decrease font
size
Decrease font size
Graphics | Zoom | Zoom In Zoom In
Graphics | Zoom | Zoom Out Zoom Out
Graphics | Zoom | Fit to Window Scale Block so that it fits the screen
Graphics | Insert | Insert Text Insert text into figure
Graphics | Insert | Insert Line Add line
Graphics | Insert | Insert Rectangle Add rectangle to the figure
Graphics | Insert | Insert Text Label
with the Variable Name
Insert text element with the variable name to each graph
Graphics | Bring to front Bring selected object to front
Graphics | Send to back Send to back
Script | New Script Open a script window
Script | Open Script... Open existing script
Script | History Script... Open history script
Script | Script Options... Open Script Options dialog
Template | Save Template ... Save Template
Template | Save As New Template
...
Save As New Template
Template | Save As Default
Template
Saves the current configuration as a default template for this
analysis
Template | Open Template and
Run Analysis From Template...
Opens a File Open dialog to select the template
Template | View Template
Properties...
View Template Properties
3DView | View Histograms in 3D Show the results in 3D Viewer
3DView | View Histogram
Variations in 3D
View Histogram Z-scores in 3D
3DView | 3D Activity Animation Opens a 3D activity viewer
3DView | Graphics Parameters... Opens a dialog to edit this window's graphics parameters
3DView | Save As New 3D
Template...
Save current graphics parameters as a new 3D template
Page 66
3DView | Save Current 3D
Template
Save current graphics parameters as a new 3D template
3DView | Save As New Animation
Template...
Save current animation template as a new template
3DView | Save Current Animation
Template
Save current animation template
Matlab | Matlab Options... Matlab Options
Matlab | Get Data From Matlab |
Get Timestamp Variables...
Get timestamp variables from Matlab
Matlab | Get Data From Matlab |
Get Continuous Variables...
Get continuous variables from Matlab
Matlab | Get Data From Matlab |
Get Continuous Variables with
Timestamps...
Get continuous variables with timestamps from Matlab
Matlab | Get Data From Matlab |
Get Interval Variables...
Get interval variables from Matlab
Matlab | Get Data From Matlab |
Open Matlab As Engine
Open Matlab as engine
Matlab | Send Selected Variables
to Matlab
Send selected variables to Matlab
Matlab | Send Numerical Results to
Matlab
Send numerical results to Matlab
R-project | Settings for running R-
project via command line...
Open a dialog to specify R-project options
Markers | Split Into Multiple
Events...
Split marker variable into multiple event variables
Markers | Extract Events... Extract events according to the specified conditions
Markers | Extract Position
Variables...
Extract position variables
Online | Connect to Plexon Server Connect to Plexon online data server
Online | Connect to Cerebus
Server
Connect to Cerebus online data server
Online | Connect to Neuralynx
Server
Connect to Neuralynx online data server
Online | Connect to AlphaMap
Server
Connect to AlphaMap online data server
Online | Pause Online Data Server
Updates
Pause online data server Updates
Online | Reset Online Data File Restart the data collection
Online | Disconnect from Online
Data Server
Disconnect from online data server
Page 67
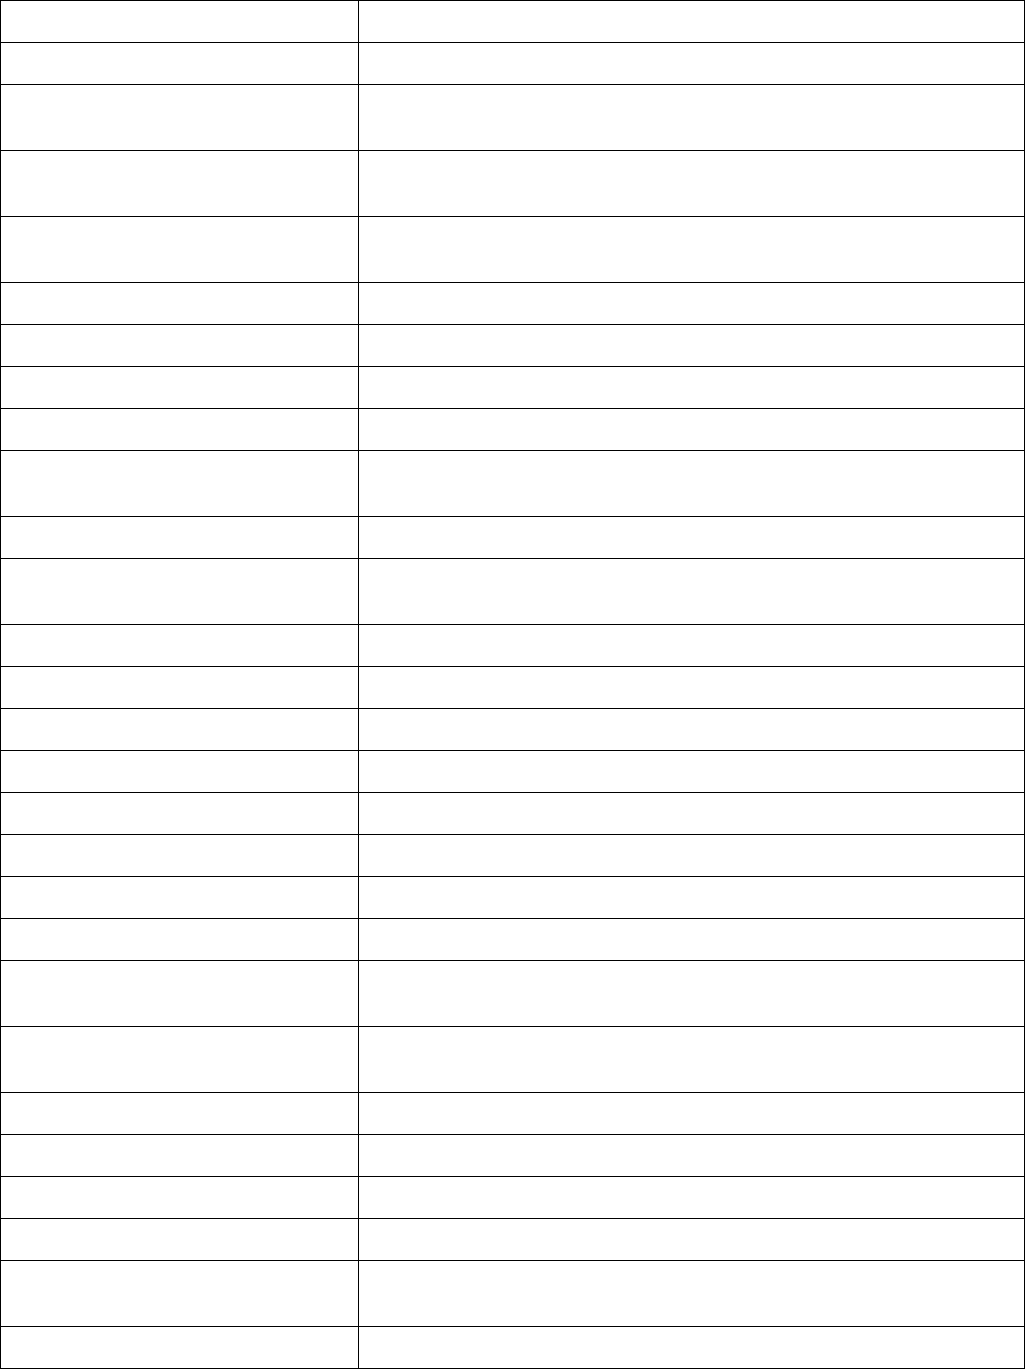
Online | Plexon Online Options... Plexon online options
Online | Cerebus Online Options... Cerebus online options
Online | Neuralynx Online
Options...
Neuralynx online options
Online | AlphaMap Online
Options...
AlphaMap online options
Sound | Play Continuous Variable
as Sound
Play continuous variable as sound
Window | Cascade Arrange windows so they overlap
Window | Tile Horizontally Arrange windows as non-overlapping tiles
Window | Tile Vertically Arrange windows as non-overlapping tiles
Window | Arrange Icons Arrange icons at the bottom of the window
Window | Numerical Results
Window
Open numerical results window
Window | Close All Windows Close all child windows
Window | Close All Windows
Except Currently Active Window
Close all windows except currently active window
Window | Files Panel View Files panel
Window | Analyses Panel View Analyses panel
Window | Parameters Panel View Properties panel
Window | Variables Panel View Variables panel
Window | Templates Panel View Templates panel
Window | Scripts Panel View Scripts panel
Window | Explore Panel View Explore panel
Window | Restore Default Layout... Restore default panel layout
Window | Save Current Layout in a
File...
Saves current panel layout
Window | Restore Layout from a
File...
Restore panel layout from a file
Help | Help Topics List Help topics
Help | NeuroExplorer Web Site Open NeuroExplorer web site home page in the default browser
Help | NeuroExplorer Blog Open NeuroExplorer Blog page in the default browser
Help | Check for Updates... Check for the updates
Help | Update Sentinel Key to
Enable Version 5...
Update Sentinel key
Help | About NeuroExplorer... Display program information, version number and copyright
Page 68
•
•
•
•
•
•
•
•
•
•
•
•
•
•
•
•
•
•
•
•
•
•
•
•
•
•
•
•
•
•
•
•
•
•
•
•
•
•
•
•
•
3. Analysis Reference
This section, NeuroExplorer Analysis Reference, describes general pre-processing and post-processing
analysis options, analysis parameters and computational algorithms used in analyses.
Data Types
Data Selection Options
Post-Processing Options
Matlab Options
Excel Options
Confidence Limits for Perievent Histograms
Rate Histograms
Interspike Interval Histograms
Autocorrelograms
Perievent Histograms
Crosscorrelograms
Rasters
Perievent Rasters
Joint PSTH
Cumulative Activity Graphs
Instant Frequency Graphs
Interspike Intervals vs Time
Poincare Maps
Spike Distance vs Time
Trial Bin Counts
Power Spectral Densities
Burst Analysis
Principal Component Analysis
Perievent Histograms vs. Time
Correlations with Continuous Variables
Regularity Analysis
Place Cell Analysis
Reverse Correlation
Epoch Counts
Coherence Analysis
Spectrogram Analysis
Perievent Spectrograms
Joint ISI Distribution
Autocorrelograms Versus Time
Perievent Rasters for Continuous
Power Spectra for Continuous
Coherence for Continuous
Analysis of Head Direction Cells
Single Trial Spectrum Analysis
Phase Analysis via Hilbert Transform
Waveform Comparison
Page 70
3.1. Data Types
NeuroExplorer supports several data types -- spike trains, behavioral events, time intervals, continuously
recorded data and other data types. The topics in this section describe the data types used in
NeuroExplorer, list the properties of data types, and show how to view and modify various data types in
NeuroExplorer.
Page 72
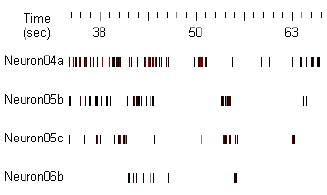
3.1.1. Spike Trains
In NeuroExplorer, the most commonly used data type is a spike train. A spike train in NeuroExplorer
does not contain the spike waveforms, it represents only the spike timestamps (the times when the
spikes occurred). A special Waveform data type is used to store the spike waveform values.
Events are very similar to spike trains. The only difference between spike trains and events is that spike
trains may contain additional information about recording sites, electrode numbers, etc. (for example,
spike trains contain positions of neurons used in the 3D activity "movie" ).
Internally, the timestamps are stored as 64-bit signed integers. These integers are usually the
timestamps recorded by the data acquisition system and they represent time in the so-called time ticks.
For example, the typical time tick for the Plexon system is 25 microseconds, so an event recorded at 1
sec will have the timestamp equal to 40000.
Limitations
The maximum number of timestamps (in each spike train) in NeuroExplorer is 2,147,483,647 for 32-bit
version and 4,294,967,295 for 64-bit version. In reality, the limiting factor is the amount of virtual memory
on your machine, since the timestamps of all the variables of a data file should fit into memory.
NeuroExplorer requires that in each spike train all the timestamps are in ascending order, that is
timestamp[i+1] > timestamp[i] for all i.
NeuroExplorer also requires that
timestamp[i] >= 0 for all i.
Timestamped Variables in NexScript
You can get access to any timestamp in the current file. For example, to assign the value 0.5 (sec) to the
third timestamp of the variable SPK01a, you can use this script:
doc = GetActiveDocument()
doc["SPK01a"][3] = 0.5
Viewers
You can view the timestamps of the selected variables in graphical display ( View | 1D Data Viewer
menu command):
Numerical values of the timestamps (in seconds) are shown in the Timestamps sheet of the Data view:
Page 73
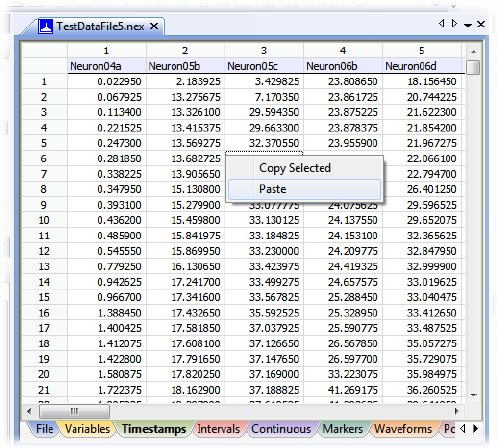
Page 74
3.1.2. Events
Event data type in NeuroExplorer is used to represent the series of timestamps recorded from external
devices (for example, stimulation times recorded as pulses produced by the stimulus generator). Event
data type stores only the times when the external events occurred. A special Marker data type is used to
store the timestamps together with other stimulus or trial information.
Events are very similar to spike trains. The only difference between spike trains and events is that spike
trains may contain additional information about recording sites, electrode numbers, etc.
Internally, event timestamps are represented exactly as Spike Train timestamps. See Spike Trains for
more information about the timestamps in NeuroExplorer.
Creating Event Variables
You can add events to the data file using Copy | Paste command in the Timestamps view (see Importing
Data from Spreadsheets for details).
You can also create additional events based on the events in the data file. Use Edit | Operations on
Data Variables menu command and then select one of the operations in the Operations dialog.
Page 75
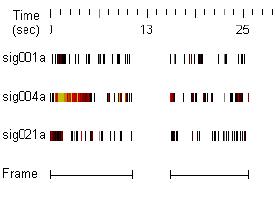
3.1.3. Intervals
Intervals are usually used in NeuroExplorer to select the data from a specified time periods (see Data
Selection Options for details).
Each interval variable can contain multiple time intervals. For example, the Frame variable in the
following figure has two intervals:
Creating Interval Variables
You can create intervals in NeuroExplorer using Edit | Add Interval Variable menu command.
You can also create intervals based on existing Event or Interval variables. Use Edit | Operations on
Data Variables menu command and then select one of the following operations:
MakeIntervals
MakeIntFromStart
MakeIntFromEnd
IntOpposite
IntAnd
IntOr
IntSize
IntFind
Burst analysis creates interval variables (one for each neuron) that contain all the detected bursts as time
intervals.
Interval Variables in NexScript
IntVar[i,1] gives you the access to the start of the i-th interval,
IntVar[i,2] gives you the access to the end of the i-th interval.
For example, the following script creates a new interval variable that has two intervals: from 0 to 100
seconds and from 200 to 300 seconds:
doc = GetActiveDocument()
doc["MyInterval"] = NewIntEvent(doc)
AddInterval(doc["MyInterval"], 0., 100.)
AddInterval(doc["MyInterval"], 200., 300.)
Limitations
Internally, NeuroExplorer stores the beginning and the end of each interval as a timestamp (see Spike
Trains for more information about timestamps in NeuroExplorer).
Page 76
Viewers
You can view the intervals of the selected variables in graphical display ( View | 1D Data Viewer menu
command, see figure above).
The intervals (in seconds) are shown in the Intervals sheet of the Data view.
Page 77
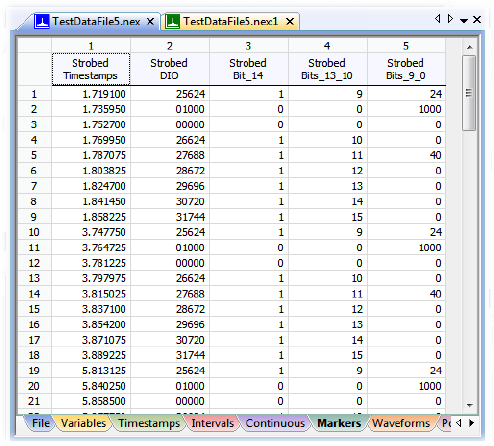
3.1.4. Markers
Marker data type in NeuroExplorer is used to represent the series of timestamps recorded from external
devices (for example, stimulation times recorded as pulses produced by the stimulus generator) together
with other stimulus or trial information. Event data type stores only the times when the external events
occurred.
NeuroExplorer creates Marker variables when it imports, for example, strobed events from Plexon data
files.
Viewers
You can view both the marker timestamps and additional marker information in the Markers tab of the
Data window:
Extracting Events
Usually you will need to extract events with specific trial information from the marker variables. To do
this, use Marker | Split... and Marker | Extract... menu commands.
For example, you may want to extract from the marker variable shown in the figure above only the
markers with DIOValue 25624 or 01000. Marker | Extract... menu command will open the Extract dialog
box in which you can specify multiple criteria for extracting events from the marker variable:
Page 78
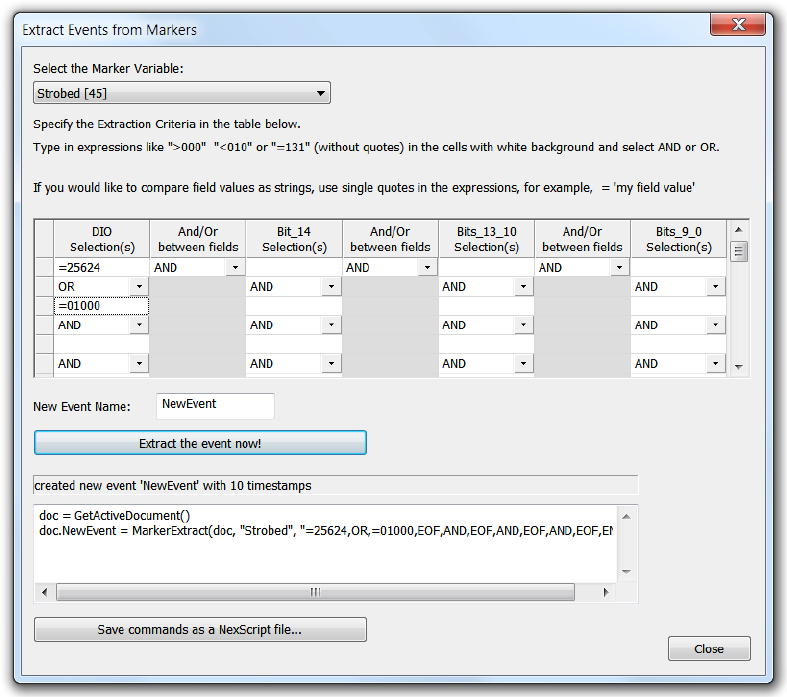
Page 79
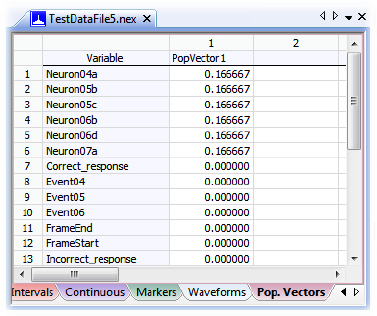
•
•
•
•
3.1.5. Population Vectors
Population vectors in NeuroExplorer can be used to display the linear combinations of histograms in
some of the analyses. For example, you can calculate perievent histograms for each individual neuron
recorded in a data file. If you want to calculate the response of the whole population of neurons (that is,
create an average PST histogram) you need to use a population vector.
Population vector assigns a weight to each spike train or event variable in the file. You can then use
population vectors in the following analyses:
Rate Histograms
Interspike Interval Histograms
Perievent Histograms
Trial Counts
If you select the population vector for analysis and then run one of the four analyses listed above, the
histogram corresponding to the population vector will be calculated as:
histogram_of_neuron_1 * weight_1 + histogram_of_neuron_2 * weight_2...
where the weights are defined in the population vector. For example, to calculate an average histogram
for 6 neurons, the following population vector should be used:
Creating Population Vectors
You can create new population vectors in NeuroExplorer using Edit | Add Population Vector menu
command.
Principal Component Analysis creates a set of population vectors based on correlations between
activities of individual neurons.
Page 80
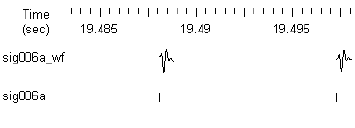
•
•
•
•
3.1.6. Waveforms
The waveform data type is used in NeuroExplorer to store the spike waveform values together with the
spike timestamps. The following figure shows the waveform variable sig006a_wf together with the
corresponding spike train sig006a:
The waveform data may not be imported by default from the data files created by the data acquisition
systems. Use View | Data Import Options menu command to specify which data types NeuroExplorer
will import from the data files.
The waveform variables can be used in the following analyses:
Rate Histograms
Rasters
Perievent Histograms (instead of PST, NeuroExplorer calculates spike-triggered average for a
waveform variable)
Waveform Comparison
Viewers
You can view the waveforms of the selected variables in the graphical display ( View | 1D Data Viewer
menu command, see figure above).
Numerical values of the waveforms and their timestamps are shown in the Waveforms sheet of the Data
view.
Page 81
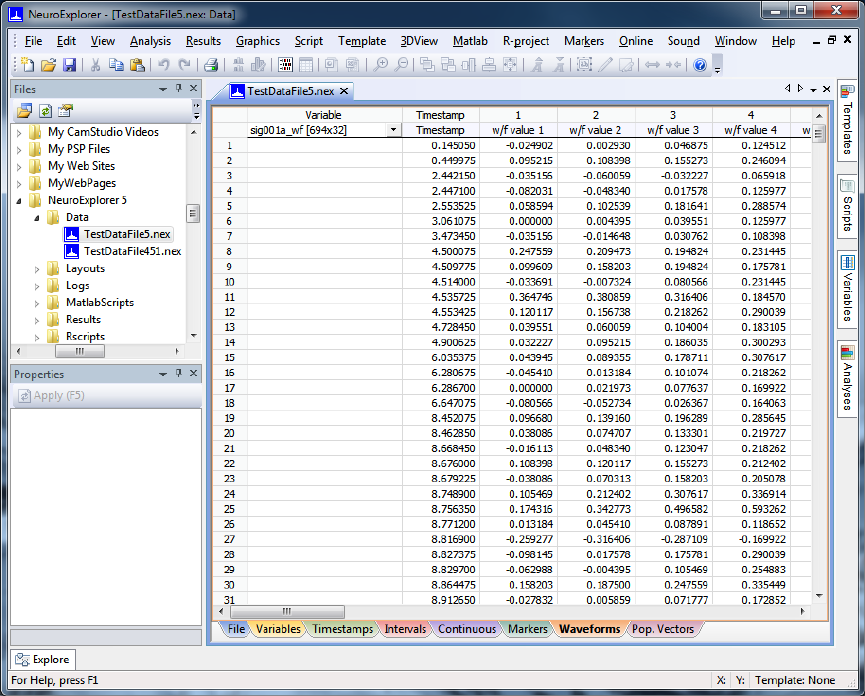
To select a different waveform variable, click in the cell located in the row 1 of the Variable column (the
cell shows sig001a_wf in the figure above).
Waveform values are shown in columns labeled 1, 2, etc.
Page 82
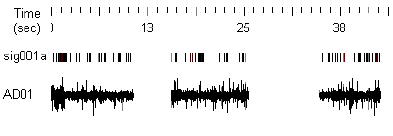
•
•
•
•
•
•
•
•
•
•
•
•
•
3.1.7. Continuously Recorded Data
The continuous data type is used in NeuroExplorer to store the data that has been continuously recorded
(digitized).
The following figure shows continuous variable AD01 together with the spike train sig001a:
Continuous data may not be imported by default from the data files created by the data acquisition
systems. Use View | Data Import Options menu command to specify which data types NeuroExplorer
will import from the data files.
Continuous variables can be used in the following analyses:
Rate Histograms
Rasters
Perievent Histograms (instead of PST, NeuroExplorer calculates the spike-triggered average for a
continuous variable)
Perievent Rasters (NeuroExplorer shows the values of continuous variable using color)
Trial Bin Counts
Spectral Densities
Correlations with Continuous Variable
Coherence Analysis
Spectrograms
Perievent Spectrograms
Phase Analysis via Hilbert Transform
Single Trial Spectrum Analysis
Find Oscillations
Limitations
Internally, each data point of the continuous variable is stored as a 2-byte integer (if data is imported from
a file created by a data acquisition system) or as a 4-byte floating point number (if data is imported from a
text file or from Matlab). The maximum number of values (in each continuous variable) in NeuroExplorer
is 2,147,483,647 for 32-bit version and 4,294,967,295 for 64-bit version. In reality, the limiting factor is
the amount of virtual memory in your computer since all the values should fit into virtual memory.
Viewers
You can view continuous variables in the graphical display ( View | 1D Data Viewer menu command,
see figure above).
Numerical values of the continuous variables are shown in the Continuous sheet of the Data view.
Page 83
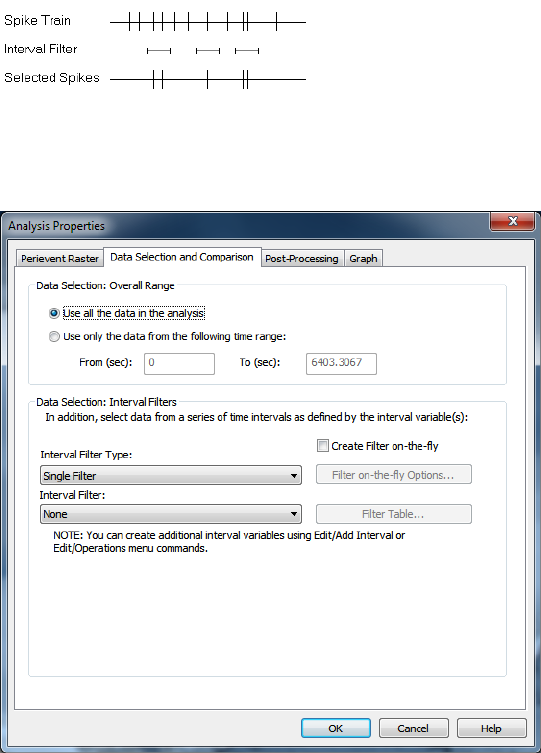
3.2. Data Selection Options
Before performing the analysis, NeuroExplorer can select the timestamped events that are inside the
specified time intervals:
For example, you may want to analyze only the first 10 minutes of the recording session. To do this,
choose the Data Selection tab in the Analysis Parameters dialog, click Use only the data from the
following time range and specify From and To parameters in seconds:
You can also choose an interval variable (at the bottom of the Data Selection page) as an additional data
filter. NeuroExplorer then will select data from one or more time intervals as specified by the interval
variable.
Some analyses (Perievent Histograms, Perievent Rasters and Crosscorrelograms) allow you to specify
several interval filters, so that a different filter will be used for a column or for a row of graphs.
Page 84

3.3. Post-Processing Options
For the histogram-style analyses, NeuroExplorer has an optional Post-processing analysis step. You
can select post-processing options using Post-processing tab in the Analysis Parameters dialog.
(double-click in the Graph window and select Analysis Parameters menu item):
You can smooth the resulting histogram with Gaussian or Boxcar filters.
The boxcar filter is a filter with equal coefficients. If f[i] is i-th filter coefficient and w is the filter width, then
f[i] = 1/w for all i
Thus for the filter of width 3, the boxcar filter is
f[-1] = 0.33333, f[0] = 0.33333, f[1] = 0.33333.
and the smoothed histogram sh[i] is calculated as
sh[i] = f[-1]*h[i-1] + f[0]*h[i] + f[1]*h[i+1]
where h[i] is the original histogram.
The boxcar filter needs to include the same number of histogram values before and after the current
value. This means that the number of coefficients of the filter cannot be even. If the filter width w is
specified as an even number, the actual filter width will be w+1.
The Gaussian filter is calculated using the following formula:
f[i] = exp(-i*i/sigma)/norm, i from -2*d to 2*d
where
d = ( (int)w + 1 )/2
sigma = -w * w * 0.25 / log(0.5)
norm = sum of exp( -i * i / sigma), i from -2*d to 2*d
The parameters of the filter are such that the width of the Gaussian curve at half the height equals to the
specified filter width. Please note that for the Gaussian filter, width of the filter (w) can be a non-integer.
For example, w can be 3.5.
Page 85
3.4. Matlab Options
NeuroExplorer can interact with Matlab via COM interface using Matlab as a powerful post-processing
engine. Immediately after calculating histograms, NeuroExplorer can send the resulting matrix of
histograms to Matlab and then ask Matlab to execute any series of Matlab commands.
Use the Matlab tab in the Analysis parameters dialog to specify the matrix name and the Matlab
command string.
Page 87
•
•
3.5. Excel Options
NeuroExplorer can send numerical results directly to Excel. There are two ways to send the results to
Excel:
Use Send to Excel button on the toolbar or menu command File | Save Numerical Results | Send
Results to Excel
Use Excel tab in the Analysis Parameters dialog to specify what to transfer to Excel and the location
of the top-left cell for the data from NeuroExplorer.
Page 88
•
•
•
3.6. Confidence Limits for Perievent Histograms
If the total time interval (experimental session) is T (seconds) and we have N spikes in the interval, then
the neuron firing rate (spikes per second) is:
F = N/T
Several options how to calculate neuron firing rate F are available. See Options below.
Then if the spike train is a Poisson train, the probability of the neuron to fire in the small bin of the size b
(seconds) is
P = F*b
The expected bin count for the perievent histogram is then:
C = P*NRef, where NRef is the number of the reference events.
The value C is used for drawing the Mean Frequency in the Perievent Histograms and Cross- and
Autocorrelograms.
The confidence limits for bin counts are calculated using the assumption that the bin count has a Poisson
distribution with mean C.
Assume that a random variable S has a Poisson distribution with parameter (and mean) C. Then, the
99% confidence limits are calculated as follows:
Low Conf. = x such that Prob(S < x) = 0.005
High Conf. = y such that Prob(S > y) = 0.005
If C < 30, NeuroExplorer uses the actual Poisson distribution
Prob(S = K) = exp(-C) * (C^K) / K!, where C^K is C to the power of K,
to calculate the confidence limits.
If C>= 30., the Gaussian approximation of Poisson distribution is used (the approximation of
Poisson(Lambda) is a Gaussian distribution with mean and variance of Lambda).
For example, for 99% confidence limits:
Low Conf. = C - 2.58*sqrt(C);
High Conf.= C + 2.58*sqrt(C);
Reference
Abeles M. Quantification, smoothing, and confidence limits for single-units histograms. Journal of
Neuroscience Methods. 5(4):317-25, 1982
Options
The following options to calculate neuron firing rate F are available:
Use target and reference timestamps from selected time range and interval filter. T is the
length of all the time intervals used in analysis, N is the number of spikes within these intervals.
Use all target and reference timestamps from the file. Here T is the total length of experimental
session, N is the total number of spikes for a given neuron.
Use target timestamps from the time intervals corresponding to bins before zero. This option
only works for a stimulation-type data. For example, if you stimulate every second and calculate
PSTH with XMin=-0.2, XMax=0.2, NeuroExplorer can easily distinguish the spikes before and after
the stimulus. However, if you stimulate every 200 ms, the spikes before the second stimulus are
Page 89
•
also the spikes after the first stimulus, so you cannot distinguish the spikes that should be used to
calculate the mean firing rate. The algorithm: for each reference event timestamp r, a time interval
(r+XMin, r) is created (where XMin is PSTH or crosscorrelogram time axis minimum parameter;
XMin should be negative). T is the length of all (r+XMin, r) intervals that do not overlap, N is the
number of spikes in these intervals. If more than 5% of intervals overlap, F is set to zero.
Use target timestamps from interval filter. Use this option when you want to calculate the
neuron firing rate using spikes from an interval filter that is different from the interval filter specified
in the Data Selection page. T is the length of all the time intervals of the specified interval filter, N is
the number of spikes within these intervals.
Page 90
3.7. Cumulative Sum Graphs
Here is the algorithm that is used to draw optional cumulative sum graphs above the histograms.
Suppose we have a histogram with bin counts bc[i], i=1,...,N. Cumulative Sum Graph displays the
following values cs[i]:
for bin 1: cs[1] = bc[1] - A
for bin 2: cs[2] = bc[1]+bc[2] - A*2
for bin 3: cs[3] = bc[1]+bc[2]+bc[3] - A*3, etc.
The value of A depends on the selected Cumulative Sum option:
A is equal to average of all bc[i] if you select "Use all histogram" option
A is equal to average of all bc[i] for bins that are before zero on time scale if you select "Use preref as
base" option.
If you use "Use all histogram" option, the value of the cumulative sum for the last bin is always zero:
sc[N] = bc[1]+bc[2]+...bc[N] - A*N, where A = (bc[1]+bc[2]+...bc[N])/N.
NeuroExplorer displays 99% confidence limits for Cumulative Sum Graphs. Confidence limits for "Use
preref as base" option are proportional to square root of bin number.
Calculations of confidence limits for "Use all histogram" option are not trivial. These calculations are
based on the formulas developed by the author of NeuroExplorer, Alexander Kirillov.
Page 91

3.8. Rate Histograms
Rate histogram displays firing rate versus time.
Parameters
Parameter Description
XMin/XMax type An option on how XMin and XMax values are specified.
XMin Time axis minimum in seconds.
XMax Time axis maximum in seconds
Bin Histogram bin size in seconds.
Normalization Histogram units (Counts/Bin or Spikes/Second). See Algorithm below.
Set Cont. Mean to Zero
if Small Bin Count
If the number of continuous data points int a bin is too small, set cont. mean
(bin value) to zero. See Algorithm below.
Cont. Min Bin Count
Percent
Minimum number of continuous data points in a bin as percent of the
expected number of data points. See Algorithm below.
Select Data If Select Data is From Time Range, only the data from the specified (by
Select Data From and Select Data To parameters) time range will be used in
analysis. See also Data Selection Options.
Select Data From Start of the time range in seconds.
Select Data To End of the time range in seconds.
Smooth histogram An option to smooth the histogram after the calculation. See Post-Processing
Options for details.
Smooth Filter Width The width of the smooth filter. See Post-Processing Options for details.
Add to Results / Bin left An option to add an additional vector (containing a left edge of each bin) to
the matrix of numerical results.
Add to Results / Bin
middle
An option to add an additional vector (containing a middle point of each bin)
to the matrix of numerical results.
Add to Results / Bin right An option to add an additional vector (containing a right edge of each bin) to
the matrix of numerical results.
Send to Matlab An option to send the matrix of numerical results to Matlab. See also Matlab
Options.
Matrix Name Specifies the name of the results matrix in Matlab workspace.
Matlab command Specifies a Matlab command that is executed after the numerical results are
sent to Matlab.
Send to Excel An option to send numerical results or summary of numerical results to Excel.
See also Excel Options.
Sheet Name The name of the worksheet in Excel where to copy the numerical results.
TopLeft Specifies the Excel cell where the results are copied. Should be in the form
Page 92
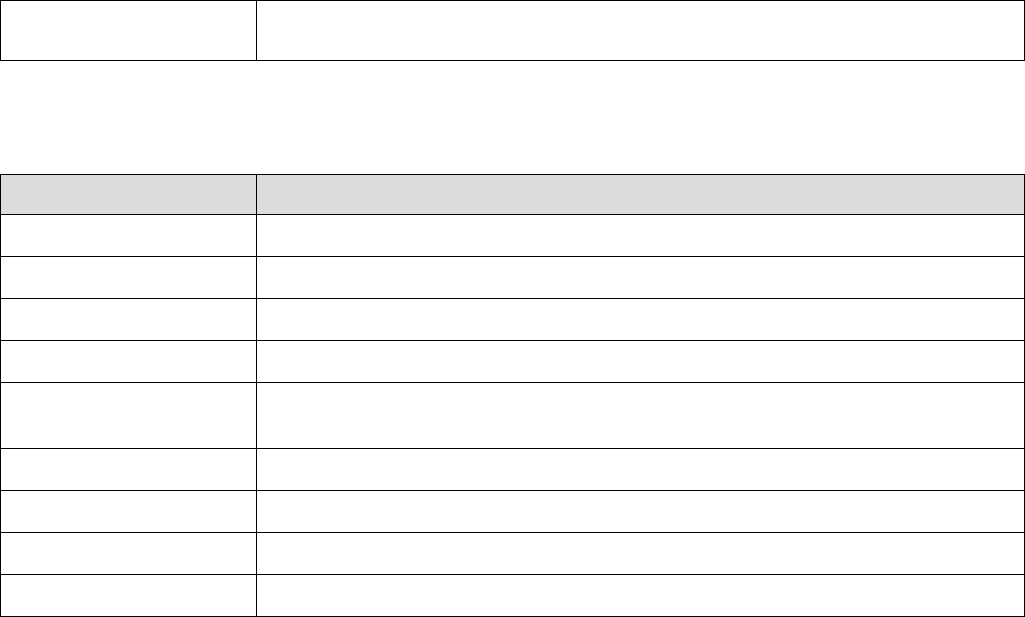
CR where C is Excel column name, R is the row number. For example, A1 is
the top-left cell in the worksheet.
Summary of Numerical Results
The following information is available in the Summary of Numerical Results
Column Description
Variable Variable name.
YMin Histogram minimum.
YMax Histogram maximum.
Spikes The number of spikes used in calculation.
Filter Length The length of all the intervals of the interval filter (if a filter was used) or the
length or the recording session (in seconds).
Mean Freq. Mean firing rate (Spikes/Filter_Length).
Mean Hist. The mean of the histogram bin values.
St. Dev. Hist. The standard deviation of the histogram bin values.
St. Err. Mean. Hist. The standard error of mean of the histogram bin values.
Algorithm
The time axis is divided into bins. The first bin is [XMin, XMin+Bin). The second bin is [XMin+Bin,
Xmin+Bin*2), etc. The left end is included in each bin, the right end is excluded from the bin.
Spike Trains and Events
For each bin, the number of events (timestamps) in this bin is calculated.
For example, for the first bin
bin_count = number of timestamps (ts) such that ts >= XMin and ts < XMin + Bin
If Normalization is Counts/Bin, no further calculations are performed.
If Normalization is Spikes/Sec, bin counts are divided by Bin.
Continuous Channels
For each bin, the average of continuous signal values in this bin is calculated. Normalization parameter is
ignored.
When calculating the average of continuous signal, we may encounter a situation when the number of
data points in a bin is very small. For example, with a 1 KHz signal and bin = 1 second, we typically have
1000 data points in each bin. If we have a bin in which we have only one data point, the average of the
signal in this bin is equal to the single data point value. This value can be very different from the typical
average of 1000 data points. Therefore, to avoid these spurious artifacts, we need to check how many
data points are in the bin and set the average to zero if there are too few data points.
Page 93
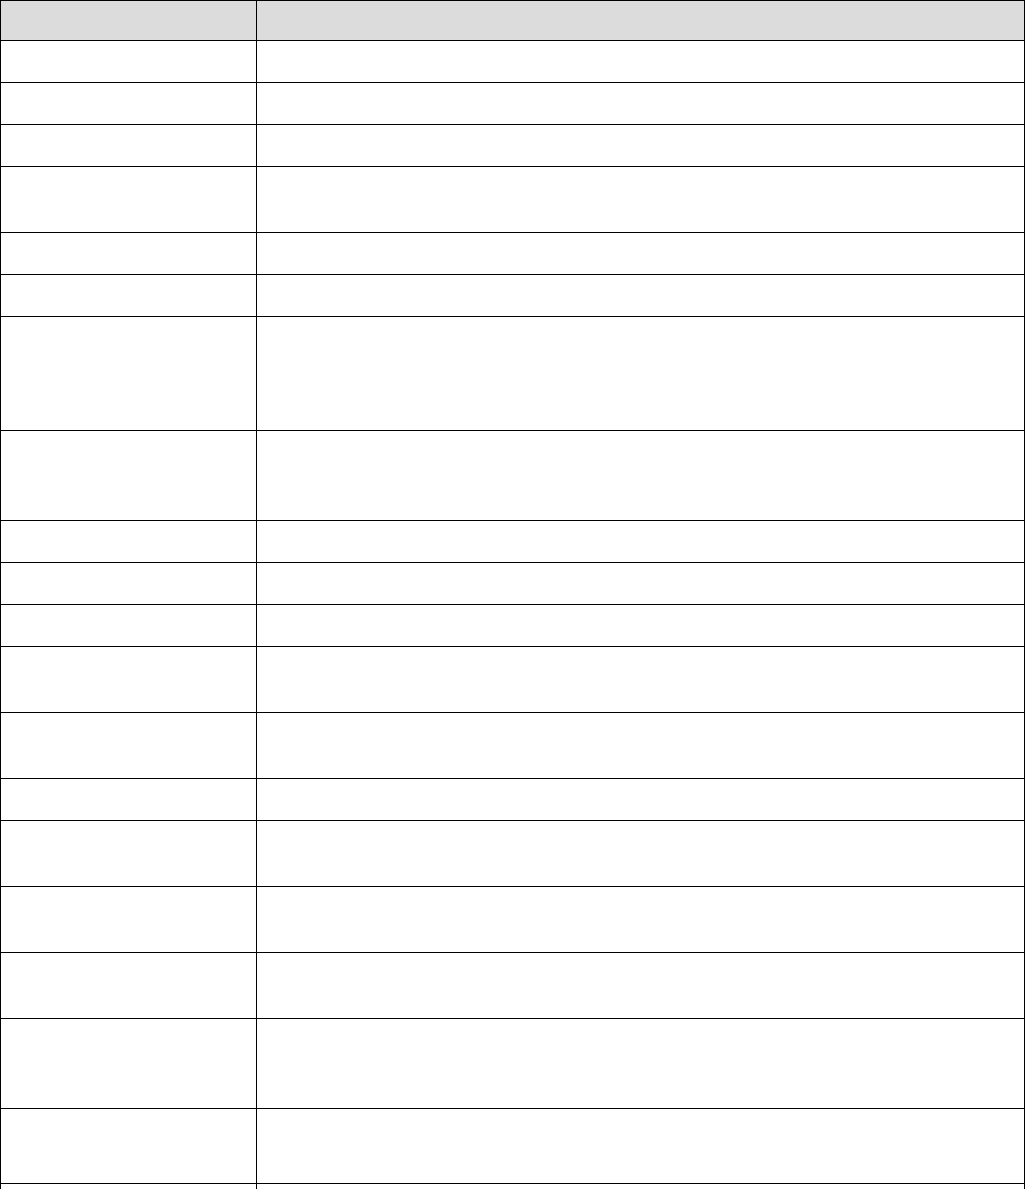
3.9. Interspike Interval Histograms
Interspike interval histogram shows the conditional probability of a first spike at time t0+t after a spike at
time t0.
Parameters
Parameter Description
Min Interval Minimum interspike interval in seconds.
Max Interval Maximum interspike interval in seconds.
Bin Bin size in seconds.
Normalization Histogram units (Counts/Bin, Probability or Spikes/Second). See Algorithm
below.
Log Bins and X Axis An option to use Log10 interval scale (see Algorithm below for details).
Bins per decade A bin size option if Log option is selected (see Algorithm below for details).
Y Axis Limit (%) An option to "zoom in" small histogram values. This parameter specifies the
maximum of Y axis. If it is 100%, the Y axis maximum is equal to the
maximum bin value. If it is, for example, 10%, Y axis maximum is set to 10%
of the bin max and the small bin values have better visibility.
Select Data If Select Data is From Time Range, only the data from the specified (by
Select Data From and Select Data To parameters) time range will be used in
analysis. See also Data Selection Options.
Select Data From Start of the time range in seconds.
Select Data To End of the time range in seconds.
Int. filter type Specifies if the analysis will use a single or multiple interval filters.
Interval filter Specifies the interval filter(s) that will be used to preselect data before
analysis. See also Data Selection Options.
Create filter on-the-fly Specifies if a temporary interval filter needs to be created (and used to
preselect data).
Create filter around Specifies an event that will be used to create a temporary filter.
Start offset Offset (in seconds, relative to the event specified in Create filter around
parameter) for the start of interval for the temporary filter.
End offset Offset (in seconds, relative to the event specified in Create filter around
parameter) for the end of interval for the temporary filter.
Fix overlaps An option to automatically merge the overlapping intervals in the temporary
filter.
Overlay Graphs An option to draw several histograms in each graph. This option requires that
Int. filter type specifies that multiple interval filters will be used (either Table
(row) or Table (col)).
Smooth Option to smooth the histogram after the calculation. See Post-Processing
Options for details.
Page 94
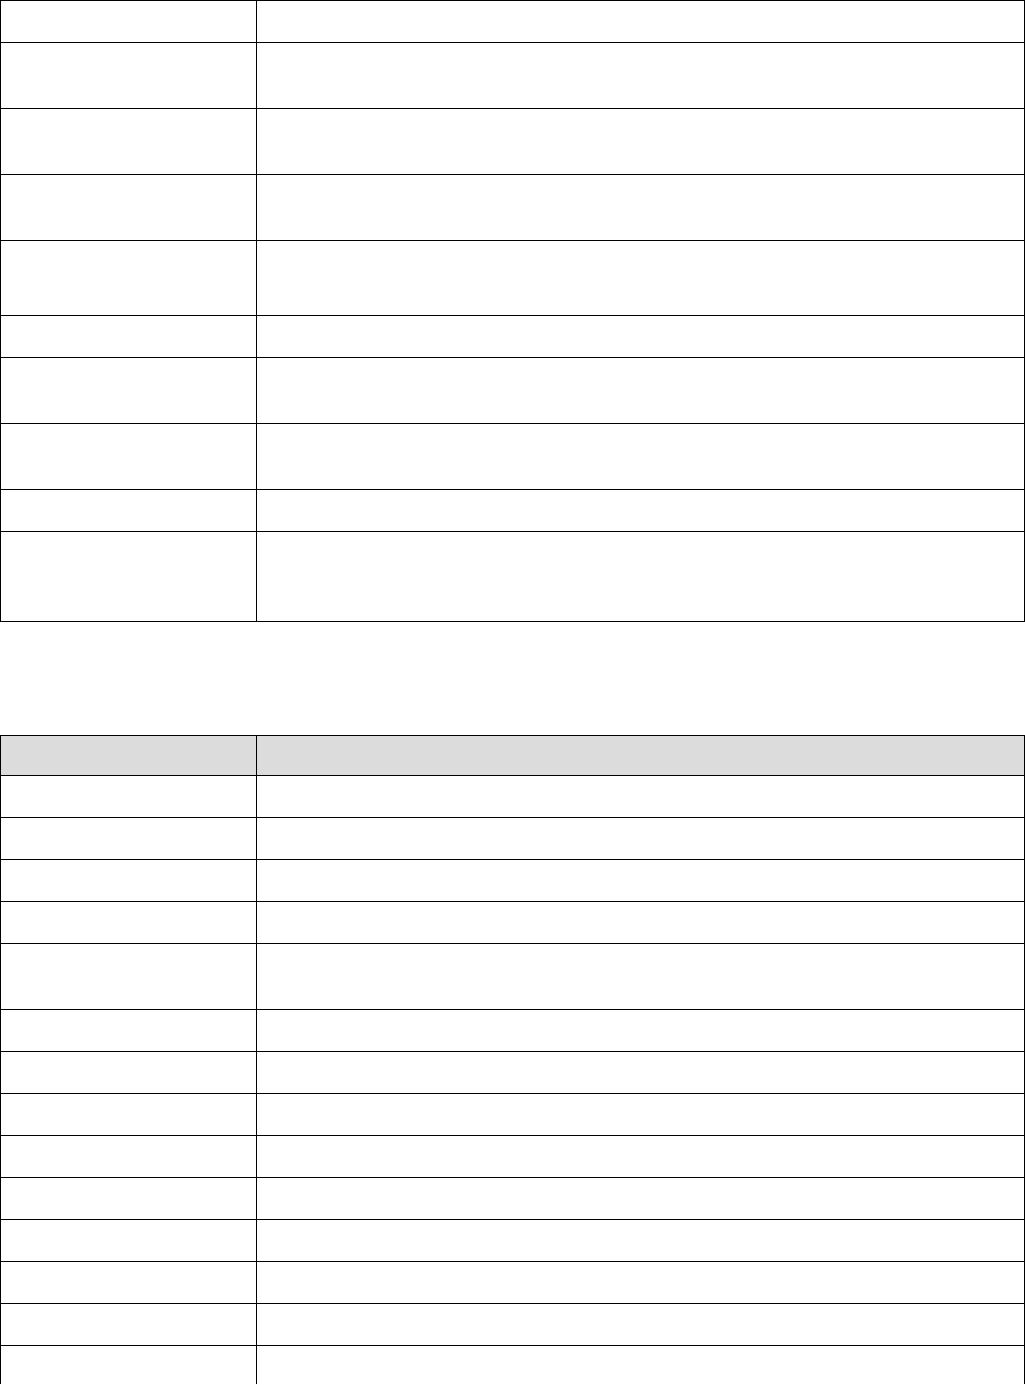
Smooth Filter Width The width of the smooth filter. See Post-Processing Options for details.
Add to Results / Bin left An option to add an additional vector (containing a left edge of each bin) to
the matrix of numerical results.
Add to Results / Bin
middle
An option to add an additional vector (containing a middle point of each bin)
to the matrix of numerical results.
Add to Results / Bin right An option to add an additional vector (containing a right edge of each bin) to
the matrix of numerical results.
Send to Matlab An option to send the matrix of numerical results to Matlab. See also Matlab
Options.
Matrix Name Specifies the name of the results matrix in Matlab workspace.
Matlab command Specifies a Matlab command that is executed after the numerical results are
sent to Matlab.
Send to Excel An option to send numerical results or summary of numerical results to Excel.
See also Excel Options.
Sheet Name The name of the worksheet in Excel where to copy the numerical results.
TopLeft Specifies the Excel cell where the results are copied. Should be in the form
CR where C is Excel column name, R is the row number. For example, A1 is
the top-left cell in the worksheet.
Summary of Numerical Results
The following information is available in the Summary of Numerical Results
Column Description
Variable Variable name.
YMin Histogram minimum.
YMax Histogram maximum.
Spikes The number of spikes used in calculation.
Filter Length The length of all the intervals of the interval filter (if a filter was used) or the
length or the recording session (in seconds).
Mean Freq. Mean firing rate (Spikes/Filter_Length).
Mean Hist. The mean of the histogram bin values.
St. Dev. Hist. The standard deviation of the histogram bin values.
St. Err. Mean. Hist. The standard error of mean of the histogram bin values.
Mean ISI The mean of the interspike intervals.
St. Dev. ISI The standard deviation of the interspike intervals.
Coeff. Var. ISI Coefficient of variation of the interspike intervals.
Median ISI Median of the interspike intervals.
Mode ISI Mode of the interspike intervals.
Page 95
Algorithm
If Use Log Bins and X Axis option is not selected:
The time axis is divided into bins. The first bin is [IntMin, IntMin+Bin). The second bin is [IntMin+Bin,
Intmin+Bin*2), etc. The left end is included in each bin, the right end is excluded from the bin. For each
bin, the number of interspike intervals within this bin is calculated.
For example, for the first bin
bin_count = number of interspike intervals (isi)
such that isi >= IntMin and isi < IntMin + Bin
If Normalization is Counts/Bin, no further calculations are performed.
If Normalization is Probability, bin counts are divided by the number of interspike intervals in the spike
train.
If Normalization is Spikes/Sec, bin counts are divided by NumInt*Bin, where NumInt is the number of
interspike intervals in the spike train.
If Use Log Bins and X Axis option is selected:
The i-th bin (i=1,2,...) is [IntMin * 10 ^ ((i -1)/D), IntMin * 10 ^ (i/D)), where D is the Number of Bins Per
Decade. For each bin, the number of interspike intervals within this bin is calculated. For discussion on
using logarithm of interspike intervals, see:
Alan D. Dorval, Probability distributions of the logarithm of inter-spike intervals yield accurate entropy
estimates from small datasets. Journal of Neuroscience Methods 173 (2008) 129-139
Page 96

3.10. Autocorrelograms
Autocorrelogram shows the conditional probability of a spike at time t0+t on the condition that there is a
spike at time t0.
Parameters
Parameter Description
XMin Time axis minimum in seconds.
XMax Time axis maximum in seconds.
Bin Bin size in seconds.
Normalization Histogram units (Counts/Bin, Probability or Spikes/Second). See Algorithm
below.
Select Data If Select Data is From Time Range, only the data from the specified (by
Select Data From and Select Data To parameters) time range will be used in
analysis. See also Data Selection Options.
Select Data From Start of the time range in seconds.
Select Data To End of the time range in seconds.
Int. filter type Specifies if the analysis will use a single or multiple interval filters.
Interval filter Specifies the interval filter(s) that will be used to preselect data before
analysis. See also Data Selection Options.
Create filter on-the-fly Specifies if a temporary interval filter needs to be created (and used to
preselect data).
Create filter around Specifies an event that will be used to create a temporary filter.
Start offset Offset (in seconds, relative to the event specified in Create filter around
parameter) for the start of interval for the temporary filter.
End offset Offset (in seconds, relative to the event specified in Create filter around
parameter) for the end of interval for the temporary filter.
Fix overlaps An option to automatically merge the overlapping intervals in the temporary
filter.
Overlay Graphs An option to draw several histograms in each graph. This option requires that
Int. filter type specifies that multiple interval filters will be used (either Table
(row) or Table (col)).
Smooth Option to smooth the histogram after the calculation. See Post-Processing
Options for details.
Smooth Filter Width The width of the smooth filter. See Post-Processing Options for details.
Draw confidence limits An option to draw the confidence limits.
Confidence (%) Confidence level (percent). See Confidence Limits for details.
Conf. mean calculation An option that specifies how the mean firing rate (that is used in the
derivation of the confidence limits) is calculated. There are 2 options: Use
Page 97
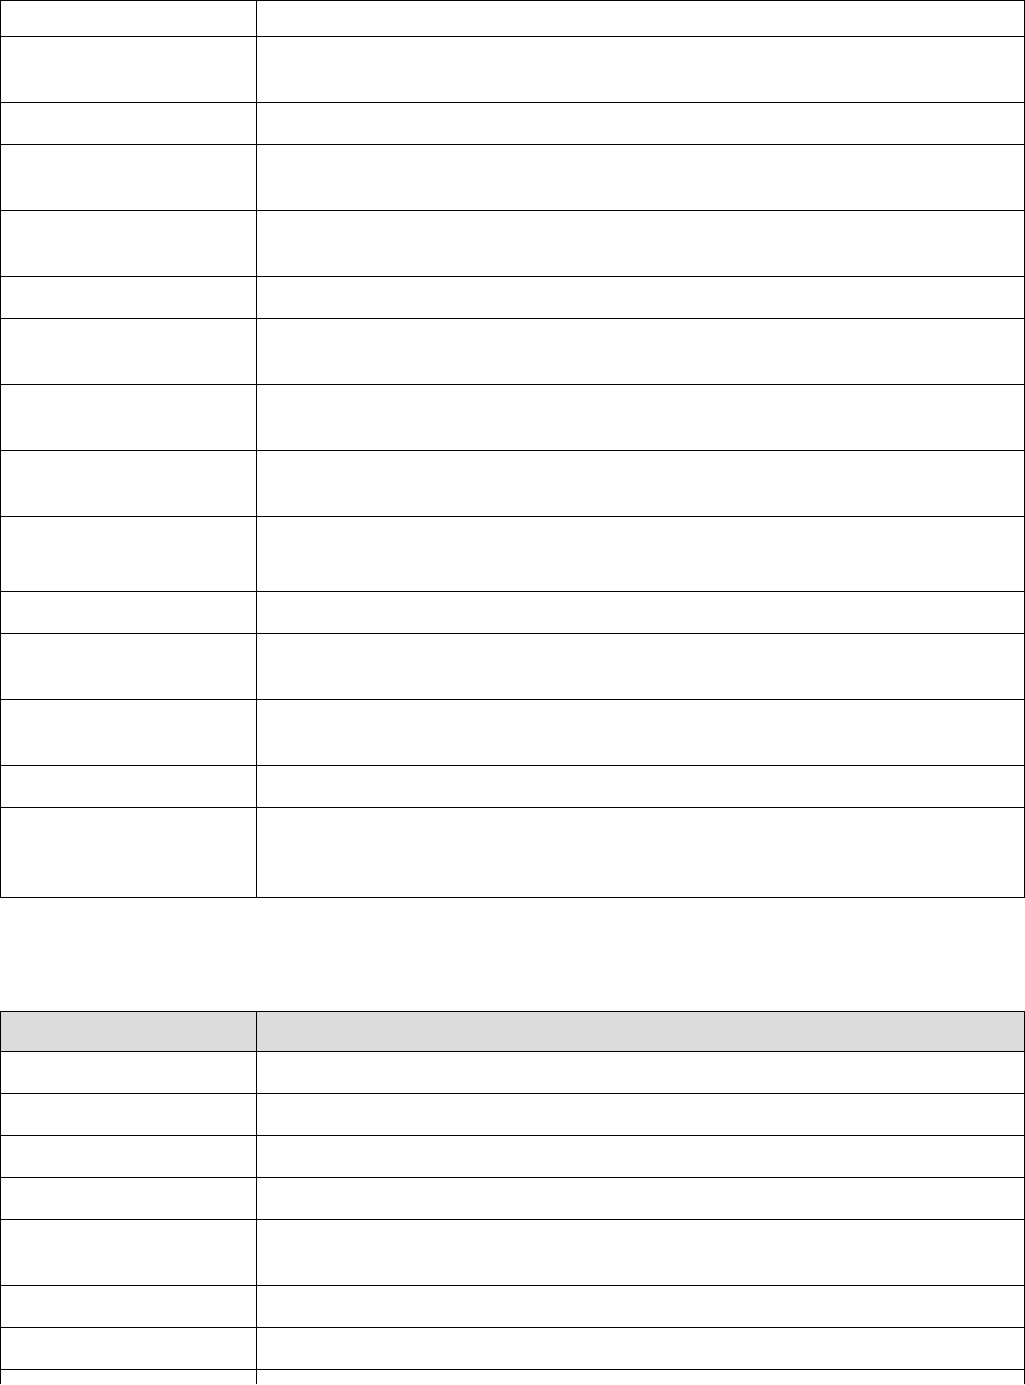
data selection and Use all file. See Confidence Limits for details.
Conf. display An option to draw confidence limits either as horizontal lines or as a colored
background.
Conf. line style Line style for drawing confidence limits (used when Conf. display is Lines ).
Conf. background color Background color for drawing confidence limits (used when Conf. display is
Colored Background ).
Draw mean freq. An option to draw a horizontal line representing the expected histogram value
for a Poisson spike train. See Confidence Limits for details.
Mean line style Line style for drawing mean frequency.
Add to Results / Bin left An option to add an additional vector (containing a left edge of each bin) to
the matrix of numerical results.
Add to Results / Bin
middle
An option to add an additional vector (containing a middle point of each bin)
to the matrix of numerical results.
Add to Results / Bin right An option to add an additional vector (containing a right edge of each bin) to
the matrix of numerical results.
Send to Matlab An option to send the matrix of numerical results to Matlab. See also Matlab
Options.
Matrix Name Specifies the name of the results matrix in Matlab workspace.
Matlab command Specifies a Matlab command that is executed after the numerical results are
sent to Matlab.
Send to Excel An option to send numerical results or summary of numerical results to Excel.
See also Excel Options.
Sheet Name The name of the worksheet in Excel where to copy the numerical results.
TopLeft Specifies the Excel cell where the results are copied. Should be in the form
CR where C is Excel column name, R is the row number. For example, A1 is
the top-left cell in the worksheet.
Summary of Numerical Results
The following information is available in the Summary of Numerical Results
Column Description
Variable Variable name.
YMin Histogram minimum.
YMax Histogram maximum.
Spikes The number of spikes used in calculation.
Filter Length The length of all the intervals of the interval filter (if a filter was used) or the
length or the recording session (in seconds).
Mean Freq. Mean firing rate (Spikes/Filter_Length).
Mean Hist. The mean of the histogram bin values.
Page 98
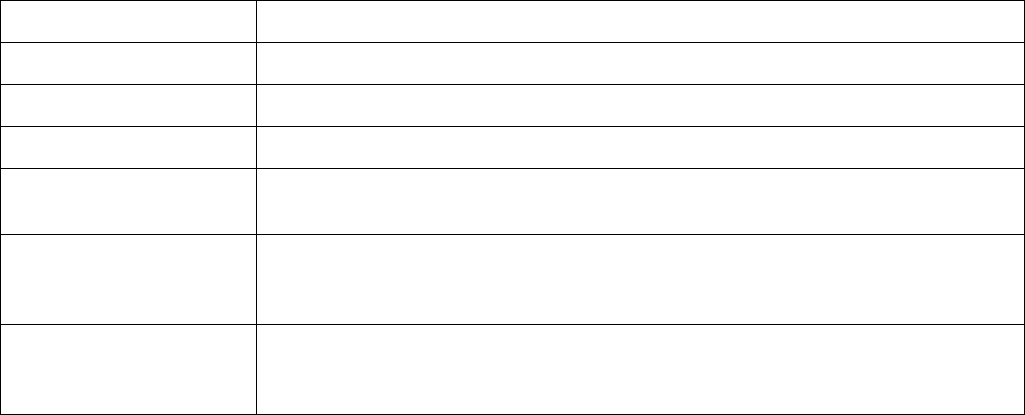
St. Dev. Hist. The standard deviation of the histogram bin values.
Conf. Low Lower confidence level.
Conf. High Upper confidence level.
Mean Expected mean value of the histogram.
Norm. Factor Normalization factor. Bin counts are divided by this value. See Normalization
in Algorithm below.
Time of Minimum Position of the histogram minimum (in seconds). If there are multiple bins in
the histogram where the bin value is equal to the histogram minimum, this
value represents the position of the first such bin.
Time of Maximum Position of the histogram maximum (in seconds). If there are multiple bins in
the histogram where the bin value is equal to the histogram maximum, this
value represents the position of the first such bin.
Algorithm
In general, the Autocorrelogram shows the conditional probability of a spike in the spike train at time t on
the condition that there is a spike at time zero.
The time axis is divided into bins. The first bin is [XMin, XMin+Bin). The second bin is [XMin+Bin,
Xmin+Bin*2), etc. The left end is included in each bin, the right end is excluded from the bin.
Let ts[i] be the spike train (each ts is the timestamp).
For each timestamp ts[k]:
calculate the distances from this spike to all other spikes in the spike train:
d[i] = ts[i] - ts[k]
for each i except i equal to k:
if d[i] is inside the first bin, increment the bin counter for the first bin:
if d[i] >= XMin and d[i] < XMin + Bin
then bincount[1] = bincount[1] +1
if d[i] is inside the second bin, increment the bin counter for the second bin:
if d[i] >= XMin+Bin and d[i] < XMin + Bin*2
then bincount[2] = bincount[2] +1
and so on... .
If Normalization is Counts/Bin, no further calculations are performed.
If Normalization is Probability, bin counts are divided by the number of spikes in the spike train.
Note that the Probability normalization makes sense only for small values of Bin. For Probability
normalization to be valid (so that the values of probability are between 0 and 1), there should be no more
than one spike in each bin. For example, if the Bin value is large and for each ts[k] above there are many
d[i] values such that d[i] >= XMin and d[i] < XMin + Bin, the bin count for the first bin can exceed the
number of spikes in the spike train. Then, the probability value (bincount[1]/number_of_spikes) could be
larger than 1.
If Normalization is Spikes/Sec, bin counts are divided by NumSpikes*Bin, where NumSpikes is the
number of spikes in the spike train.
Page 99
3.11. Perievent Histograms
Perievent Histogram shows the conditional probability of a spike at time t0+t on the condition that there is
a reference event at time t0. For continuous variable, this analysis calculates event-triggered average.
Parameters
Parameter Description
Reference Type Specifies if the analysis will use a single or multiple reference events.
Reference Specifies a reference neuron or event (or a group of reference neurons or
events).
XMin Histogram time axis minimum in seconds.
XMax Histogram time axis maximum in seconds
Bin Bin size in seconds.
Normalization Histogram units (Counts/Bin, Probability, Spikes/Second or Z-score). See
Algorithm below.
No Selfcount An option not to count reference events if the target event is the same as the
reference event (prevents a histogram to have a huge peak at zero when
calculating PSTH versus itself).
Ignore Ref. with Missing
Data
An option not to use reference events (t) that have missing continuous data in
time interval (t+XMin,t+XMax). If this option is not specified and continuous
values are missing for part of (t+XMin,t+XMax), the missing values are
replaced by zero values. This may distort the resulting PSTH (spike-triggered
average).
Select Data If Select Data is From Time Range, only the data from the specified (by
Select Data From and Select Data To parameters) time range will be used in
analysis. See also Data Selection Options.
Select Data From Start of the time range in seconds.
Select Data To End of the time range in seconds.
Int. filter type Specifies if the analysis will use a single or multiple interval filters.
Interval filter Specifies the interval filter(s) that will be used to preselect data before
analysis. See also Data Selection Options.
Create filter on-the-fly Specifies if a temporary interval filter needs to be created (and used to
preselect data).
Create filter around Specifies an event that will be used to create a temporary filter.
Start offset Offset (in seconds, relative to the event specified in Create filter around
parameter) for the start of interval for the temporary filter.
End offset Offset (in seconds, relative to the event specified in Create filter around
parameter) for the end of interval for the temporary filter.
Fix overlaps An option to automatically merge the overlapping intervals in the temporary
filter.
Page 100
Overlay Graphs An option to draw several histograms in each graph. This option requires that
Int. filter type specifies that multiple interval filters will be used (either Table
(row) or Table (col)).
Overlay Options Specifies line colors and line styles for overlaid graphs.
Smooth Option to smooth the histogram after the calculation. See Post-Processing
Options for details.
Smooth Filter Width The width of the smooth filter. See Post-Processing Options for details.
Draw confidence limits An option to draw the confidence limits.
Confidence (%) Confidence level (percent). See Confidence Limits for details.
Conf. mean calculation An option that specifies how the mean firing rate (that is used in the
derivation of the confidence limits) is calculated. There are 3 options: Use
data selection, Use all file and Use pre-ref data. See Confidence Limits for
details. Note that Use pre-ref data option can only be used for a stimulation
type data, i.e. when the distance between any two consecutive reference
events is larger than XMax-XMin. See Confidence Limits for details.
Conf. display An option to draw confidence limits either as horizontal lines or as a colored
background.
Conf. line style Line style for drawing confidence limits (used when Conf. display is Lines ).
Conf. background color Background color for drawing confidence limits (used when Conf. display is
Colored Background ).
Draw mean freq. An option to draw a horizontal line representing the expected histogram value
for a Poisson spike train. See Confidence Limits for details.
Mean line style Line style for drawing mean frequency.
Draw Cusum An option to draw a cumulative sum graph above the histogram. See
Cumulative Sum Graphs for details.
Add to Results / Bin left An option to add an additional vector (containing a left edge of each bin) to
the matrix of numerical results.
Add to Results / Bin
middle
An option to add an additional vector (containing a middle point of each bin)
to the matrix of numerical results.
Add to Results / Bin right An option to add an additional vector (containing a right edge of each bin) to
the matrix of numerical results.
Background An option on how to calculate the histogram background for the peak and
through analysis. See Peak and Trough Statistics below.
Peak width Peak width (the number of bins in peak) in the peak and through analysis.
See Peak and Trough Statistics below.
Left shoulder Specifies the left shoulder value (in seconds) in the peak and through
analysis. See Peak and Trough Statistics below.
Right shoulder Specifies the right shoulder value (in seconds) in the peak and through
analysis. See Peak and Trough Statistics below.
Send to Matlab An option to send the matrix of numerical results to Matlab. See also Matlab
Options.
Page 101
Matrix Name Specifies the name of the results matrix in Matlab workspace.
Matlab command Specifies a Matlab command that is executed after the numerical results are
sent to Matlab.
Send to Excel An option to send numerical results or summary of numerical results to Excel.
See also Excel Options.
Sheet Name The name of the worksheet in Excel where to copy the numerical results.
TopLeft Specifies the Excel cell where the results are copied. Should be in the form
CR where C is Excel column name, R is the row number. For example, A1 is
the top-left cell in the worksheet.
Summary of Numerical Results
The following information is available in the Summary of Numerical Results
Column Description
Variable Variable name.
Reference Reference variable name.
NumRefEvents The number of reference events used in calculation.
YMin Histogram minimum.
YMax Histogram maximum.
Spikes The number of spikes used in calculation.
Filter Length The length of all the intervals of the interval filter (if a filter was used) or the
length or the recording session (in seconds).
Mean Freq. Mean firing rate (Spikes/Filter_Length).
Mean Hist. The mean of the histogram bin values.
St. Dev. Hist. The standard deviation of the histogram bin values.
St. Err. Mean. Hist. The standard error of mean of the histogram bin values.
Conf. Low Lower confidence level.
Conf. High Upper confidence level.
Mean Expected mean value of the histogram. If Z-score normalization is specified,
this value is zero and the expected mean value of the histogram with
Counts/Bin normalization is shown in Z-score Mean.
Norm. Factor Normalization factor. Bin counts are divided by this value. See Normalization
in Algorithm below.
Z-score mean Expected mean value of the histogram before Z-score normalization (in other
words, confidence mean). See Confidence Limits for details .
Mean Before Ref. Mean of the histogram before the reference event (i.e. for all the bins before
zero on time axis).
Bins Before Ref. The number of bins before the bin that contains zero on time axis.
Page 102
Zero Bin The index of the bin that contains zero on time axis.
Background Mean The mean of the histogram background for the peak and trough analysis. See
Peak and Through Statistics below.
Background Stdev The standard deviation of the histogram background for the peak and trough
analysis. See Peak and Trough Statistics below.
Peak Z-score Peak Z-score. See Peak and Trough Statistics below.
Peak/Mean Histogram peak value divided by the background mean value.
Peak Position Peak position (in seconds).
Peak Half Height The Y value of the half height of the peak, i.e. histogram_background_mean
+ (peak-mean)/2.
Peak Width at Half
Height
Peak width at the peak half height level (in seconds).
Trough Z-score Trough Z-score. See Peak and Trough Statistics below.
Trough/Mean Histogram trough value divided by the background mean value.
Trough Position Trough position (in seconds).
Trough Half Height The Y value of the half height of the trough, i.e. histogram_background_mean
+ (trough-mean)/2.
Trough Width at Half
Height
Trough width at the trough half height level (in seconds).
Algorithm
In general, the Perievent Histogram shows the conditional probability of a spike in the spike train at time
t0+t on the condition that there is a reference event (or reference spike) at time t0.
The time axis is divided into bins. The first bin is [XMin, XMin+Bin). The second bin is [XMin+Bin,
XMin+Bin*2), etc. The left end is included in each bin, the right end is excluded from the bin.
Let ref[i] be the array of timestamps of the reference event,
ts[i] be the spike train (each ts is the timestamp)
For each timestamp ref[k]:
1) calculate the distances from this event (or spike) to all the spikes in the spike train:
d[i] = ts[i] - ref[k]
2) for each i:
if d[i] is inside the first bin, increment the bin counter for the first bin:
if d[i] >= XMin and d[i] < XMin + Bin
then bincount[1] = bincount[1] +1
if d[i] is inside the second bin, increment the bin counter for the second bin:
if d[i] >= XMin+Bin and d[i] < XMin + Bin*2
then bincount[2] = bincount[2] +1
and so on... .
If Normalization is Counts/Bin, no further calculations are performed.
Page 103
•
•
•
•
•
•
•
•
•
If Normalization is Probability, bin counts are divided by the number of reference events.
Note that the Probability normalization makes sense only for small values of Bin. For Probability
normalization to be valid (so that the values of probability are between 0 and 1), there should be no more
than one spike in each bin. For example, if the Bin value is large and for each ref[k] above there are
many d[i] values such that d[i] >= XMin and d[i] < XMin + Bin, the bin count for the first bin can exceed
the number of reference events. Then, the probability value (bincount[1]/number_of_reference_events)
could be larger than 1.
If Normalization is Spikes/Sec, bin counts are divided by NumRefEvents*Bin, where NumRefEvents is
the number of reference events.
If Normalization is Z-score, bin_value = (bin_count - Confidence_mean)/sqrt(Confidence_mean), where
Confidence_mean is the expected mean bin count calculated according to Conf. mean calculation
parameter. Please note that bin counts are assumed to have Poisson distribution (therefore, standard
deviation is equal to square root of expected mean) and Z-score can be considered to have Normal
distribution only for large values (more than 10) of the Confidence_mean.
For continuous variables, the mean of the variable values is calculated for each bin around reference
event. These mean values are then averaged across all the timestamps of the reference event.
Peak and Trough Statistics
NeuroExplorer calculates the histogram peak statistics the following way:
Maximum of the histogram is found
If the histogram contains several maxima with the same value, peak statistics are not calculated
Otherwise, the center of the bin, where the histogram reaches maximum, is shown as Peak
Position in the Summary of Numerical results
The mean M and standard deviation S of the bin values of the histogram background are calculated:
If Background parameter is set as Bins outside peak/trough, bins outside peak and trough (i.e., bins
that are more than PeakWidth/2 away from the bin with the histogram maximum and the bin with the
histogram minimum) are used to calculate M and S If Background parameter is set as Shoulders,
bins that are to the left of Left Shoulder or to the right of Right Shoulder parameters are used to
calculate M and S
The value M (mean of the background bin values) is shown as Background Mean in the Summary
of Numerical results
The value S (standard deviation of the background bin values) is shown as Background Stdev in
the Summary of Numerical results
The value (HistogramMaximum - M)/S is shown as Peak Z-score
The value (HistogramMaximum + M)/2 is shown as Peak Half Height
Histogram intersects a horizontal line drawn at Peak Half Height at time points TLeft and TRight.
(TRight - TLeft) is shown as Peak Width
Histogram trough statistics are calculated in a similar way. The only difference is that histogram minimum
instead of histogram maximum is analyzed.
Page 104
3.12. Crosscorrelograms
Crosscorrelogram shows the conditional probability of a spike at time t0+t on the condition that there is a
reference event at time t0.
Compared to PSTH (that calculates the same probabilities), crosscorrelogram allows to use shift-
predictors.
Parameters
Parameter Description
Reference Type Specifies if the analysis will use a single or multiple reference events.
Reference Specifies a reference neuron or event (or a group of reference neurons or
events).
XMin Histogram time axis minimum in seconds.
XMax Histogram time axis maximum in seconds
Bin Bin size in seconds.
Normalization Histogram units (Counts/Bin, Probability, Spikes/Second or Z-score). See
Algorithm below.
No Selfcount An option not to count reference events if the target event is the same as the
reference event (prevents a histogram to have a huge peak at zero when
calculating crosscorrelogram versus itself).
Select Data If Select Data is From Time Range, only the data from the specified (by
Select Data From and Select Data To parameters) time range will be used in
analysis. See also Data Selection Options.
Select Data From Start of the time range in seconds.
Select Data To End of the time range in seconds.
Int. filter type Specifies if the analysis will use a single or multiple interval filters.
Interval filter Specifies the interval filter(s) that will be used to preselect data before
analysis. See also Data Selection Options.
Count bins in filter An option to normalize each bin individually if the interval filter is used. See
Algorithm section below for detailed discussion.
Create filter on-the-fly Specifies if a temporary interval filter needs to be created (and used to
preselect data).
Create filter around Specifies an event that will be used to create a temporary filter.
Start offset Offset (in seconds, relative to the event specified in Create filter around
parameter) for the start of interval for the temporary filter.
End offset Offset (in seconds, relative to the event specified in Create filter around
parameter) for the end of interval for the temporary filter.
Fix overlaps An option to automatically merge the overlapping intervals in the temporary
filter.
Overlay Graphs An option to draw several histograms in each graph. This option requires that
Page 105
Int. filter type specifies that multiple interval filters will be used (either Table
(row) or Table (col)).
Overlay Options Specifies line colors and line styles for overlaid graphs.
Smooth Option to smooth the histogram after the calculation. See Post-Processing
Options for details.
Smooth Filter Width The width of the smooth filter. See Post-Processing Options for details.
Shift-predictor An option to use shift-predictor. Shift-predictor requires that an interval filter is
used in the analysis. See Using Shift-Predictor for details.
Shift times How many times to calculate shift predictor. See Using Shift-Predictor for
details.
Subtract predictor An option to subtract shift-predictor from crosscorrelogram. See Using Shift-
Predictor for details.
Predictor line style Specifies the line used to draw shift-predictor (if subtract predictor is not
selected).
Draw confidence limits An option to draw the confidence limits.
Confidence (%) Confidence level (percent). See Confidence Limits for details.
Conf. mean calculation An option that specifies how the mean firing rate (that is used in the
derivation of the confidence limits) is calculated. There are 3 options: Use
data selection, Use all file and Use pre-ref data. See Confidence Limits for
details. Note that Use pre-ref data option can only be used for a stimulation
type data, i.e. when the distance between any two consecutive reference
events is larger than XMax-XMin. See Confidence Limits for details.
Conf. display An option to draw confidence limits either as horizontal lines or as a colored
background.
Conf. line style Line style for drawing confidence limits (used when Conf. display is Lines ).
Conf. background color Background color for drawing confidence limits (used when Conf. display is
Colored Background ).
Draw mean freq. An option to draw a horizontal line representing the expected histogram value
for a Poisson spike train. See Confidence Limits for details.
Mean line style Line style for drawing mean frequency.
Draw Cusum An option to draw a cumulative sum graph above the histogram. See
Cumulative Sum Graphs for details.
Add to Results / Bin left An option to add an additional vector (containing a left edge of each bin) to
the matrix of numerical results.
Add to Results / Bin
middle
An option to add an additional vector (containing a middle point of each bin)
to the matrix of numerical results.
Add to Results / Bin right An option to add an additional vector (containing a right edge of each bin) to
the matrix of numerical results.
Background An option on how to calculate the histogram background for the peak and
through analysis. See Peak and Trough Statistics below.
Page 106

Peak width Peak width (the number of bins in peak) in the peak and through analysis.
See Peak and Trough Statistics below.
Left shoulder Specifies the left shoulder value (in seconds) in the peak and through
analysis. See Peak and Trough Statistics below.
Right shoulder Specifies the right shoulder value (in seconds) in the peak and through
analysis. See Peak and Trough Statistics below.
Send to Matlab An option to send the matrix of numerical results to Matlab. See also Matlab
Options.
Matrix Name Specifies the name of the results matrix in Matlab workspace.
Matlab command Specifies a Matlab command that is executed after the numerical results are
sent to Matlab.
Send to Excel An option to send numerical results or summary of numerical results to Excel.
See also Excel Options.
Sheet Name The name of the worksheet in Excel where to copy the numerical results.
TopLeft Specifies the Excel cell where the results are copied. Should be in the form
CR where C is Excel column name, R is the row number. For example, A1 is
the top-left cell in the worksheet.
Summary of Numerical Results
The following information is available in the Summary of Numerical Results
Column Description
Variable Variable name.
Reference Reference variable name.
NumRefEvents The number of reference events used in calculation.
YMin Histogram minimum.
YMax Histogram maximum.
Spikes The number of spikes used in calculation.
Filter Length The length of all the intervals of the interval filter (if a filter was used) or the
length or the recording session (in seconds).
Mean Freq. Mean firing rate (Spikes/Filter_Length).
Mean Hist. The mean of the histogram bin values.
St. Dev. Hist. The standard deviation of the histogram bin values.
St. Err. Mean. Hist. The standard error of mean of the histogram bin values.
Conf. Low Lower confidence level.
Conf. High Upper confidence level.
Mean Expected mean value of the histogram. If Z-score normalization is specified,
this value is zero and the expected mean value of the histogram with
Page 107
Counts/Bin normalization is shown in Z-score Mean.
Norm. Factor Normalization factor. Bin counts are divided by this value. See Normalization
in Algorithm below.
Z-score mean Expected mean value of the histogram before Z-score normalization (in other
words, confidence mean). See Confidence Limits for details .
Mean Before Ref. Mean of the histogram before the reference event (i.e. for all the bins before
zero on time axis).
Bins Before Ref. The number of bins before the bin that contains zero on time axis.
Zero Bin The index of the bin that contains zero on time axis.
Background Mean The mean of the histogram background for the peak and trough analysis. See
Peak and Through Statistics below.
Background Stdev The standard deviation of the histogram background for the peak and trough
analysis. See Peak and Trough Statistics below.
Peak Z-score Peak Z-score. See Peak and Trough Statistics below.
Peak/Mean Histogram peak value divided by the background mean value.
Peak Position Peak position (in seconds).
Peak Half Height The Y value of the half height of the peak, i.e. histogram_background_mean
+ (peak-mean)/2.
Peak Width at Half
Height
Peak width at the peak half height level (in seconds).
Trough Z-score Trough Z-score. See Peak and Trough Statistics below.
Trough/Mean Histogram trough value divided by the background mean value.
Trough Position Trough position (in seconds).
Trough Half Height The Y value of the half height of the trough, i.e. histogram_background_mean
+ (trough-mean)/2.
Trough Width at Half
Height
Trough width at the trough half height level (in seconds).
Algorithm
Crosscorrelogram shows the conditional probability of a spike at time t0+t on the condition that there is a
reference event at time t0.
The time axis is divided into bins. The first bin is [XMin, XMin+Bin). The second bin is [XMin+Bin,
XMin+Bin*2), etc. The left end is included in each bin, the right end is excluded from the bin.
Let ref[i] be the array of timestamps of the reference event,
ts[i] be the spike train (each ts is the timestamp).
For each timestamp ref[k]:
1) calculate the distances from this event (or spike) to all the spikes in the spike train:
d[i] = ts[i] - ref[k]
Page 108
•
•
•
•
2) for each i:
if d[i] is inside the first bin, increment the bin counter for the first bin:
if d[i] >= XMin and d[i] < XMin + Bin
then bincount[1] = bincount[1] +1
if d[i] is inside the second bin, increment the bin counter for the second bin:
if d[i] >= XMin+Bin and d[i] < XMin + Bin*2
then bincount[2] = bincount[2] +1
and so on... .
If Normalization is Counts/Bin, no further calculations are performed.
If Normalization is Probability, bin counts are divided by the number of reference events.
Note that the Probability normalization makes sense only for small values of Bin. For Probability
normalization to be valid (so that the values of probability are between 0 and 1), there should be no more
than one spike in each bin. For example, if the Bin value is large and for each ref[k] above there are
many d[i] values such that d[i] >= XMin and d[i] < XMin + Bin, the bin count for the first bin can exceed
the number of reference events. Then, the probability value (bincount[1]/number_of_reference_events)
could be larger than 1.
If Normalization is Spikes/Sec, bin counts are divided by NumRefEvents*Bin, where NumRefEvents is
the number of reference events.
If Normalization is Z-score, bin_value = (bin_count - Confidence_mean)/sqrt(Confidence_mean), where
Confidence_mean is the expected mean bin count calculated according to Conf. mean calculation
parameter. Please note that bin counts are assumed to have Poisson distribution (therefore, standard
deviation is equal to square root of expected mean) and Z-score can be considered to have Normal
distribution only for large values (more than 10) of the Confidence_mean.
If the option Count Bins In Filter is selected, for normalization Spikes/Second, NeuroExplorer will divide
bin count by NumTimesBinWasInFilter*Bin instead of NumRefEvents*Bin. The problem is that when
the interval filter is used, bins close to XMin and to XMax may often (when a reference event is close to
the beginning or to the end of the interval in the interval filter) be positioned outside the filter and
therefore will not be used for many reference events. Hence, the bins close to 0.0 will be used in analysis
more often than the bins close to XMin and XMax. If the option Count Bins In Filter is selected,
NeuroExplorer will count the number of times each bin was used in the calculation and use this count,
NumTimesBinWasInFilter, (instead of the number of reference events) to normalize the histogram.
Peak and Trough Statistics
NeuroExplorer calculates histogram peak statistics the following way:
Maximum of the histogram is found
If the histogram contains several maxima with the same value, peak statistics are not calculated
Otherwise, the center of the bin, where the histogram reaches maximum, is shown as Peak
Position in the Summary of Numerical results
The mean M and standard deviation S of the bin values of the histogram background are calculated:
If Background parameter is set as Bins outside peak/trough, bins outside peak and trough (i.e., bins
that are more than PeakWidth/2 away from the bin with the histogram maximum and the bin with the
histogram minimum) are used to calculate M and S If Background parameter is set as Shoulders,
bins that are to the left of Left Shoulder or to the right of Right Shoulder parameters are used to
calculate M and S
Page 109
•
•
•
•
•
The value M (mean of the background bin values) is shown as Background Mean in the Summary
of Numerical results
The value S (standard deviation of the background bin values) is shown as Background Stdev in
the Summary of Numerical results
The value (HistogramMaximum - M)/S is shown as Peak Z-score
The value (HistogramMaximum + M)/2 is shown as Peak Half Height
Histogram intersects a horizontal line drawn at Peak Half Height at time points TLeft and TRight.
(TRight - TLeft) is shown as Peak Width
Histogram trough statistics are calculated in a similar way. The only difference is that histogram minimum
instead of histogram maximum is analyzed.
Page 110
•
•
•
•
•
•
•
3.13. Shift-Predictor for Crosscorrelograms
Shift-predictor is defined for a series of trials - you take the spikes of one neuron in trial 1 and correlate
them with the spikes of another neuron in trial 2, etc.
These "trials" are represented in NeuroExplorer as time intervals, i.e. pairs of numbers:
start of interval 1, end of interval 1
start of interval 2, end of interval 2, etc.
To use the shift-predictor, you need to create those "trials" first.
You need an external event that is fired at the beginning of each trial. Suppose Event03 is the event that
happens at the beginning of each trial and each trial lasts 20 seconds.
To create the trial intervals:
click on the New Events! button (or select Edit | Operations on Variables menu command)
in the operations list, select MakeIntervals
in the First Operand, select the external event Event03
set Shift Min to 0. and Shift Max to 20.0
in the New Var Name, type: Trials
press Run the Operation button
close the dialog.
Now, click on the Crosscorrelogram button, select Shift-predictor page and select Trials as an interval
filter and specify other shift-predictor parameters.
Classic Shift-Predictor Algorithm
Suppose we have n trial intervals:
[trial_1_start, trial_1_end], [trial_2_start, trial_2_end], ..., [trial_n_start, trial_n_end]
and we have 2 spike trains:
reference spike train with N timestamps r1, r2, ... , rN;
and target spike train with M timestamps s1, s2, ... , sM.
Shift-predictor for shift = 1 is calculated like this:
Step 1: find all the timestamps ri that are inside the first trial interval [trial_1_start, trial_1_end]
Step 2: find all the timestamps sj that are inside the second trial interval [trial_2_start, trial_2_end]
Step 3: shift all the timestamps ri so that they align with the second trial:
calculate new timestamps pi = ri + (trial_2_start - trial_1_start)
Step 4: calculate a crosscorrelogram between pi and sj
Repeat Steps 1 through 4 with interval [trial_2_start, trial_2_end] in Step 1 and interval [trial_3_start,
trial_3_end] in Step 2.
...
Repeat Steps 1 through 4 with interval [trial_n_start, trial_n_end] in Step 1 and interval [trial_1_start,
trial_1_end] in Step 2. Note that we wrap around the trials: the last trial is correlated with the first one.
Then, calculate shift-predictors for shift = 2:
Repeat Steps 1 through 4 with interval [trial_1_start, trial_1_end] in Step 1 and interval [trial_3_start,
trial_3_end] in Step 2. That is, shift trials by 2.
Page 111
...
And, finally, calculate shift-predictors for shift = Number_of_shifts specified in the shift-predictor options.
Shift-Predictor With Random Shuffle
When using random shuffle, for each shift, we shuffle the trial numbers. That is, we take trial numbers
array tn = [1, 2, 3, ..., n] and randomly shuffle this array. If randomly shuffled array is tn_shuffled, we
correlate trial i with trial tn_shuffled[i].
More on Time Intervals
These time intervals can be used in other analyses in NeuroExplorer to analyze spikes only from those
intervals.
For example, you may have a pre-drug period in the experiment (say, from 0 to 600 seconds) and want
to analyze the spikes from this pre-drug time period.
To do this, you create a new "interval variable" (let's call it "PreDrug") that contains only one interval (0.,
600.) (press "New Intervals!" button to create a new interval variable).
Then you can calculate, for example, the autocorrelograms for the spikes in the pre-drug period by
specifying PreDrug as an "interval filter" in the Data Selection page of the Autocorrelogram parameters
dialog.
Page 112
3.14. Rasters
The raster display shows the spikes as vertical lines (tick) positioned according to the spikes timestamps.
This analysis does not generate numerical results since the raster lines (ticks) are drawn directly from the
data. Some generic analysis statistics are available in the Summary of Numerical Results (see below).
Parameters
Parameter Description
XMin Time axis minimum in seconds.
XMax Time axis maximum in seconds
Select Data If Select Data is From Time Range, only the data from the specified (by
Select Data From and Select Data To parameters) time range will be used in
analysis. See also Data Selection Options.
Select Data From Start of the time range in seconds.
Select Data To End of the time range in seconds.
Interval filter Specifies the interval filter(s) that will be used to preselect data before
analysis. See also Data Selection Options.
Vert. size The size of a raster tick (in percent of the graph height).
Summary of Numerical Results
The following information is available in the Summary of Numerical Results
Column Description
Variable Variable name.
YMin Y axis minimum (added for compatibility with other analyses, always 0).
YMax Y axis maximum (added for compatibility with other analyses, always 1).
Spikes The number of spikes used in calculation.
Filter Length The length of all the intervals of the interval filter (if a filter was used) or the
length or the recording session (in seconds).
Mean Freq. Mean firing rate (Spikes/Filter_Length).
Algorithm
The raster display shows the spikes as vertical lines positioned according to the spikes timestamps.
Page 113
3.15. Perievent Rasters
This analysis shows the timestamps of the selected variable relative to the timestamps of the reference
variable.
Parameters
Parameter Description
Reference Type Specifies if the analysis will use a single or multiple reference events.
Reference Specifies a reference neuron or event (or a group of reference neurons or
events).
XMin Time axis minimum in seconds.
XMax Time axis maximum in seconds
Markers An option to display additional events (as markers - triangles, squares, etc.)
in the perievent raster.
Background Intervals An option to draw intervals in the raster background.
Trial Order This option allows you to specify how the raster lines are drawn. The raster
lines (corresponding to reference events) can be drawn in the order of
reference events (with the first event on top, the last at the bottom of the
perievent raster), or in the reverse order (the first event at the bottom of the
raster display, the last event at the top). This option is ignored if Sort trials
parameter is not None.
Sort trials An option to sort raster lines. By default, the raster lines (corresponding to
reference events) are drawn in the order specified by the Trial Order
parameter. This option allows you to display reference events in a different
order. For example, in behavioral experiments, you can sort the trials
according to the latency of the response.
Sort event Specifies how to identify the timestamps (in Sort ref. variable) that will be
used in sorting.
Sort ref. Specifies event variable that will be used to sort trials.
Histogram An option to draw a histogram.
Bin Histogram bin size in seconds.
Normalization Histogram units (Counts/Bin, Probability or Spikes/Second). See Algorithm
below.
No Selfcount An option not to count reference events if the target event is the same as the
reference event (prevents a histogram to have a huge peak at zero when
calculating PSTH versus itself).
Select Data If Select Data is From Time Range, only the data from the specified (by
Select Data From and Select Data To parameters) time range will be used in
analysis. See also Data Selection Options.
Select Data From Start of the time range in seconds.
Select Data To End of the time range in seconds.
Page 114
Int. filter type Specifies if the analysis will use a single or multiple interval filters.
Interval filter Specifies the interval filter(s) that will be used to preselect data before
analysis. See also Data Selection Options.
Create filter on-the-fly Specifies if a temporary interval filter needs to be created (and used to
preselect data).
Create filter around Specifies an event that will be used to create a temporary filter.
Start offset Offset (in seconds, relative to the event specified in Create filter around
parameter) for the start of interval for the temporary filter.
End offset Offset (in seconds, relative to the event specified in Create filter around
parameter) for the end of interval for the temporary filter.
Fix overlaps An option to automatically merge the overlapping intervals in the temporary
filter.
Smooth histogram An option to smooth the histogram after the calculation. See Post-Processing
Options for details.
Smooth Filter Width The width of the smooth filter. See Post-Processing Options for details.
Summary of Numerical Results
The following information is available in the Summary of Numerical Results
Column Description
Variable Variable name.
Reference Reference variable name.
NumRefEvents The number of reference events used in calculation.
YMin Histogram minimum.
YMax Histogram maximum.
Spikes The number of spikes used in calculation.
Filter Length The length of all the intervals of the interval filter (if a filter was used) or the
length or the recording session (in seconds).
Mean Freq. Mean firing rate (Spikes/Filter_Length).
Mean Hist. The mean of the histogram bin values.
St. Dev. Hist. The standard deviation of the histogram bin values.
St. Err. Mean. Hist. The standard error of mean of the histogram bin values.
Algorithm
For the perievent histogram calculation, see Perievent Histograms.
Let ref[i] be the array of timestamps of the reference event,
sortref[i] be the array of timestamps of the sort event.
Page 115

If Sort Trials is selected, the following algorithm is used:
1) for each timestamp ref[k], NeuroExplorer finds the smallest sortref[i], such that
sortref[i] > ref[k]
2) the distance between two events is calculated:
dist[k] = sortref[i] - ref[k]
3) the trials ref[k] are sorted array sorted in ascending or descending order of dist[k].
Continuous variables can also be used in this analysis. However, you may prefer to use PeriEvent
Rasters for Continuous Variables analysis.
For each ref[k], NeuroExplorer calculates a series of bins. The first bin is:
[ref[k]+XMin, ref[k]+XMin+Bin]
the second bin is [ref[k]+XMin+Bin, ref[k]+XMin+Bin+Bin], etc.
Then, the average value of a continuous variable is calculated within each of the bins and this average
value is displayed using the color scale. If bin does not contain any timestamps of the continuous
variable, the previous value of the continuous variable is used.
Page 116
3.16. Joint PSTH
Joint PSTH matrix shows the correlations of the two neurons around the reference events.
Parameters
Parameter Description
XMin Time axis minimum in seconds.
XMax Time axis maximum in seconds
Bin Bin size in seconds.
Reference Specifies a reference neuron or event.
Bottom Neuron The neuron of event shown along the horizontal axis (the vertical axis shows
a neuron selected for analysis).
Diag The width (in seconds) of the area in the scatter matrix around its main
diagonal used to calculate the main diagonal histogram.
Normalization Scatter matrix normalization.
Select Data If Select Data is From Time Range, only the data from the specified (by
Select Data From and Select Data To parameters) time range will be used in
analysis. See also Data Selection Options.
Select Data From Start of the time range in seconds.
Select Data To End of the time range in seconds.
Int. filter type Specifies if the analysis will use a single or multiple interval filters.
Interval filter Specifies the interval filter(s) that will be used to preselect data before
analysis. See also Data Selection Options.
Create filter on-the-fly Specifies if a temporary interval filter needs to be created (and used to
preselect data).
Create filter around Specifies an event that will be used to create a temporary filter.
Start offset Offset (in seconds, relative to the event specified in Create filter around
parameter) for the start of interval for the temporary filter.
End offset Offset (in seconds, relative to the event specified in Create filter around
parameter) for the end of interval for the temporary filter.
Fix overlaps An option to automatically merge the overlapping intervals in the temporary
filter.
Smooth Option to smooth the histograms (not the scatter matrix) after the calculation.
See Post-Processing Options for details.
Smooth Filter Width The width of the smooth filter. See Post-Processing Options for details.
Send to Matlab An option to send the matrix of numerical results to Matlab. See also Matlab
Options.
Matrix Name Specifies the name of the results matrix in Matlab workspace.
Page 117
Matlab command Specifies a Matlab command that is executed after the numerical results are
sent to Matlab.
Send to Excel An option to send numerical results or summary of numerical results to Excel.
See also Excel Options.
Sheet Name The name of the worksheet in Excel where to copy the numerical results.
TopLeft Specifies the Excel cell where the results are copied. Should be in the form
CR where C is Excel column name, R is the row number. For example, A1 is
the top-left cell in the worksheet.
Matrix Scale An option on how to draw the scatter matrix (color or black and white).
Font size (% matrix) Font size in percent of scatter matrix height.
Summary of Numerical Results
The following information is available in the Summary of Numerical Results
Column Description
Variable Variable name.
YMin Y axis minimum (added for compatibility with other analyses, always 0).
YMax Y axis maximum (added for compatibility with other analyses, always 1).
Spikes The number of spikes of the neuron shown on the vertical axis used in
calculation.
Filter Length The length of all the intervals of the interval filter (if a filter was used) or the
length or the recording session (in seconds).
Mean Freq. Mean firing rate (Spikes/Filter_Length).
Hist. norm. Normalization factor. Histogram bin counts are divided by this value.
Color scale minimum Scatter matrix color scale minimum.
Color scale maximum Scatter matrix color scale maximum.
Algorithm
The main Joint PSTH matrix shows the correlations of the bin counts of two neurons around the
reference events. Histograms to the left of and below the matrix are standard perievent histograms for
two specified neurons. The first histogram to the right of the matrix shows the correlations of near-
coincident spikes around the reference events. The far-right histogram shows correlations of firings of
two neurons around reference events.
See the following paper for details on Joint PSTH analysis:
M. H. J. Aertsen, G. L. Gerstein, M. K. Habib and G. Palm. Dynamics of Neuronal Firing Correlation:
Modulation of "Effective Connectivity" J. Neurophysiol., Vol. 61, pp. 900-917, 1989.
Page 118
3.17. Cumulative Activity Graphs
The cumulative activity display shows a stepwise function which makes a jump at the moment of spike
and stays constant between the spikes.
Parameters
Parameter Description
XMin Time axis minimum in seconds.
XMax Time axis maximum in seconds
Summary of Numerical Results
The following information is available in the Summary of Numerical Results
Column Description
Variable Variable name.
YMin Y axis minimum.
YMax Y axis maximum.
Spikes The number of spikes used in calculation.
Mean Freq. Mean firing rate.
Algorithm
The cumulative activity display shows the stepwise function, which makes a jump at the moment of spike
and stays constant between the spikes.
Page 119
3.18. Instant Frequency
The instant frequency display shows the instantaneous frequency of the spike train (at the end of each
interspike interval, the inverted interspike interval is drawn as a vertical line).
Parameters
Parameter Description
XMin Time axis minimum in seconds.
XMax Time axis maximum in seconds
Graph Style An option to draw vertical lines or points.
Summary of Numerical Results
The following information is available in the Summary of Numerical Results
Column Description
Variable Variable name.
YMin Y axis minimum.
YMax Y axis maximum.
Spikes The number of spikes used in calculation.
Mean Freq. Mean firing rate.
Algorithm
The instant frequency display shows the instantaneous frequency of the spike train.
For each spike that occurred at time t[i] it draws the vertical line
from point ( t[i], 0.) to point (t[i], 1/(t[i] - t[i-1])),
where t[i-1] is the time of the preceding spike.
In other words, at the end of each interspike interval, the inverted interspike interval is drawn as a vertical
line.
Page 120

3.19. Interspike Intervals vs. Time
The intervals vs. time graph displays interspike intervals against time (at the end of each interspike
interval, the point is drawn with the Y coordinate equal to the interspike interval).
Parameters
Parameter Description
XMin Time axis minimum in seconds.
XMax Time axis maximum in seconds
Summary of Numerical Results
The following information is available in the Summary of Numerical Results
Column Description
Variable Variable name.
YMin Y axis minimum.
YMax Y axis maximum.
Spikes The number of spikes used in calculation.
Mean Freq. Mean firing rate.
Algorithm
The intervals vs. time graph displays interspike intervals against time.
For each spike that occurred at time t[i] it draws the point with the coordinates
(t[i], t[i] - t[i-1]),
where t[i-1] is the time of the preceding spike.
In other words, at the end of each interspike interval, the point is drawn with the Y coordinate equal to the
interspike interval.
Page 121
3.20. Poincare Maps
For each spike, a point is displayed where the X coordinate of the point is the current interspike interval
and Y coordinate of the point is the preceding interspike interval.
Parameters
Parameter Description
Min Interval Time axis minimum in seconds.
Max Interval Time axis maximum in seconds
Log Axis Scale An option to use Log10 axis scales.
Select Data If Select Data is From Time Range, only the data from the specified (by
Select Data From and Select Data To parameters) time range will be used in
analysis. See also Data Selection Options.
Select Data From Start of the time range in seconds.
Select Data To End of the time range in seconds.
Int. filter type Specifies if the analysis will use a single or multiple interval filters.
Interval filter Specifies the interval filter(s) that will be used to preselect data before
analysis. See also Data Selection Options.
Summary of Numerical Results
The following information is available in the Summary of Numerical Results
Column Description
Variable Variable name.
YMin Y axis minimum.
YMax Y axis maximum.
Spikes The number of spikes used in calculation.
Mean Freq. Mean firing rate.
Algorithm
For each spike that occurred at time t[i], Poincare plot shows the point with the coordinates
(t[i] - t[i-1], t[i-1] - t[i-2]).
That is, the X coordinate of the point is the current interspike interval and Y coordinate of the point is the
preceding interspike interval.
Page 122
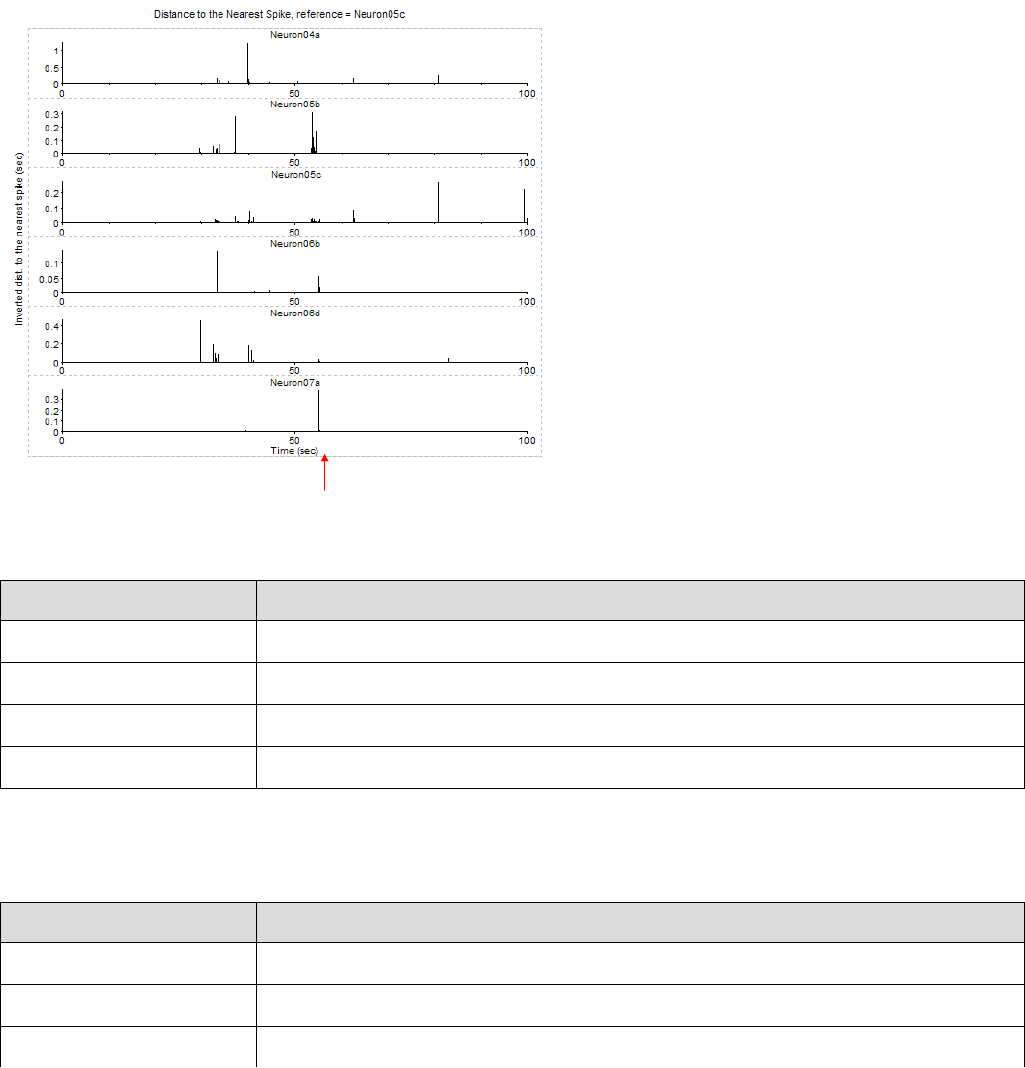
3.21. Synchrony vs. Time
For each spike, this graph shows the distance from this spike to the closest spike (timestamp) in the
reference event.
This analysis is useful in identifying the moments in time when several neurons are in sync with the
reference neuron. To do this, you need to select Inverted Distance. Then, high values will indicate spikes
that are close to each other. Also, it is useful to specify that the graphs are shown in 1 column (in Num.
Columns in Properties panel).
The red arrow in the picture below shows a moment in time where several neurons have almost-
synchronous spikes with the reference.
Parameters
Parameter Description
XMin Time axis minimum in seconds.
XMax Time axis maximum in seconds
Reference Reference event.
Distance An option to draw linear or inverted distance.
Summary of Numerical Results
The following information is available in the Summary of Numerical Results
Column Description
Variable Variable name.
YMin Y axis minimum.
YMax Y axis maximum.
Page 123

Spikes
The number of spikes used in calculation.
Mean Freq. Mean firing rate.
Algorithm
For each spike that occurred at time t[i], this graph shows the distance from this spike to the closest spike
(timestamp) in the reference event:
dist = min(abs(t[i] - ref[j])),
where ref[j] is a timestamp of the reference event
If Distance is Linear, the vertical line is drawn
from point ( t[i], 0.) to point (t[i], dist).
If Distance is Inverted, the vertical line is drawn
from point ( t[i], 0.) to point (t[i], 1/dist).
Page 124
3.22. Trial Bin Counts
Trial bin counts analysis computationally is essentially the same as the perievent histogram. The
difference is that the bin counts are saved for each reference event. When used with continuous data, for
each bin and reference vent, the average of the continuous values within the bin is calculated.
Parameters
Parameter Description
Reference Specifies a reference neuron or event.
XMin Histogram time axis minimum in seconds.
XMax Histogram time axis maximum in seconds
Bin Bin size in seconds.
Normalization Histogram units (Counts/Bin, Probability or Spikes/Second). See Algorithm
below.
No Selfcount An option not to count reference events if the target event is the same as the
reference event (prevents a histogram to have a huge peak at zero when
calculating PSTH versus itself).
Select Data If Select Data is From Time Range, only the data from the specified (by
Select Data From and Select Data To parameters) time range will be used in
analysis. See also Data Selection Options.
Select Data From Start of the time range in seconds.
Select Data To End of the time range in seconds.
Interval filter Specifies the interval filter(s) that will be used to preselect data before
analysis. See also Data Selection Options.
Send to Matlab An option to send the matrix of numerical results to Matlab. See also Matlab
Options.
Matrix Name Specifies the name of the results matrix in Matlab workspace.
Matlab command Specifies a Matlab command that is executed after the numerical results are
sent to Matlab.
Send to Excel An option to send numerical results or summary of numerical results to Excel.
See also Excel Options.
Sheet Name The name of the worksheet in Excel where to copy the numerical results.
TopLeft Specifies the Excel cell where the results are copied. Should be in the form
CR where C is Excel column name, R is the row number. For example, A1 is
the top-left cell in the worksheet.
Summary of Numerical Results
The following information is available in the Summary of Numerical Results
Column Description
Page 125
Variable Variable name.
Color Scale Min Color scale minimum.
Color Scale Max Color scale maximum.
Reference Reverence event.
NumRefEvents Number of reference events.
Bin001Mean Mean of all the values for Bin 1.
Bin001SdDev Standard deviation of all the values for Bin 1.
Algorithm
Trial bin counts analysis computationally is essentially the same as the perievent histogram. The
difference is that the bin counts are saved for each reference event. When used with continuous data, for
each bin and reference vent, the average of the continuous values within the bin is calculated.
The time axis is divided into bins. The first bin is [XMin, XMin+Bin). The second bin is [XMin+Bin,
Xmin+Bin*2), etc. The left end is included in each bin, the right end is excluded from the bin.
Let ref[i] be the array of timestamps of the reference event,
ts[i] be the spike train (each ts is the timestamp)
For each timestamp ref[k]:
Set all bin counts to zero:
bincount[i] = 0 for all i
Calculate the distances from this event (or spike) to all the spikes in the spike train:
d[i] = ts[i] - ref[k]
for each i:
if d[i] is inside the first bin, increment the bin counter for the first bin:
if d[i] >= XMin and d[i] < XMin + Bin
then bincount[1] = bincount[1] +1
if d[i] is inside the second bin, increment the bin counter for the second bin:
if d[i] >= XMin+Bin and d[i] < XMin + Bin*2
then bincount[2] = bincount[2] +1
and so on... .
If Normalization is Counts/Bin, no further calculations are performed.
If Normalization is Spikes/Sec, bin counts are divided by Bin.
Page 126
3.23. Power Spectral Densities
This analysis captures the frequency content neuronal rate histograms.
X axis shows frequency in Hz, Y axis shows the values of the power spectral density. The Y axis units
depend on Normalization parameter.
Normalization Y axis units
Raw PSD (Num.Rec.) RateHistBinCounts^2
% of total PSD (Num. Rec.) %
Log of PSD(dB) (Num.Rec.) dB
Raw PSD (Matlab) RateHistBinCounts^2/Hz
Log of PSD (Matlab) dB/Hz
Parameters
Parameter Description
Max Frequency Maximum frequency of the spectrum in Hz
Number of values Number of values in the spectrum.
Window Overlap (%) Window overlap in percent (from 0 to 90).
Window Preprocessing Preprocessing to be done for each window before calculating the spectrum of
the window.
Windowing Function Windowing Function to be applied to each window before calculating the
spectrum of the window.
Discard Incomplete
Windows
Option to discard the last window if it contains less than the expected number
of data points (less than NumberOfFrValues*2 points).
Use Multitaper Algorithm Option to use multi-taper algorithm.
Time-Bandwidth Product Time-Bandwidth Product when using multi-taper algorithm.
Number of Tapers Number of Tapers when using multi-taper algorithm.
Show Frequency From Minimum frequency to be shown in the spectrum graph.
Show Frequency To Maximum frequency to be shown in the spectrum graph.
Normalization Spectrum normalization. See Algorithm below.
Log Frequency Scale An option show Log10 frequency scale.
Smooth Option to smooth the spectrum after the calculation. See Post-Processing
Options for details.
Smooth Filter Width The width of the smooth filter. See Post-Processing Options for details.
Select Data If Select Data is From Time Range, only the data from the specified (by
Select Data From and Select Data To parameters) time range will be used in
analysis. See also Data Selection Options.
Page 127
Select Data From Start of the time range in seconds.
Select Data To End of the time range in seconds.
Int. filter type Specifies if the analysis will use a single or multiple interval filters.
Interval filter Specifies the interval filter(s) that will be used to preselect data before
analysis. See also Data Selection Options.
Create filter on-the-fly Specifies if a temporary interval filter needs to be created (and used to
preselect data).
Create filter around Specifies an event that will be used to create a temporary filter.
Start offset Offset (in seconds, relative to the event specified in Create filter around
parameter) for the start of interval for the temporary filter.
End offset Offset (in seconds, relative to the event specified in Create filter around
parameter) for the end of interval for the temporary filter.
Fix overlaps An option to automatically merge the overlapping intervals in the temporary
filter.
Overlay Graphs An option to draw several histograms in each graph. This option requires that
Int. filter type specifies that multiple interval filters will be used (either Table
(row) or Table (col)).
Overlay Options Specifies line colors and line styles for overlaid graphs.
Add to Results / Bin left An option to add an additional vector (containing a left edge of each bin) to
the matrix of numerical results.
Add to Results / Bin
middle
An option to add an additional vector (containing a middle point of each bin)
to the matrix of numerical results.
Add to Results / Bin right An option to add an additional vector (containing a right edge of each bin) to
the matrix of numerical results.
Send to Matlab An option to send the matrix of numerical results to Matlab. See also Matlab
Options.
Matrix Name Specifies the name of the results matrix in Matlab workspace.
Matlab command Specifies a Matlab command that is executed after the numerical results are
sent to Matlab.
Send to Excel An option to send numerical results or summary of numerical results to Excel.
See also Excel Options.
Sheet Name The name of the worksheet in Excel where to copy the numerical results.
TopLeft Specifies the Excel cell where the results are copied. Should be in the form
CR where C is Excel column name, R is the row number. For example, A1 is
the top-left cell in the worksheet.
Summary of Numerical Results
The following information is available in the Summary of Numerical Results
Column Description
Page 128

Variable Variable name.
YMin Spectrum minimum.
YMax Spectrum maximum.
Spikes The number of spikes used in spectrum calculation.
Filter Length The length of all the intervals of the interval filter (if a filter was used) or the
length or the recording session (in seconds).
Mean Freq. Mean firing rate (Spikes/Filter_Length).
Frequency of Minimum The position of the minimum of the displayed spectrum (in Hz). If there are
multiple bins in the spectrum where the spectrum value is equal to the
spectrum minimum, this value represents the frequency of the first such bin.
Frequency of Maximum The position of the maximum of the displayed spectrum (in Hz). If there are
multiple bins in the spectrum where the spectrum value is equal to the
spectrum maximum, this value represents the frequency of the first such bin.
Algorithm
Spectral Densities for Spike Trains and Events
Spectral Densities are defined only for continuously recorded signals, so series of timestamps (neurons
and events) need to be converted to continuously recorded signals to calculate the spectra.
NeuroExplorer uses rate histograms to represent spike trains as continuous signals. Rate histogram
parameters are calculated using the following formulas:
Bin = 1./(2.* Maximum_Frequency )
NumberofBins = 2* Number_of_Frequency_Values
The rate histogram over the whole analysis time period is split up into data segments (or windows) of
length N (where N is NumberOfBins), overlapping by D points. If overlap is 50%, then D is N/2.
For each segment, the signal is preprocessed according to Window Preprocessing parameter. For
example, if Subtract Mean is selected, ProcessedSignal[i] = Signal[i] - meanOfSignalInSegment.
The overlapping segments are then windowed: after the data is split up into overlapping segments, the
individual data segments have a window applied to them (that is, ProcessedWindowedSignal[i] =
ProcessedSignal[i]*WindowValue[i]; the window is specified by the Windowing Function).
Most window functions afford more influence to the data at the center of the segment than to data at the
edges, which represents a loss of information. To mitigate that loss, the individual data segments are
commonly overlapped in time (as in the above step).
After doing the above, the periodogram is calculated by computing the discrete Fourier transform, and
then computing the squared magnitude of the result. The individual periodograms are then time-
averaged, which reduces the variance of the individual power measurements. The end result is an array
of power measurements vs. frequency "bin".
For multi-taper spectral estimate, several periodograms (tapers) are calculated for each segment. Each
taper is calculated by applying a specially designed windowing function (Slepian function, see
http://en.wikipedia.org/wiki/Multitaper ). All the tapers for a given segment are then averaged to form the
periodogram of the segment. The individual segment periodograms are then time-averaged.
Page 129
See http://www.spectraworks.com/Help/mtmtheory.html for a discussion on selecting Multi-Taper
parameters.
Normalization
If Normalization is Raw PSD (Numerical Recipes), the power spectrum is normalized so that the sum of
all the spectrum values is equal to the mean squared value of the rate histogram. The formulas (13.4.10)
of Numerical Recipes in C are used (squared fft values are divided by Nb^2 where Nb is the number of
values in data window, NumberofBins above). (Numerical Recipes in C, Press, Flannery, et al.
(Cambridge University Press, 1992))
If Normalization is % of Total PSD (Numerical Recipes), the power spectrum is normalized so that the
sum of all the spectrum values equals 100.
If Normalization is Log of PSD (Numerical Recipes), the power spectrum is calculated using the formula:
power_spectrum[i] = 10.*log10(raw_spectrum[i])
where raw_spectrum is calculated as described above in Raw PSD (Numerical Recipes).
If Normalization is Raw PSD (Matlab), the power spectrum is normalized as described in
http://www.mathworks.com/help/signal/ug/psd-estimate-using-fft.html (squared fft values are divided by
Fs*Nb, where Fs is sampling rate, Nb is the number of values in window, NumberOfBins defined above).
If Normalization is Log of PSD (Matlab), the power spectrum is calculated using the formula:
power_spectrum[i] = 10.*log10(raw_spectrum_matlab[i])
where raw_spectrum_matlab is calculated as described above in Raw PSD (Matlab).
Page 130
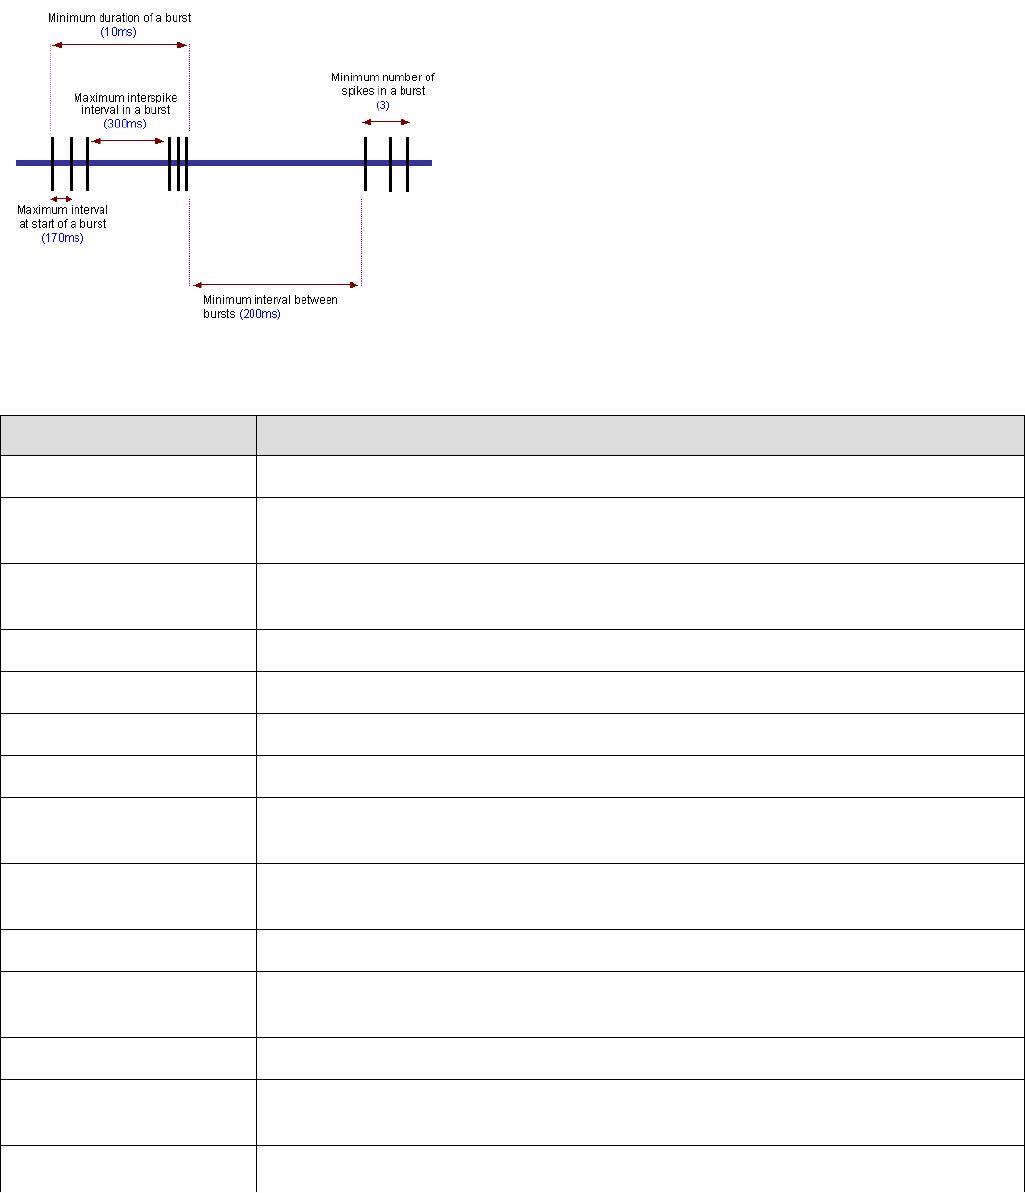
3.24. Burst Analysis
This analysis identifies bursts in spike trains. Burst start and end times, duration of each burst and other
burst statistics are calculated.
For each neuronal variable, a new interval variable can also be created that would contain the time
intervals corresponding to bursts.
Parameters
Parameter Description
Algorithm Selection of MaxInterval, Surprise or Firing Rate Based algorithms.
Max Interval Maximum interspike interval to start the burst (in seconds, MaxInterval
method).
Max End Interval Maximum interspike interval to end the burst (in seconds, MaxInterval
method).
Min Interburst Interval Minimum interval between bursts (in seconds, MaxInterval method).
Min Burst Duration Minimum burst duration (in seconds, MaxInterval method).
Min Number of Spikes Minimum number of spikes in the burst (MaxInterval method).
Min Surprise Minimum surprise of the burst (Surprise method).
Surprise Method Min.
Num. Spikes
Minimum number of spikes in the burst (Surprise method).
Surprise Method Min.
Duration
Minimum burst duration (Surprise method).
Surprise Merge Bursts Merge bursts (Surprise method).
Surprise Min. Interburst
Interval (sec)
Merge bursts if interburst interval is less than this parameter (Surprise
method).
Firing Rate Method Bin Firing Rate Method Bin (seconds).
Firing Rate Method
Smooth Width
Width of the Gaussian filter used in Firing Rate Method.
Firing Rate Method Firing Rate Method Threshold (number of standard deviations).
Page 131

Threshold
Firing Rate Method
Minimum Number of
Spikes in Burst
Firing Rate Method Minimum Number of Spikes in Burst.
Display Specifies what burst statistics to display.
Add Burst Interval Vars. An option to create interval variables containing time intervals corresponding
to bursts.
Select Data If Select Data is From Time Range, only the data from the specified (by
Select Data From and Select Data To parameters) time range will be used in
analysis. See also Data Selection Options.
Select Data From Start of the time range in seconds.
Select Data To End of the time range in seconds.
Interval filter Specifies the interval filter(s) that will be used to preselect data before
analysis. See also Data Selection Options.
Send to Excel An option to send numerical results or summary of numerical results to Excel.
See also Excel Options.
Sheet Name The name of the worksheet in Excel where to copy the numerical results.
TopLeft Specifies the Excel cell where the results are copied. Should be in the form
CR where C is Excel column name, R is the row number. For example, A1 is
the top-left cell in the worksheet.
Summary of Numerical Results
The following information is available in the Summary of Numerical Results
Column Description
Variable Variable name.
YMin Burst rate histogram minimum.
YMax Burst rate histogram maximum.
Spikes The number of spikes used in spectrum calculation.
Filter Length The length of all the intervals of the interval filter (if a filter was used) or the
length or the recording session (in seconds).
Mean Frequency Mean firing rate (Spikes/Filter_Length).
Num Bursts Number of bursts.
Bursts Per Second Burst rate in bursts per second.
Bursts Per Minute Burst rate in bursts per minute.
% of Spikes in Bursts Percent of spikes in bursts.
Mean Burst Duration Mean duration of burst (in seconds).
St. Dev. of Burst
Duration
Standard deviation of burst duration.
Page 132
•
•
•
•
•
Mean Spikes in Burst Average number of spikes in burst.
St. Dev. of Spikes in
Burst
Standard deviation of the number of spikes in burst.
Mean ISI Burst Mean interspike interval in burst.
St. Dev of ISI in Burst Standard deviation of interspike intervals in burst.
Mean Freq. in Burst Mean firing rate (1/interspike_interval) in burst.
St. Dev. of Freq. in Burst Standard deviation of (1/interspike_interval) in burst.
Mean Peak Frequency
in Burst
Mean of (1/min_interspike_interval), where min_interspike_interval is the
minimum interspike interval in a burst.
St. Dev. Peak
Frequency in Burst
Standard deviation of (1/min_interspike_interval), where
min_interspike_interval is the minimum interspike interval in a burst.
Mean Interburst Interval Average length (in seconds) of interburst interval. Interburst interval is the
interval from the end of the previous burst to the start of the current burst.
St. Dev. of Interburst
Interval
Standard deviation of the interburst intervals.
Mean Burst Surprise Average burst surprise.
St. Dev. Burst Surprise Standard deviation of burst surprise.
Algorithm
For each spike train, NeuroExplorer identifies bursts and calculates burst start and end times, burst
duration, number of spikes in burst, mean ISI in burst and peak frequency (1/min_interspike_interval) in
burst. Optionally, creates a new Interval variable and stores all the burst intervals in this variable.
MaxInterval Method
Find all the bursts using the following algorithm:
Scan the spike train until an interspike interval is found that is less than or equal to Max. Interval.
While the interspike intervals are less than Max. End Interval, they are included in the burst.
If the interspike interval is more than Max. End Interval, the burst ends.
Merge all the bursts that are less than Min. Interval Between Bursts apart.
Remove the bursts that have duration less than Min. Duration of Burst or have fewer spikes than
Min. Number of Spikes.
Surprise Method
1) First the mean firing rate ( Freq ), mean interspike interval ( MeanISI ) and median interspike interval (
MedianISI ) of the neuron are calculated.
Freq = NumberOfSpikes / (FileEndTime - FileStartTime)
MeanISI = 1 / Freq
ISIToStartBurst = MeanISI / 2
ISIToEndBurst = MeanISI
2) NeuroExplorer scans the spike train until it finds two sequential ISI's so that each of those ISIs is less
than ISIToStartBurst. The surprise of the resulting 3-spike sequence is calculated:
Page 133
If we assume that a random variable P has a Poisson distribution with parameter Freq and we also
assume that the burst has N spikes and the distance from the first to the last spike of the burst is T, then
the surprise of the burst is:
S = - log10 (Probability that P has at least N points in a time interval of length T )
3) NeuroExplorer adds the spikes to the end of the burst until the first ISI that is more than
ISIToEndBurst and calculates surprise for each of the bursts (with 3 initial spikes, 4 spikes, 5 spikes,
etc.) The burst with maximum surprise Smax is then selected.
4) NeuroExplorer removes the spikes from the beginning of the burst and calculates the surprise for
each of the reduced bursts. The burst with maximum surprise Smax is then selected.
5) If Smax is more than MinSurprise and the number of spikes in the burst is more than 3,
NeuroExplorer adds the burst to the result.
Firing Rate Based Method
1) Firing rate histogram with the specified bin size is calculated.
2) Rate histogram is smoothed using Gaussian smooth filter of the specified width. See Post-Processing
Options for details of filter design.
3) Mean and Standard Deviation (STD) of the smoothed rate histogram are calculated.
4) Bins that have smooth histogram values of more than Mean+STD*Firing_Rate_Method_Threshold are
considered to be in the burst. Burst start is the first spike in the burst bins, burst end is the last spike in
the burst bins.
5) Bursts that have fewer spikes than the specified Minimum Number of Spikes in Burst are removed.
Reference
Legendy C.R. and Salcman M. (1985): Bursts and recurrences of bursts in the spike trains of
spontaneously active striate cortex neurons. J. Neurophysiology, 53(4):926-39.
Page 134
3.25. Principal Component Analysis
This analysis calculates eigenvalues and eigenvectors (principal components) of the matrix of
correlations of rate histograms. The analysis creates population vectors corresponding to the principal
components.
Parameters
Parameter Description
Bin Bin size in seconds.
Vectors Prefix A string specifying how the population vector names will be generated. For
example, if prefix is pca1, the vector names will be pca1_01, pca1_02, etc.
Select Data If Select Data is From Time Range, only the data from the specified (by
Select Data From and Select Data To parameters) time range will be used in
analysis. See also Data Selection Options.
Select Data From Start of the time range in seconds.
Select Data To End of the time range in seconds.
Interval filter Specifies the interval filter that will be used to preselect data before analysis.
See also Data Selection Options.
Send to Matlab An option to send the matrix of numerical results to Matlab. See also Matlab
Options.
Matrix Name Specifies the name of the results matrix in Matlab workspace.
Matlab command Specifies a Matlab command that is executed after the numerical results are
sent to Matlab.
Send to Excel An option to send numerical results or summary of numerical results to Excel.
See also Excel Options.
Sheet Name The name of the worksheet in Excel where to copy the numerical results.
TopLeft Specifies the Excel cell where the results are copied. Should be in the form
CR where C is Excel column name, R is the row number. For example, A1 is
the top-left cell in the worksheet.
Summary of Numerical Results
The following information is available in the Summary of Numerical Results
Column Description
Variable Variable name and PCA statistics name.
pca1_N The weight of the variable in the N-th eigenvector. The rows at the bottom of
the table also show Eigenvalue of this eigenvector, % of variance it explains,
and the cumulative percent of the variance explained by this and preceding
eigenvectors.
Corr with VAR Correlation with the specified variable.
Page 135
Numerical Results
The Results sheet shows for each neuron the weights this neuron has in all the eigenvectors.
Algorithm
Step 1.
Rate histograms are calculated for each of the selected neurons.
The time axis is divided into bins. The first bin is [0, Bin). The second bin is [Bin, Bin*2), etc. The left
end is included in each bin, the right end is excluded from the bin. For each bin, the number of events
(spikes) in this bin is calculated.
For example, for the first bin
bin_count = number of timestamps (ts) such that ts >= 0 and ts < Bin
Bin counts are calculated in such a way for all the selected variables resulting in a matrix
bin_count[i, j],
where i is the neuron number, j is the bin number.
Step 2.
The matrix of correlations between neurons c[t, s] is calculated:
c[t, s] = correlation between vectors bin_count[t, *] and bin_count[s, *], s, t = 1, ..., number of selected
neurons.
Step 3
The eigenvalues and eigenvectors are calculated for the matrix c[t, s]. The eigenvectors (principal
components) are sorted according to their eigenvalues. The first principal component has the largest
eigenvalue.
Each principal component becomes a new population vector in the data file.
Page 136
3.26. PSTH Versus Time
This analysis shows the dynamics of the perievent histogram over time. It calculates multiple PST
histograms using a "sliding window" in time. Each histogram is shown as a vertical stripe with colors
representing the bin counts. Horizontal axis represents the position of the sliding window in time.
Parameters
Parameter Description
Reference Specifies a reference neuron or event.
XMinPSTH Histogram time minimum in seconds.
XMaxPSTH Histogram time maximum in seconds
BinPSTH Histogram bin size in seconds.
Start Start of the first sliding window in seconds.
Duration Duration of the sliding window in seconds.
Shift How much sliding window is shifted each time.
Number of shifts The number of sliding windows to be used.
Normalization Histogram units (Counts/Bin, Probability or Spikes/Second). See Algorithm
below.
No Selfcount An option not to count reference events if the target event is the same as the
reference event (prevents a histogram to have a huge peak at zero when
calculating PSTH versus itself).
Sliding window axis
direction
Direction of the sliding window axis (horizontal or vertical).
Sliding window axis
alignment
Allows to specify what values are shown in the sliding window axis. There are
two options: Start of Window and Center of Window. Suppose your data has
the strongest correlation at 50 seconds. This means that the window that has
50 seconds as its center will show the highest PST values. If the window
width is 20 seconds, it will be the window [40,60]. If you are using 'Start of
window' option, you will see the peak at 40 instead of 50 seconds. However,
with 'Center of window' option, the peak will be at 50 seconds.
Smooth Option to smooth the histogram after the calculation. See Post-Processing
Options for details.
Smooth Filter Width The width of the smooth filter. See Post-Processing Options for details.
Send to Matlab An option to send the matrix of numerical results to Matlab. See also Matlab
Options.
Matrix Name Specifies the name of the results matrix in Matlab workspace.
Matlab command Specifies a Matlab command that is executed after the numerical results are
sent to Matlab.
Send to Excel An option to send numerical results or summary of numerical results to Excel.
See also Excel Options.
Page 137
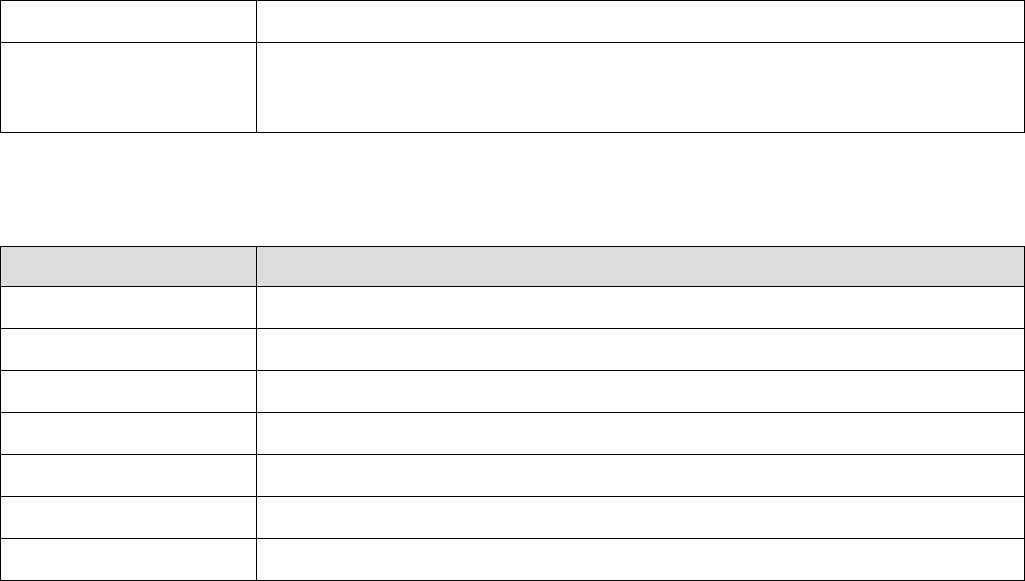
Sheet Name The name of the worksheet in Excel where to copy the numerical results.
TopLeft Specifies the Excel cell where the results are copied. Should be in the form
CR where C is Excel column name, R is the row number. For example, A1 is
the top-left cell in the worksheet.
Summary of Numerical Results
The following information is available in the Summary of Numerical Results
Column Description
Variable Variable name.
Reference Reference variable name.
YMin PSTH minimum.
YMax PSTH maximum.
Color Scale Min PSTH minimum.
Color Scale Max PSTH maximum.
Spikes The number of spikes in the variable.
Algorithm
NeuroExplorer calculates multiple PST histograms (see Perievent Histogram for more information on
how each PSTH is calculated). Each histogram is calculated for a different interval (window) in time:
[window_start[i], window_end[i]], i = 1,..., Number of Shifts.
That is, for each histogram only the timestamps that are within the window are used.
The following rules are used to calculate the windows:
window_start[1] = Start
window_end[1] = Start + Duration
window_start[2] = Start + Shift
window_end[2] = Start + Shift + Duration
...
Page 138
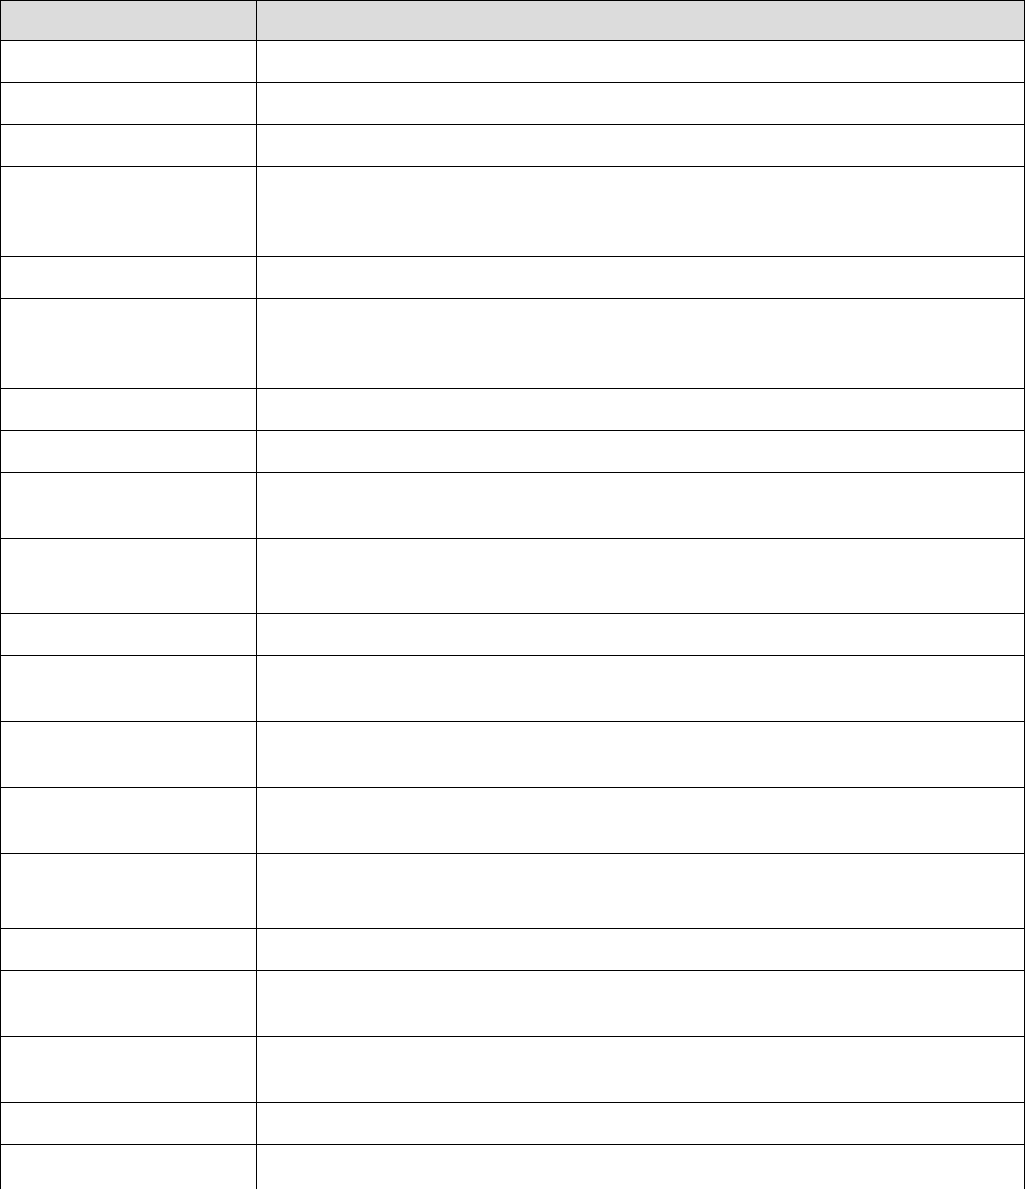
3.27. Correlations with Continuous Variable
This analysis calculates crosscorrelations between a continuously recorded variable and a neuronal firing
rate, or crosscorrelations between a continuously recorded variable and another continuous variable.
Parameters
Parameter Description
Reference Specifies a reference continuous variable.
XMin Time axis minimum in seconds.
XMax Time axis maximum in seconds.
Bin Type An option to specify how the bin value is determined. If this option is Auto,
NeuroExplorer will use the bin equal to the A/D sampling interval of the
reference variable.
Bin Bin size in seconds. Used if Bin Type is set to User defined.
Select Data If Select Data is From Time Range, only the data from the specified (by
Select Data From and Select Data To parameters) time range will be used in
analysis. See also Data Selection Options.
Select Data From Start of the time range in seconds.
Select Data To End of the time range in seconds.
Interval filter Specifies the interval filter(s) that will be used to preselect data before
analysis. See also Data Selection Options.
Smooth Option to smooth the histogram after the calculation. See Post-Processing
Options for details.
Smooth Filter Width The width of the smooth filter. See Post-Processing Options for details.
Add to Results / Bin left An option to add an additional vector (containing a left edge of each bin) to
the matrix of numerical results.
Add to Results / Bin
middle
An option to add an additional vector (containing a middle point of each bin)
to the matrix of numerical results.
Add to Results / Bin right An option to add an additional vector (containing a right edge of each bin) to
the matrix of numerical results.
Send to Matlab An option to send the matrix of numerical results to Matlab. See also Matlab
Options.
Matrix Name Specifies the name of the results matrix in Matlab workspace.
Matlab command Specifies a Matlab command that is executed after the numerical results are
sent to Matlab.
Send to Excel An option to send numerical results or summary of numerical results to Excel.
See also Excel Options.
Sheet Name The name of the worksheet in Excel where to copy the numerical results.
TopLeft Specifies the Excel cell where the results are copied. Should be in the form
Page 139
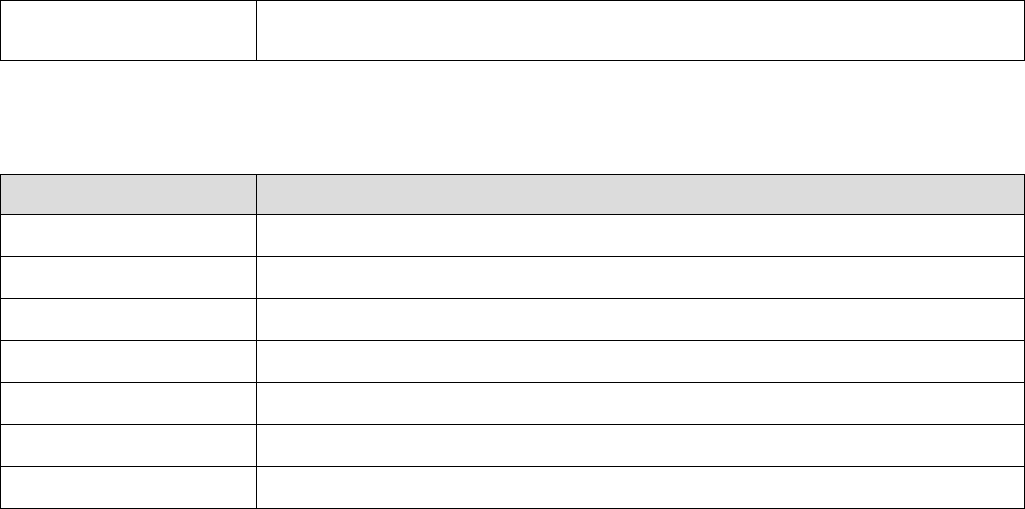
CR where C is Excel column name, R is the row number. For example, A1 is
the top-left cell in the worksheet.
Summary of Numerical Results
The following information is available in the Summary of Numerical Results
Column Description
Variable Variable name.
Reference Reference variable name.
YMin Y axis minimum.
YMax Y axis maximum.
Mean Hist. Mean of all the correlation values for this variable.
St. Dev. Hist Standard deviation of all the correlation values for this variable.
St. Err. Mean Hist Standard error of mean of all the correlation values for this variable.
Algorithm
This analysis calculates standard correlograms for two (continuously recorded) vectors. For spike trains
and events, NeuroExplorer first calculates the rate histograms with the specified bin size, and then
calculates the correlations between the reference variable and the rate histogram.
If x[i], i=1,...N is the vector of all the values of the reference variable with sampling rate SR and y[i],
i=1,...,N is the vector of all the values of another continuous variable or values of spike train rate
histogram, then
correlation[lag_n_seconds] = Pearson correlation between vectors
{ x[1], x[2], ..., x[N-lag_in_samples] }
and
{ y[1+lag_in_samples], y[2+lag_in_samples], ..., y[N] }
where lag_in_samples = lag_in_seconds*SR.
Let's consider the following example. We have continuous variable Cont1. We create continuous variable
Cont2 by running shift operation on Cont1 with shift=0.02s.
For each value of time t, we have Cont1[t] = Cont2[t+0.02]. This means that if reference is Cont1 and
lag_in_seconds = 0.02s, we will calculate Pearson correlation of identical vectors. That is, our correlation
result will have the highest value close to 1.0 at 0.02 seconds.
Page 140

3.28. Regularity Analysis
This analysis estimates the regularity of neuronal firing after the stimulation.
Parameters
Parameter Description
Reference Specifies a reference event or spike train.
XMin Time axis minimum in seconds.
XMax Time axis maximum in seconds.
Bin Bin size in seconds. Used if Bin Type is set to User defined.
Select Data If Select Data is From Time Range, only the data from the specified (by
Select Data From and Select Data To parameters) time range will be used in
analysis. See also Data Selection Options.
Select Data From Start of the time range in seconds.
Select Data To End of the time range in seconds.
Interval filter Specifies the interval filter that will be used to preselect data before analysis.
See also Data Selection Options.
ISI Graph This parameter determines how the mean ISI values is displayed in the
graph.
SD Graph This parameter determines how the standard deviation of ISI is displayed in
the graph.
CV Graph This parameter determines how the CV (coefficient of variation) values are
displayed in the graph.
CV Graph Max This parameter determines the scale for the CV values in the graph. CV
values are scaled from zero (bottom of the graph) to CV Graph Max (top of
the graph).
Add to Results / Bin left An option to add an additional vector (containing a left edge of each bin) to
the matrix of numerical results.
Add to Results / Bin
middle
An option to add an additional vector (containing a middle point of each bin)
to the matrix of numerical results.
Add to Results / Bin right An option to add an additional vector (containing a right edge of each bin) to
the matrix of numerical results.
Summary of Numerical Results
The following information is available in the Summary of Numerical Results
Column Description
Variable Variable name.
NumRefEvents Number of reference events.
YMin Histogram minimum.
Page 141

YMax Histogram maximum.
Spikes The number of spikes used in calculation.
Filter Length The length of all the intervals of the interval filter (if a filter was used) or the
length or the recording session (in seconds).
Mean Freq. Mean firing rate (Spikes/Filter_Length).
Mean Hist. The mean of the histogram bin values (ISI values).
St. Dev. Hist. The standard deviation of the histogram bin values.
St. Dev. ISI The mean value of the SD ISI graph.
CV The mean value of the CV ISI graph.
Algorithm
This analysis estimates the regularity of neuronal firing after the stimulation. The time axis is divided into
bins with the first bin starting at the stimulus sync pulse. Interspike intervals are computed and interval
values are placed in time bins according to the latency of the first spike in the interval (if the end of the ISI
is more than XMax, the interval is not used in the analysis). Then the mean and standard deviation in
each bin are calculated. CV is equal to standard deviation for the bin divided by the mean ISI for the bin.
Let ref[i] be the array of timestamps of the reference event,
ts[i] be the spike train (each ts is the timestamp)
For each timestamp ref[k]:
1a) calculate the distances from this event (or spike) to all the spikes in the spike train:
d[i] = ts[i] - ref[k]
1b) calculate the interspike interval
isi[i] = ts[i+1] - ts[i]
1c) for each i:
if d[i] is inside the first bin ( d[i] >= XMin and d[i] < XMin + Bin )
and d[i] + isi[i] < XMax,
add isi[i] to the series of intervals for the first bin
if d[i] is inside the second bin ( d[i] >= XMin+Bin and d[i] < XMin + Bin*2 )
and d[i] + isi[i] < XMax, add isi[i] to the series of intervals for the second bin
and so on... .
2) for each bin, calculate mean and standard deviation of the series of interspike intervals for this bin.
Reference
E.D. Young, J.-M. Robert and W.P. Shofner. Regularity and latency of units in ventral cochlear nucleus:
implications for unit classification and generation of response properties. J. Neurophysiology, Vol. 60,
1988, 1-29.
Page 142
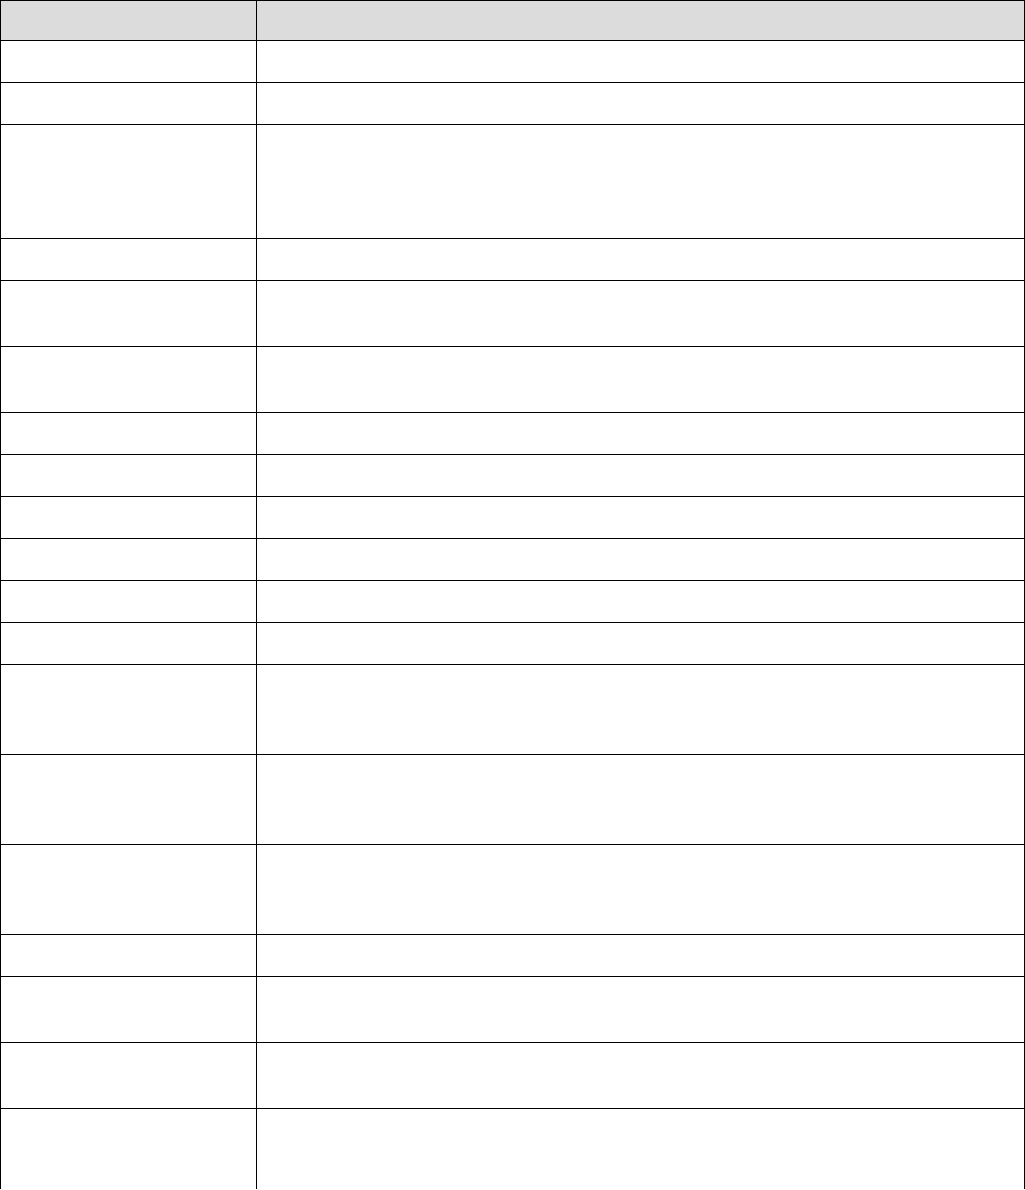
3.29. Place Cell Analysis
This analysis estimates the frequency of neuronal firing as a function of position of an animal. The animal
position should be described by two continuously recorded variables.
Parameters
Parameter Description
X Position Continuous variable that describes X position of the animal.
Y Position Continuous variable that describes Y position of the animal.
Fix Positions This option specifies whether NeuroExplorer needs to fix problems that often
occur in recording of position variables. For example, when LED is obscured
by the wires, both position variables suddenly jump to 0 and then jump back
to the previous position.
Fix Threshold Fix Positions parameter. See Algorithm section below for details.
Fix Bad X Fix Positions parameter. The 'bad' value of X variable. See Algorithm section
below for details.
Fix Bad Y Fix Positions parameter. The 'bad' value of Y variable. See Algorithm section
below for details.
X Min X axis minimum in X Position units.
X Max X axis maximum in X Position units.
Y Min Y axis minimum in Y Position units.
Y Max Y axis maximum in Y Position units.
Number of Bins (X) Number of bins along X axis.
Number of Bins (Y) Number of bins along Y axis.
Display This parameter determines what kind of Place Cell Analysis display is shown
(Path, Firing Positions, Time Spent (in each cell), Number of Visits (to each
cell), Spike Counts (for each cell), Firing Rates (for each cell), Firing Fields).
Min. Time Spent Minimum time spent. This parameter is used only with Firing Rates display. If
the animal spent less time in the cell than Min Time Spent, the firing rate for
the cell is set to zero.
Min Visits Minimum number of visits. This parameter is used only with Firing Rates
display. If the animal visited the cell less than Min Visits number of times, the
firing rate for the cell is set to zero.
Firing Rate Bin Bin size (in seconds) to calculate firing rates.
Min Std. Dev. in Field Minimum standard deviation in the field. See Algorithm section below for
details.
Min. Pixels in Field Minimum number of pixels in the field. See Algorithm section below for
details.
Select Data If Select Data is From Time Range, only the data from the specified (by
Select Data From and Select Data To parameters) time range will be used in
Page 143
analysis. See also Data Selection Options.
Select Data From Start of the time range in seconds.
Select Data To End of the time range in seconds.
Int. filter type Specifies if the analysis will use a single or multiple interval filters.
Interval filter Specifies the interval filter(s) that will be used to preselect data before
analysis. See also Data Selection Options.
Create filter on-the-fly Specifies if a temporary interval filter needs to be created (and used to
preselect data).
Create filter around Specifies an event that will be used to create a temporary filter.
Start offset Offset (in seconds, relative to the event specified in Create filter around
parameter) for the start of interval for the temporary filter.
End offset Offset (in seconds, relative to the event specified in Create filter around
parameter) for the end of interval for the temporary filter.
Fix overlaps An option to automatically merge the overlapping intervals in the temporary
filter.
Smooth Matrix An option to smooth the matrix after the calculation. See Post-Processing
Options for details.
Smooth Radius The radius of the smoothing filter (in cells) See Post-Processing Options for
details.
Smooth Colors An option to smooth colors (blend colors across cells to make smooth color
transitions). This option may require considerable computation time.
Bins with Num Visits
Less than Min
An option on how to display cells where the number of visits is less than the
specified minimum ( Min Visits parameter).
Bins with Time Spent
Less than Min
An option on how to display cells where the time spent is less than the
specified minimum ( Min. Time Spent parameter).
Send to Matlab An option to send the matrix of numerical results to Matlab. See also Matlab
Options.
Matrix Name Specifies the name of the results matrix in Matlab workspace.
Matlab command Specifies a Matlab command that is executed after the numerical results are
sent to Matlab.
Send to Excel An option to send numerical results or summary of numerical results to Excel.
See also Excel Options.
Sheet Name The name of the worksheet in Excel where to copy the numerical results.
TopLeft Specifies the Excel cell where the results are copied. Should be in the form
CR where C is Excel column name, R is the row number. For example, A1 is
the top-left cell in the worksheet.
Summary of Numerical Results
The following information is available in the Summary of Numerical Results
Page 144
Column Description
Variable Variable name.
Spikes The number of spikes used in calculation.
Filter Length The length of all the intervals of the interval filter (if a filter was used) or the
length or the recording session (in seconds).
Position ISI mode Average interval between two consecutive position data points (in seconds).
Mean Firing Rate Mean firing rate (mean of all the firing rates for all the cells).
St. Dev. Firing Rate Standard deviation of the firing rate (st. dev. of all the firing rates for all the
cells).
Firing Fields The number of firing fields.
Field N Num Cells The number of cells in the firing field N.
Field N Centroid X X coordinate of the field N centroid.
Field N Centroid Y Y coordinate of the field N centroid.
Field N Peak Rate Maximum firing rate among the cells inside the firing field N.
Field N Spikes Number of spikes in field N.
Field N Time Spent Total time spend in the field N.
Field N Rate Average firing rate in field N ( Field N Spikes divided by Field N Time Spent ).
Field N Coherence Coherence measures the local smoothness of the firing rate distribution in the
field. It is the Pearson correlation of the firing rate in each cell (pixel) with the
firing rate averaged over the pixel and its 8 nearest neighbors.
Algorithm
If Fix Positions is set to Use 4 Neighbors, NeuroExplorer will analyze X and Y position variables and do
the following:
for each point x[t], calculate the average of its 4 neighbors:
aver = (x[t-2]+x[t-1]+x[t+1]+x[t+2])/4
if abs(x[t] - aver) > FixThreshold, then assign x[t] the average of its neighbors:
x[t] = aver
If Fix Positions is set to Ignore Bad, NeuroExplorer will ignore position points that have coordinates that
are within 0.001 of the specified 'bad' X and X values.
If Fix Positions is set to Interpolate, for each position point that has coordinates that are within 0.001 of
the specified 'bad' X and X values, the X and Y values are interpolated using the closest previous valid
position and the closest next valid position.
The following steps are then performed:
The position space is divided into cells with width ( XMax - XMin )/ Number of Bins (X) and height (
YMax - YMin )/ Number of Bins (Y).
Page 145
For each cell, the number of visits to this cell and the time spent in the cell are calculated.
For each of the neuron firing times, the position of the animal is calculated using linear interpolation of
animal positions before and after the spike.
For each cell, the number of times the neuron fired in this cell is calculated.
With Firing Rates display, if the animal spent less time in the cell than Min Time Spent or visited the cell
less than Min Visits number of times, the firing rate for the cell is set to zero. Otherwise the number of
times the neuron fired in this cell is divided by the time the animal spent in the cell producing the firing
rate for the cell.
Firing Field a set of at least Min. Pixels in Field contiguous cells where each cell in the field shared at
least one side with another cell in the field and each cell had a firing rate greater than (Session_mean +
Min Std. Dev. in Field * Session_st_dev), where Session_mean is the firing rate of the complete
recording session, Session_st_dev is the standard deviation of the mean firing rate. Session_mean and
Session_st_dev are calculated the following way: the recording session is divided into time bins of size
Firing Rate Bin. For each bin i, neuron firing rate R[i] is calculated. Session_mean is the mean of array
R[i], Session_st_dev is the standard deviation of array R[i].
Centroid of field location is the arithmetic mean center of a firing field's spatial firing rate distribution
determined after the coordinates of each cell in the field was multiplied by the firing rate in the cell.
Coherence measures the local smoothness of the firing rate distribution in the field. It is the Pearson
correlation of the firing rate in each cell with the firing rate averaged over the cell and its 8 nearest
neighbors.
Reference
A. Fentona, Gyorgy Csizmadiab, and Robert U. Muller. Conjoint Control of Hippocampal Place Cell Firing
by Two Visual Stimuli I. The Effects of Moving the Stimuli on Firing Field Positions. The Journal of
General Physiology, Volume 116, Number 2, August 1, 2000 191-210.
Page 146
3.30. Reverse Correlation
This analysis is used for estimation of receptive fields in vision research. The analysis calculates the
average visual stimulus that preceded the spike.
Parameters
Parameter Description
Reference the variable that contains timestamps of the stimuli.
Stim. Sequence File The path of the text file that contains the sequence of images used for
stimulation. See Algorithm below for file format description.
Char. per pixel The number of characters per pixel in image file.
Pixels in Row The number of pixels in a row for each stimulus image.
Rows in Image The number of rows of pixels in each stimulus image.
Cache Stim. Data An option to cache stimulus image data. If this option is selected, the image
data is loaded once and stored in memory (until a different stimulus sequence
file is specified). To clear cache, run this analysis once with this option
disabled.
XMin (deg) Minimum of the X axis of the average stimulus display (in degrees).
XMax (deg) Maximum of the X axis of the average stimulus display (in degrees).
YMin (deg) Minimum of the Y axis of the average stimulus display (in degrees).
YMax (deg) Maximum of the Y axis of the average stimulus display (in degrees).
Time Min (sec) Time minimum in seconds.
Time Max (sec) Time maximum. For example, if Time Min = -0.4 and Time Max = 0,
NeuroExplorer will analyze all the stimuli that were presented up to 400 msec
before each spike.
Time Bin (sec) Time bin.
Display This option specifies what view of the average stimulus will be displayed. See
Algorithm below.
Show Slice At This option specifies the slice that will be shown. The units and valid range
depend on the Display option See Algorithm below.
Z Min Color scale minimum.
Z Max Color scale maximum.
Smooth Colors An option to smooth colors of the average stimulus matrix.
Matrix Scale An option on what color scale to use when drawing the matrix.
Send to Matlab An option to send the matrix of numerical results to Matlab. See also Matlab
Options.
Matrix Name Specifies the name of the results matrix in Matlab workspace.
Matlab command Specifies a Matlab command that is executed after the numerical results are
Page 147
•
•
•
•
•
sent to Matlab.
Send to Excel An option to send numerical results or summary of numerical results to Excel.
See also Excel Options.
Sheet Name The name of the worksheet in Excel where to copy the numerical results.
TopLeft Specifies the Excel cell where the results are copied. Should be in the form
CR where C is Excel column name, R is the row number. For example, A1 is
the top-left cell in the worksheet.
Save 3D Matrix An option to save 3D matrix of numerical results in a .csv file. 3D matrix (in X
vs. Y display case) is saved starting from the first slice (at Time Min), then the
second slice, etc. Within the slice, the first row corresponds to Y Min, the first
column corresponds to X Min.
Save File The name of the file that will contain 3D matrix data.
Summary of Numerical Results
The following information is available in the Summary of Numerical Results
Column Description
Variable Variable name.
YMin Y axis minimum.
YMax Y axis maximum.
RefCount Number of reference events (and images used).
Color Scale Min Minimum of color scale.
Color Scale Max Maximum of color scale.
Spikes The number of spikes used in calculation.
Algorithm
Stimulus File Format. NeuroExplorer assumes that the sequence of images used for stimulation is
saved in a text file. The file has the following format:
each line of the file represents a row of pixels in the stimulus image
each pixel is represented by an integer
each pixel has the same number of characters used for its description
images are saved in the file in the order they were presented
images can be (optionally) separated by blank lines
Here is an example of an image file with 2 images (16 pixels per row, 12 rows per image):
0 1 1 1 0 0 0 0 0 0 0 0 0 0 0
0 0 0 0 0 0 0 0 0 0 0 0 0 0 0
0 0 0 0 0 0 0 0 0 0 0 0 0 0 0
0 0 0 0 0 0 0 0 0 0 0 0 0 0 0
0 0 0 0 0 0 0 0 0 0 0 0 0 0 0
0 0 0 0 0 0 0 0 0 0 0 0 0 0 0
0 0 0 0 0 0 0 0 0 0 0 0 0 0 0
0 0 0 0 0 0 0 0 0 0 0 0 0 0 0
0 0 0 0 0 0 0 0 0 0 0 0 0 0 0
Page 148
0 0 0 0 0 0 0 0 0 0 0 0 0 0 0
0 0 0 0 0 0 0 0 0 0 0 0 0 0 0
0 0 0 0 0 0 0 0 0 0 0 0 0 0 0
0 0 0 0 0 0 0 0 0 0 0 0 0 0 0
0 1 1 1 0 0 0 0 0 0 0 0 0 0 0
0 0 0 0 0 0 0 0 0 0 0 0 0 0 0
0 0 0 0 0 0 0 0 0 0 0 0 0 0 0
0 0 0 0 0 0 0 0 0 0 0 0 0 0 0
0 0 0 0 0 0 0 0 0 0 0 0 0 0 0
0 0 0 0 0 0 0 0 0 0 0 0 0 0 0
0 0 0 0 0 0 0 0 0 0 0 0 0 0 0
0 0 0 0 0 0 0 0 0 0 0 0 0 0 0
0 0 0 0 0 0 0 0 0 0 0 0 0 0 0
0 0 0 0 0 0 0 0 0 0 0 0 0 0 0
0 0 0 0 0 0 0 0 0 0 0 0 0 0 0
The computational algorithm works the following way. For each spike of a selected neuron,
NeuroExplorer identifies the images that precede the spike and are within the specified time interval
(between Tmin and Tmax; for example, if Tmin = -0.4 and Tmax = 0, NeuroExplorer will analyze all the
stimuli that were presented up to 400 msec before each spike).
Then, NeuroExplorer calculates the average of the presented stimuli over all the spikes. The result is a 3-
dimensional matrix (with X, Y, and Time dimensions, time axis is divided into bins of the specified size).
Display option identifies what 2-dimensional view of this matrix is presented:
X vs. Y display shows an average stimulus image for the specified time slice
X vs. Time display shows average X pixels of the stimuli for the specified Y value
Y vs. Time display shows average Y pixels of the stimuli for the specified X value
Reference
Izumi Ohzawa, Gregory C. DeAngelis, and Ralph D. Freeman (1996). Encoding of binocular disparity by
simple cells in the cat's visual cortex. J. Neurophysiol. 75: 1779-1805.
Page 149
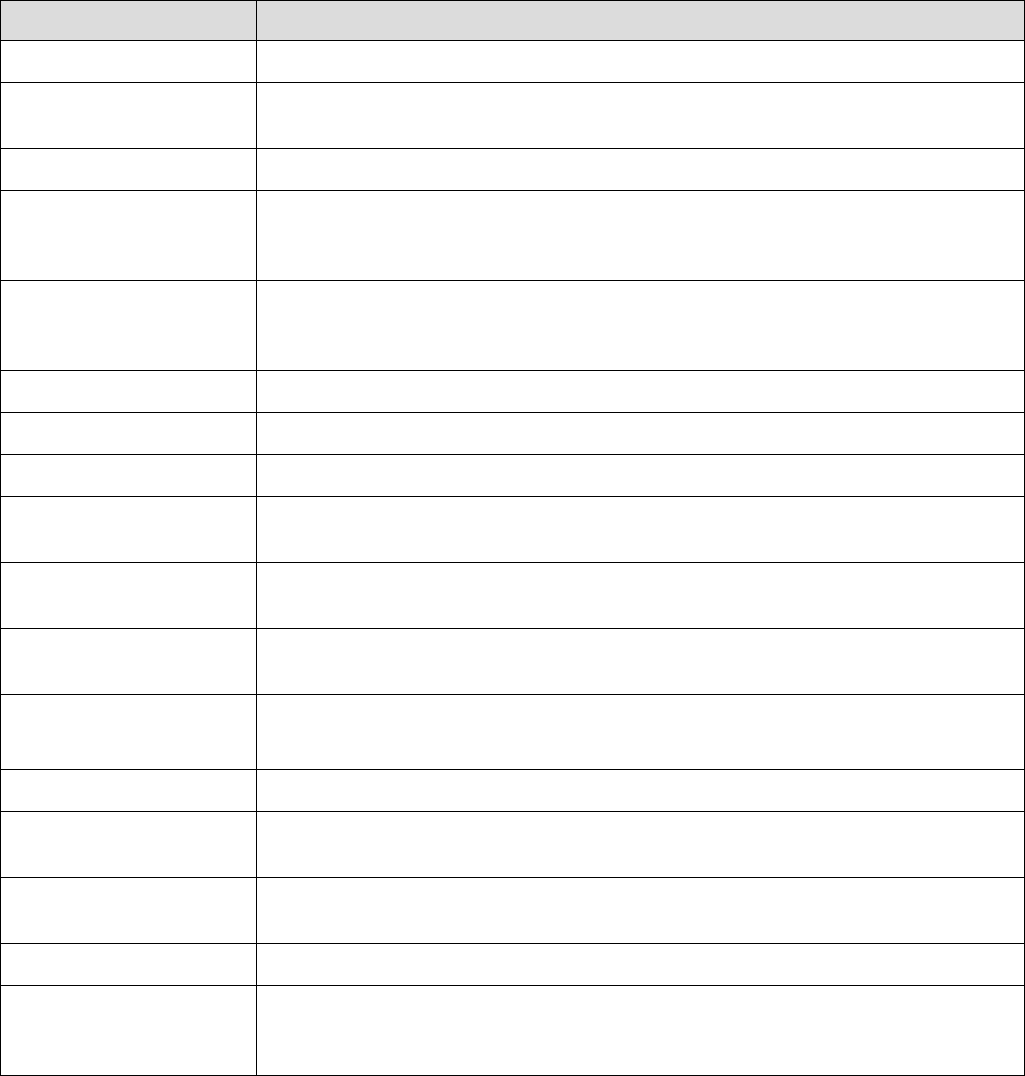
3.31. Epoch Counts
This analysis is very similar to Perievent Histograms. The only distinction is that, instead of calculating
bin counts for consecutive bins of the same size, Epoch Counts analysis can calculate bin counts for bins
(epochs) of any size. Epochs can be of different lengths and can overlap.
Parameters
Parameter Description
Reference Type Specifies if the analysis will use a single or multiple reference events.
Reference Specifies a reference neuron or event (or a group of reference neurons or
events).
Epochs A table of epochs in seconds.
No Selfcount An option not to count reference events if the target event is the same as the
reference event (prevents a histogram to have a huge peak at zero when
calculating PSTH versus itself).
Select Data If Select Data is From Time Range, only the data from the specified (by
Select Data From and Select Data To parameters) time range will be used in
analysis. See also Data Selection Options.
Select Data From Start of the time range in seconds.
Select Data To End of the time range in seconds.
Int. filter type Specifies if the analysis will use a single or multiple interval filters.
Interval filter Specifies the interval filter(s) that will be used to preselect data before
analysis. See also Data Selection Options.
Add to Results / Bin left An option to add an additional vector (containing a left edge of each epoch) to
the matrix of numerical results.
Add to Results / Bin right An option to add an additional vector (containing a right edge of each epoch)
to the matrix of numerical results.
Send to Matlab An option to send the matrix of numerical results to Matlab. See also Matlab
Options.
Matrix Name Specifies the name of the results matrix in Matlab workspace.
Matlab command Specifies a Matlab command that is executed after the numerical results are
sent to Matlab.
Send to Excel An option to send numerical results or summary of numerical results to Excel.
See also Excel Options.
Sheet Name The name of the worksheet in Excel where to copy the numerical results.
TopLeft Specifies the Excel cell where the results are copied. Should be in the form
CR where C is Excel column name, R is the row number. For example, A1 is
the top-left cell in the worksheet.
Summary of Numerical Results
Page 150

The following information is available in the Summary of Numerical Results
Column Description
Variable Variable name.
Reference The name of the reference event.
NumRefEvents The number of reference events.
YMin Minimum epoch count for this variable.
YMax Maximum epoch count for this variable.
Filter Length The length of the interval filter.
Algorithm
Let ref[i] be the array of timestamps of the reference event, ts[i] be the spike train (each ts is the
timestamp) and epochs are specified as EpochStart[j], EpochEnd[j].
For each timestamp ref[k]:
1) calculate the distances from this event (or spike) to all the spikes in the spike train:
d[i] = ts[i] - ref[k]
2) for each i:
if d[i] is inside the first epoch, increment the counter for the first epoch:
if d[i] >= EpochStart[1] and d[i] < EpochEnd[1]
then epochcount[1] = epochcount[1] +1
if d[i] is inside the second epoch, increment the counter for the second epoch:
if d[i] >= EpochStart[2] and d[i] < EpochEnd[2]
then epochcount[2] = epochcount[2] +1
and so on... .
Page 151
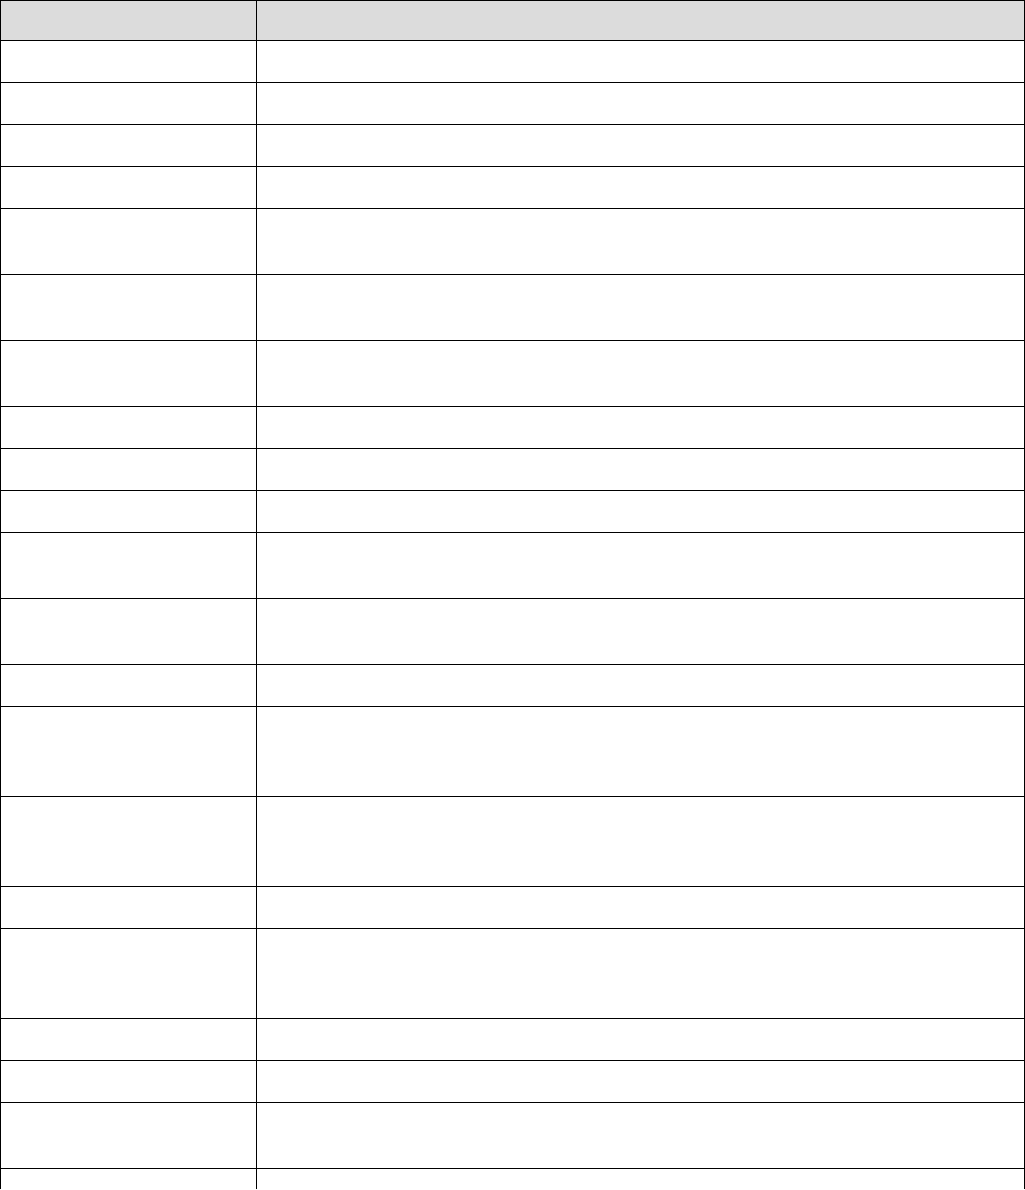
3.32. Coherence Analysis
Coherence is a measure of the degree of relationship, as a function of frequency, between two time
series.
Parameters
Parameter Description
Reference Specifies a reference variable.
Max. Freq. Frequency maximum (Hz).
Number of Fr. Values Number of frequency values.
Window Overlap Percent of window overlaps when calculating FFTs.
Window Preprocessing Preprocessing to be done for each window before calculating the spectrum of
the window.
Windowing Function Windowing Function to be applied to each window before calculating the
spectrum of the window.
Discard Incomplete
Windows
Option to discard the last window if it contains less than the expected number
of data points (less than NumberOfFrValues*2 points).
Use Multitaper Algorithm Option to use multi-taper algorithm.
Time-Bandwidth Product Time-Bandwidth Product when using multi-taper algorithm.
Number of Tapers Number of Tapers when using multi-taper algorithm.
Show Freq. From An option to show a subset of frequencies. Specifies minimum frequency to
be displayed.
Show Freq. To An option to show a subset of frequencies. Specifies maximum frequency to
be displayed.
Calculate Specifies whether coherence values or coherence phases are calculated.
Confidence Level (%) Confidence level (percent) for the coherence values. Can only be calculated if
a single-taper algorithm is used. See Confidence Level Calculation below for
details.
Draw confidence level An option to draw the confidence level. Confidence level is not drawn if
coherence phases are specified in Calculate parameter or if a multi-taper
algorithm is used.
Conf. line style Line style for drawing confidence level.
Select Data If Select Data is From Time Range, only the data from the specified (by
Select Data From and Select Data To parameters) time range will be used in
analysis. See also Data Selection Options.
Select Data From Start of the time range in seconds.
Select Data To End of the time range in seconds.
Interval filter Specifies the interval filter that will be used to preselect data before analysis.
See also Data Selection Options.
Page 152
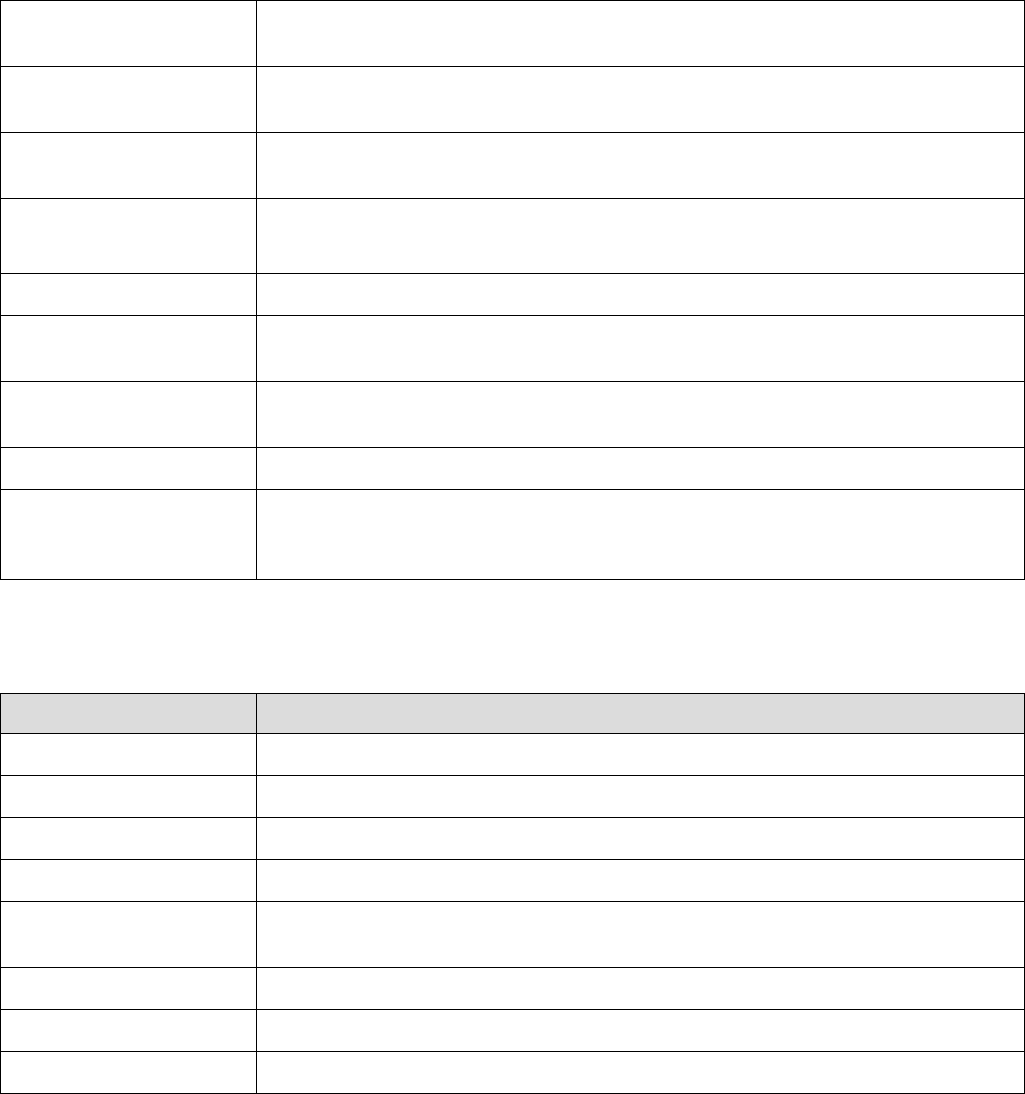
Add to Results / Bin left An option to add an additional vector (containing a left edge of each
frequency bin) to the matrix of numerical results.
Add to Results / Bin
middle
An option to add an additional vector (containing a center of each frequency
bin) to the matrix of numerical results.
Add to Results / Bin right An option to add an additional vector (containing a right edge of each
frequency bin) to the matrix of numerical results.
Send to Matlab An option to send the matrix of numerical results to Matlab. See also Matlab
Options.
Matrix Name Specifies the name of the results matrix in Matlab workspace.
Matlab command Specifies a Matlab command that is executed after the numerical results are
sent to Matlab.
Send to Excel An option to send numerical results or summary of numerical results to Excel.
See also Excel Options.
Sheet Name The name of the worksheet in Excel where to copy the numerical results.
TopLeft Specifies the Excel cell where the results are copied. Should be in the form
CR where C is Excel column name, R is the row number. For example, A1 is
the top-left cell in the worksheet.
Summary of Numerical Results
The following information is available in the Summary of Numerical Results
Column Description
Variable Variable name.
Y Min Y axis minimum.
Y Max Y axis maximum.
Spikes The number of spikes used (for neurons or events).
Rate Hist Bin Bin size of the rate histograms used for the calculations (for neurons or
events).
Filter Length The length of the interval filter.
Mean Freq. Mean firing rate (for neurons or events).
Confidence Level Confidence level for the coherence values.
Algorithm
Neurons and Events
Coherence is defined only for continuously recorded signals, so series of timestamps (neurons and
events) need to be converted to continuously recorded signals to calculate coherence.
NeuroExplorer uses rate histograms to represent spike trains as continuous signals. Rate histogram
parameters are calculated using the following formulas:
Bin = 1./(2.* Maximum_Frequency )
Page 153
NumberOfBins = 2* Number_of_Frequency_Values
The rate histogram over the whole analysis time period is split up into data segments (or windows) of
length N (where N is NumberOfBins), overlapping by D points. If overlap is 50%, then D is N/2.
For each segment, the signal is preprocessed according to Window Preprocessing parameter. For
example, if Subtract Mean is selected, ProcessedSignal[i] = Signal[i] - meanOfSignalInSegment.
The overlapping segments are then windowed: after the data is split up into overlapping segments, the
individual data segments have a window applied to them (that is, ProcessedWindowedSignal[i] =
ProcessedSignal[i]*WindowValue[i]; the window is specified by the Windowing Function).
Most window functions afford more influence to the data at the center of the segment than to data at the
edges, which represents a loss of information. To mitigate that loss, the individual data segments are
commonly overlapped in time (as in the above step).
For two variables X (reference) and Y (target) the following entities are calculated. FFTs of the data
segments (after preprocessing) are calculated. Then, individual and cross-densities are calculated:
Pxx = FFT(X)*Conj(FFT(X)),
Pyy = FFT(Y)*Conj(FFT(Y))
Pxy = FFT(X)*Conj(FFT(Y)).
Here Conj(z) is a complex conjugate of z. Pxx, Pyy and Pxy values are averaged across all intervals and
coherence values are calculated as
Mean(Pxy)*Mean(Pxy) / (Mean(Pxx)*Mean(Pyy)).
Coherence phase values are calculated as phase of Mean(Pxy).
Continuous Variables
For continuous variables, if both the reference and the target variables have the same digitizing
frequency, the FFTs of variable values (after applying preprocessing and tapering window) are calculated
and then resampled to the specified frequency steps. If the reference is a timestamped variable or two
continuous variables have different digitizing rates, the values of continuous variables are averaged
within the specified bins and then FFTs of these averages are calculated.
Calculation of the Confidence Level
Confidence levels can only be calculated if a single-taper algorithm is used.
Confidence levels are calculated as described in Kattla and Lowery (2010). The confidence level Z is
calculated as
Z = 1 - pow(alpha, 1/(w*L - 1))
where
pow(x,y) returns x to the power of y,
alpha = 1 - Confidence_Level*0.01,
L is the number of overlapped windows
w is the correction due to the Hanning window tapering (see eq. (5) and (6) in Kattla and Lowery (2010)).
Reference
Kattla S, Lowery MM. Fatigue related changes in electromyographic coherence between synergistic hand
muscles. Exp Brain Res. 2010 Apr; 202(1):89-99. Epub 2009 Dec 12.
Page 154
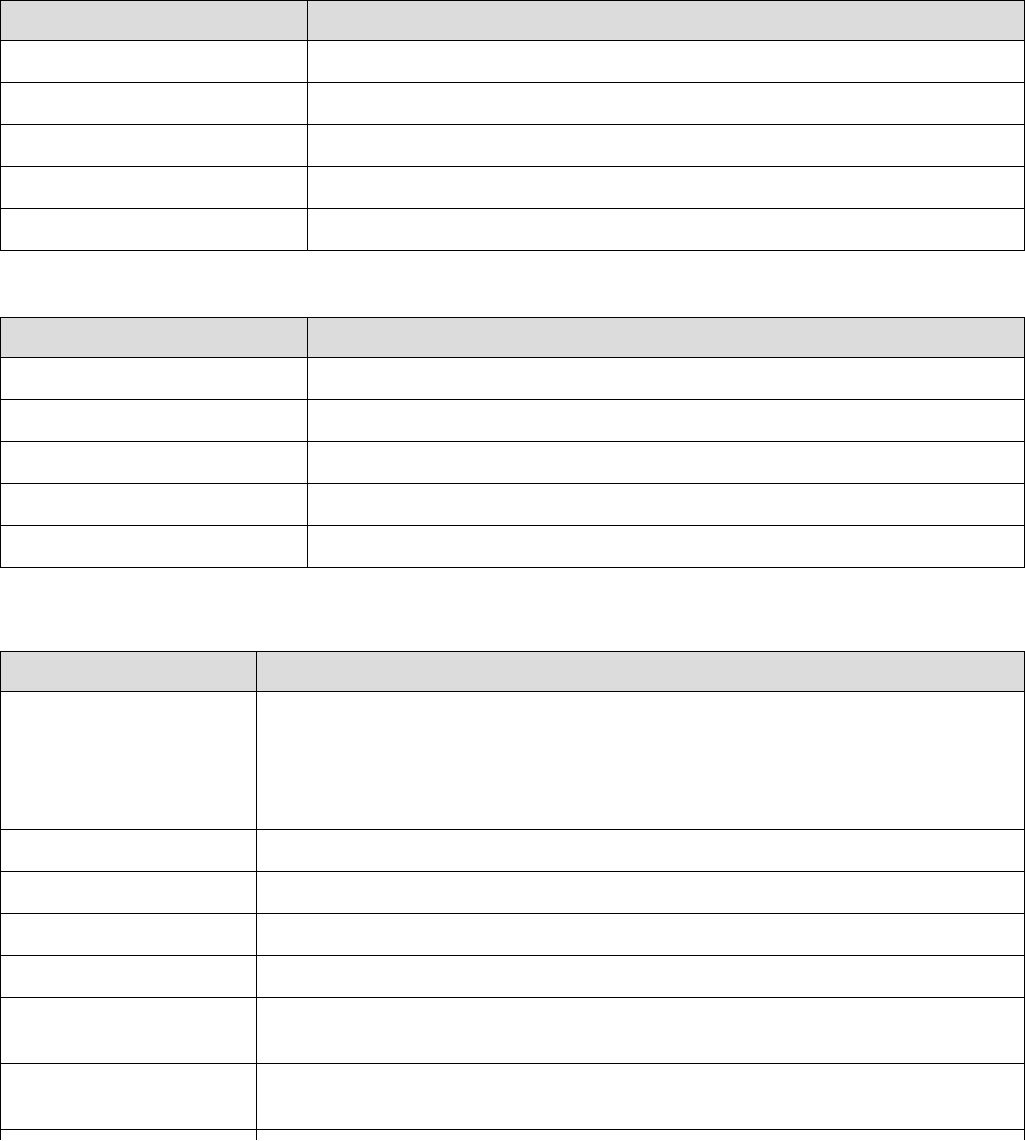
3.33. Spectrogram Analysis
A spectrogram is a visual representation of the spectrum of frequencies of a signal as it varies with time.
This analysis captures the frequency content of continuous variables or neuronal rate histograms.
X axis shows the time in seconds. Y axis shows frequency in Hz. Color scale shows spectrum values.
The color scale units depend on the Normalization parameter.
For continuous variables, the color scale units are:
Normalization Color scale units
Raw PSD (Num.Rec.) mV^2
% of total PSD (Num. Rec.) %
Log of PSD(dB) (Num.Rec.) dB
Raw PSD (Matlab) mV^2/Hz
Log of PSD (Matlab) dB/Hz
For neurons, the color scale units are:
Normalization Color scale units
Raw PSD (Num.Rec.) RateHistBinCounts^2
% of total PSD (Num. Rec.) %
Log of PSD(dB) (Num.Rec.) dB
Raw PSD (Matlab) RateHistBinCounts^2/Hz
Log of PSD (Matlab) dB/Hz
Parameters
Parameter Description
Max. Freq. Maximum frequency for the spectrograms. If at least one continuous variable
is selected, the value of the Maximum Frequency parameter is set as
0.5*Digitizing frequency of the first selected continuous variable. All
continuous variables selected for this analysis should have the same
digitizing rate.
Number of Fr. Values Number of frequency values.
Normalization Spectrum units (see Normalization below).
Start Start of the first window.
Shift Type Option to specify shift in seconds or as a percent of the sliding window width.
Shift (sec) If Shift Type is Absolute, specifies how much sliding window is shifted each
time (in seconds).
Shift (window %) If Shift Type is Window Percent, specifies how much sliding window is
shifted each time as a percent of the overall sliding window width.
Page 155

Number of Shifts total number of sliding windows.
Window Preprocessing Preprocessing to be done for each window before calculating the spectrum of
the window.
Windowing Function Windowing Function to be applied to each window before calculating the
spectrum of the window.
Use Multitaper Algorithm Option to use multi-taper algorithm.
Time-Bandwidth Product Time-Bandwidth Product when using multi-taper algorithm.
Number of Tapers Number of Tapers when using multi-taper algorithm.
Show Freq. From An option to show a subset of frequencies. Specifies minimum frequency to
be displayed.
Show Freq. To An option to show a subset of frequencies. Specifies maximum frequency to
be displayed.
X Axis Allows to specify what values are shown in the sliding window X axis. There
are two options: Start of Window and Center of Window. Suppose your data
has the strongest spectral value at 5 seconds. This means that the window
that has 5 seconds as its center will show the highest spectrum values. If the
window width is 2 seconds, it will be the window [4,6]. If you are using 'Start
of window' option, you will see the peak at 4 instead of 5 seconds. However,
with 'Center of window' option, the peak will be at 5 seconds.
Smooth Option to smooth the spectrum after the calculation. See Post-Processing
Options for details.
Smooth Filter Width The width of the smooth filter. See Post-Processing Options for details.
Color Scale Limit (%) Specifies maximum value for the color scale in percent. Allows you to 'zoom
in' small spectrogram values.
Log Vertical Frequency
Scale
Option to draw logarithmic vertical frequency scale.
Draw Signal above
Spectrogram
Option to draw signal above histogram. The signal is drawn for the time
values specified in X Axis. It is recommended to use Center of Window option
for X Axis (otherwise, the signal will not be aligned to the spectrogram).
Signal Window Height
(%)
The height of the signal window (percent of the total graph window).
Add Freq. Values to
Results
An option to add an additional vector (containing a left edge of each
frequency bin) to the matrix of numerical results.
Send to Matlab An option to send the matrix of numerical results to Matlab. See also Matlab
Options.
Matrix Name Specifies the name of the results matrix in Matlab workspace.
Matlab command Specifies a Matlab command that is executed after the numerical results are
sent to Matlab.
Send to Excel An option to send numerical results or summary of numerical results to Excel.
See also Excel Options.
Sheet Name The name of the worksheet in Excel where to copy the numerical results.
Page 156
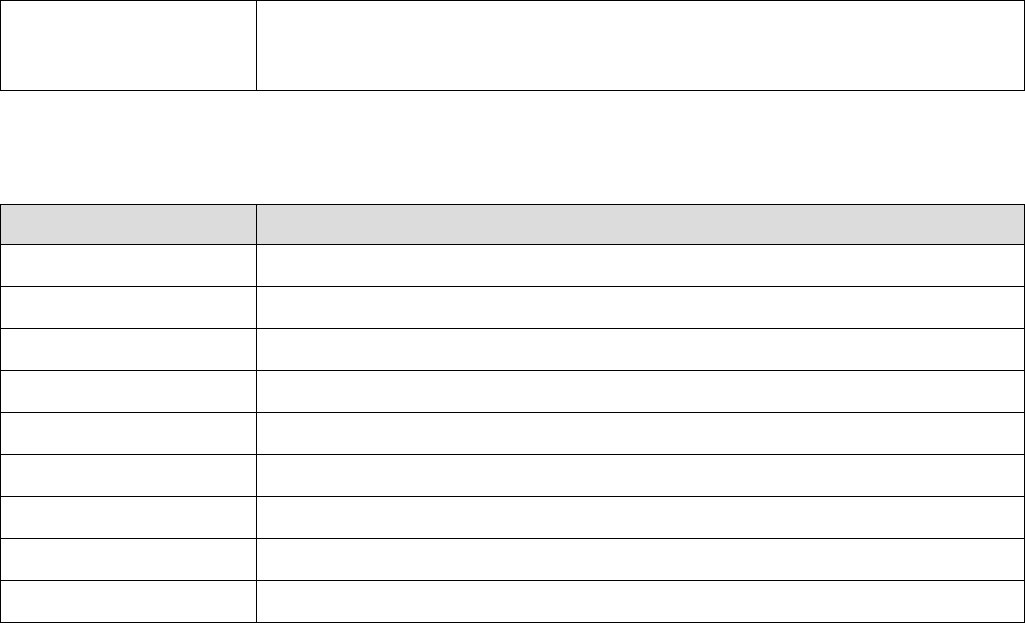
TopLeft Specifies the Excel cell where the results are copied. Should be in the form
CR where C is Excel column name, R is the row number. For example, A1 is
the top-left cell in the worksheet.
Summary of Numerical Results
The following information is available in the Summary of Numerical Results
Column Description
Variable Variable name.
Y Min Y axis minimum.
Y Max Y axis maximum.
Color Scale Min Color scale minimum.
Color Scale Max Color scale maximum.
Max Frequency Used Maximum frequency of the FFTs used.
Rate Histogram Bin Rate histogram bin size in seconds (if used).
Window width FFT window width (seconds).
Actual shift Actual window shift used in analysis.
Algorithm
The power spectrum is calculated for the specified number ( Number of Shifts ) of windows. For each
window:
Normalization
If Normalization is Raw PSD (Numerical Recipes), the power spectrum is normalized so that the sum of
all the spectrum values is equal to the mean squared value of the rate histogram. The formulas (13.4.10)
of Numerical Recipes in C are used. (Numerical Recipes in C, Press, Flannery, et al. (Cambridge
University Press, 1992))
If Normalization is % of Total PSD (Numerical Recipes), the power spectrum is normalized so that the
sum of all the spectrum values equals 100.
If Normalization is Log of PSD (Numerical Recipes), the power spectrum is calculated using the formula:
power_spectrum[i] = 10.*log10(raw_spectrum[i])
where raw_spectrum is calculated as described above in Raw PSD (Numerical Recipes).
If Normalization is Raw PSD (Matlab), the power spectrum is normalized as described in
http://www.mathworks.com/help/signal/ug/psd-estimate-using-fft.html
If Normalization is Log of PSD (Matlab), the power spectrum is calculated using the formula:
power_spectrum[i] = 10.*log10(raw_spectrum_matlab[i])
where raw_spectrum_matlab is calculated as described above in Raw PSD (Matlab).
Page 157
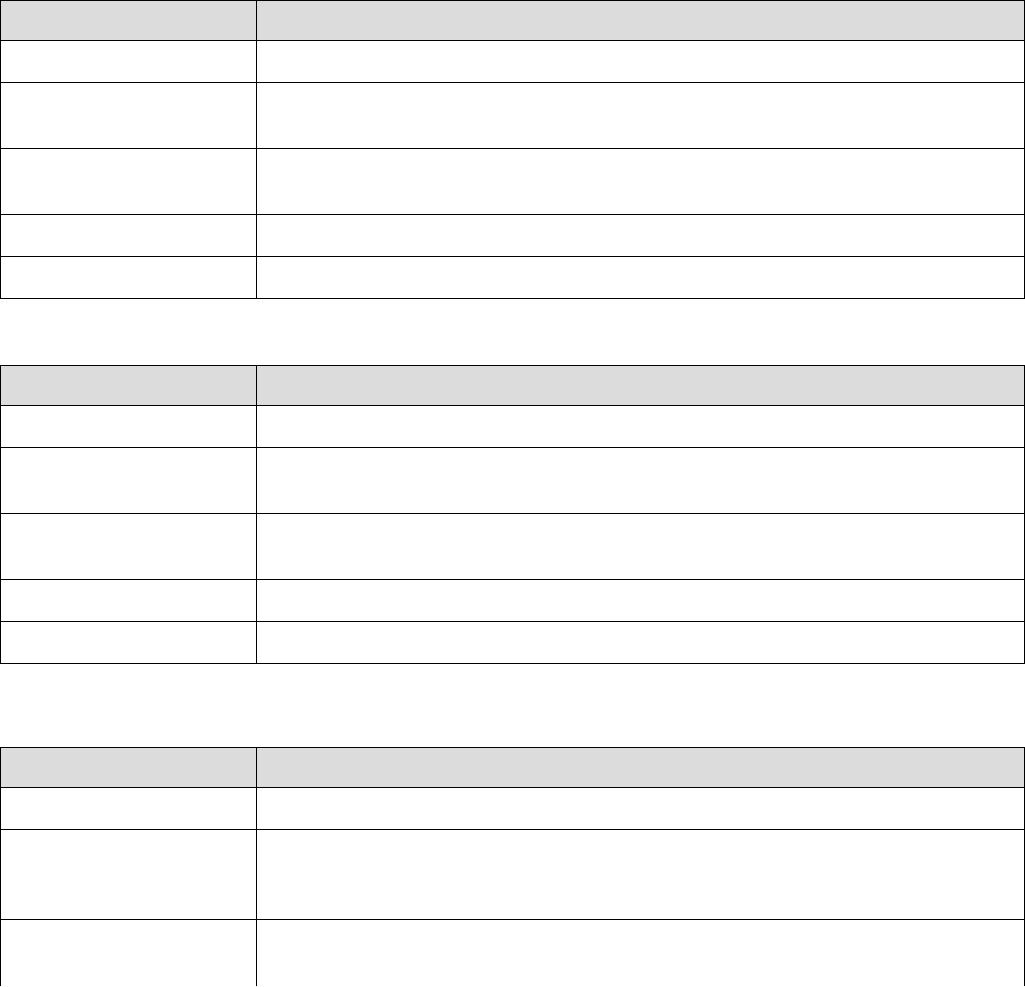
3.34. Perievent Spectrograms
A spectrogram is a visual representation of the spectrum of frequencies of a signal as it varies with time.
This analysis captures the frequency content of continuous variables or neuronal rate histograms in the
time windows around reference events.
The idea of perievent spectrogram analysis is that you may have stimuli applied to your neural network
and the neurons or LFPs exhibit slight variations of their spectral properties in some periods right after
the stimuli. You may not see the variation when analyzing the response to the single stimulus, but when
you average the spectrograms over all the stimuli, you may get a clear picture.
X axis shows the time in seconds. Y axis shows frequency in Hz. Color scale shows spectrum values.
The color scale units depend on the Normalization parameter.
For continuous variables, the color scale units are:
Normalization Color scale units
Raw PSD (Num.Rec.) mV^2
% of total PSD (Num.
Rec.)
%
Log of PSD(dB)
(Num.Rec.)
dB
Raw PSD (Matlab) mV^2/Hz
Log of PSD (Matlab) dB/Hz
For neurons, the color scale units are:
Normalization Color scale units
Raw PSD (Num.Rec.) RateHistBinCounts^2
% of total PSD (Num.
Rec.)
%
Log of PSD(dB)
(Num.Rec.)
dB
Raw PSD (Matlab) RateHistBinCounts^2/Hz
Log of PSD (Matlab) dB/Hz
Parameters
Parameter Description
Reference Reference event.
Skip ref. events with
missing cont. data
An option to skip reference events when calculating PeriEvent Spectrograms
for continuous variables. Use this option when continuous variables have
gaps (time periods without data points). See Algorithm below for details.
Max. Freq. Maximum frequency for the spectrograms. If at least one continuous variable
is selected, the value of the Maximum Frequency parameter is set as
Page 158
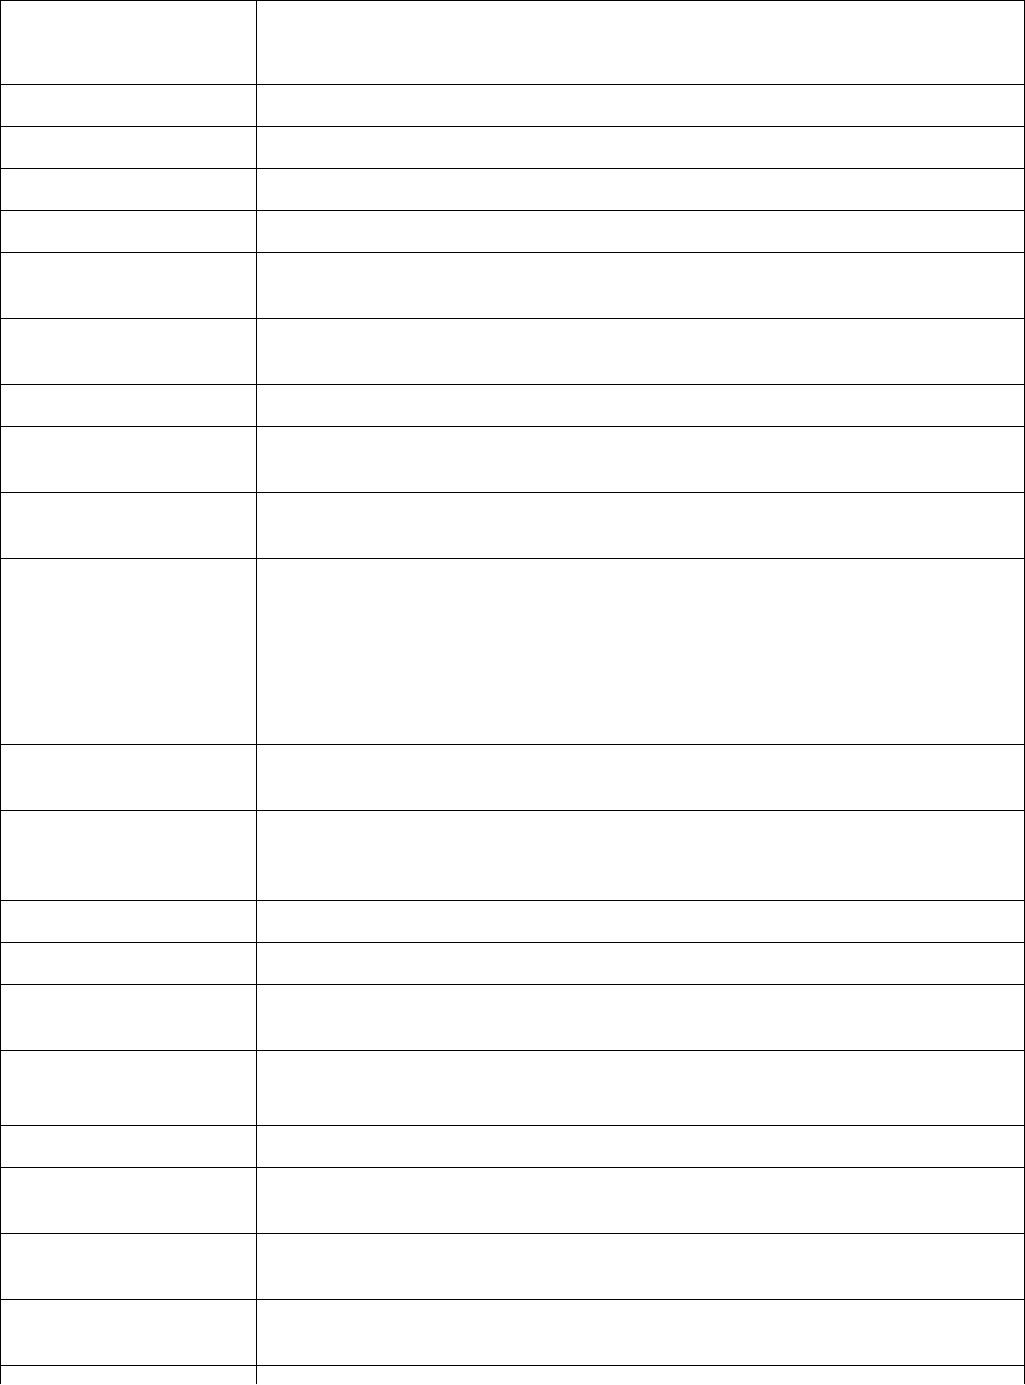
0.5*Digitizing frequency of the first selected continuous variable. All
continuous variables selected for this analysis should have the same
digitizing rate.
Number of Fr. Values Number of frequency values.
Normalization Spectrum units (see Normalization in Spectrogram Analysis).
Start Start of the first window (relative to the reference event).
Shift Type Option to specify shift in seconds or as a percent of the sliding window width.
Shift (sec) If Shift Type is Absolute, specifies how much sliding window is shifted each
time (in seconds).
Shift (window %) If Shift Type is Window Percent, specifies how much sliding window is
shifted each time as a percent of the overall sliding window width.
Number of Shifts total number of sliding windows.
Show Freq. From An option to show a subset of frequencies. Specifies minimum frequency to
be displayed.
Show Freq. To An option to show a subset of frequencies. Specifies maximum frequency to
be displayed.
X Axis Allows to specify what values are shown in the sliding window X axis. There
are two options: Start of Window and Center of Window. Suppose your data
has the strongest spectral value at 5 seconds. This means that the window
that has 5 seconds as its center will show the highest spectrum values. If the
window width is 2 seconds, it will be the window [4,6]. If you are using 'Start
of window' option, you will see the peak at 4 instead of 5 seconds. However,
with 'Center of window' option, the peak will be at 5 seconds.
Log Vertical Frequency
Scale
Option to draw logarithmic vertical frequency scale.
Select Data If Select Data is From Time Range, only the data from the specified (by
Select Data From and Select Data To parameters) time range will be used in
analysis. See also Data Selection Options.
Select Data From Start of the time range in seconds.
Select Data To End of the time range in seconds.
Interval filter Specifies the interval filter that will be used to preselect data before analysis.
See also Data Selection Options.
Smooth Option to smooth the spectrum after the calculation. See Post-Processing
Options for details.
Smooth Filter Width The width of the smooth filter. See Post-Processing Options for details.
Add to Results / Bin left An option to add an additional vector (containing a left edge of each
frequency bin) to the matrix of numerical results.
Add to Results / Bin
middle
An option to add an additional vector (containing a center of each frequency
bin) to the matrix of numerical results.
Add to Results / Bin right An option to add an additional vector (containing a right edge of each
frequency bin) to the matrix of numerical results.
Page 159

Send to Matlab An option to send the matrix of numerical results to Matlab. See also Matlab
Options.
Matrix Name Specifies the name of the results matrix in Matlab workspace.
Matlab command Specifies a Matlab command that is executed after the numerical results are
sent to Matlab.
Send to Excel An option to send numerical results or summary of numerical results to Excel.
See also Excel Options.
Sheet Name The name of the worksheet in Excel where to copy the numerical results.
TopLeft Specifies the Excel cell where the results are copied. Should be in the form
CR where C is Excel column name, R is the row number. For example, A1 is
the top-left cell in the worksheet.
Summary of Numerical Results
The following information is available in the Summary of Numerical Results
Column Description
Variable Variable name.
Y Min Y axis minimum.
Y Max Y axis maximum.
Color Scale Min Color scale minimum.
Color Scale Max Color scale maximum.
Max Frequency Used Maximum frequency of the FFTs used.
Rate Histogram Bin Rate histogram bin size in seconds (if used).
Number of Ref. Events Number of reference events.
Window width FFT window width (seconds).
Actual shift Actual window shift used in analysis.
Number of Bins In Shift Number of rate histogram bins in shift (if rate histograms were used).
Algorithm
Perievent spectrogram is an average of multiple regular spectrograms. For each timestamp of the
reference event, a regular spectrogram is calculated, then these spectrograms are averaged over all
selected reference timestamps.
If Skip ref. events with missing cont. data option is selected, and there is no continuous data for any
part of time interval [RefTimestamp+StartTime, RefTimestamp+StartTime+Shift*NumberOfShifts], the
spectrogram for RefTimestamp is not calculated.
Page 160

3.35. Joint ISI Distribution
For each spike, a point is calculated where the X coordinate of the point is the current interspike interval
and Y coordinate of the point is the preceding interspike interval. The density of these points is shown in
the graph.
Parameters
Parameter Description
Min Interval Time axis minimum in seconds.
Max Interval Time axis maximum in seconds
Bin Bin size in seconds.
Log Axis Scale An option to use Log10 axis scales.
Matrix Scale Matrix color scale.
Smooth Matrix An option to smooth matrix after calculation.
Smooth Radius Radius of the smooth filter (in bins).
Smooth Colors An option to smooth colors using bicubic splines.
Log Color Scale An option to use Log10 color scale.
Select Data If Select Data is From Time Range, only the data from the specified (by
Select Data From and Select Data To parameters) time range will be used in
analysis. See also Data Selection Options.
Select Data From Start of the time range in seconds.
Select Data To End of the time range in seconds.
Interval filter Specifies the interval filter that will be used to preselect data before analysis.
See also Data Selection Options.
Add to Results / Bin left An option to add an additional vector (containing a left edge of each bin) to
the matrix of numerical results.
Add to Results / Bin
middle
An option to add an additional vector (containing a middle point of each bin)
to the matrix of numerical results.
Add to Results / Bin right An option to add an additional vector (containing a right edge of each bin) to
the matrix of numerical results.
Send to Matlab An option to send the matrix of numerical results to Matlab. See also Matlab
Options.
Matrix Name Specifies the name of the results matrix in Matlab workspace.
Matlab command Specifies a Matlab command that is executed after the numerical results are
sent to Matlab.
Send to Excel An option to send numerical results or summary of numerical results to Excel.
See also Excel Options.
Sheet Name The name of the worksheet in Excel where to copy the numerical results.
Page 161
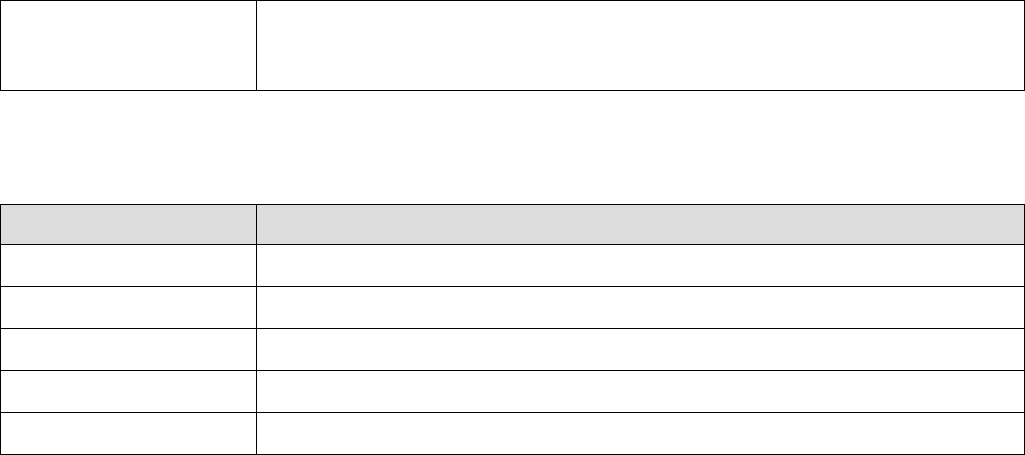
TopLeft Specifies the Excel cell where the results are copied. Should be in the form
CR where C is Excel column name, R is the row number. For example, A1 is
the top-left cell in the worksheet.
Summary of Numerical Results
The following information is available in the Summary of Numerical Results
Column Description
Variable Variable name.
YMin Y axis minimum.
YMax Y axis maximum.
Color Scale Min Color scale minimum.
Color Scale Max Color scale maximum.
Algorithm
If Use Log Bins and Axes option is not selected:
Matrix of binCounts[x,y] is created. Each element of the matrix is initialized as zero.
For each spike that occurred at time t[i], the following values are calculated:
Interval_I = t[i] - t[i-1]
binX = (Interval_I - MinInterval)/Bin
Interval_I_Plus_1 = t[i+1] - t[i]
binY = (Interval_I_Plus_1 - MinInterval)/Bin
Then, the corresponding bin count is incremented:
binCounts[binX, binY] = binCounts[binX, binY] + 1
The graph shows binCounts matrix values using color scale.
If Use Log Bins and Axes option is selected:
The i-th bin (i=1,2,...) on each axis is [IntMin * 10 ^ ((i -1)/D), IntMin * 10 ^ (i/D)), where D is Number of
Bins Per Decade. binX and binY are calculated accordingly:
binX = ( log10(Interval_I) - log10(MinInterval) )* NumBinsPerDecade
Reference
For discussion on using logarithm of interspike intervals, see:
Alan D. Dorval, Probability distributions of the logarithm of inter-spike intervals yield accurate entropy
estimates from small datasets. Journal of Neuroscience Methods 173 (2008) 129-139
Page 162

3.36. Autocorrelograms Versus Time
This analysis shows the dynamics of the autocorrelograms over time. It calculates multiple
autocorrelograms using a "sliding window" in time. Each autocorrelogram is shown as a vertical stripe
with colors representing the bin counts. Horizontal axis represents the position of the sliding window in
time.
Parameters
Parameter Description
XMin AutoCorr Autocorrelogram time axis minimum in seconds.
XMax AutoCorr Autocorrelogram time axis maximum in seconds.
Bin AutoCorr Autocorrelogram bin size in seconds.
Normalization Histogram units (Counts/Bin, Probability or Spikes/Second). See Algorithm
below.
Start Start of the first sliding window in seconds.
Duration Duration of the sliding window in seconds.
Shift How much sliding window is shifted each time.
Number of shifts The number of sliding windows to be used.
Matrix Scale Specifies color scale for drawing matrix.
X Axis (Sliding window
axis alignment)
Allows to specify what values are shown in the sliding window axis. There are
two options: Start of Window and Center of Window. Suppose your data has
the strongest correlation at 50 seconds. This means that the window that has
50 seconds as its center will show the highest autocorrelation values. If the
window width is 20 seconds, it will be the window [40,60]. If you are using
'Start of window' option, you will see the peak at 40 instead of 50 seconds.
However, with 'Center of window' option, the peak will be at 50 seconds.
Smooth Option to smooth the histogram after the calculation. See Post-Processing
Options for details.
Smooth Filter Width The width of the smooth filter. See Post-Processing Options for details.
Select Data If Select Data is From Time Range, only the data from the specified (by
Select Data From and Select Data To parameters) time range will be used in
analysis. See also Data Selection Options.
Select Data From Start of the time range in seconds.
Select Data To End of the time range in seconds.
Interval filter Specifies the interval filter that will be used to preselect data before analysis.
See also Data Selection Options.
Send to Matlab An option to send the matrix of numerical results to Matlab. See also Matlab
Options.
Matrix Name Specifies the name of the results matrix in Matlab workspace.
Page 163
Matlab command Specifies a Matlab command that is executed after the numerical results are
sent to Matlab.
Send to Excel An option to send numerical results or summary of numerical results to Excel.
See also Excel Options.
Sheet Name The name of the worksheet in Excel where to copy the numerical results.
TopLeft Specifies the Excel cell where the results are copied. Should be in the form
CR where C is Excel column name, R is the row number. For example, A1 is
the top-left cell in the worksheet.
Summary of Numerical Results
The following information is available in the Summary of Numerical Results
Column Description
Variable Variable name.
YMin Y axis minimum.
YMax Y axis maximum.
Color Scale Min Color scale minimum.
Color Scale Max Color scale maximum.
Spikes Number of spikes used.
Algorithm
NeuroExplorer calculates here multiple autocorrelograms (see Autocorrelograms for more information on
how each autocorrelogram is calculated). Each autocorrelogram is calculated for a different interval
(window) in time:
[window_start[i], window_end[i]], i = 1,..., Number of Shifts.
That is, for each autocorrelogram only the timestamps that are within the window are used.
The following rules are used to calculate the windows:
window_start[1] = Start
window_end[1] = Start + Duration
window_start[2] = Start + Shift
window_end[2] = Start + Shift + Duration
...
Page 164
3.37. Perievent Rasters for Continuous
This analysis shows the traces of the selected continuous variable relative to the timestamps of the
reference variable.
Parameters
Parameter Description
Reference Specifies a reference neuron or event.
XMin Time axis minimum in seconds.
XMax Time axis maximum in seconds
Use last ref. event An option to draw the trace only for the last reference event.
Round ref. timestamp An option to align reference event timestamps to the timestamps of the
continuous variable. This option is valid only if XMin <0 and XMax >0.
Draw Variation An option to draw variation around the mean as a colored background.
Variation (standard
deviations)
Number of standard deviations in the colored background around the mean.
Variation Background
Color
The color to be used for drawing of the colored background around the mean.
Select Data If Select Data is From Time Range, only the data from the specified (by
Select Data From and Select Data To parameters) time range will be used in
analysis. See also Data Selection Options.
Select Data From Start of the time range in seconds.
Select Data To End of the time range in seconds.
Interval filter Specifies the interval filter that will be used to preselect data before analysis.
See also Data Selection Options.
Send to Matlab An option to send the matrix of numerical results to Matlab. See also Matlab
Options.
Matrix Name Specifies the name of the results matrix in Matlab workspace.
Matlab command Specifies a Matlab command that is executed after the numerical results are
sent to Matlab.
Send to Excel An option to send numerical results or summary of numerical results to Excel.
See also Excel Options.
Sheet Name The name of the worksheet in Excel where to copy the numerical results.
TopLeft Specifies the Excel cell where the results are copied. Should be in the form
CR where C is Excel column name, R is the row number. For example, A1 is
the top-left cell in the worksheet.
Summary of Numerical Results
Page 165

The following information is available in the Summary of Numerical Results
Column Description
Variable Variable name.
Reference Reference variable name.
NumRefEvents The number of reference events used in calculation.
YMin Minimum of the average trace shown at the bottom.
YMax Minimum of the average trace shown at the bottom.
Algorithm
Let ref[i] be the array of timestamps of the reference event.
For each timestamp ref[k], NeuroExplorer draws the values of continuous variable with timestamps from
ref[k] + XMin to ref[k] + XMax. The timestamps of the continuous variables are shown as relative to the
ref[k]: if the timestamp of continuous variable data point is cont_ts[i], the timestamp shown in Numerical
Results is relative_ts[i] = cont_ts[i] - ref[k].
If Round ref. timestamp option is used, NeuroExplorer shifts the relative timestamps of the continuous
variable. For example, if round to previous timestamp option is used, the program finds the last
timestamp cont_ts[j] of the continuous variable before ref[k]. Then, the program adjusts the relative
timestamps of the continuous variable so that
relative_ts_adjusted[j] = ref[k]
If diff = ref[k] - cont_ts[j] then relative_ts_adjusted[i] = relative_ts[i] + diff.
Mean values of the perievent raster shown at the bottom graph are calculated using linear interpolation.
Page 166
3.38. Power Spectra for Continuous
This analysis captures the frequency content of continuous variables.
X axis shows frequency in Hz, Y axis shows the values of the power spectral density. The Y axis units
depend on Normalization parameter.
Normalization Y axis units
Raw PSD (Num.Rec.) mV^2
% of total PSD (Num. Rec.) %
Log of PSD(dB) (Num.Rec.) dB
Raw PSD (Matlab) mV^2/Hz
Log of PSD (Matlab) dB/Hz
Parameters
Parameter Description
Number of Fr. Values Number of values in the spectrum.
Window Overlap (%) Window (segment) overlap in percent (from 0 to 90).
Window Preprocessing Preprocessing to be done for each window before calculating the spectrum of
the window.
Windowing Function Windowing Function to be applied to each window before calculating the
spectrum of the window.
Discard Incomplete
Windows
Option to discard the last window if it contains less than the expected number
of data points (less than NumberOfFrValues*2 points).
Concatenate Selected
Data Points
If this option is selected, data points that are selected for analysis (that is,
points inside time interval filter) are concatenated and then the PSD of the
concatenated signal is calculated. This means that the signal from two
adjacent time intervals can be in the same data segment used to calculate
FFT. If this option is not selected and interval filter is specified, data
segments used to calculate FFT (see Algorithm below) are guaranteed to
contain data points from one interval of the interval filter. For each time
interval, the first data segment in the interval is aligned with the interval start.
Use Multitaper Algorithm Option to use multi-taper algorithm.
Time-Bandwidth Product Time-Bandwidth Product when using multi-taper algorithm.
Number of Tapers Number of Tapers when using multi-taper algorithm.
Show Frequency From Minimum frequency to be shown in the spectrum graph.
Show Frequency To Maximum frequency to be shown in the spectrum graph.
Normalization Spectrum normalization. See Algorithm below.
Frequency Bands Percent of spectrum values and the sum of spectrum values will be
calculated for each of the specified frequency bands. If Log of PSD
Normalization is specified, band percents will be calculated BEFORE
Page 167
applying log() transform.
Log Frequency Scale An option show Log10 frequency scale.
Smooth Option to smooth the spectrum after the calculation. See Post-Processing
Options for details.
Smooth Filter Width The width of the smooth filter. See Post-Processing Options for details.
Select Data If Select Data is From Time Range, only the data from the specified (by
Select Data From and Select Data To parameters) time range will be used in
analysis. See also Data Selection Options.
Select Data From Start of the time range in seconds.
Select Data To End of the time range in seconds.
Interval filter Specifies the interval filter that will be used to preselect data before analysis.
See also Data Selection Options.
Add Freq. Values to
Results
An option to add an additional vector of frequency values to the matrix of
numerical results.
Send to Matlab An option to send the matrix of numerical results to Matlab. See also Matlab
Options.
Matrix Name Specifies the name of the results matrix in Matlab workspace.
Matlab command Specifies a Matlab command that is executed after the numerical results are
sent to Matlab.
Send to Excel An option to send numerical results or summary of numerical results to Excel.
See also Excel Options.
Sheet Name The name of the worksheet in Excel where to copy the numerical results.
TopLeft Specifies the Excel cell where the results are copied. Should be in the form
CR where C is Excel column name, R is the row number. For example, A1 is
the top-left cell in the worksheet.
Summary of Numerical Results
The following information is available in the Summary of Numerical Results
Column Description
Variable Variable name.
YMin Spectrum minimum.
YMax Spectrum maximum.
Filter Length The length of all the intervals of the interval filter (if a filter was used) or the
length or the recording session (in seconds).
Number of FFT windows Number of FFT windows used in analysis.
Frequency of Minimum The position of the minimum of the displayed spectrum (in Hz). If there are
multiple bins in the spectrum where the spectrum value is equal to the
spectrum minimum, this value represents the frequency of the first such bin. If
you need to calculate spectrum peaks, go to Post-processing tab, press Post-
Page 168

processing Script Options button and select PostAnalysis_Peaks.py
Frequency of Maximum The position of the maximum of the displayed spectrum (in Hz). If there are
multiple bins in the spectrum where the spectrum value is equal to the
spectrum maximum, this value represents the frequency of the first such bin.
If you need to calculate spectrum peaks, go to Post-processing tab, press
Post-processing Script Options button and select PostAnalysis_Peaks.py
Algorithm
For each selected continuous variable, a standard or multi-taper power spectrum is calculated.
In each case, a Welsh periodogram method is used:
The original data array is split up into data segments (or windows) of length 2*Nf (where Nf is the
Number of Frequency Values), overlapping by D points. If overlap is 50%, then D is (2*Nf)/2=Nf.
For each segment, the signal is preprocessed according to Window Preprocessing parameter. For
example, if Subtract Mean is selected, ProcessedSignal[i] = Signal[i] - meanOfSignalInSegment.
The overlapping segments are then windowed: after the data is split up into overlapping segments, the
individual data segments have a window applied to them (that is, ProcessedWindowedSignal[i] =
ProcessedSignal[i]*WindowValue[i]; the window is specified by the Windowing Function).
Most window functions afford more influence to the data at the center of the segment than to data at the
edges, which represents a loss of information. To mitigate that loss, the individual data segments are
commonly overlapped in time (as in the above step).
After doing the above, the periodogram is calculated by computing the discrete Fourier transform, and
then computing the squared magnitude of the result. The individual periodograms are then time-
averaged, which reduces the variance of the individual power measurements. The end result is an array
of power measurements vs. frequency "bin".
For multi-taper spectral estimate, several periodograms (tapers) are calculated for each segment. Each
taper is calculated by applying a specially designed windowing function (Slepian function, see
http://en.wikipedia.org/wiki/Multitaper ). All the tapers for a given segment are then averaged to form the
periodogram of the segment. The individual segment periodograms are then time-averaged.
See http://www.spectraworks.com/Help/mtmtheory.html for a discussion on selecting Multi-Taper
parameters.
Normalization
If Normalization is Raw PSD (Numerical Recipes), the power spectrum is normalized so that the sum of
all the spectrum values is equal to the mean squared value of the rate histogram. The formulas (13.4.10)
of Numerical Recipes in C are used (squared fft values are divided by N^2 where N is the number of
values in data window). (Numerical Recipes in C, Press, Flannery, et al. (Cambridge University Press,
1992)). The units are signal_units^2 (mV^2 in NeuroExplorer).
If Normalization is % of Total PSD (Numerical Recipes), the power spectrum is normalized so that the
sum of all the spectrum values equals 100.
If Normalization is Log of PSD (Numerical Recipes), the power spectrum is calculated using the formula:
power_spectrum[i] = 10.*log10(raw_spectrum[i])
where raw_spectrum is calculated as described above in Raw PSD (Numerical Recipes).
If Normalization is Raw PSD (Matlab), the power spectrum is normalized as described in
http://www.mathworks.com/help/signal/ug/psd-estimate-using-fft.html (squared fft values are divided by
Page 169
Fs*N, where Fs is sampling rate, N is the number of values in window, see Matlab code below). The units
are signal_units^2/Hz (mV^2/Hz in NeuroExplorer).
If Normalization is Log of PSD (Matlab), the power spectrum is calculated using the formula:
power_spectrum[i] = 10.*log10(raw_spectrum_matlab[i])
where raw_spectrum_matlab is calculated as described above in Raw PSD (Matlab). The units are
dB/Hz.
In Matlab:
Fs = 1000;
t = 0:1/Fs:1-1/Fs;
x = cos(2*pi*100*t) + randn(size(t));
xdft = fft(x);
N = length(x);
xdft = xdft(1:N/2+1);
% psdx below corresponds to Raw PSD (Matlab) normalization
% the units are signal_units^2/Hz (mV^2/Hz in NeuroExplorer)
% note that we divide squared fft by (Fs*N)
psdx = (1/(Fs*N)) * abs(xdft).^2;
psdx(2:end-1) = 2*psdx(2:end-1);
% psdDb below corresponds to Log of Raw PSD (Matlab) normalization
psdDb = 10*log10(psdx)
freq = 0:Fs/length(x):Fs/2;
plot(freq,psDb)
title('Periodogram Using FFT')
xlabel('Frequency (Hz)')
ylabel('Power/Frequency (dB/Hz)')
Here is how you can verify that calculations in NeuroExplorer produce the same values as spectrum
calculations in Matlab:
- Open the file TestDataFile5.nex
- Deselect all neuronal variables
- Select ContChannel01 variable
- Select Matlab | Send Selected Variables to Matlab menu command
- Select Power Spectra for Continuous analysis
- Specify the following parameters:
Page 170
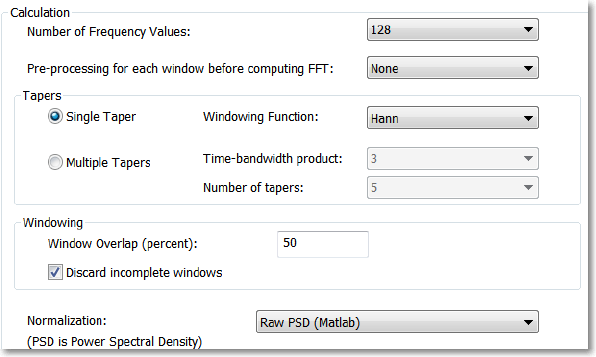
- Make sure that Add columns(s) with frequency values option is disabled in Post-Processing tab of
Analysis Properties dialog
- Run the analysis
- Select Matlab | Send Numerical Results to Matlab menu command
- In Matlab, execute:
p=pwelch(ContChannel01(:,1), hann(256), 128, 256, 10000);
maxDiff = max(abs(p-nex(:,1)))
- You will see the following result:
1.3500e-13
This means that at least the first 11 decimal places of the PSD values calculated in NeuroExplorer and in
Matlab are identical.
Page 171
3.39. Coherence for Continuous
Coherence is a measure of the degree of relationship, as a function of frequency, between two time
series.
Parameters
Parameter Description
Reference Specifies a reference variable.
Number of Fr. Values Number of values in the spectrum.
Window Overlap (%) Window overlap in percent (from 0 to 90).
Window Preprocessing Preprocessing to be done for each window before calculating the spectrum of
the window.
Windowing Function Windowing Function to be applied to each window before calculating the
spectrum of the window.
Discard Incomplete
Windows
Option to discard the last window if it contains less than the expected number
of data points (less than NumberOfFrValues*2 points).
Use Multitaper Algorithm Option to use multi-taper algorithm.
Time-Bandwidth Product Time-Bandwidth Product when using multi-taper algorithm.
Number of Tapers Number of Tapers when using multi-taper algorithm.
Show Freq. From An option to show a subset of frequencies. Specifies minimum frequency to
be displayed.
Show Freq. To An option to show a subset of frequencies. Specifies maximum frequency to
be displayed.
Calculate Specifies whether coherence values or coherence phases are calculated.
Confidence Level (%) Confidence level (percent) for the coherence values. Can only be calculated if
a single-taper algorithm is used. See Confidence Level Calculation below for
details.
Draw confidence level An option to draw the confidence level. Confidence level is not drawn if
coherence phases are specified in Calculate parameter or if a multi-taper
algorithm is used.
Conf. line style Line style for drawing confidence level.
Select Data If Select Data is From Time Range, only the data from the specified (by
Select Data From and Select Data To parameters) time range will be used in
analysis. See also Data Selection Options.
Select Data From Start of the time range in seconds.
Select Data To End of the time range in seconds.
Interval filter Specifies the interval filter that will be used to preselect data before analysis.
See also Data Selection Options.
Add to Results / Bin left An option to add an additional vector (containing a left edge of each
frequency bin) to the matrix of numerical results.
Page 172
Add to Results / Bin
middle
An option to add an additional vector (containing a center of each frequency
bin) to the matrix of numerical results.
Add to Results / Bin right An option to add an additional vector (containing a right edge of each
frequency bin) to the matrix of numerical results.
Send to Matlab An option to send the matrix of numerical results to Matlab. See also Matlab
Options.
Matrix Name Specifies the name of the results matrix in Matlab workspace.
Matlab command Specifies a Matlab command that is executed after the numerical results are
sent to Matlab.
Send to Excel An option to send numerical results or summary of numerical results to Excel.
See also Excel Options.
Sheet Name The name of the worksheet in Excel where to copy the numerical results.
TopLeft Specifies the Excel cell where the results are copied. Should be in the form
CR where C is Excel column name, R is the row number. For example, A1 is
the top-left cell in the worksheet.
Summary of Numerical Results
The following information is available in the Summary of Numerical Results
Column Description
Variable Variable name.
Y Min Y axis minimum.
Y Max Y axis maximum.
Filter Length The length of the interval filter.
Confidence Level Confidence level for the coherence values.
Algorithm
The FFTs of variable values (after specified preprocessing and applying the specified tapering window)
are calculated. Then, individual and cross-densities are calculated:
Pxx = FFT(X)*Conj(FFT(X)),
Pyy = FFT(Y)*Conj(FFT(Y))
Pxy = FFT(X)*Conj(FFT(Y)).
Here Conj(z) is a complex conjugate of z. Pxx, Pyy and Pxy values are averaged across all intervals and
coherence values are calculated as
Mean(Pxy)*Mean(Pxy) / (Mean(Pxx)*Mean(Pyy)).
Coherence phase values are calculated as phase of Mean(Pxy).
Calculation of the Confidence Level
Confidence levels can only be calculated if a single-taper algorithm is used.
Page 173
Confidence levels are calculated as described in Kattla and Lowery (2010). The confidence level Z is
calculated as
Z = 1 - pow(alpha, 1/(w*L - 1))
where
pow(x,y) returns x to the power of y,
alpha = 1 - Confidence_Level*0.01,
L is the number of overlapped windows
w is the correction due to the Hanning window tapering (see eq. (5) and (6) in Kattla and Lowery (2010)).
Reference
Kattla S, Lowery MM. Fatigue related changes in electromyographic coherence between synergistic hand
muscles. Exp Brain Res. 2010 Apr; 202(1):89-99. Epub 2009 Dec 12.
Page 174
3.40. Analysis of Head Direction Cells
This analysis estimates the frequency of neuronal firing as a function of a head direction of an animal.
The head direction should be described by two pairs of continuously recorded variables (head base X
and Y and nose X and Y).
Parameters
Parameter Description
Head Base X Position Continuous variable that describes X position of the head base of the animal.
Head Base Y Position Continuous variable that describes Y position of the head base of the animal.
Nose X Position Continuous variable that describes X position of the nose of the animal.
Nose Y Position Continuous variable that describes Y position of the nose of the animal.
Bad Position Value When LED is obscured by the wires, both position variables may suddenly
jump to 0 and then jump back to the previous position. All the data points
where BaseX, BaseY, NoseX or NoseY is equal to Bad Bad Position Value
are ignored.
Min Distance between
LEDs
All the data points where the distance between base and nose LEDs is
smaller than this value are ignored.
Direction Bin (degrees) Head direction is measured in degrees (from 0 to 360). This parameter
represents the size of the head direction bin in degrees.
Select Data If Select Data is From Time Range, only the data from the specified (by
Select Data From and Select Data To parameters) time range will be used in
analysis. See also Data Selection Options.
Select Data From Start of the time range in seconds.
Select Data To End of the time range in seconds.
Interval filter Specifies the interval filter that will be used to preselect data before analysis.
See also Data Selection Options.
Send to Matlab An option to send the matrix of numerical results to Matlab. See also Matlab
Options.
Matrix Name Specifies the name of the results matrix in Matlab workspace.
Matlab command Specifies a Matlab command that is executed after the numerical results are
sent to Matlab.
Send to Excel An option to send numerical results or summary of numerical results to Excel.
See also Excel Options.
Sheet Name The name of the worksheet in Excel where to copy the numerical results.
TopLeft Specifies the Excel cell where the results are copied. Should be in the form
CR where C is Excel column name, R is the row number. For example, A1 is
the top-left cell in the worksheet.
Summary of Numerical Results
Page 175
The following information is available in the Summary of Numerical Results
Column Description
Variable Variable name.
YMin Histogram minimum.
YMax Histogram maximum.
Mean Hist. The mean of the histogram bin values.
St. Dev. Hist. The standard deviation of the histogram bin values.
Algorithm
NeuroExplorer will ignore position points that have coordinates that are within 0.001 of the specified 'bad'
X and X values.
For all valid data points, head directions are calculated. Then, intervals in time are calculated where head
direction is in one of the direction bins. Then, we calculate the number of of spikes in all the intervals
where head direction was in a specific bin (for example, from 0 to 10 degrees). The number of spike is
then divided by the duration of the intervals for this bin to get the firing rate at the bin's head direction.
Page 176
3.41. Single Trial Spectrum Analysis
This analysis captures the frequency content of continuous variables for a single trial.
X axis shows frequency in Hz, Y axis shows the values of the power spectral density. The Y axis units
depend on Normalization parameter.
Normalization Y axis units
Raw PSD (Num.Rec.) mV^2
% of total PSD (Num. Rec.) %
Log of PSD(dB) (Num.Rec.) dB
Raw PSD (Matlab) mV^2/Hz
Log of PSD (Matlab) dB/Hz
Parameters
Parameter Description
Reference Specifies a reference neuron or event.
XMin Time window minimum in seconds.
XMax Time window maximum in seconds
Ref. Timestamp Number Reference timestamp number.
Number of Fr. Values Number of values in the spectrum.
Window Overlap (%) Window overlap in percent (from 0 to 90).
Window Preprocessing Preprocessing to be done for each window before calculating the spectrum of
the window.
Windowing Function Windowing Function to be applied to each window before calculating the
spectrum of the window.
Discard Incomplete
Windows
Option to discard the last window if it contains less than the expected number
of data points (less than NumberOfFrValues*2 points).
Use Multitaper Algorithm Option to use multi-taper algorithm.
Time-Bandwidth Product Time-Bandwidth Product when using multi-taper algorithm.
Number of Tapers Number of Tapers when using multi-taper algorithm.
Show Frequency From Minimum frequency to be shown in the spectrum graph.
Show Frequency To Maximum frequency to be shown in the spectrum graph.
Normalization Spectrum normalization. See Algorithm below.
Log Frequency Scale An option show Log10 frequency scale.
Smooth Option to smooth the spectrum after the calculation. See Post-Processing
Options for details.
Page 177
Smooth Filter Width The width of the smooth filter. See Post-Processing Options for details.
Select Data If Select Data is From Time Range, only the data from the specified (by
Select Data From and Select Data To parameters) time range will be used in
analysis. See also Data Selection Options.
Select Data From Start of the time range in seconds.
Select Data To End of the time range in seconds.
Interval filter Specifies the interval filter that will be used to preselect data before analysis.
See also Data Selection Options.
Add Freq. Values to
Results
An option to add an additional vector of frequency values to the matrix of
numerical results.
Send to Matlab An option to send the matrix of numerical results to Matlab. See also Matlab
Options.
Matrix Name Specifies the name of the results matrix in Matlab workspace.
Matlab command Specifies a Matlab command that is executed after the numerical results are
sent to Matlab.
Send to Excel An option to send numerical results or summary of numerical results to Excel.
See also Excel Options.
Sheet Name The name of the worksheet in Excel where to copy the numerical results.
TopLeft Specifies the Excel cell where the results are copied. Should be in the form
CR where C is Excel column name, R is the row number. For example, A1 is
the top-left cell in the worksheet.
Summary of Numerical Results
The following information is available in the Summary of Numerical Results
Column Description
Variable Variable name.
YMin Spectrum minimum.
YMax Spectrum maximum.
Filter Length The length of all the intervals of the interval filter (if a filter was used) or the
length or the recording session (in seconds).
Number of FFT windows Number of FFT windows used in analysis.
Frequency of Minimum The position of the minimum of the displayed spectrum (in Hz). If there are
multiple bins in the spectrum where the spectrum value is equal to the
spectrum minimum, this value represents the frequency of the first such bin.
Frequency of Maximum The position of the maximum of the displayed spectrum (in Hz). If there are
multiple bins in the spectrum where the spectrum value is equal to the
spectrum maximum, this value represents the frequency of the first such bin.
Algorithm
Page 178
For each selected continuous variable, a standard or multi-taper power spectrum is calculated.
Normalization
If Normalization is Raw PSD, the power spectrum is normalized so that the sum of all the spectrum
values is equal to the mean squared value of the rate histogram.
If Normalization is % of Total PSD, the power spectrum is normalized so that the sum of all the
spectrum values equals 100.
If Normalization is Log of PSD, the power spectrum is calculated using the formula:
power_spectrum[i] = 10.*log10(raw_spectrum[i])
Page 179
3.42. Phase Analysis via Hilbert Transform
This analysis graphs amplitude and phase of a continuous signal in a single trial.
Parameters
Parameter Description
Reference Specifies a reference neuron or event.
XMin Time axis minimum in seconds.
XMax Time axis maximum in seconds
Ref. Timestamp Number Reference timestamp number.
Bandpass Filter From
(Hz)
Minimum frequency for the bandpass filter.
Bandpass Filter To (Hz) Maximum frequency for the bandpass filter.
Bandpass Filter Type The type of the bandpass filter.
FIR Filter Order The order of the bandpass filter.
Send to Matlab An option to send the matrix of numerical results to Matlab. See also Matlab
Options.
Matrix Name Specifies the name of the results matrix in Matlab workspace.
Matlab command Specifies a Matlab command that is executed after the numerical results are
sent to Matlab.
Send to Excel An option to send numerical results or summary of numerical results to Excel.
See also Excel Options.
Sheet Name The name of the worksheet in Excel where to copy the numerical results.
TopLeft Specifies the Excel cell where the results are copied. Should be in the form
CR where C is Excel column name, R is the row number. For example, A1 is
the top-left cell in the worksheet.
Summary of Numerical Results
The following information is available in the Summary of Numerical Results
Column Description
Variable Variable name.
YMin Graph minimum.
YMax Graph maximum.
Algorithm
The signal for the specified trial is bandpass filtered and the analytic signal of the result is calculated via
Hilbert transform.
Page 180
The original signal is drawn in light gray, the filtered signal is drawn in dark gray, the amplitude of the
filtered signal is drawn in green and the phase is drawn in red.
Page 181
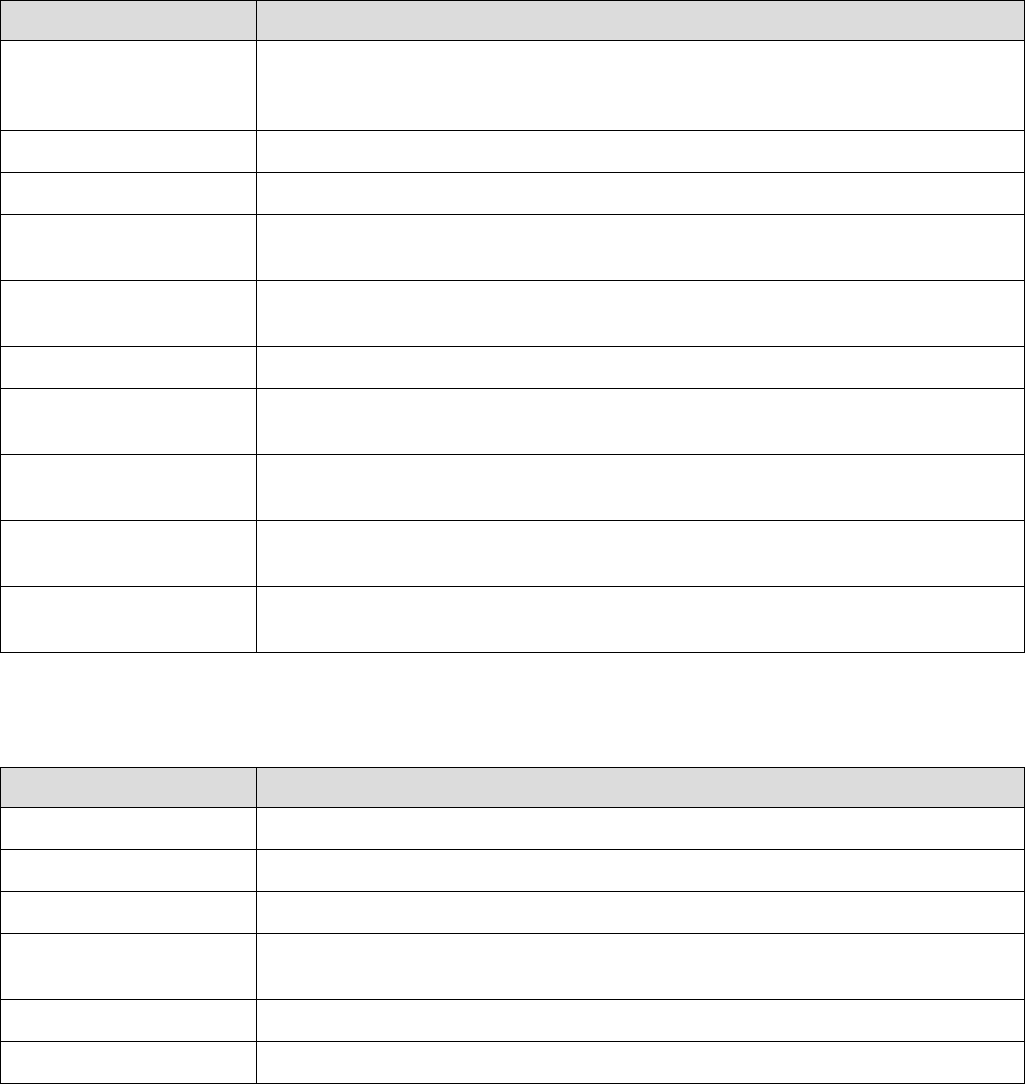
3.43. Waveform Comparison
This analysis displays means and standard deviations of waveform variables in specified time intervals.
This analysis can also display waveforms in the Principal Component space.
Parameters
Parameter Description
Select Data If Select Data is From Time Range, only the data from the specified (by
Select Data From and Select Data To parameters) time range will be used in
analysis. See also Data Selection Options.
Select Data From Start of the time range in seconds.
Select Data To End of the time range in seconds.
Interval filter Specifies the interval filter(s) that will be used to preselect data before
analysis. See also Data Selection Options.
What to Draw Specifies graphics output (means and standard deviations of waveforms or
projections in the Principal Component space).
Draw Variation An option to draw waveform variation as a colored background.
Variation (standard
deviations)
Number of standard deviations in the colored background around waveform
mean.
Variation Background
Color
The color to be used for drawing of the colored background around waveform
mean.
PC X Axis Which principal component to use for X axis for the Principal Component
projections display.
PC Y Axis Which principal component to use for Y axis for the Principal Component
projections display.
Summary of Numerical Results
The following information is available in the Summary of Numerical Results
Column Description
Variable Variable name.
YMin Y Axis minimum.
YMax Y Axis maximum.
Filter Length The length of all the intervals of the interval filter (if a filter was used) or the
length or the recording session (in seconds).
Mean Waveform Min Minimum of the mean waveform.
Mean Waveform Max Maximum of the mean waveform.
Algorithm
Page 182
The program selects waveforms in the specified time range and the interval filter(s) and calculates the
mean and the standard deviation of the selected waveforms.
Principal components are calculated from all the waveforms of the given waveform variable.
First, the matrix of correlations between waveform points ( c[t, s] ) is calculated:
c[t, s] = correlation between vectors waveform_value[t, *] and waveform_value[s,*], s, t = 1, ..., number of
points in each waveform.
Then, the eigenvalues and eigenvectors are calculated for the matrix c[t, s]. The eigenvectors (principal
components) are sorted according to their eigenvalues. The first principal component has the largest
eigenvalue.
PCA projection display shows scatter plots where x and y are projections of a waveform to the specified
principal components (projection is a sum of products waveform_value[t]*principal_component_value[t] ).
Page 183
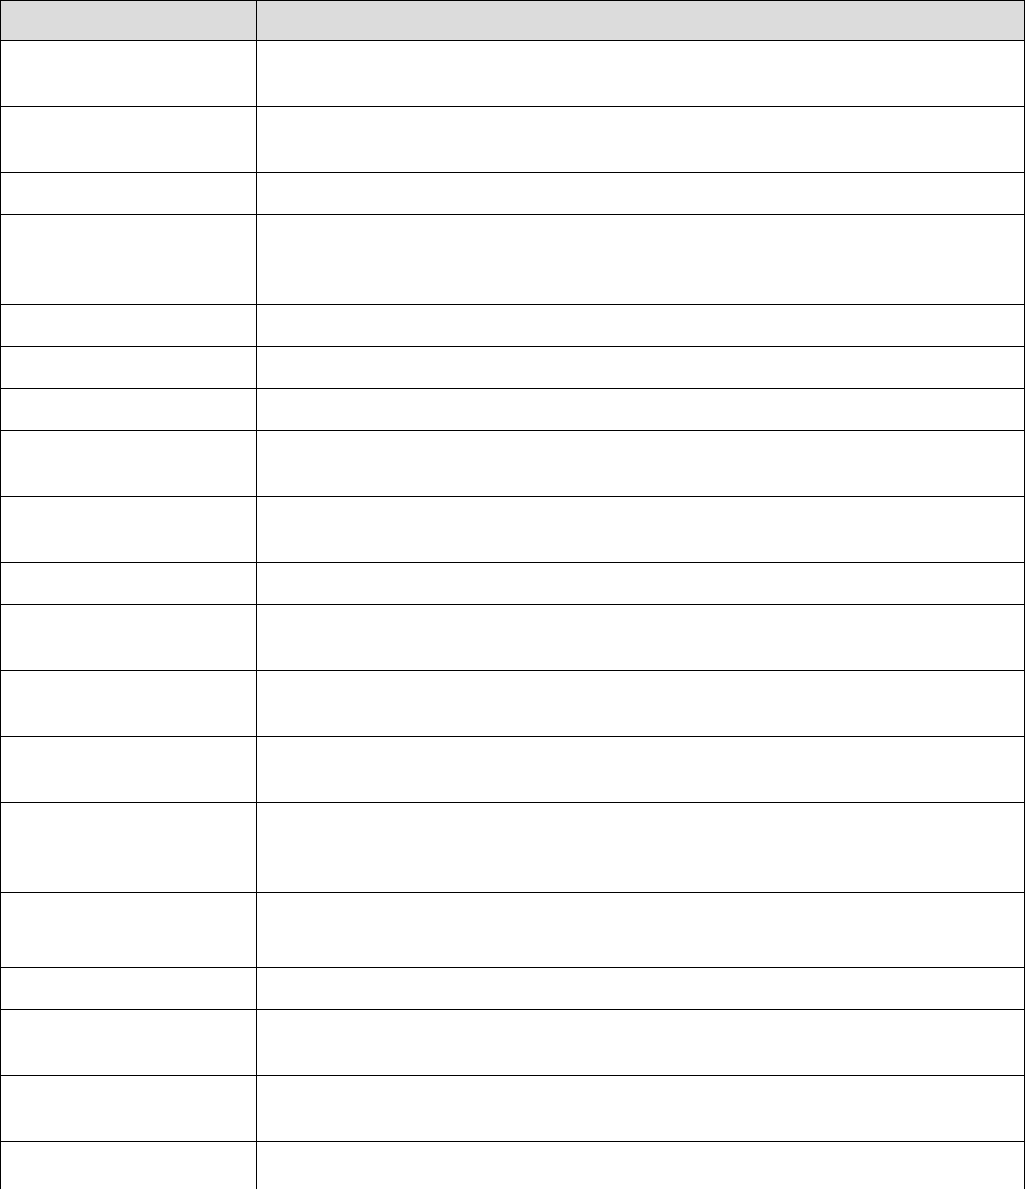
3.44. Hazard Analysis
This analysis calculates a hazard function -- the conditional probability of a spike at time t0+t on the
condition that there is a spike at time t0 and there are no spikes in the interval [t0, t0+t).
Parameters
Parameter Description
Max IIH Interval (sec) Maximum interspike interval used in calculation of interspike interval
histogram (see Algorithm below).
Hazard Time Max (sec) Time axis maximum in seconds. This parameter is expected to be smaller
than Max IIH Interval (sec). See Algorithm below.
Bin Bin size in seconds.
Select Data If Select Data is From Time Range, only the data from the specified (by
Select Data From and Select Data To parameters) time range will be used in
analysis. See also Data Selection Options.
Select Data From Start of the time range in seconds.
Select Data To End of the time range in seconds.
Int. filter type Specifies if the analysis will use a single or multiple interval filters.
Interval filter Specifies the interval filter(s) that will be used to preselect data before
analysis. See also Data Selection Options.
Create filter on-the-fly Specifies if a temporary interval filter needs to be created (and used to
preselect data).
Create filter around Specifies an event that will be used to create a temporary filter.
Start offset Offset (in seconds, relative to the event specified in Create filter around
parameter) for the start of interval for the temporary filter.
End offset Offset (in seconds, relative to the event specified in Create filter around
parameter) for the end of interval for the temporary filter.
Fix overlaps An option to automatically merge the overlapping intervals in the temporary
filter.
Overlay Graphs An option to draw several histograms in each graph. This option requires that
Int. filter type specifies that multiple interval filters will be used (either Table
(row) or Table (col)).
Smooth Option to smooth the histogram after the calculation. See Post-Processing
Options for details.
Smooth Filter Width The width of the smooth filter. See Post-Processing Options for details.
Add to Results / Bin left An option to add an additional vector (containing a left edge of each bin) to
the matrix of numerical results.
Add to Results / Bin
middle
An option to add an additional vector (containing a middle point of each bin)
to the matrix of numerical results.
Add to Results / Bin right An option to add an additional vector (containing a right edge of each bin) to
Page 184

the matrix of numerical results.
Send to Matlab An option to send the matrix of numerical results to Matlab. See also Matlab
Options.
Matrix Name Specifies the name of the results matrix in Matlab workspace.
Matlab command Specifies a Matlab command that is executed after the numerical results are
sent to Matlab.
Send to Excel An option to send numerical results or summary of numerical results to Excel.
See also Excel Options.
Sheet Name The name of the worksheet in Excel where to copy the numerical results.
TopLeft Specifies the Excel cell where the results are copied. Should be in the form
CR where C is Excel column name, R is the row number. For example, A1 is
the top-left cell in the worksheet.
Summary of Numerical Results
The following information is available in the Summary of Numerical Results
Column Description
Variable Variable name.
YMin Hazard minimum.
YMax Hazard maximum.
Spikes The number of spikes used in calculation.
Filter Length The length of all the intervals of the interval filter (if a filter was used) or the
length or the recording session (in seconds).
Mean Freq. Mean firing rate (Spikes/Filter_Length).
Mean Hazard. The mean of the hazard values.
Algorithm
First, the program calculates the interspike interval histogram using interspike intervals that are less than
Max IIH Interval.
The hazard function is then calculated according to the following formula (N.Sabatier, et.al., Phasic spike
patterning in rat supraoptic neurones in vivo and in vitro, J. Physiol. 558.1 (2004) pp 161-180):
(hazard in bin [t, t+dt]) = (number of intervals in bin [t,t+dt])/(number of intervals of length > t)
where dt is the bin size.
Hazard Time Max (which specifies the last bin of the hazard function) is expected to be smaller than
Max IIH Interval. If Hazard Time Max = Max IIH Interval, the hazard value for the last bin is always 1.
Then the maximum of Y axis is set to 1 and smaller hazard values are scaled down. We want to avoid
this.
Page 185
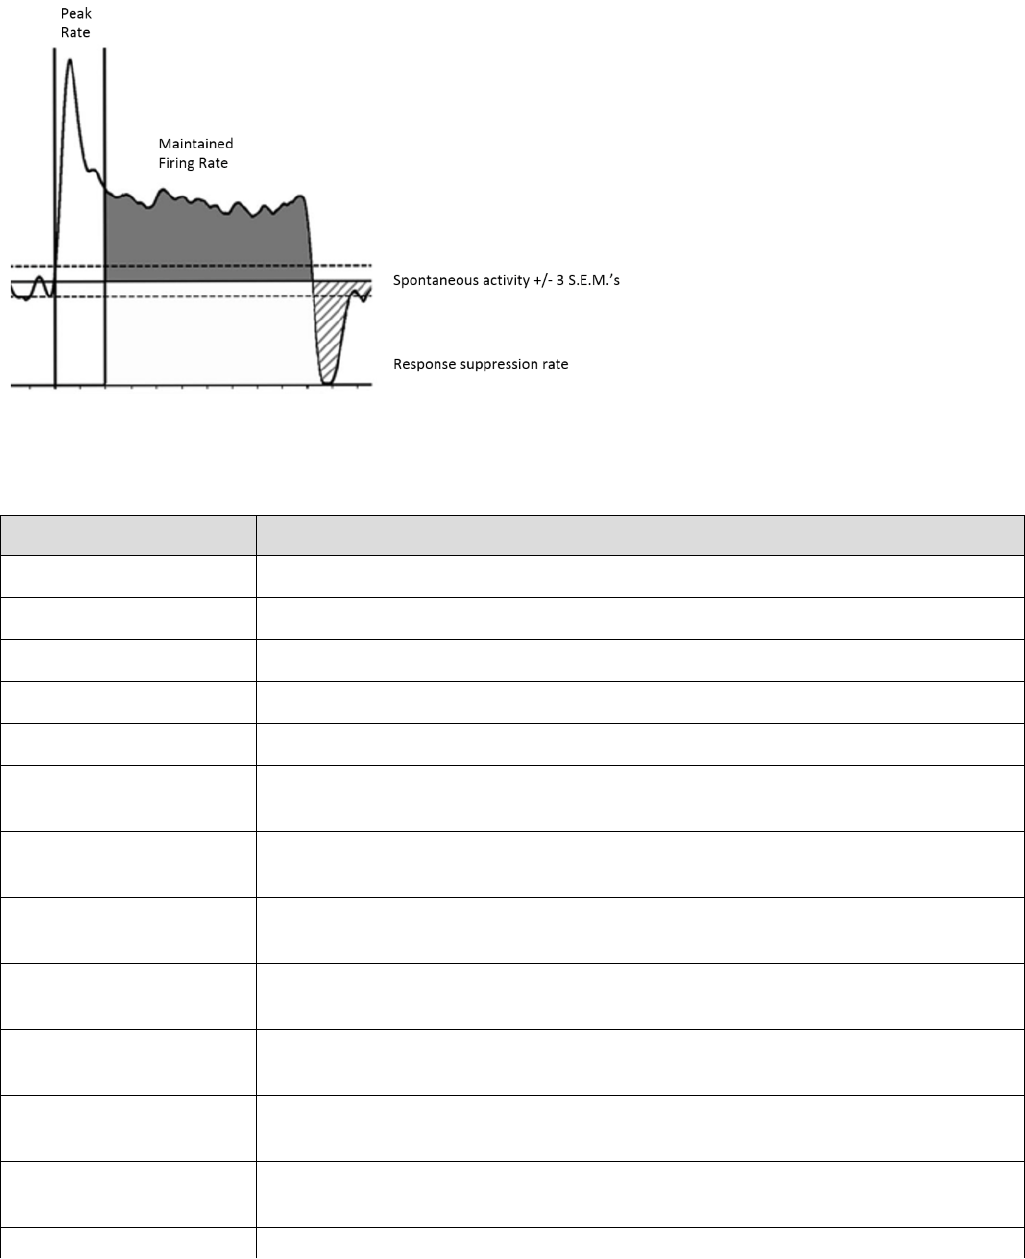
3.45. Perievent Firing Rates
This analysis is similar to Perievent Histograms, but instead of counting numbers of spikes in bins, this
analysis uses method based on convolution of a spike train with a fixed kernel function.
[Figure provided by Dr. Maureen McCall, University of Louisville School of Medicine]
Parameters
Parameter Description
Reference Specifies a reference neuron or event.
XMin Time axis minimum in seconds.
XMax Time axis maximum in seconds
Kernel Type The type of kernel to be used (Boxcar, Triangle, Gaussian or Exponential)
Kernel Width (sec) Kernel width in seconds
Draw Variation An option to draw variation of firing across reference events as a colored
background.
Variation (st. err. mean) Number of standard errors of mean in the colored background around firing
rate mean.
Variation Background
Color
The color to be used for drawing of the colored background around firing rate
mean.
Draw Mean and
Standard Error of Mean
An option to draw expected mean firing rate and plus/minus Variation *
S.E.M.
Calculate Response
Statistics
An option to calculate response statistics.
Spontaneous Activity
Interval Filter
The interval variable used to calculate spontaneous activity mean and S.E.M.
Peak Time Frame Start
(seconds)
The start of the time interval (relative to reference) used to calculate peak
firing rate.
Page 186
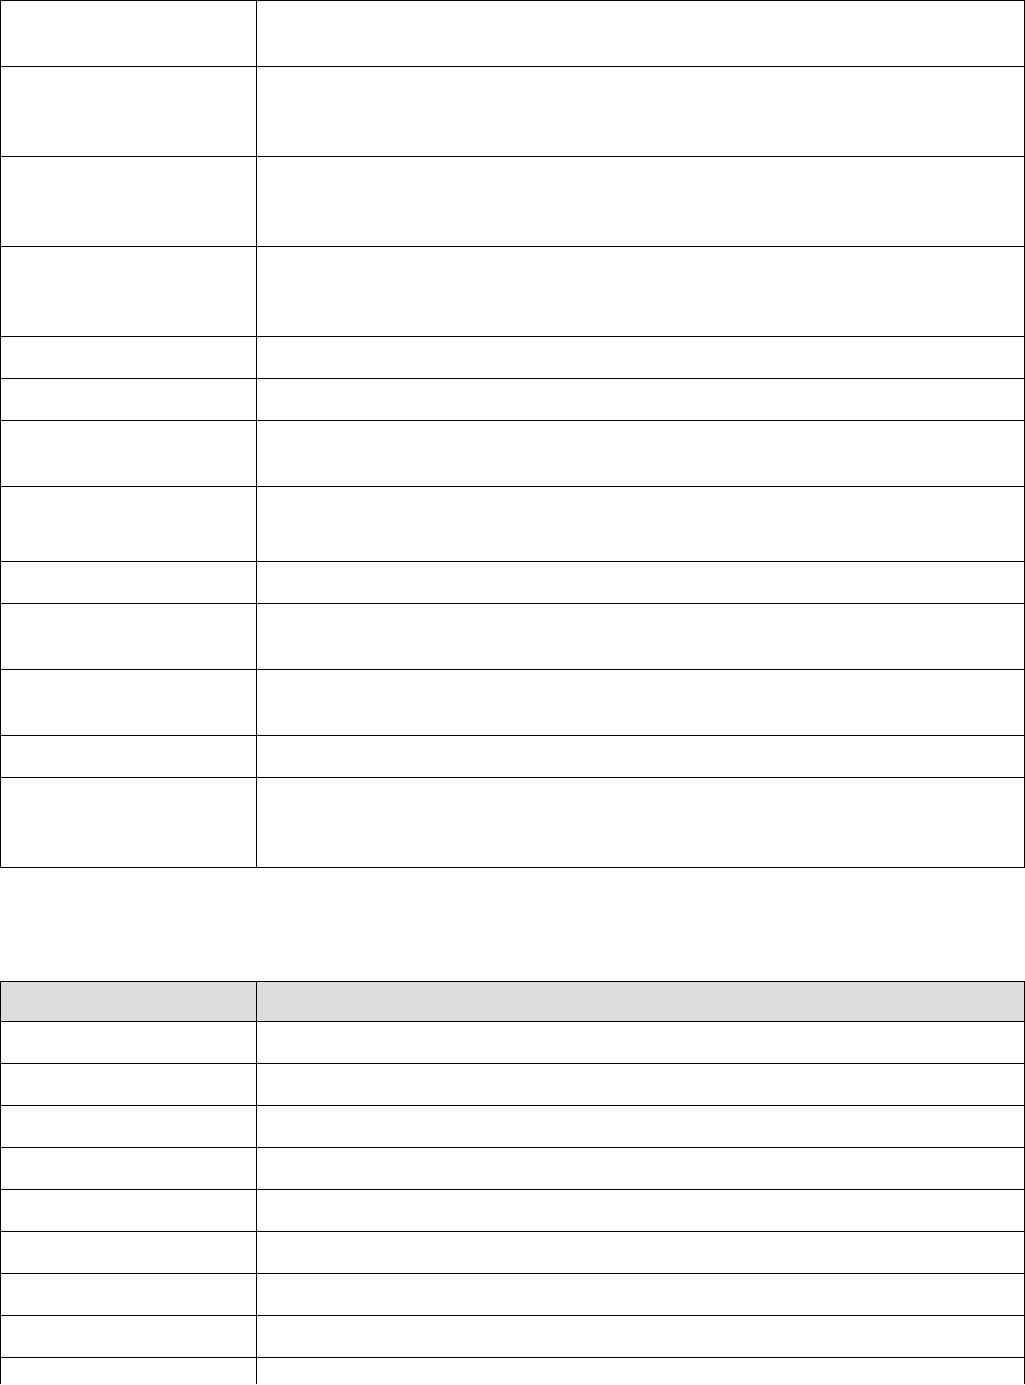
Peak Time Frame End
(seconds)
The end of the time interval (relative to reference) used to calculate peak
firing rate.
Maintained Firing Rate
Time Frame Start
(seconds)
The start of the time interval (relative to reference) used to calculate
maintained firing rate.
Maintained Firing Rate
Time Frame End
(seconds)
The end of the time interval (relative to reference) used to calculate
maintained firing rate.
Select Data If Select Data is From Time Range, only the data from the specified (by
Select Data From and Select Data To parameters) time range will be used in
analysis. See also Data Selection Options.
Select Data From Start of the time range in seconds.
Select Data To End of the time range in seconds.
Interval filter Specifies the interval filter that will be used to preselect data before analysis.
See also Data Selection Options.
Send to Matlab An option to send the matrix of numerical results to Matlab. See also Matlab
Options.
Matrix Name Specifies the name of the results matrix in Matlab workspace.
Matlab command Specifies a Matlab command that is executed after the numerical results are
sent to Matlab.
Send to Excel An option to send numerical results or summary of numerical results to Excel.
See also Excel Options.
Sheet Name The name of the worksheet in Excel where to copy the numerical results.
TopLeft Specifies the Excel cell where the results are copied. Should be in the form
CR where C is Excel column name, R is the row number. For example, A1 is
the top-left cell in the worksheet.
Summary of Numerical Results
The following information is available in the Summary of Numerical Results
Column Description
Variable Variable name.
XMin Time axis minimum.
XMax Time axis maximum.
YMin Y axis minimum.
YMax Y axis maximum.
FiringRateMin Firing rate minimum.
FiringRateMax Firing rate maximum.
NumRefEvents The number of reference events used in calculation.
Page 187
NumSpikes The number of spikes used in calculation.
Filter Length The length of all the intervals of the interval filter (if a filter was used) or the
length or the recording session (in seconds).
ResponsePresent 1 if firing rate exceeded SpontaneuousMean + Variation*S.E.M.
PeakRate Peak firing rate (max. of firing rate in Peak Time Frame).
PeakPosition Peak firing rate position in seconds.
MaintainedRate Mean firing rate in Maintained Time Frame.
ResponseDuration Response duration in seconds.
SupressionStart Suppression start time in seconds.
SupressionEnd Suppression end time in seconds.
Algorithm
The firing rate is estimated using convolution of a spike train with a fixed kernel function:
FiringRate(t) = sum of K(t-t[i]), where K(t) is a kernel function, t[i] are spike occurrence times.
The following kernel functions are used
Boxcar(t) = 1/(2*sqrt(3)*w), t in interval [-sqrt(3)*w, sqrt(3)*w]
Triangle(t) = (sqrt(6)*w - abs(t))/(6*w*w), t in interval [-sqrt(6)*w, sqrt(6)*w]
Gaussian(t) = exp(-t*t/(2*w*w))/(sqrt(2*PI)*w), t in interval [-5*w, 5*w]
Exponential(t) = exp(-sqrt(2)*abs(t)/w/(sqrt(2)*w), t in interval [-5*w, 5*w]
w is a kernel width parameter (square root of the integral of t square times kernel equals w). It is
specified as Kernel Width analysis parameter.
For each reference event at time Ref[k], FiringRate(t) is calculated for the spikes within time interval
[Ref[k]+ XMin, Ref[k]+ XMax ]
The average firing rate across all reference event is then calculated and displayed.
To calculate response statistics, spontaneous mean and standard error of mean (S.E.M) are calculated:
For each interval in interval variable (specified in Spontaneous Activity Interval Filter), the mean firing
rate is calculated. Spontaneous mean is the average of mean rates over all the intervals. S.E.M. is the
standard error of mean over all the intervals.
If perievent firing rate exceeded SpontaneuousMean + Variation*S.E.M, ResponsePresent is set to to 1.
ResponseDuration is the time when perievent firing rate drops below SpontaneuousMean.
SupressionStart is the time when perievent firing rate drops below SpontaneuousMean -
Variation*S.E.M.
SupressionEnd is the time when perievent firing rate returns to SpontaneuousMean.
SuppressionRate is the minimum firing rate in the interval [SupressionStart, SupressionEnd]
References
Nawrot, Martin, Ad Aertsen, and Stefan Rotter. Single-trial estimation of neuronal firing rates: from single-
neuron spike trains to population activity. Journal of neuroscience methods 94.1 (1999): 81-92.
Page 188
Shigeru Shinomoto. Estimating the Firing Rate. Analysis of Parallel Spike Trains. Springer Series in
Computational Neuroscience, Volume 7, 2010, pp 21-35
Page 189
3.46. Find Oscillations
This analysis identifies episodes of oscillatory activity in the specified frequency band in recorded analog
signals.
Parameters
Parameter Description
XMin (sec) Analysis is run on the data from a specific time range [XMin, XMax]. XMin
specifies time range minimum in seconds.
XMax (sec) Analysis is run on the data from a specific time range [XMin, XMax]. XMax
specifies time range maximum in seconds.
Window Width (sec) Frequency power ratios are calculated in consecutive time windows. This
parameter specifies the width of each window in seconds.
Use Custom Window
Shift
By default (if Use Custom Window Shift is not checked), window shift is
equal to Window Width (sec) (so the analysis is done over consecutive non-
overlapping windows). If Use Custom Window Shift option is selected, the
shift is specified by Window Shift (sec) parameter.
Window Shift (sec) If Use Custom Window Shift is not checked, window shift is equal to
Window Width (sec) and this parameter is ignored. If Use Custom Window
Shift option is selected, the shift is specified by Window Shift (sec)
parameter.
Main Band Min Freq
(Hz)
Specifies minimum of the main frequency band in Hz (for example, 3 Hz for
theta band).
Main Band Max Freq
(Hz)
Specifies maximum of the main frequency band in Hz (for example, 6 Hz for
theta band).
Method Specifies what method to use to identify periods with oscillations. There are
two method options: Use Ratio to Other Band or Use Percent of Main
Band.
Second Band Min Freq
(Hz)
Specifies minimum of the second frequency band in Hz (for example, 2 Hz for
delta band). If Method is Use Percent of Main Band, this parameter is
ignored.
Second Band Max Freq
(Hz)
Specifies maximum of the second frequency band in Hz (for example, 3 Hz
for delta band). If Method is Use Percent of Main Band, this parameter is
ignored.
Min Power Ratio Ratio of the power of the main frequency to the power of the second
frequency must exceed this value. If Method is Use Percent of Main Band,
this parameter is ignored.
Min Percent Percent of spectrum energy of the main band must exceed this value. If
Method is Use Ratio to Other Band, this parameter is ignored.
Min Number of Windows If Method is Use Ratio to Other Band, the Ratio must exceed Min Power
Ratio in a number of consecutive windows. This parameter specifies
minimum number of consecutive windows. If Method is Use Percent of Main
Band, the Percent of spectrum energy of the main band must exceed Min
Percent in a number of consecutive windows. This parameter specifies
minimum number of consecutive windows.
Page 190
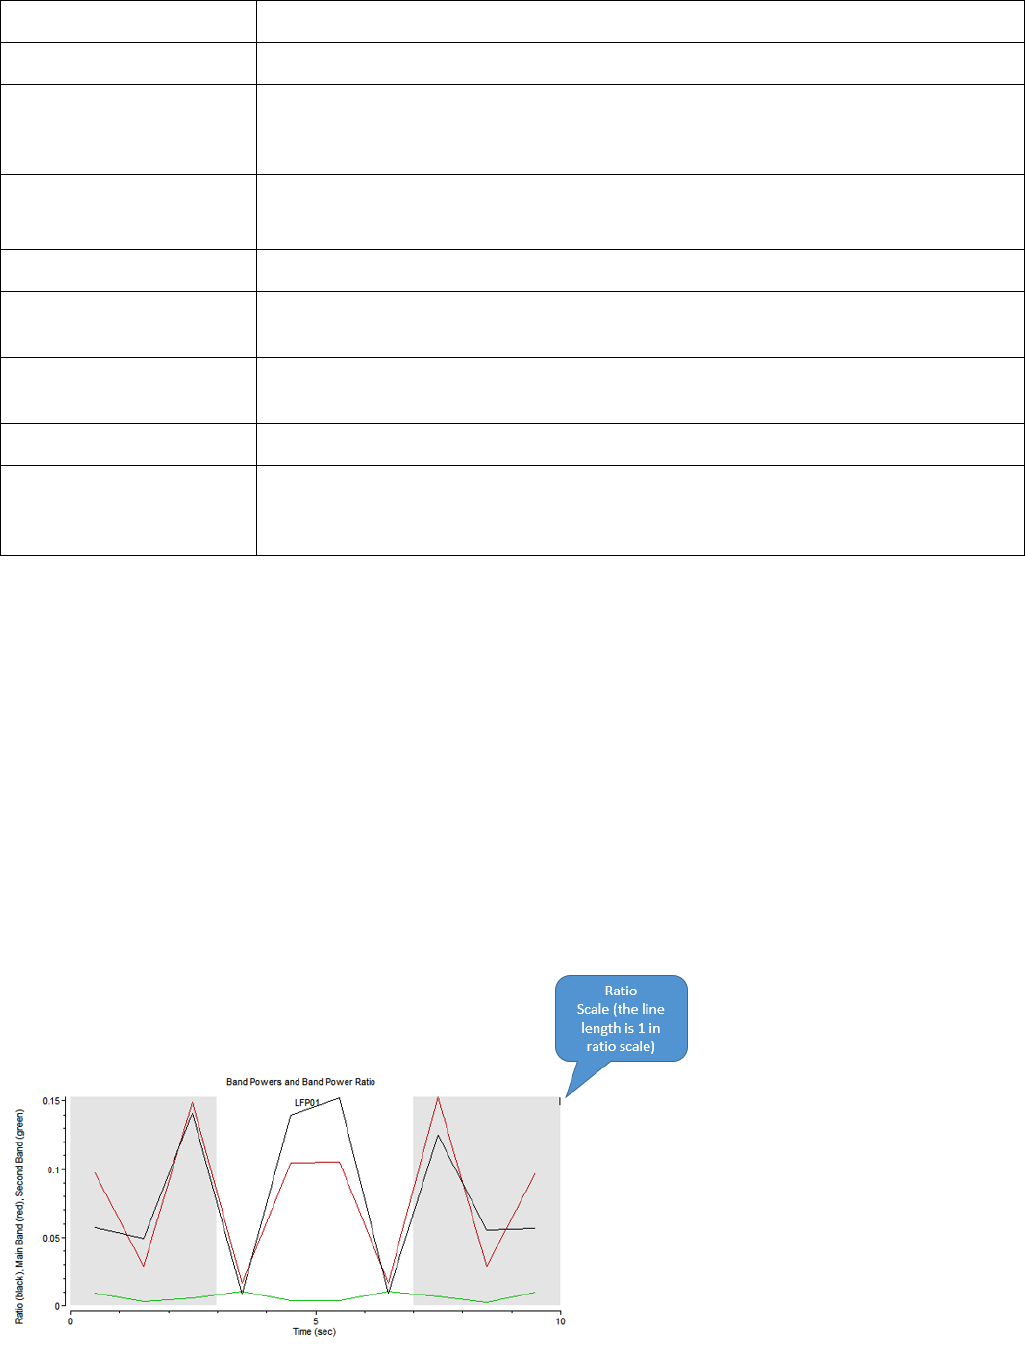
Filter Type The type of the frequency filter.
Filter Order The order of the frequency filter.
Result Prefix The prefix for generating names of the results. For example, if we analyze
variable LFP and the prefix is Theta, the results will have names
LFP_Theta_Epochs, LFP_Theta_Filtered and LFP_Theta_ZeroPhase.
Send to Matlab An option to send the matrix of numerical results to Matlab. See also Matlab
Options.
Matrix Name Specifies the name of the results matrix in Matlab workspace.
Matlab command Specifies a Matlab command that is executed after the numerical results are
sent to Matlab.
Send to Excel An option to send numerical results or summary of numerical results to Excel.
See also Excel Options.
Sheet Name The name of the worksheet in Excel where to copy the numerical results.
TopLeft Specifies the Excel cell where the results are copied. Should be in the form
CR where C is Excel column name, R is the row number. For example, A1 is
the top-left cell in the worksheet.
Analysis Results
This analysis adds several new variables to the data file. For example, if we analyze continuous variable
LFP and the Result Prefix is Theta, this analysis will add the following new variables to the file:
- LFP_Theta_Epochs (interval variable that specifies beginning and end of each oscillatory episode)
- LFP_Theta_ZeroPhase (event variable containing timestamps of the starts of the oscillation cycles)
- LFP_Theta_Filtered (continuous variable containing band-filtered LFP)
Variables LFP_Theta_ZeroPhase and LFP_Theta_Epochs can then be used in Firing Phase analysis.
Graphical results display the values of energy for each band (red line for main band energy and green
line for the second band energy) as well as the values of power ratio (black line).
Y axis shows the scale for the band energy values. The scale for the power ratio is shown as a vertical
line in the upper-right corner of the graph:
Page 191
The gray background areas show the identified epochs of oscillatory activity.
Algorithm
For each window, the spectrum of the signal in this window is calculated.
If Method is Use Ratio to Other Band:
- The power of each band is calculated as an average spectrum value for the frequencies in the band.
- If Min Power Ratio is 4 and Min Number of Windows is 3, a ratio greater than 4 in at least 3 consecutive
windows is identified as a start of an oscillatory epoch. The subsequent windows are added to the epoch
if the band power ratio for each window is greater than 4.
If Method is Use Percent of Main Band:
- The percent or spectrum values in the Main Band is calculated.
- If Min Percent is 2 and Min Number of Windows is 3, a percent of main band greater than 2 in at least 3
consecutive windows is identified as a start of an oscillatory epoch. The subsequent windows are added
to the epoch if the percent of the main band for each window is greater than 2.
After the oscillatory epochs are identified, the continuous variable is band-filtered within these epochs
(with filter band specified as [Main Band Min Freq, Main Band Max Freq]). Hilbert transform is then
applied to the filtered signal. The jumps of the phase of the Hilbert transform from 360 degrees to zero
are identified as starts of the oscillation cycles.
References
Klausberger et al. Brain-state- and cell-type-specific firing of hippocampal interneurons in vivo. Nature.
2003 Feb 20;421(6925):844-8
Page 192

3.47. Firing Phase
This analysis determines phase relationships between single cell and continuous signal activity.
Parameters
Parameter Description
Zero Phase Event Specifies an event variable containing timestamps of the starts of the
oscillation cycles. Usually, this variable is created by running Find Oscillations
analysis.
Oscillation Epochs Specifies an interval variable that specifies beginning and end of each
oscillatory episode. Usually, this variable is created by running Find
Oscillations analysis.
Number of Phase Bins Number of bins in [0,360] degrees phase range.
Select Data If Select Data is From Time Range, only the data from the specified (by
Select Data From and Select Data To parameters) time range will be used in
analysis. See also Data Selection Options.
Select Data From Start of the time range in seconds.
Select Data To End of the time range in seconds.
Interval filter Specifies the interval filter that will be used to preselect data before analysis.
See also Data Selection Options.
Smooth Option to smooth the result after the calculation. See Post-Processing
Options for details.
Smooth Filter Width The width of the smooth filter. See Post-Processing Options for details.
Send to Matlab An option to send the matrix of numerical results to Matlab. See also Matlab
Options.
Matrix Name Specifies the name of the results matrix in Matlab workspace.
Matlab command Specifies a Matlab command that is executed after the numerical results are
sent to Matlab.
Send to Excel An option to send numerical results or summary of numerical results to Excel.
See also Excel Options.
Sheet Name The name of the worksheet in Excel where to copy the numerical results.
TopLeft Specifies the Excel cell where the results are copied. Should be in the form
CR where C is Excel column name, R is the row number. For example, A1 is
the top-left cell in the worksheet.
Summary of Numerical Results
The following information is available in the Summary of Numerical Results
Column Description
Variable Variable name.
Page 193

YMin Y axis minimum.
YMax Y axis maximum.
NumSpikes The number of spikes used in calculation.
CyclesUsed The number of oscillation cycles used in calculation.
Algorithm
For each interval of the Oscillation Epochs variable:
- Timestamps of Zero Phase Event in this interval are selected
- For each oscillation cycle (a pair of selected Zero Phase Event timestamps (zero_phase[i],
zero_phase[i+1]):
- Spikes in the oscillation cycle [zero_phase[i], zero_phase[i+1]) are selected
- For each selected spike, spike phase is calculated as
360*(spike_time - zero_phase[i)/(zero_phase[i+1] - zero_phase[i])
A histogram of spike phases is calculated. Histogram bin counts are divided by the number of spikes in
all oscillation cycles.
References Klausberger et al. Brain-state- and cell-type-specific firing of hippocampal interneurons in
vivo. Nature. 2003 Feb 20;421(6925):844-8
Page 194
3.48. Detect Spikes
This analysis optionally subtracts reference channel, band-pass filters continuous variables and detects
spikes using threshold crossing algorithm. Detected spikes are added to current data file as new
waveform variables.
Parameters
Parameter Description
Subtract Reference An option to subtract reference channel before filtering and spike detection.
Reference Channel Reference Channel to subtract before filtering and spike detection.
Filter Before Detection An option to band-pass filter continuous variables (using Butterworth filter)
before spike detection.
Filter Order The Butterworth filter order.
Filter Frequency From Minimum frequency (Hz) of the band-pass filter.
Filter Frequency To Maximum frequency (Hz) of the band-pass filter.
Threshold type An option specifying how the threshold is calculated (see Algorithm below).
Custom Threshold Threshold value or number of standard deviations (can be negative, see
Algorithm below).
Threshold Crossing
Type
Type of threshold crossing to use. Auto (if threshold is nonnegative, detect a
spike when the signal crosses the threshold when signal is going up, if
threshold is negative, detect a spike when the signal crosses the threshold
when signal is going down); Up (detect a spike when the signal crosses the
threshold when signal is going up); Down (detect a spike when the signal
crosses the threshold when signal is going down).
Segment Before
Threshold (mS)
Signal segment before threshold to include into spike waveform.
Segment After
Threshold (mS)
Signal segment after threshold to include into spike waveform.
Minimum Time Between
Spikes
Minimum time between spikes.
Select Data If Select Data is From Time Range, only the data from the specified (by
Select Data From and Select Data To parameters) time range will be used in
analysis. See also Data Selection Options.
Select Data From Start of the time range in seconds.
Select Data To End of the time range in seconds.
Interval filter Specifies the interval filter(s) that will be used to preselect data before
analysis. See also Data Selection Options.
Summary of Numerical Results
The following information is available in the Summary of Numerical Results
Page 195

Column Description
Variable Variable name.
YMin Y axis minimum.
YMax Y axis maximum.
Threshold The threshold value used to detect spikes (in mV).
Spikes Detected The number of spikes detected.
Algorithm
The standard deviation of the signal (SD) and the median of the signal absolute values (MA) are
calculated. 'Median Sigma' (MS) is equal to MA/0.6745 (see eq. 3.1 in Reference).
If threshold type is Auto, the threshold is equal to -4.0*MS (see eq. 3.1 in Reference).
If threshold type is Number of Median Sigma, the threshold is equal to Custom_Threshold*MS.
If threshold type is Number of Standard Deviations, the threshold is equal to Custom_Threshold*SD.
If threshold type is Absolute, the threshold is equal to Custom_Threshold.
The spike is detected if the signal crosses the threshold when signal is going up or down (depending on
the value of the Threshold Crossing Type parameter).
Reference
Neural Comput. 2004 Aug;16(8):1661-87. Unsupervised spike detection and sorting with wavelets and
superparamagnetic clustering. Quiroga R, Nadasdy Z, Ben-Shaul Y.
Page 196
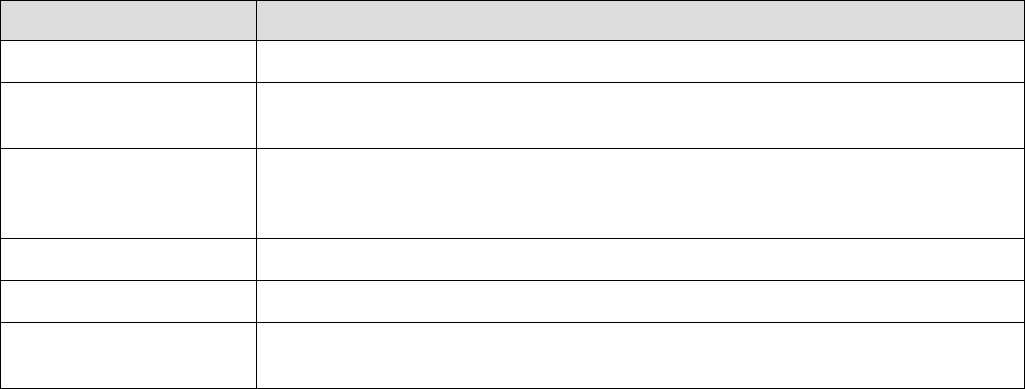
3.49. Python-based Analysis
This analysis uses a Python script to calculate analysis results.
Parameters
Parameter Description
Script Path Python script path.
Script Parameters as
JSON
Script Parameters as JSON string.
Select Data If Select Data is From Time Range, only the data from the specified (by
Select Data From and Select Data To parameters) time range will be used in
analysis. See also Data Selection Options.
Select Data From Start of the time range in seconds.
Select Data To End of the time range in seconds.
Interval filter Specifies the interval filter(s) that will be used to preselect data before
analysis. See also Data Selection Options.
Algorithm
For each selected data variable, NeuroExplorer will execute the specified Python script.
The script can specify script parameters in the comment lines at the top of the script file.
Use doc.GetPythonAnalysisInput() to get information about the current data variable and to get the
values of analysis parameters.
Use doc.SetPythonAnalysisOutput() to specify numerical results of the analysis as JSON string.
The results object should be a dictionary with 'XValues' and 'YValues' properties containing Python lists
of numeric values (see lines with result['XValues'] and result['YValues'] in the script below).
Here is a script that calculates a DFT-based spectrum for a specified Continuous variable:
#Description: calculates the spectrum of the selected signal RANGE via DFTs
# Range selection is done using Select Data, From, To in Data Selection tab
# Assumes that less than 100,000 data points are selected.
#Parameter:name=Show Frequency From;default=0
#Parameter:name=Show Frequency To;default=100000
import nex
import json
import math
# helper function to select data from specified time range
def IntervalFilterVarIfNeeded( doc, var, pars ):
selData = pars['Select Data']
theFilter = pars['Interval Filter']
if selData == 'All' and theFilter == 'None':
# no need to filter
return var
mainFrom = 0.0
mainTo = nex.GetDocEndTime(doc)
Page 197
if selData == 'From Time Range':
mainFrom = float(pars['Select Data From (sec)'])
mainTo = float(pars['Select Data To (sec)'])
tempInt = nex.NewIntEvent(doc, 0)
nex.AddInterval(tempInt, mainFrom, mainTo)
if theFilter == 'None':
return nex.IntervalFilter(var, tempInt)
else:
tempInt1 = nex.IntAnd(tempInt, doc[theFilter])
return nex.IntervalFilter(var, tempInt1)
# main calculate function of the script
# called in the last line of the script below
def Calculate():
doc = nex.GetActiveDocument()
# get the variable info and values of script parameters
inputJson = doc.GetPythonAnalysisInput()
inputPars = json.loads(inputJson)
# get all analysis parameters (we need to get data selection options)
parsJson = doc.GetAllAnalysisParameters()
pars = json.loads(parsJson)
variable = inputPars['Variable']
if variable['Type'] != 'Continuous':
raise ValueError('This analysis can only analyze Continuous variables')
filteredVar = IntervalFilterVarIfNeeded(doc, doc[variable['Name']], pars)
v = filteredVar.ContinuousValues()
numberOfContValues = len(v)
if numberOfContValues > 100000:
raise ValueError('Too many Continuous values')
freqFrom = float(inputPars['ScriptParameters']['Show Frequency From'])
freqTo = float(inputPars['ScriptParameters']['Show Frequency To'])
samplingRate = float(variable['SamplingRate'])
spectrumStep = samplingRate/numberOfContValues
spectrum = nex.Spectrum(v)
s = sum(spectrum)
result = {}
result['XAxisLabel'] = 'Frequency (Hz)'
result['YAxisLabel'] = 'Spectrum (%)'
result['XValues'] = []
result['YValues'] = []
for i in range(len(spectrum)):
freq = i*spectrumStep
if freq >= freqFrom and freq <= freqTo:
result['XValues'].append(freq)
result['YValues'].append(100.0*spectrum[i]/s)
if len(result['XValues']) == 0:
Page 198
raise ValueError('Frequency range is too narrow: frequency step = ' +
str(spectrumStep))
doc.SetPythonAnalysisOutput(json.dumps(result))
# call Calculate()
Calculate()
Page 199
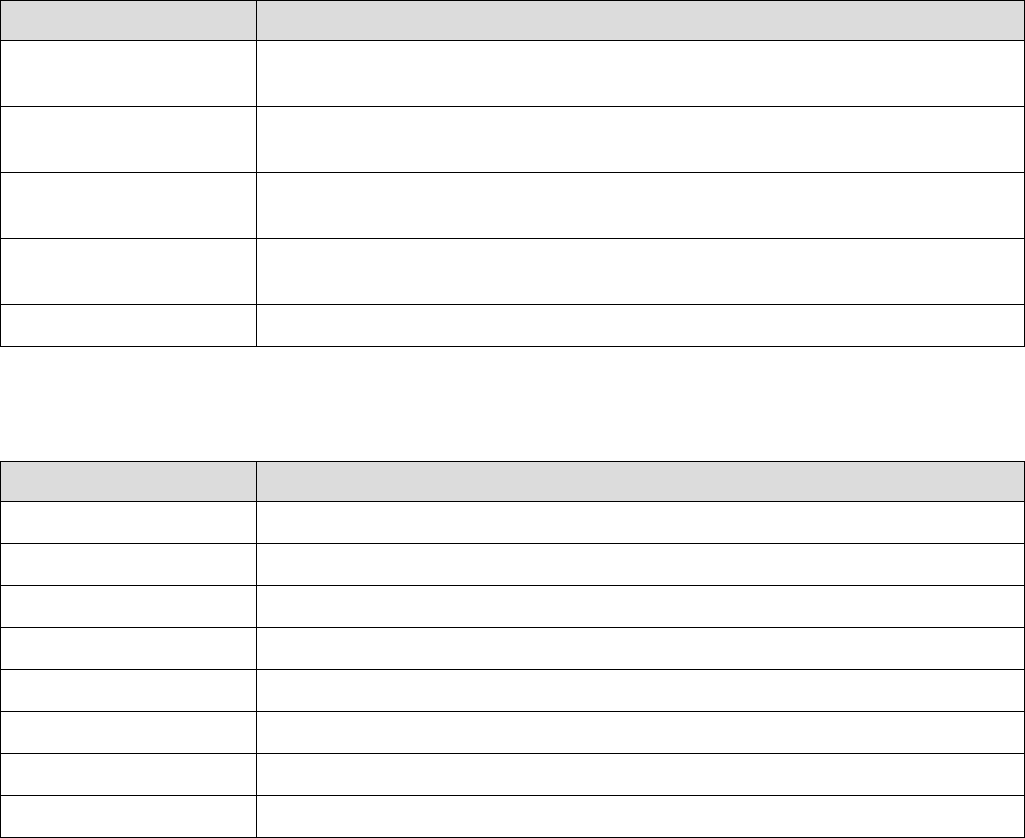
3.50. CV2 Analysis
CV2 Analysis evaluates variability of interspike intervals by comparing only adjacent interspike intervals.
CV2 statistic is less sensitive to rate variations than other measures such as the coefficient of variation of
interspike intervals.
Parameters
Parameter Description
Time Min (sec) Only the timestamps in time interval [Time Min, Time Max] will be selected for
analysis.
Time Max (sec) Only the timestamps in time interval [Time Min, Time Max] will be selected for
analysis.
Max Mean of ISI Pair
(sec)
CV2 graph shows ISI variability versus Mean of ISI Pair. Max Mean of ISI
Pair specifies maximum of X axis in CV2 graphs
Mean of ISI Pair Bin
(sec)
Bin size for calculation of CV2 mean and Standard Error of Mean.
Dot Size (pts) Specifies the size of the dots shown at (Mean of ISI Pair, CV2) coordinates.
Summary of Numerical Results
The following information is available in the Summary of Numerical Results
Column Description
Variable Variable name.
CV2 Min Y axis minimum.
CV2 Max Y axis maximum.
Time Min Minimum of the time interval that was used to select spikes.
Time Max Minimum of the time interval that was used to select spikes.
CV2 Mean Average of all CV2 values.
Spikes The number of spikes used in calculation.
Mean Firing Rate Mean firing rate of the spikes used in analysis.
Algorithm
If the spikes in a train occur at times t[i] (i = 1, 2, ..., N) then the ISIs will be isi[i] = t[i] - t[i-1] (i = 2, 3, ...,
N) CV2 is then calculated as CV2[i] = 2*abs(isi[i+1] - isi[i]) / (isi[i+1] - isi[i])
Dots in CV2 graph are drawn at (X,Y) locations ( ISIPairMean[i], CV2[i] ) where ISIPairMean[i] = (isi[i+1]
- isi[i]) / 2.
X (ISI pair mean) axis is divided into bins. For each bin, the mean of CV2 values and the Standard Error
of Mean of CV2 values are calculated.
Page 200
Reference
Holt, Gary R., William R. Softky, Christof Koch, and Rodney J. Douglas. "Comparison of discharge
variability in vitro and in vivo in cat visual cortex neurons." Journal of Neurophysiology 75, no. 5 (1996):
1806-1814.
Page 201
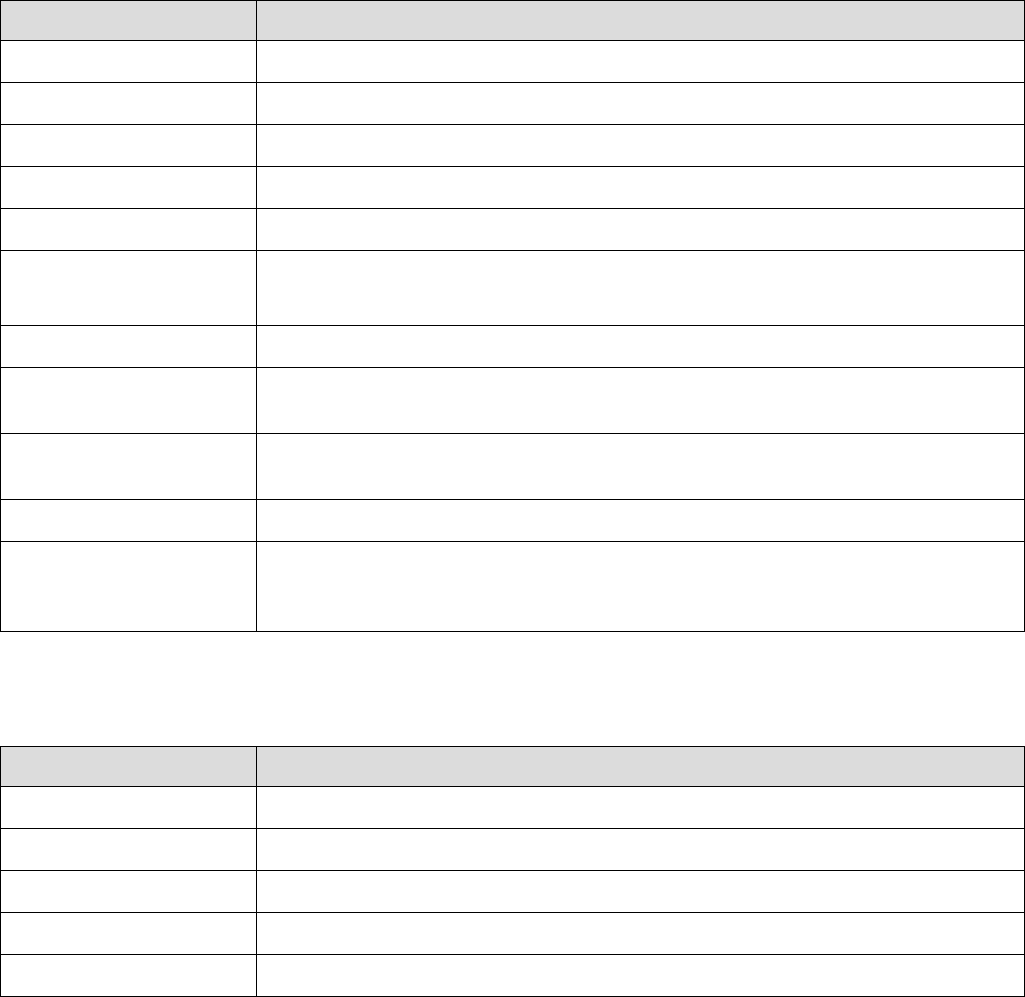
3.51. Firing Rates Analysis
Firing Rates analysis calculates and displays firing rates in specified time intervals or series of time
intervals.
Parameters
Parameter Description
Time Period 1 Type How period 1 is specified (None, Single Interval or Interval Variable).
Period 1 From (sec) If period 1 type is Single Interval, interval start in seconds.
Period 1 To (sec) If period 1 type is Single Interval, interval end in seconds.
Period 1 Interval Var. If period 1 type is Interval Variable, selected interval variable.
Period 1 Inside/Outside An option to calculate firing rates inside or outside specified time interval(s).
Send to Matlab An option to send the matrix of numerical results to Matlab. See also Matlab
Options.
Matrix Name Specifies the name of the results matrix in Matlab workspace.
Matlab command Specifies a Matlab command that is executed after the numerical results are
sent to Matlab.
Send to Excel An option to send numerical results or summary of numerical results to Excel.
See also Excel Options.
Sheet Name The name of the worksheet in Excel where to copy the numerical results.
TopLeft Specifies the Excel cell where the results are copied. Should be in the form
CR where C is Excel column name, R is the row number. For example, A1 is
the top-left cell in the worksheet.
Summary of Numerical Results
The following information is available in the Summary of Numerical Results
Column Description
Variable Variable name.
Period Spec 1 Period 1 specification.
Period Length 1 Length of period 1 in seconds.
Spikes in Period 1 The number of spikes in period 1.
Firing rate in Period 1 Firing Rate in period 1 (spikes per second).
Algorithm
For each specified interval or interval variable (series of time intervals), the number of events
(timestamps) within the time interval(s) is calculated. The number of timestamps is then divided by the
duration of the intervals(s).
Page 202
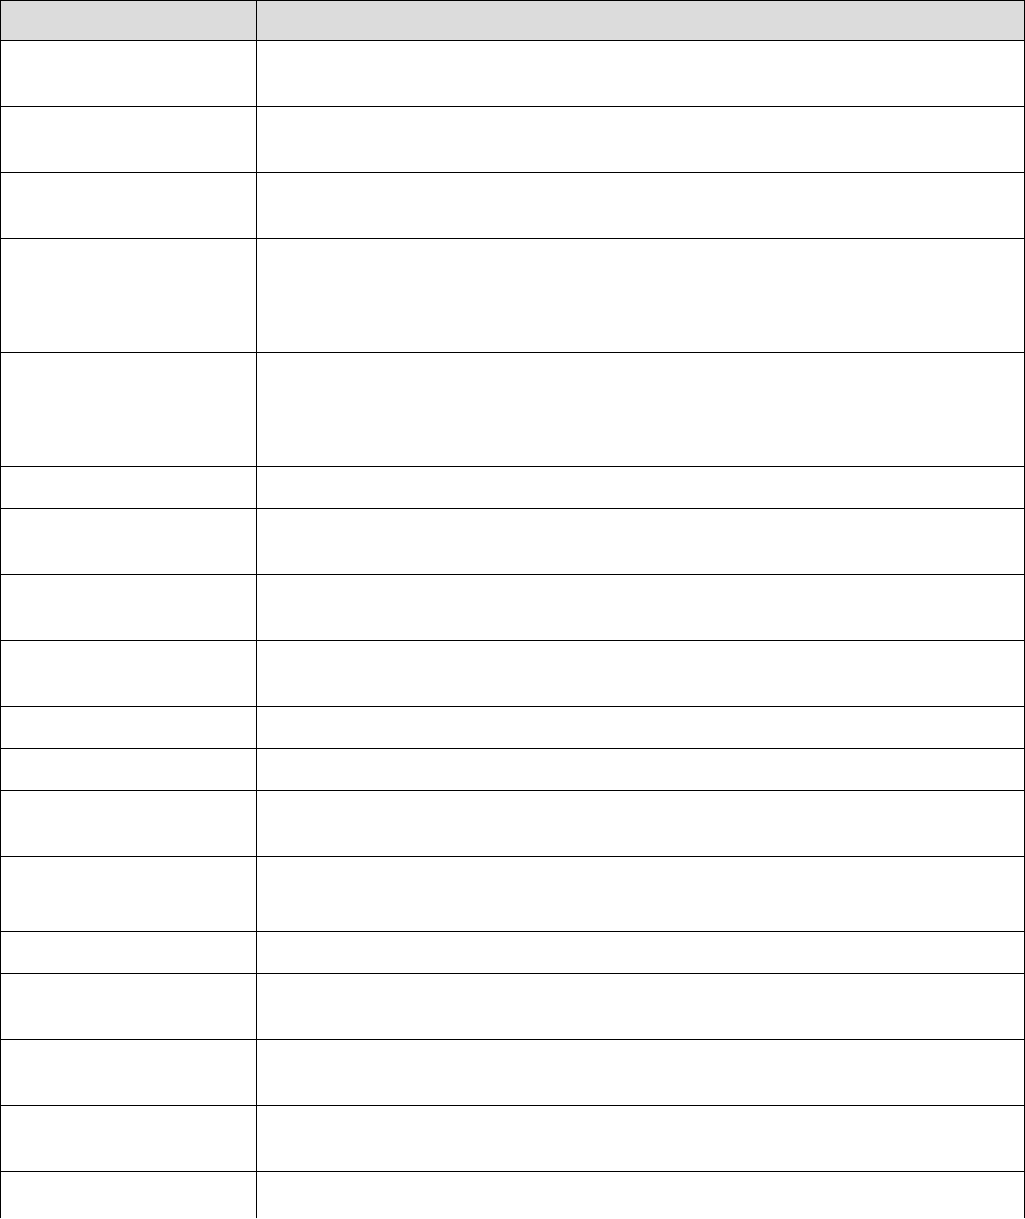
3.52. Band Energy versus Time Analysis
This analysis calculates energy of a specified frequency band over time.
Parameters
Parameter Description
XMin (sec) Analysis is run on the data from a specific time range [XMin, XMax]. XMin
specifies time range minimum in seconds.
XMax (sec) Analysis is run on the data from a specific time range [XMin, XMax]. XMax
specifies time range maximum in seconds.
Window Width (sec) Band energies are calculated in consecutive time windows. This parameter
specifies the width of each window in seconds.
Use Custom Window
Shift
By default (if Use Custom Window Shift is not checked), window shift is
equal to Window Width (sec) (so the analysis is done over consecutive non-
overlapping windows). If Use Custom Window Shift option is selected, the
shift is specified by Window Shift (sec) parameter.
Window Shift (sec) If Use Custom Window Shift is not checked, window shift is equal to
Window Width (sec) and this parameter is ignored. If Use Custom Window
Shift option is selected, the shift is specified by Window Shift (sec)
parameter.
Normalization Spectrum units (see Normalization below).
Min. Freq. (Hz) Specifies minimum of the frequency band in Hz (for example, 3 Hz for theta
band).
Max. Freq. (Hz) Specifies maximum of the frequency band in Hz (for example, 6 Hz for theta
band).
Select Data If Select Data is From Time Range, only the data from the specified time
range will be used in analysis. See also Data Selection Options.
Select Data From Start of the time range in seconds.
Select Data To End of the time range in seconds.
Interval filter Specifies the interval filter that will be used to preselect data before analysis.
See also Data Selection Options.
Smooth Option to smooth the result after the calculation. See Post-Processing
Options for details.
Smooth Filter Width The width of the smooth filter. See Post-Processing Options for details.
Add to Results / Bin left An option to add an additional vector (containing a left edge of each
frequency bin) to the matrix of numerical results.
Add to Results / Bin
middle
An option to add an additional vector (containing a center of each frequency
bin) to the matrix of numerical results.
Add to Results / Bin right An option to add an additional vector (containing a right edge of each
frequency bin) to the matrix of numerical results.
Result Prefix The prefix for generating names of the continuous variables. For example, if
Page 203
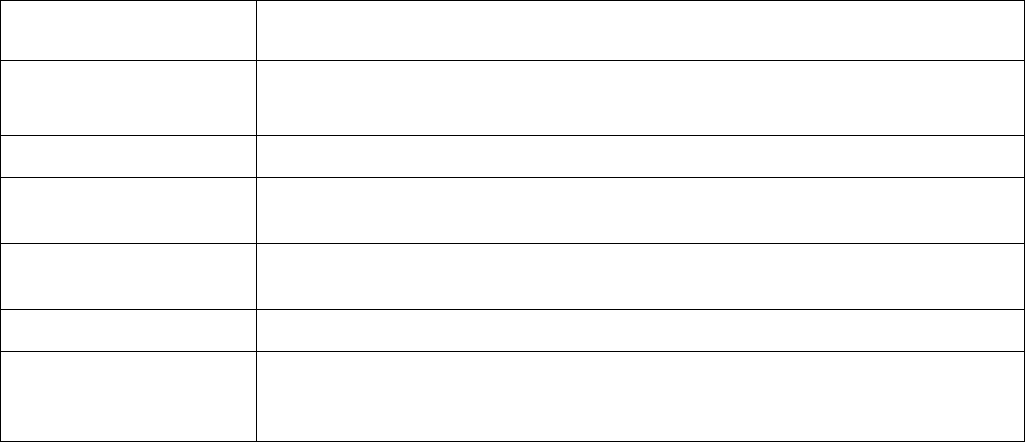
we analyze variable LFP and the prefix is Theta, the generated continuous
variable will be named Theta_LFP.
Send to Matlab An option to send the matrix of numerical results to Matlab. See also Matlab
Options.
Matrix Name Specifies the name of the results matrix in Matlab workspace.
Matlab command Specifies a Matlab command that is executed after the numerical results are
sent to Matlab.
Send to Excel An option to send numerical results or summary of numerical results to Excel.
See also Excel Options.
Sheet Name The name of the worksheet in Excel where to copy the numerical results.
TopLeft Specifies the Excel cell where the results are copied. Should be in the form
CR where C is Excel column name, R is the row number. For example, A1 is
the top-left cell in the worksheet.
Algorithm
For each window, the spectrum of the signal in this window is calculated. For the values of the specified
frequency band, average, sum or percent of these values is calculated.
Normalization
If Normalization is Raw PSD (Numerical Recipes), the power spectrum is normalized so that the sum of
all the spectrum values is equal to the mean squared value of the rate histogram. The formulas (13.4.10)
of Numerical Recipes in C are used. (Numerical Recipes in C, Press, Flannery, et al. (Cambridge
University Press, 1992))
If Normalization is % of Total PSD (Numerical Recipes), the power spectrum is normalized so that the
sum of all the spectrum values equals 100.
If Normalization is Log of PSD (Numerical Recipes), the power spectrum is calculated using the formula:
power_spectrum[i] = 10.*log10(raw_spectrum[i])
where raw_spectrum is calculated as described above in Raw PSD (Numerical Recipes).
If Normalization is Raw PSD (Matlab), the power spectrum is normalized as described in
http://www.mathworks.com/help/signal/ug/psd-estimate-using-fft.html
If Normalization is Log of PSD (Matlab), the power spectrum is calculated using the formula:
power_spectrum[i] = 10.*log10(raw_spectrum_matlab[i])
where raw_spectrum_matlab is calculated as described above in Raw PSD (Matlab).
Page 204
4. Working with Graphics
Graphical analysis results in NeuroExplorer can be adjusted by the user to include custom labels, lines
and arrows. The topics in this section describe the graphics elements, list the attributes that you can use
with them, and show how to customize NeuroExplorer graphics output.
Page 205
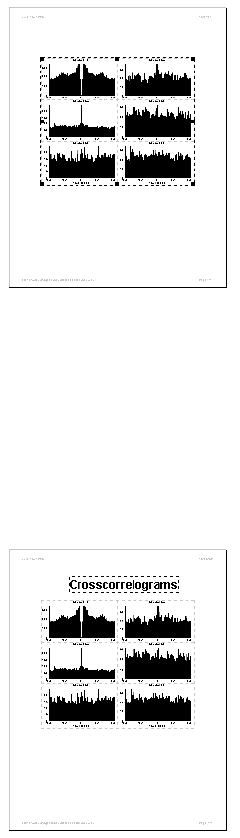
•
•
•
4.1. NeuroExplorer Graphics
NeuroExplorer Graph Window shows the graphs as they will be printed on a page. If you press Zoom Out
button several times, you'll see the whole page with the graphs, header and footer:
NeuroExplorer Graph Window shows one or more graphics objects. The page above has only one object
- a block of graphs. You can add more objects by using Insert menu commands.
For example, to add a label to the NeuroExplorer Graph Window:
select Insert | Text menu command
click in the Graph window where you want the new label to be placed
edit the label properties in the Text Dialog
Here is the page shown above with an additional Text object ("Crosscorrelograms" label):
Page 206
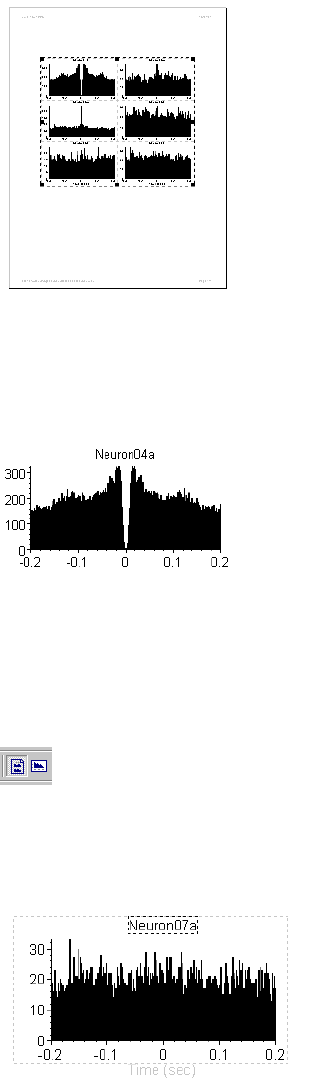
•
4.2. Graphics Modes
The standard display of the NeuroExplorer Graph Window shows the graphics in the Page Mode:
In this mode, you can add, delete and edit page graphics objects, i.e. the graphics elements that you
want to have on the page.
Each graph in the page, however, has its own set of graphics objects. Thus, the default graph usually
contains the text label that displays the variable name (Neuron04a in this picture):
To edit the properties of the graphical objects (like the label "Neuron04a" above) that belong to the graph
, you need to switch the Graph Window to the Graph Mode.
Use Graphics | Edit Graphics | Graph Layout Mode and Graphics | Edit Graphics | Page Layout
Mode menu commands to switch the graphics mode in NeuroExplorer. You can also use the following
toolbar buttons to switch the graphics modes:
The left button will switch the Graph Window to the Page Mode, the right button will switch it to the Graph
Mode.
Here is the typical picture in Graph Mode:
Only one graph is visible in this mode. While in the Graph Mode, you can select, drag, resize and edit the
graphical objects that will appear in every graph.
For example, to move the variable name label to a different position relative to the graph:
Switch to the Graph Mode as described above
Page 207
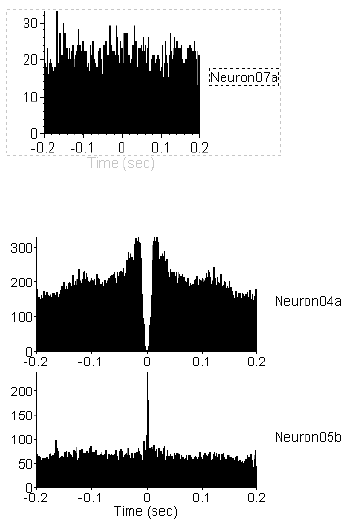
•
•
•
Click on the text label to select it
Drag the label to a different position:
Switch back to the Page Mode:
Note that the labels of all graphs are now in new positions.
Page 208
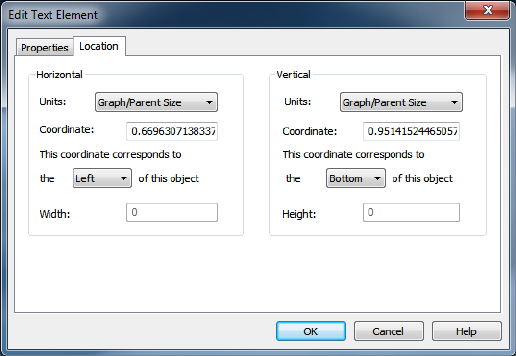
4.3. Positioning the Graphics Objects
Every graphical object in NeuroExplorer has its parent. Thus, the Block of Graphs is a parent of all the
page graphics objects. The Graph is a parent of all the objects inside the graph (X and Y axes, variable
label, etc.).
A position of any graphics object is always specified relative to its parent. When you move or resize the
owner, other objects will move together with their parent.
There are several types of coordinates units that you can use to position the objects.
For X coordinates, NeuroExplorer has the following options:
Graph Width. With these coordinate units, 0.0 corresponds to the left edge of the owner, 1.0
corresponds to the right edge of the parent.
Inches From Left. Here 0.0 corresponds to the left edge of the parent. If you want on object to be 0.3
inches to the left of the parent, specify X as -0.3.
Inches From Right. Here 0.0 corresponds to the right edge of the parent. If you want on object to be 0.3
inches to the right of the parent, specify X as 0.3.
Graph Data. With these coordinate units, X coordinate corresponds to the graph X axis.
For Y coordinates, NeuroExplorer has the following options:
Graph Height. With these coordinate units, 0.0 corresponds to the bottom edge of the parent, 1.0
corresponds to the top edge of the parent.
Inches From Bottom. Here 0.0 corresponds to the bottom edge of the parent. If you want on object to
be 0.3 inches below of the parent, specify Y as -0.3.
Inches From Top. Here 0.0 corresponds to the top edge of the parent. If you want on object to be 0.3
inches above the parent, specify Y as 0.3.
Graph Data. With these coordinate units, Y coordinate corresponds to the graph Y axis.
Use Location tab in the graphics object Edit dialog to specify the object's position:
Coordinates and alignment options shown in this dialog are for the text label in the following graph:
Page 209
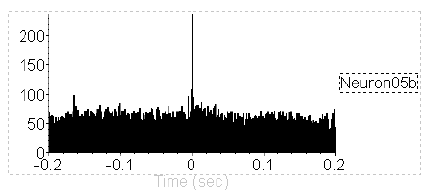
This text object is located to the right of the graph, so the X coordinate is 1.05 with the Graph Size units
and horizontal alignment Left.
The object is centered vertically relative to the graph, so its Y coordinate is 0.5 with the Graph Size units
and vertical alignment Center.
Page 210
•
•
•
•
4.4. Text Labels
To add a label in the NeuroExplorer Graph Window:
Select Insert | Text menu command
Move the mouse pointer to the Graph Window. Note that the cursor changes to the picture of a
hand
Click in the Graph window where you want the new label to be placed
Edit the label properties in the displayed Text Dialog
To specify the font, press Change Font button.
To specify the exact position of the text object, use the Location page of the dialog. See Positioning the
Graphics Objects for details.
To specify the text of the label, type the text of the label in the Text field.
In many cases there is a need to specify a text that depends on the opened data file, the variable in the
graph, etc. NeuroExplorer uses Template Strings to accomplish this task.
Template String is a string enclosed in brackets (for example, <VarName> ). During the drawing
process, NeuroExplorer tries to find the actual string for each of the template strings. If the actual string is
found, the template string is replaced by the actual string. For example, if the variable used in the graph
is Neuron04a, the <VarName> string in the text object is replaced by Neuron04a.
Insert button in the Text Edit Dialog opens a menu that allows you to insert various Template Strings into
the text object. You can also manually type in the template strings into the text field of the dialog.
Here is the list of available template strings:
<VarName> - replaced by the name of the variable used in a graph. Works in the graph labels only.
<ColVarName> - replaced by the name of the variable used for a column of graphs. Works in the page
labels only when the analysis has a reference variable and the reference type is Table.
<RowVarName> - replaced by the name of the variable used for a row of graphs. Works in the page
labels only when the analysis has a reference variable and the reference type is Table.
<Bin> - replaced by the bin value in seconds.
<BinMS> - replaced by the bin value in milliseconds.
<RefName> - replaced by the name of the reference variable. Works only when the analysis has a
reference variable.
<NumRef> - replaced by the number of reference events. Works only when the analysis has a reference
variable.
<FileName> - replaced with the name of the data file.
<FilePath> - replaced with the full path of the data file.
<Date> - replaced with current date.
<Time> - replaced with current time.
<Smooth> - replaced with one of the three strings "None", "Boxcar" or "Gaussian", depending of the
current smooth selection. Works with histogram-type analyses only.
<SmoothWidth> - replaced with the smooth filter width. Works with histogram-type analyses only.
<IntFilter> - replaced with the name of the Interval Filter.
Page 211
<FirstInt> - replaced with the first interval of the Interval Filter (if Interval Filter is specified), or the
interval from 0 to the end of experiment (if the filter is not specified).
Page 212
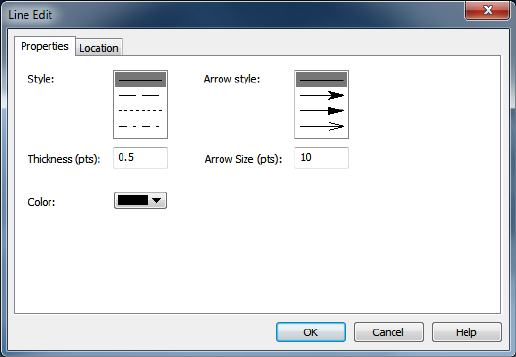
•
•
•
•
•
4.5. Lines
To add a line in the NeuroExplorer Graph Window:
Select Insert | Line menu command
Move the mouse pointer to the Graph Window. Note that the cursor changes to the picture of a
hand
Click in the Graph window where you want the new line to start and keep the left mouse button
down
Drag the mouse pointer to the place where you want the new line to end
Release mouse button
To edit the properties of the line, double-click at the line. The following dialog will be displayed:
Line thickness and the size of the arrow are specified in points (1/72th of the inch).
To specify the exact position of the line, use the Location page of the dialog. See Positioning the
Graphics Objects for details.
Page 213
•
•
•
•
•
4.6. Rectangles
To add a rectangle in the NeuroExplorer Graph Window:
Select Insert | Rectangle menu command
Move mouse pointer to the Graph Window. Note that the cursor changes to the picture of a hand
Click in the Graph window where you want to position the top-left corner of the new rectangle and
keep the left mouse button down
Drag the mouse pointer to the place where you want to position the bottom-right corner of the new
rectangle
Release mouse button
To edit the properties of the rectangle, double-click anywhere in the rectangle and specify rectangle
parameters in Rectangle Properties dialog.
To specify the exact position of the rectangle, use the Location page of the dialog. See Positioning the
Graphics Objects for details.
Page 214
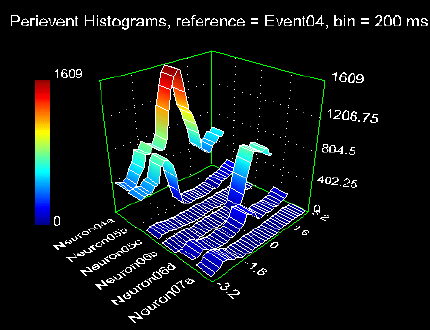
5. Working with 3D Graphics
NeuroExplorer 3D Graphics Module adds high quality 3D graphics to NeuroExplorer. It was always
possible before to export the analysis results from NeuroExplorer to Matlab and then create the 3D
graphs in Matlab. However, it would require a considerable amount of time and effort to create the
properly labeled 3D graph in Matlab. In NeuroExplorer version 3 and higher, a single click of a button will
display in NeuroExplorer a highly customizable and properly labeled 3D graph.
You can easily change dozens of graph parameters and options using the Properties Window or dialogs.
You can even rotate the graph with the mouse in all 3 dimensions.
As with the NeuroExplorer Analysis Templates, any set or 3D graph parameters can be saved as a
template. For example, you may save one set of color preferences for slide presentations and another
set of colors for printed materials.
NeuroExplorer also enables you to display a "movie" of the concurrent activity of a neuronal network.
You can specify a position of each recorded neuron in a plane (using Edit | Positions.. menu command)
and then display the animation of the activity of the neurons over time.
Here is an example of a 3D graph in NeuroExplorer. Multiple perievent histograms are shown side-by-
side in 3 dimensions:
Page 215
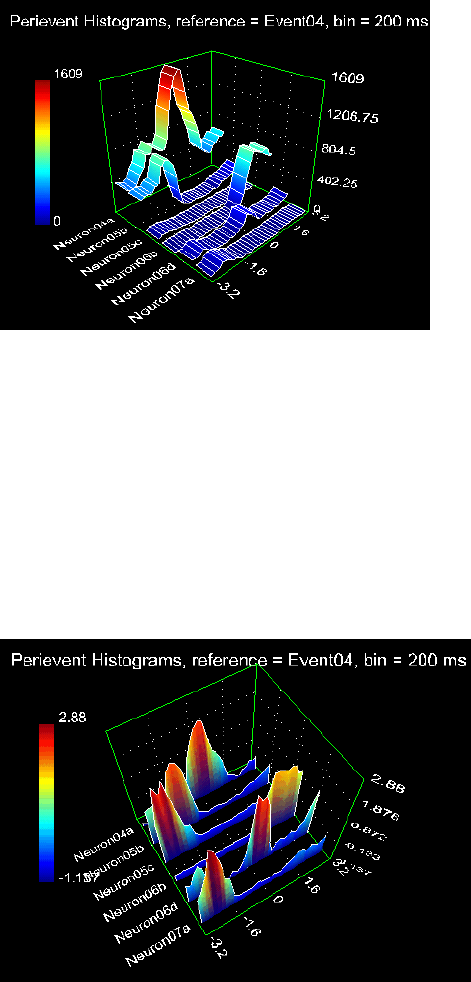
•
•
5.1. Viewing Multiple Histograms in 3D
To view a set of histograms in 3 dimensions:
Calculate the histograms by applying any of the histogram analyses (Rate Histograms, Interspike
Interval Histograms, Auto- and Cross-correlograms, Perievent Histograms, etc.)
Select 3D | View Histograms in 3D menu command.
NeuroExplorer will open the 3D Viewer window and all the histograms in the NeuroExplorer graphics
view will be shown in a 3D graph:
Note that all the histograms are shown in the same scale. However, neurons often have very different
firing rates so that the histograms for the slow firing neurons may be displayed as having almost zero
values.
If you would like to view the variations of the histograms around their respective means, you can use a
separate menu command, 3D | View Histogram Variations in 3D. This option will allow you to view the
z-scores of histograms instead of the raw histogram values. z-score is calculated as:
z = (histogram_value - histogram_mean)/histogram_standard_deviation
Here is the same set of histograms as above shown using 3D | View Histogram Variations in 3D menu
command (the graph type is also changed from 'Stripes' to 'Walls'):
For more information on 3D Viewer options and parameters, see 3D Graphics Parameters.
Page 216
5.2. 3D Graphics Parameters
3D Template - allows you to choose the 3D Template. When you start using 3D capabilities in
NeuroExplorer, only one 3D Template, Default is available. You can add templates by saving any set of
3D graphics parameters as a new template (to do this, use 3DView | Save As New 3D Template menu
command).
Graph Type - allows you to choose the graph type.
Draw Lines - an option to draw mesh or contour lines.
Z Color Scale - an option to use color scale in the graph.
Light - an option to use lighting effects in the graph.
Smooth - an option to smooth the graph using a 2D Gaussian filter.
Smooth Radius - smooth filter radius in mesh points.
Z Min, Z Max - overwritable minimum and maximum of the Z Axis.
Distance From Camera - this parameter determines the size of the graph in the window. The distance
should be between 1 and 10.
Draw Labels - an option to draw axes labels.
Title - 3D graph title.
Title Font Size, Label Font Size - font sizes relative to the 3D graph "cube" size.
Light X, Y, Z - position of the light source.
Page 217
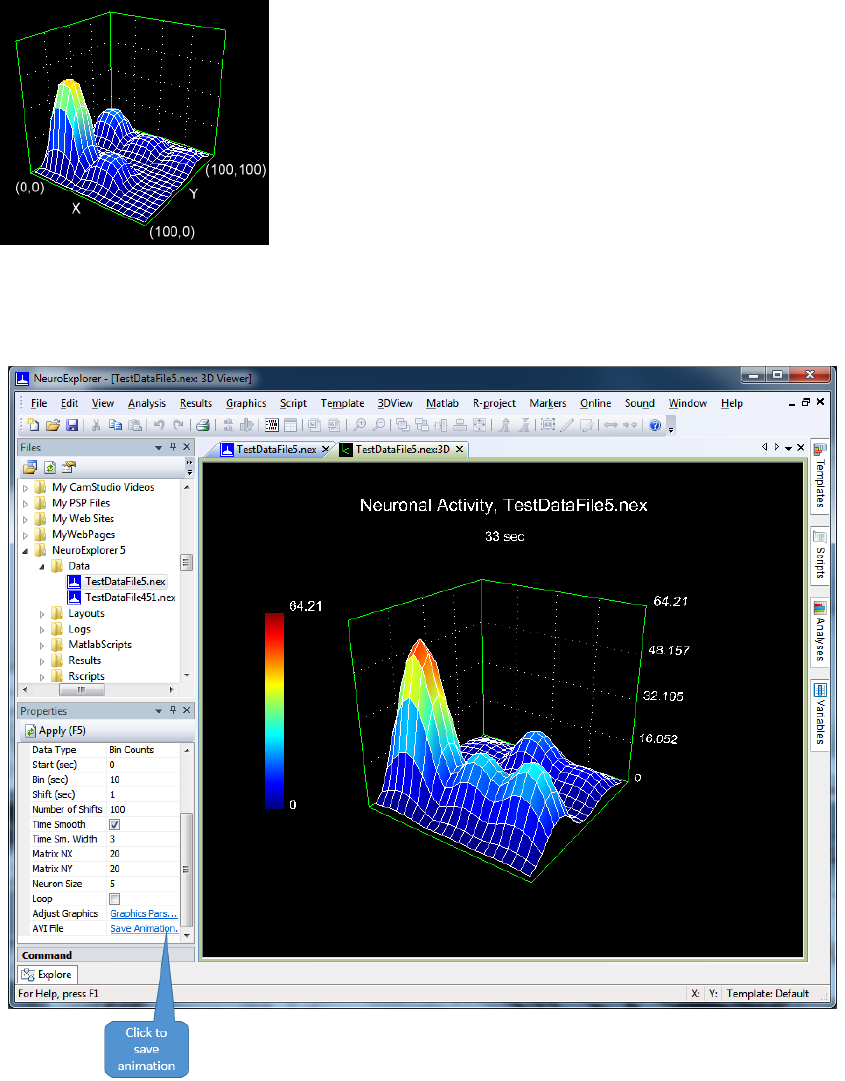
•
•
•
•
•
5.3. Viewing the Neuronal Activity "Movie"
To view a 'movie' of neuronal activity:
Open the data file.
Next, you need to specify the positions of neurons. Neuron positions are saved in a NeuroExplorer data
file, so you only need to do this once.
Select Edit | Set Positions of the Neurons menu command
Specify the positions of neurons in the Positions Dialog Box. NeuroExplorer assumes that all the
neurons are located on a plane with X and Y coordinates ranging from 0 to 100:
Select 3D | Activity Animation menu command.
Use the buttons in the Properties Panel to start and stop the animation.
You can save animation to an AVI file. To do this, press "Save Animation" button in the control panel:
Page 218
You may want to change the 3D graph properties to get the smooth surface shown above. To change the
graph properties, right-click in the 3D Viewer window and select Graphics Parameters menu command.
Select Surface plot type and enable Gaussian Smoothing.
For more information on 3D Viewer options and parameters, see 3D Graphics Parameters.
For more information on Activity Animation options and parameters, see Activity Animation Parameters.
Page 219
5.4. Activity Animation Parameters
Animation Template - allows you to choose the Animation Template. When you start using 3D
capabilities of NeuroExplorer, only one Animation Template, Default is available. You can add templates
by saving any set of Animation parameters as a new template (to do this, use 3DView | Save As New
Animation Template menu command).
Reference - if this parameter is None, NeuroExplorer shows the rate histograms-based animation (that
is, neuronal activity in real time). If this parameter is not None, NeuroExplorer calculates the perievent
histograms for the specified reference and shows neural network activity around the specified event.
NeuroExplorer uses a sliding window to calculate the firing rates of the neurons. The window has the
width equal to the Bin. The first window begins at Start time. The second window begins at Start+Shift
and ends at Start+Shift+Bin, etc. For each of the windows, the number of spikes that each neuron has
inside this window is calculated. Then for each neuron the point (X_position, Y_position, Spike_Count) is
shown in a 3D graph.
Start - beginning of the first sliding window.
Bin - width of the sliding window.
Shift - sliding window shift.
Number of shifts - number of windows (frames).
Time Smooth - allows you to enable or disable time smoothing of the spike counts.
Time Smooth Width - sigma of the Gaussian filter used for smoothing over time. See Post-Processing
Options for more information about smoothing the histograms.
Matrix NX - the number of points in the mesh in X direction.
Matrix NY - the number of points in the mesh in Y direction.
Neuron Size - the size of the square (in mesh points) that represents a single neuron.
Loop - an option to show the animation in a "loop" mode (after all the frames are shown, animation goes
back to the first frame and starts again).
Page 220
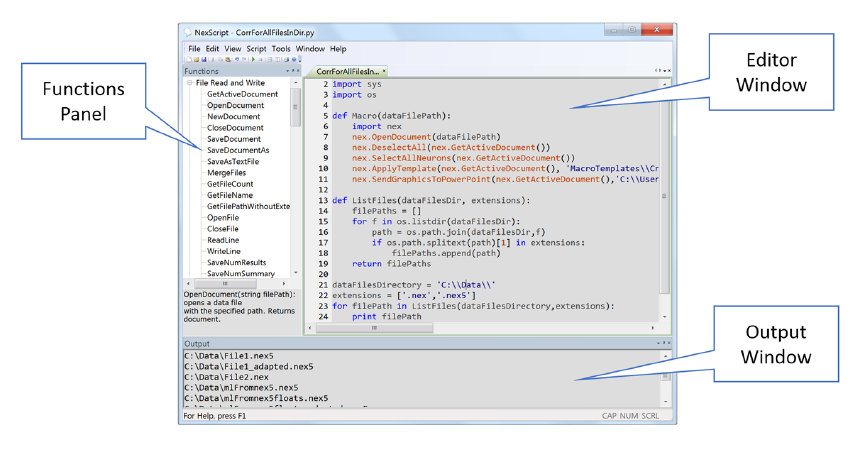
6. Programming with Python and NexScript
Starting with version 5.022, NeuroExplorer scripts can be written using a powerful and well-documented
Python language. NeuroExplorer uses Python 2.7.17 and Python 3.7.8 and there is no need to install
Python -- all the Python files needed for scripting are installed by NeuroExplorer setup program.
The new scripting capabilities in NeuroExplorer can only be used from Python. It is recommended that
you use Python for all new scripts.
Starting with version 5.036, you can also run Python scripts communicating with NeuroExplorer using a
Python development environment of your choice (for example, PyCharm is an excellent free Python
development environment with debugging and auto-completion). To use PyCharm, install Anaconda
Python distribution, install PyCharms, then invoke View | Options menu commands, go to Python tab,
enable Start TCP Server and restart NeuroExplorer:
If you are using Python via NeuroExplorer TCP server, all you need to do to connect to the server and
run NeuroExplorer commands is to add the following 3 lines to your script:
import sys
sys.path.append('C:\\ProgramData\\Nex Technologies\\NeuroExplorer 5 x64')
import nex
You can convert existing NexScript scripts to Python using Tools | Convert to Python menu command in
NexScript editor.
Python is a very popular language and you can find an extensive documentation on any Python feature
on the Web. One of the best introductions to Python is a book ' A Byte of Python '. You can read this
book here: http://www.swaroopch.com/notes/python/.
NeuroExplorer also has a less powerful internal scripting language (NexScript) resembling the Matlab
language.
To create a script, select the Script | New Script menu command. To open existing script, double-click
at the script name in the Scripts View. NeuroExplorer will open NexScript editor:
NexScript editor has two docked panels: Functions Panel and Output Panel. In the Functions Panel, you
cal click at the function name to display function description. You can also double-click at the function
Page 221
name to insert the function into the script. The Output Panel displays compiler messages and debug
output (generated using print function in Python or Trace function in NexScript).
Scripts
Each script is a text file that has an extension .py (for Python script) or extension .nsc (for NexScript
script). Scripts are usually saved in user's Documents directory in NeuroExplorer 5\Scripts folder.
Note that you can create subfolders in the scripts folder. The scripts tree shown in the Scripts View is a
copy of the scripts directory specified above. You can create subfolders in your scripts directory and then
NeuroExplorer will allow you to navigate through the scripts directory tree within the Scripts View.
Lines and Comments in Python
Python is a very popular language and you can find an extensive documentation on any Python feature
on the Web. One of the best introductions to Python is a book ' A Byte of Python '. You can read this
book here: http://www.swaroopch.com/notes/python/.
The hash symbol (#) marks the beginning of a comment in Python, for example:
# this is a comment line in Python
x = 0 # this is also a comment in Python
Variables and Expressions in Python
See http://www.swaroopch.com/notes/python/#op_exp.
Flow Control in Python
See http://www.swaroopch.com/notes/python/#control_flow.
Lines and Comments in NexScript
Each line of the script may contain only one statement, for example:
x = 0
If the statement is very long, you can use the line continuation symbol (backslash \) to indicate that the
next line contains the continuation of the current line. For example, instead of:
Dialog(doc, "D:\Plexon\data\mydata\*.plx", "Filter", "string")
you can write:
Dialog(doc, "D:\Plexon\data\mydata\*.plx",\
"Filter"", "string")
The percent symbol (%) marks the beginning of a comment in NexScript, for example:
% this is a comment line
x = 0 % this is also a comment
Variables and Expressions in NexScript
NexScript supports numeric variables and standard expressions:
xmean = (xmax - xmin)/2.
strings:
name = "SPK" + "01"
You can also query and modify file variables (spike trains, intervals, continuous variables, etc.).
See Variables and Expressions to learn more about the basics of NexScript.
Page 222
Flow Control in NexScript
for loops, while loops and if ... else constructs can be used for flow control:
imax = 0
doc = GetActiveDocument()
for i = 2 to n
interval = doc["SPK01a"][i] - doc["SPK01a"][i-1]
if interval > imax
imax = interval
end
end
See Flow Control for more information.
Functions
NeuroExplorer Python and NexScript interfaces offer more than 190 functions that allow you to edit data,
open and close files, perform analyses, save the results and send results to Matlab of Excel. See
Functions for more information.
Page 223
6.1. Script Variables
Variable Names
The variable name in NexScript should begin with a letter and contain only letters, digits and the
underscore sign.
The following names are valid:
Neuron01 Bar_press Nr_1a SPK02b
These variable names cannot be used in NexScript:
2Neuron Bar-press
The variables from the opened data file can be accessed using the document reference with the variable
name specified in the square brackets. For example, the spike train SPK01a from the active document
can be addressed as:
doc["SPK01a"]
where doc is a reference to the document. You can get this reference by calling GetActiveDocument or
calling OpenDocument.
An alternative way to access file variable is by getting a reference to the variable:
SPK01a = GetVarByName(doc, "SPK01a")
See Also File Variables
Variable Types
NexScript supports numeric variables:
xmean = (xmax - xmin)/2.
and strings:
name = "SPK" + "01"
A variable can also be a reference to the existing variable in the file:
neuron1 = GetVar(doc, 1, "neuron")
or a reference to the opened document:
doc = GetActiveDocument()
A variable type can be changed if the right-hand side of the assignment has a different type. For
example:
x = 0.005 % x now is a numeric variable
x = "SPK" % after this statement, x is a string
Global Variables
A variable can be declared global so that it can be accessed from several scripts:
Global name
Global statements should be placed at the beginning of the script.
See Also File Variables
Page 224
6.2. File Variables
The variables from the opened data file can be accessed using the document reference with the variable
name specified in the square brackets. For example, the spike train SPK01a from the active document
can be addressed as:
doc["SPK01a"]
where doc is a reference to the document. You can get this reference by calling GetActiveDocument or
calling OpenDocument.
An alternative way to access a file variable is by getting a reference to the variable:
spikeTrain = GetVarByName(doc, "SPK01a")
You can also use a string variable to specify the variable name using doc[VariableName] notation:
name = "SPK01b"
spikeTrainB = doc[name]
This way you can generate the new variable names in the script. For example, to create new variables
containing only the spikes of neuron variables that are within the intervals of the interval variable
CorrectTrials, you can write:
doc = GetActiveDocument()
numNeurons = GetVarCount(doc, "neuron")
for i = 1 to numNeurons
% generate the name for the new variable
newName = GetVarName(doc, i, "neuron") + "Filtered"
% run IntervalFilter operation
doc[newName] = IntervalFilter(GetVar(doc, i, "neuron"), doc["CorrectTrials"])
end
Assignments Involving File Variables
If the left-hand side of the assignment is not a file variable:
v = doc["Neuron01"]
the script variable v will contain a reference (a shortcut) to the file variable Neuron01 and Neuron01 spike
times will not be copied to v.
If the left-hand side of the assignment is a file variable:
doc["ContVarCopy"] = doc["ContChannel01"]
all the data of the file variable ContChannel01 will be copied to the new file variable ContVarCopy.
For example, to create a new continuous variable containing rectified signal of continuous variable FP01,
we can write the following code:
doc["FP01_Rectified"] = NewContVarWithFloats(doc, 10000)
for i=1 to GetContNumDataPoints(doc["FP01"])
t = doc["FP01"][i,1]
v = abs(doc["FP01"][i,2])
AddContValue(doc["FP01_Rectified"], t, v)
end
We can achieve the same result using variable references and copying data to a new variable (and the
code below will run more than 7 times faster than the code above):
doc["FP01_Rectified"] = doc["FP01"]
rectified = doc["FP01_Rectified"]
ContVarStoreValuesAsFloats( rectified )
n = GetContNumDataPoints( rectified )
Page 225
for i=1 to n
rectified[i,2] = abs( rectified[i,2] )
end
Access to the Data in File Variables
Timestamped Variables
You can access the timestamp value by specifying the timestamp index (1-based, i.e. the first timestamp
has index 1) in square brackets:
doc = GetActiveDocument()
% first option: use doc["VarName"] notation
timestamp = doc["SPK01a"][3]
% second option: get variable by name and then use the variable directly
spikeTrain = GetVarByName(doc, "SPK01a")
timestamp = spikeTrain[3]
You can assign a new value for any timestamp in the current file. For example, to assign the value 0.5
(sec) to the third timestamp of the variable SPK01a, you can use this script:
doc = GetActiveDocument()
doc["SPK01a"][3] = 0.5
You can also add timestamps to a variable using NexScript functions. See Properties of Variables and
Adding Data to Variables for details.
Interval Variables
IntVar[i,1] gives you read/write access to the start of the i-th interval, IntVar[i,2] gives you read/write
access to the end of the i-th interval.
For example, to assign the value 27.5 seconds to the end of the first interval of interval variable Frame,
you would use this script:
doc = GetActiveDocument()
doc["Frame"][1,2] = 27.5
You can also add intervals to an interval variable using NexScript functions. See Properties of Variables
and Adding Data to Variables for details.
Continuous Variables
ContVar[i,1] gives you read-only access to the timestamp of the i-th data point.
ContVar[i,2] gives you read-write access to the value of the i-th data point.
For example, the following script prints the timestamp and the value of the fifth data point in variable
ContChannel01:
Trace("ts = ", doc["ContChannel01"][5,1], "value =" ,doc["ContChannel01"][5,2])
The following script line assigns the value of 100 to the fifth data point:
doc["ContChannel01"][5,2] = 100.0
Note that when you assign a value to a continuous variable that was imported from a file created by a
data acquisition system, the assigned value might be clipped.
Data acquisition systems usually store continuous values as 2-byte integers. NeuroExplorer also stores
imported analog data as 2-byte integers with some scaling factors.
For example, if analog to digital converter has input range from -1000mV to +1000mV, then maximum 2-
byte value 32767 corresponds to 1000mV and the scaling factor is 1000/32768. If we try to assign the
Page 226
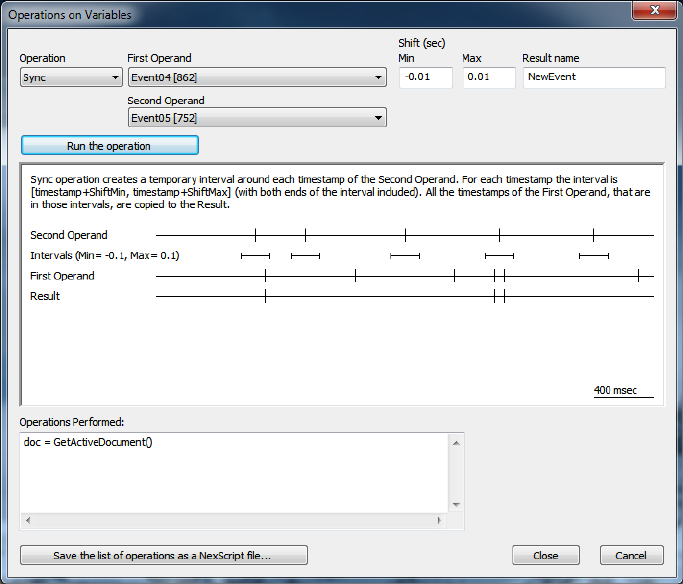
value that is outside the original input range, the value has to be clipped so that it could be stored as a 2-
byte integer (for example, if we try to assign 2000mV, the stored value will be 32767 or 1000mV).
To avoid data clipping, use ContVarStoreValuesAsFloats function to convert 2-byte integer storage to 4-
byte float storage that does not have clipping problems.
You can add new data points to a continuous variable using NexScript functions. See Properties of
Variables and Adding Data to Variables for details.
Marker Variables
MarkerVar[i,1] gives you read-only access to the timestamp of the i-th marker.
MarkerVar[i,2] gives you read-only access to the value of the first field of the i-th marker. Note that
marker field values are stored as strings, so you will need to use StrToNum() function to convert these
values to numbers.
For example, the following script prints the timestamp and the first field value of the fifth marker in
variable Strobed:
Trace("ts = ", doc["Strobed"][5,1], "marker value =" ,doc["Strobed"]5,2])
Operations on Variables
Many operations on data variables are available via Edit | Operations on Data Variables menu command.
This menu command opens Operations dialog:
The operation is specified in the top left corner of the dialog. When you select an operation, an operation
description is shown in the central panel of the dialog. When you press Run the Operation button, the
specified operation is performed and a script line is added to the 'Operations Performed' window at the
bottom of the dialog. You can save the list of operations in a NexScript file if you press the "Save.."
button.
Page 227
6.3. Expressions
Standard algebraic expressions are supported:
xmean = (xmax - xmin)/2.
Addition operation can also be applied to the strings:
name = "SPK" + "01"
Logical expressions may be used in if and while statements:
x = 2
if x >= 2
Trace("x is greater or equal to 2")
End
if x > 2
Trace("x > 2")
End
if x <= 2
Trace("x <= 2")
end
if x == 2
Trace("x equals 2")
end
if x <> 1
Trace("x is not equal to 1")
end
Logical expressions may be combined using logical AND (&) or logical OR (|) operators:
if (x >= 2) & (y <4)
Trace("x <=2 and y <4")
end
if (x >= 2) | (y <4)
Trace("x <=2 or y <4")
end
Page 229
6.4. Flow Control
Loops
NexScript supports two types of loops: for loops and while loops.
for loop has the following syntax:
for variable = expression to expression
statements ...
end
Example:
for i = 1 to 10
SelectVar(doc, i, "neuron")
end
while loop has the following syntax:
while logical_expression
statements ...
end
Example:
i = 1
while i < 10
SelectVar(doc, i, "neuron")
i = i + 1
end
break
break statement causes an immediate exit from the loop.
The following loop
for i = 1 to 10
Trace(i)
if i == 5
break
end
end
will produce output: 1 2 3 4 5
continue
continue statement returns to the loop's beginning skipping the statements that follow it.
The following loop
for i = 1 to 5
if i == 3
continue
end
Trace(i)
end
will produce output: 1 2 4 5
return
Page 230
return statement causes an immediate exit from the script.
Conditional operators
Operator if has the following syntax:
if logical_expression statements ... end
or
if logical_expression statements ... else statements ...
end
Example
% select a variable if it has at lest one spike
% otherwise, deselect the variable
if GetVarCount(doc, i, "neuron") > 0
SelectVar(doc, i, "neuron")
else
DeselectVar(doc, i, "neuron")
end
Page 231
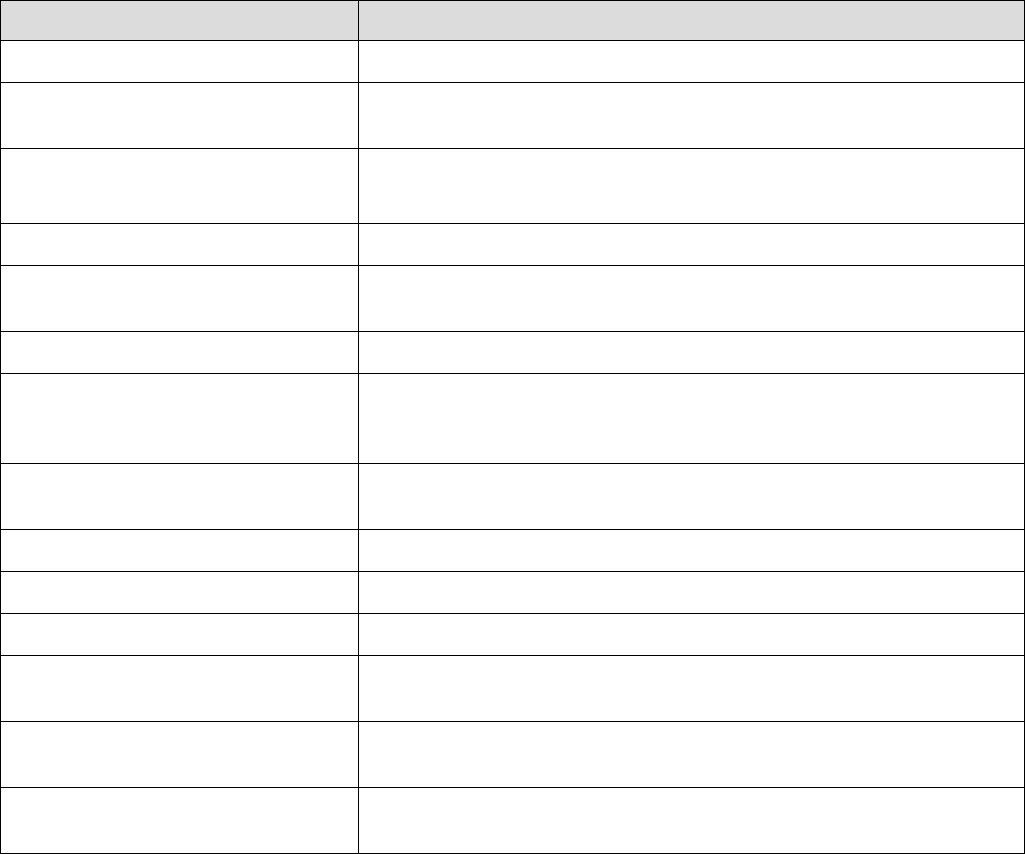
6.5. Functions
The following function categories are available in NexScript and Python
Category Description
File Read and Write Functions Functions to read data and text files, save data and results.
Document Properties Functions to access general document properties such as file
name and comment.
Document Variables and Adding
New Variables
Functions to get the number of spike trains, etc. in the document;
to get variable by name; to add new variables to the document.
Selecting Document Variables Functions to select variables for analysis.
Analysis Functions Functions to run analysis templates, modify templates, print
results.
Numerical Results Functions Functions to query and save numerical results.
Operations on Document Variables Functions to modify existing variables (for example, frequency
filter) and to run calculations based on the variables (for example,
find synchronous spikes).
Matlab Functions Functions to send data and results to Matlab and to read data from
Matlab.
Excel Functions Functions to send data and results to Excel.
PowerPoint Functions Functions to send graphical results to PowerPoint.
Running Script Functions Functions to run another script or to pause script.
Math Functions Various math functions (random numbers, bitwise operations,
square root, etc.).
String Functions Functions related to stings (search in string, substrings, convert
numbers to strings, etc.).
Debug Functions Functions that are helpful in debugging (for example, print script
variables).
See Also
Introduction to NexScript and Python Programming
Page 232
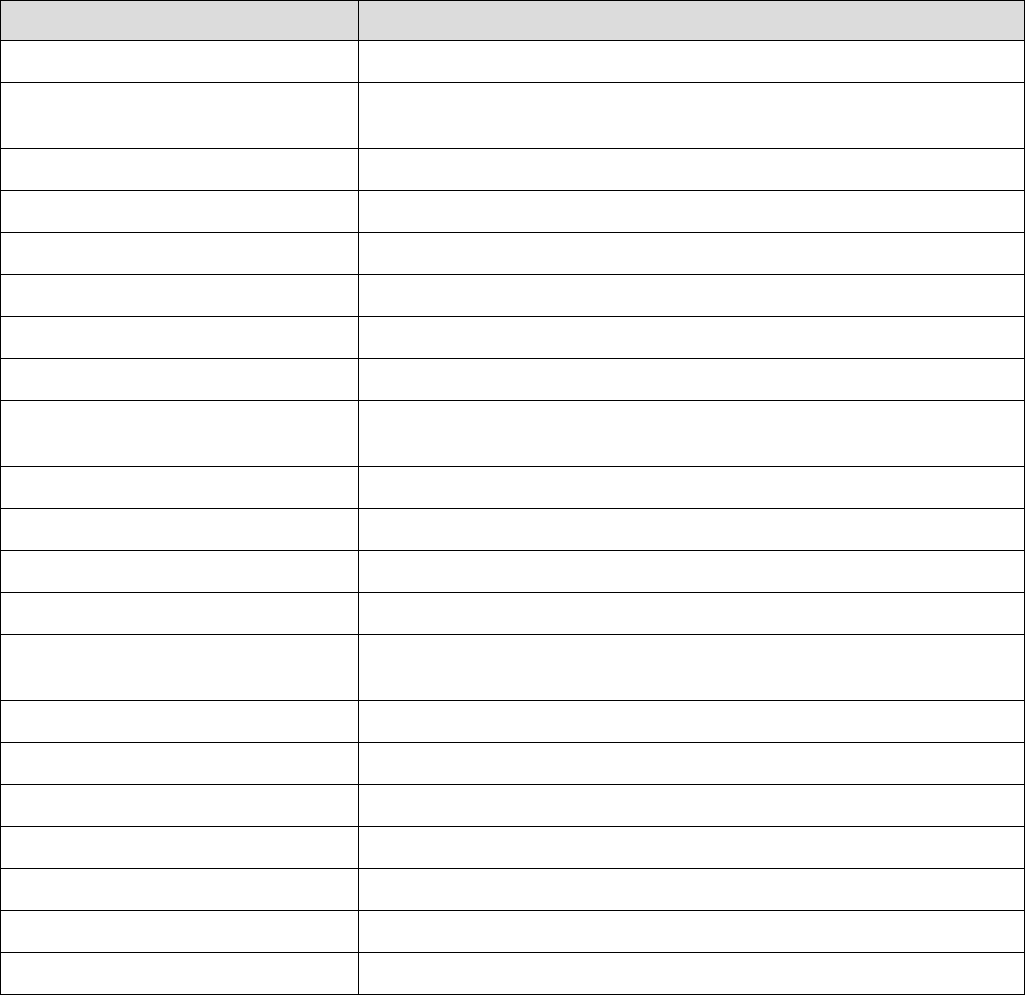
6.5.1. File Read and Write Functions
The following file read and write functions are available in NexScript and Python
Function Description
GetFileCount Returns the number of files that match the specified file filter.
GetFileName Returns the file name for the specified index after GetFileCount()
was called.
OpenFile Opens text file using the specified mode, returns file ID.
CloseFile Closes the file.
ReadLine Reads a line from the specified text file.
WriteLine Writes a line of text to the specified file.
OpenDocument Opens a data file with the specified path.
GetActiveDocument Returns a reference to currently active document.
NewDocument Opens a new document (data file) with the specified timestamp
frequency.
CloseDocument Closes the specified document.
SaveDocument Saves the specified document.
SaveDocumentAs Saves the specified document in a file with the specified file path.
SaveNumResults Saves the numerical results to a text file with the specified name.
SaveNumSummary Saves the summary of numerical results to a text file with the
specified name.
SaveAsTextFile Saves the document in the text file with the specified file name.
MergeFiles Merges the specified files, returns the reference to the merged file.
ReadBinary Reads binary value of a specified type.
FileSeek Repositions file pointer by the specified offset.
SelectFile Returns the path of the file selected in File Open dialog.
SelectFiles Returns the paths of several files selected in File Open dialog.
OpenSavedResult Opens a saved result file with the specified path.
See Also
Introduction to NexScript and Python Programming
Function Categories
Page 233

6.5.1.1. GetFileCount
GetFileCount Function
Returns the number of files that match the file filter.
Syntax
number GetFileCount(string fileFilter)
Parameters
Parameter Type Description
fileFilter string File filter specification. Can contain wildcards (*). For
example, to get all .nex files in folder C:\data\, use
filter "C:\data\*.nex".
Returns
Returns the number of files that match file filter.
Comments
In Python, use os.listdir() method: http://stackoverflow.com/questions/3964681/find-all-files-in-directory-
with-extension-txt-with-python.
Usage
NexScript
% repeat analysis for all .nex files in the folder
filefilter = "C:\Data\*.nex"
n = GetFileCount(filefilter)
for i=1 to n
name = GetFileName(i)
doc = OpenDocument(name)
if doc > 0
% run the analysis, print results and close the file
ApplyTemplate(doc, "Interspike Interval Histograms")
PrintGraphics(doc)
CloseDocument(doc)
end
end
Python
import nex
import os
# repeat analysis for all .nex files in the folder
directory = "C:\\Data\\"
for name in os.listdir(directory):
if name.endswith(".nex"):
doc = nex.OpenDocument(directory + name)
if doc > 0:
nex.SelectAllEvents(doc)
# run the analysis, print results and close the file
nex.ApplyTemplate(doc, "Auto")
Page 234

6.5.1.2. GetFileName
GetFileName Function
Returns the file name for the specified index after GetFileCount() was called.
Syntax
string GetFileName(index)
Parameters
Parameter Type Description
index number Index of the file in the file list created by the last call to
GetFileCount.
Returns
Returns the file name (the full path of the file) for the specified index after GetFileCount() was called.
Comments
In Python, use os.listdir() method: http://stackoverflow.com/questions/3964681/find-all-files-in-directory-
with-extension-txt-with-python.
Usage
NexScript
% repeat analysis for all .nex files in the folder
filefilter = "C:\Data\*.nex"
n = GetFileCount(filefilter)
for i=1 to n
name = GetFileName(i)
doc = OpenDocument(name)
if doc > 0
% run the analysis, print results and close the file
ApplyTemplate(doc, "Interspike Interval Histograms")
PrintGraphics(doc)
CloseDocument(doc)
end
end
Python
import nex
import os
# repeat analysis for all .nex files in the folder
directory = "C:\\Data\\"
for name in os.listdir(directory):
if name.endswith(".nex"):
doc = nex.OpenDocument(directory + name)
if doc > 0:
nex.SelectAllEvents(doc)
# run the analysis, print results and close the file
nex.ApplyTemplate(doc, "Auto")
nex.PrintGraphics(doc)
nex.CloseDocument(doc)
Page 236

6.5.1.3. OpenFile
OpenFile Function
Opens text file using the specified mode, returns file ID.
Syntax
number OpenFile(filePath, mode)
Parameters
Parameter Type Description
filePath string Full path of the file.
mode string File open mode. Can be either "r", "rt" (read), "w" or
"wt" (write) or "a" or "at" (append).
Returns
Returns file ID.
Comments
None
Usage
NexScript
% open a file in read mode
file = OpenFile("C:\Data\parameters.txt", "r")
% read all the lines in the file and print them
if file > 0
line = "" % make line a string variable
while ReadLine(file, line) > 0
Trace(line)
end
CloseFile(file)
end
Python
import nex
# open a file in read mode
file = nex.OpenFile("C:\\Data\\parameters.txt", "r")
# read all the lines in the file and print them
if file > 0:
line = "" # make line a string variable
__wrapper = []
while nex.ReadLine(file, __wrapper) > 0:
line = __wrapper[0]
print(line)
nex.CloseFile(file)
See Also
Page 238

6.5.1.4. CloseFile
CloseFile Function
Closes the specified file.
Syntax
CloseFile(fileID)
Parameters
Parameter Type Description
fileID number File ID received from OpenFile function.
Returns
None
Comments
In Python, use Python native file close() method. See Python code below.
In Python, backslash character (\) has a special meaning. When specifying a Windows path like
"C:\Data\NexResults.xls" in Python, use either "C:/Data/NexResults.xls" or "C:\\Data\\NexResults.xls".
Usage
NexScript
% open a file in read mode
file = OpenFile("C:\Data\parameters.txt", "r")
% read all the lines in the file and print them
if file > 0
line = " " % make line a string variable
while ReadLine(file, line) > 0
Trace(line)
end
CloseFile(file)
end
Python
# open a file in read mode
f = open("C:\\Data\\parameters.txt", "r")
# read all the lines in the file and print them
if f:
lines = f.readlines()
f.close()
for line in lines:
print(line.rstrip()) # rstrip() removes end-of-line character from line
See Also
Introduction to NexScript and Python Programming
Function Categories
Page 240

6.5.1.5. ReadLine
ReadLine Function
Reads a line from the text file.
Syntax
number ReadLine(fileID, lineString)
Parameters
Parameter Type Description
fileID number File ID received from OpenFile function.
lineString string String that receives the text from the file.
Returns
Returns 1 if more text to read is available in the file, otherwise, returns 0.
Comments
In Python, use Python native file readlines() method. See Python code below.
In Python, backslash character (\) has a special meaning. When specifying a Windows path like
"C:\Data\NexResults.xls" in Python, use either "C:/Data/NexResults.xls" or "C:\\Data\\NexResults.xls".
Usage
NexScript
% open a file in read mode
file = OpenFile("C:\Data\parameters.txt", "r")
% read all the lines in the file and print them
if file > 0
line = " " % make line a string variable
while ReadLine(file, line) > 0
Trace(line)
end
CloseFile(file)
end
Python
# open a file in read mode
f = open("C:\\Data\\parameters.txt", "r")
# read all the lines in the file and print them
if f:
lines = f.readlines()
f.close()
for line in lines:
print(line.rstrip()) # rstrip() removes end-of-line character from line
See Also
Introduction to NexScript and Python Programming
Page 241

6.5.1.6. WriteLine
WriteLine Function
Writes a line of text to a text file.
Syntax
WriteLine(fileID, lineString)
Parameters
Parameter Type Description
fileID number File ID received from OpenFile function.
lineString string The string to be written to the file.
Returns
None
Comments
In Python, use file object writelines() method: http://www.tutorialspoint.com/python/file_writelines.htm.
Usage
NexScript
% open a file in write mode
fileID = OpenFile("C:\Data\results.txt", "w")
WriteLine(fileID, "first line")
CloseFile(fileID)
Python
import nex
# open a file in write mode
fileID = nex.OpenFile("C:\\Data\\results.txt", "w")
nex.WriteLine(fileID, "first line")
nex.CloseFile(fileID)
See Also
Introduction to NexScript and Python Programming
Function Categories
Page 243

6.5.1.7. OpenDocument
OpenDocument Function
Opens a data file with the specified path. Returns a reference to the opened document.
Syntax
documentReference OpenDocument(string filePath)
Parameters
Parameter Type Description
filePath string Full path of the file.
Returns
Returns a reference to the opened document. The function returns zero (invalid document reference) if
OpenDocument operation failed.
Comments
None
Usage
NexScript
This function can be used to open all supported data file formats. For example:
doc = OpenDocument("C:\Data\file1.plx")
doc = OpenDocument("C:\Data\file1.map")
doc = OpenDocument("C:\Data\file1.mcd")
doc = OpenDocument("C:\Data\file1.txt")
Python
import nex
doc = nex.OpenDocument("C:\\Data\\file1.plx")
doc = nex.OpenDocument("C:\\Data\\file1.map")
doc = nex.OpenDocument("C:\\Data\\file1.mcd")
doc = nex.OpenDocument("C:\\Data\\file1.txt")
Before opening a text file, specify text file options using View/Options menu command.
See Also
Introduction to NexScript and Python Programming
Function Categories
Page 244
6.5.1.8. GetActiveDocument
GetActiveDocument Function
Returns a reference to the currently active document.
Syntax
documentReference GetActiveDocument()
Returns
Returns a reference to the currently active document. The function returns zero (invalid document
reference) if there are no data files open.
Comments
None
Usage
NexScript
doc = GetActiveDocument()
Python
import nex
doc = nex.GetActiveDocument()
See Also
Introduction to NexScript and Python Programming
Function Categories
Page 245

6.5.1.9. NewDocument
NewDocument Function
Creates a new document (data file) with the specified timestamp frequency.
Syntax
documentReference NewDocument(frequency)
Parameters
Parameter Type Description
frequency number Timestamp frequency.
Returns
Returns the reference to the new document.
Comments
None
Usage
NexScript
doc = NewDocument(25000.)
Python
import nex
doc = nex.NewDocument(25000.)
See Also
Introduction to NexScript and Python Programming
Function Categories
Page 246

6.5.1.10. CloseDocument
CloseDocument Function
Closes the specified document.
Syntax
CloseDocument(doc)
Parameters
Parameter Type Description
doc documentReference Reference to the document.
Returns
None
Comments
None
Usage
NexScript
% this script prints the number of variables in the file
doc = GetActiveDocument()
Trace("document contains", GetVarCount(doc, "all"), "variables")
CloseDocument(doc)
Python
import nex
# this script prints the number of variables in the file
doc = nex.GetActiveDocument()
print("document contains "+str(nex.GetVarCount(doc,"all"))+ " variables")
See Also
Introduction to NexScript and Python Programming
Function Categories
Page 247

6.5.1.11. SaveDocument
SaveDocument Function
Saves the specified document.
Syntax
SaveDocument(doc)
Parameters
Parameter Type Description
doc documentReference Reference to the document.
Returns
None
Comments
Document is saved as a .nex file.
Usage
NexScript
doc = GetActiveDocument()
SaveDocument(doc)
Python
import nex
doc = nex.GetActiveDocument()
nex.SaveDocument(doc)
See Also
Introduction to NexScript and Python Programming
Function Categories
Page 248

6.5.1.12. SaveDocumentAs
SaveDocumentAs Function
Saves the data (in .nex, .nex5 or .edf format) in a file with the specified file path.
Syntax
SaveDocumentAs(doc, filePath)
Parameters
Parameter Type Description
doc documentReference Reference to the document.
filePath string File path.
Returns
None
Comments
If filePath has extension '.nex', the document is saved using .nex format. If filePath has extension '.nex5',
the document is saved using .nex5 format.
If filePath has extension '.edf', continuous variables of the document that have no gaps in recording (the
number of fragments is 1) are saved in the .edf (European Data Format) file.
NeuroExplorer uses edflib library (www.teuniz.net/edflib/) to save data in EDF files. The library license is
in the file
C:\Program Files\Nex Technologies\NeuroExplorer 5\EDFLIB_LICENSE.txt
Usage
NexScript
doc = GetActiveDocument()
SaveDocumentAs(doc, "C:\Data\file1.nex")
Python
import nex
doc = nex.GetActiveDocument()
# save file in .nex5 format
nex.SaveDocumentAs(doc, "C:\\Data\\file1.nex5")
See Also
Introduction to NexScript and Python Programming
Function Categories
Page 249

6.5.1.13. SaveNumResults
SaveNumResults Function
Saves the numerical results to a text file with the specified name.
Syntax
SaveNumResults(doc, fileName)
Parameters
Parameter Type Description
doc documentReference Reference to the document.
fileName string File path for saved results.
Returns
None
Comments
None
Usage
NexScript
doc = GetActiveDocument()
SaveNumResults(doc, "C:\Data\res1.txt")
Python
import nex
doc = nex.GetActiveDocument()
nex.SaveNumResults(doc, "C:\\Data\\res1.txt")
See Also
Introduction to NexScript and Python Programming
Function Categories
Page 250

6.5.1.14. SaveNumSummary
SaveNumSummary Function
Saves the summary of numerical results to a text file with the specified name.
Syntax
SaveNumSummary(doc, filename)
Parameters
Parameter Type Description
doc documentReference Reference to the document.
filename string File path for saved results.
Returns
None
Comments
None
Usage
NexScript
doc = GetActiveDocument()
SaveNumSummary(doc, "C:\Data\res1summary.txt")
Python
import nex
doc = nex.GetActiveDocument()
nex.SaveNumSummary(doc, "C:\\Data\\res1summary.txt")
See Also
Introduction to NexScript and Python Programming
Function Categories
Page 251

6.5.1.15. SaveAsTextFile
SaveAsTextFile Function
Saves the document in the text file with the specified file name.
Syntax
SaveAsTextFile(doc, filePath)
Parameters
Parameter Type Description
doc documentReference Reference to the document.
filePath string Text file path.
Returns
None
Comments
This function uses options that were specified the last time the menu command File | Export Data | As
Text File was executed.
Usage
NexScript
doc = GetActiveDocument()
SaveAsTextFile(doc, "C:\Data\dataFromNex.txt")
Python
import nex
doc = nex.GetActiveDocument()
nex.SaveAsTextFile(doc, "C:\\Data\\dataFromNex.txt")
See Also
Introduction to NexScript and Python Programming
Function Categories
Page 252

6.5.1.16. MergeFiles
MergeFiles Function
Opens and merges the specified files, returns the reference to the merged file.
Syntax
documentReference MergeFiles(name_list, gap)
Parameters
Parameter Type Description
name_list string The list of files to be merged. File names should be
separated by commas.
gap number Gap between the files (in seconds). See comments
below.
Returns
Returns the reference to the merged files.
Comments
In merge process, the data (for the same variable) from the second file is appended to the data from the
first file. Before appending, the timestamps of the variable in the second file are shifted by the value
equal to duration_of_the_first_file + gap. Since the function uses commas as separators between file
names, it is assumed that each file name does not contain commas.
Usage
NexScript
dataDir = "C:\Data\"
file1 = dataDir + "file1.nex"
file2 = dataDir + "file2.nex"
file3 = dataDir + "file3.nex"
mergeList = file1 + "," + file2 + "," + file3
doc = MergeFiles(mergeList, 1.)
Python
import nex
import json
dataDir = "C:\\Data\\"
files = []
files.append(dataDir + "file1.nex")
files.append(dataDir + "file2.nex")
files.append(dataDir + "file3.nex")
doc = nex.MergeFiles(json.dumps(files), 1.)
See Also
Introduction to NexScript and Python Programming
Page 253

6.5.1.17. ReadBinary
ReadBinary Function
Reads a binary value of a specified type from a file.
Syntax
number ReadBinary(fileID, valueType)
Parameters
Parameter Type Description
fileID number File ID received from OpenFile function.
valueType string Binary type. Should be "char", "uchar", "short",
"ushort", "int", "uint", "int64", "uint64", "float" or
"number".
Returns
The value read from the file.
Comments
None
Usage
NexScript
% open binary file in read mode
file = OpenFile("C:\Data\binaryfile.dat", "r")
% read short (2-byte signed) value
shortValue = ReadBinary(file, "short")
CloseFile(file)
Python
import nex
# open binary file in read mode
file = nex.OpenFile("C:\\Data\\binaryfile.dat", "r")
# read short (2-byte signed) value
shortValue = nex.ReadBinary(file, "short")
nex.CloseFile(file)
See Also
Introduction to NexScript and Python Programming
Function Categories
Page 255

6.5.1.18. FileSeek
FileSeek Function
Repositions file pointer by the specified offset.
Syntax
number FileSeek(fileID, offset, type)
Parameters
Parameter Type Description
fileID number File ID received from OpenFile function.
offset number Number of bytes to move the file pointer.
type string Pointer movement mode. Should be "begin", "current"
or "end".
Returns
The new byte offset from the beginning of the file.
Comments
FileSeek(file,0,"end") returns file size in bytes. FileSeek(file,0,"current") returns current file position.
In Python, you may want to use Python native file.seek()
http://www.tutorialspoint.com/python/file_seek.htm.
In Python, backslash character (\) has a special meaning. When specifying a Windows path like
"C:\Data\File.nex" in Python, use either "C:/Data/File.nex" or "C:\\Data\\File.nex".
Usage
NexScript
% open binary file in read mode
file = OpenFile("C:\Data\binaryfile.dat", "r")
% get file length
fileLength = FileSeek(file, 0, "end")
% move pointer 4 bytes from the beginning of the file
newPosition = FileSeek(file, 4, "begin")
% read short (2-byte signed) value
shortValue = ReadBinary(file, "short")
CloseFile(file)
Python
import nex
# open binary file in read mode
file = nex.OpenFile("C:\\Data\\binaryfile.dat", "r")
# get file length
fileLength = nex.FileSeek(file, 0, "end")
# move pointer 4 bytes from the beginning of the file
newPosition = nex.FileSeek(file, 4, "begin")
# read short (2-byte signed) value
Page 256
6.5.1.19. SelectFile
SelectFile Function
Opens File Open dialog and returns the path of the file selected in the dialog.
Syntax
string SelectFile()
Returns
Returns the path of the file selected in File Open dialog.
Comments
None
Usage
NexScript
path = SelectFile()
% if the user pressed Cancel in file dialog, the returned path is empty
if StrLength(path) > 0
% open file for reading
file = OpenFile(path, "r")
line = ""
% read the first line of the file
ReadLine(file, line)
Trace(line)
CloseFile(file)
end
Python
import nex
path = nex.SelectFile()
# if the user pressed Cancel in file dialog, the returned path is empty
if len(path) > 0:
# open file for reading
file = open(path, "r")
# read the first line of the file
line = file.readline()
print(line)
file.close()
See Also
Introduction to NexScript and Python Programming
Function Categories
Page 258

6.5.1.20. SelectFiles
SelectFiles Function
Opens File Open dialog with multiple selection option and returns the list of file paths selected in the
dialog. To select multiple files in the dialog, use Ctrl+Mouse_Click or Shift+Mouse_Click
Syntax
list SelectFiles(initialDirectory, extension)
Parameters
Parameter Type Description
initialDirectory string Optional parameter that specifies initial directory for
File Open dialog.
extension string Optional parameter that specifies file extension for File
Open dialog.
Returns
Returns the list of file paths selected in the File Open dialog. If the user pressed Cancel in File Open
dialog, the returned list is empty.
Comments
None
Usage
Python
import nex
# default initial directory and show all files in dialog
files = nex.SelectFiles()
# default initial directory and show only .nex5 files in dialog
files = nex.SelectFiles(extension='nex5')
# open files in directory 'C:/MyData' and show only .nex5 files in dialog
files = nex.SelectFiles(initialDirectory='C:/MyData', extension='nex5')
# run the same analysis (Detect Spikes) on all selected files
for filePath in files:
doc = nex.OpenDocument(filePath)
nex.DeselectAll(doc)
# select all continuous variables
contNames = doc.ContinuousNames()
for name in contNames:
nex.Select(doc, doc[name])
# run DetectSpikes analysis
nex.ApplyTemplate(doc, 'Default\\DetectSpikes')
# save results in new .nex5 file
newName = os.path.splitext(filePath)[0] + "_spikes.nex5"
nex.SaveDocumentAs(doc, newName)
nex.CloseDocument(doc)
Page 259

6.5.1.21. OpenSavedResult
OpenSavedResult Script Function
Opens a saved result file with the specified path.
Syntax
OpenSavedResult(string filePath)
Parameters
Parameter Type Description
filePath string A full path of a saved result (.nexresult) file or analysis
template (.ntp) file. Use SaveResults|Restore
Analysis in NeuroExplorer menu command to
restore analysis saved in the result file. You can also
use the script commands saved in history.py file.
Returns
None
Comments
Analysis template files can be used in two functions: ApplyTemplate and OpenSavedResult. Here are the
differences:
- The template file used in OpenSavedResult needs to have the data file path and the list of selected
variables specified within the template file
- ApplyTemplate command ignores the data file path and the list of selected variables specified within the
template file
Usage
NexScript
OpenSavedResult("C:\Data\MyResult.nexresult")
Python
import nex
nex.OpenSavedResult("C:\\Data\\MyResult.nexresult")
See Also
Introduction to NexScript and Python Programming
Function Categories
Page 261
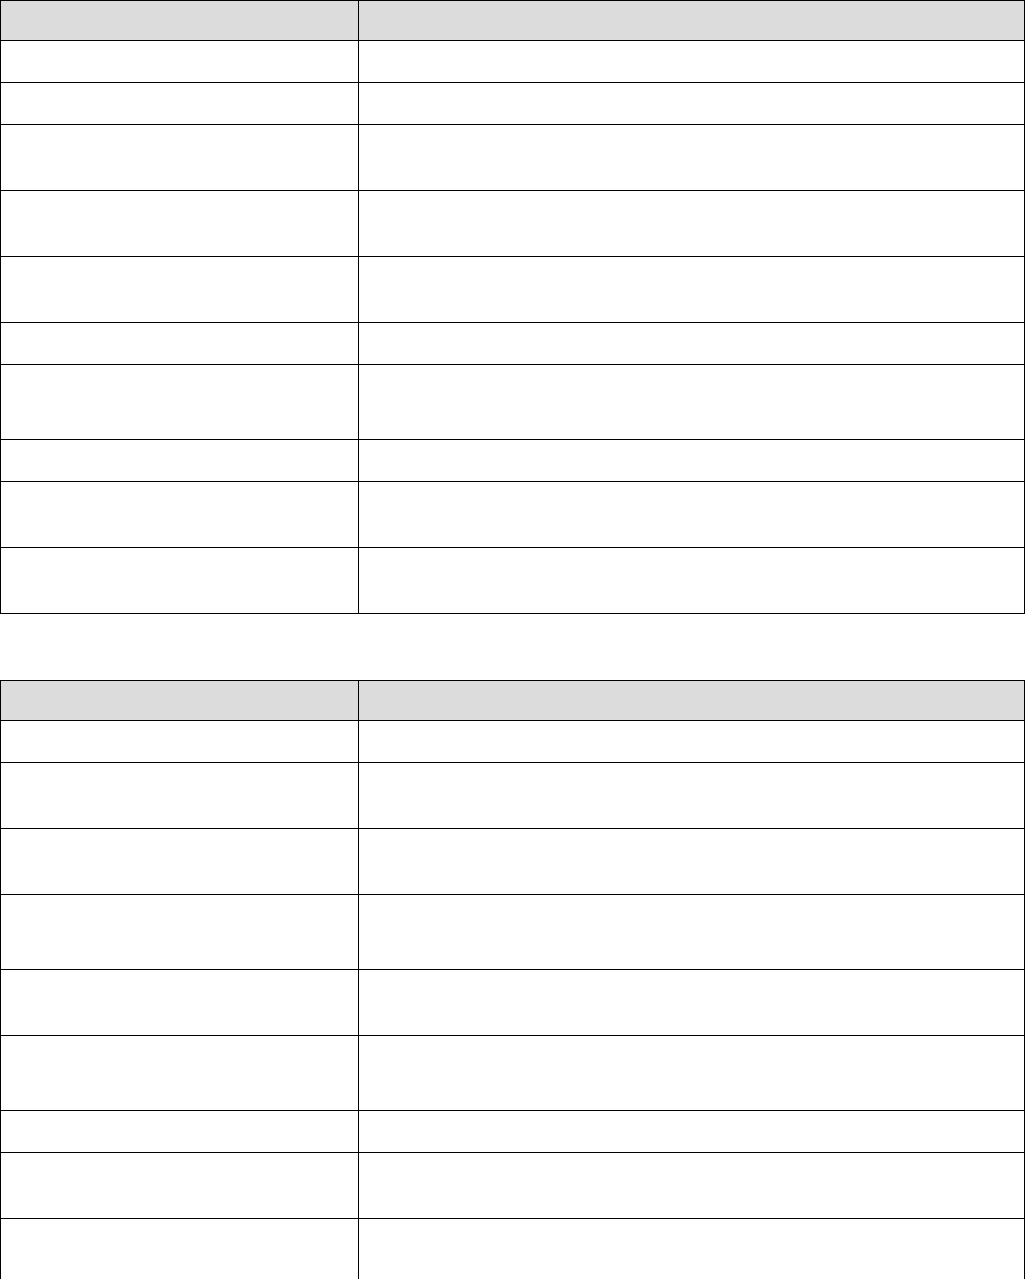
6.5.2. Document Properties Functions
The following document properties functions are available in NexScript and Python
Function Description
GetDocPath Returns the full path of the data file.
GetDocTitle Returns the data file name.
GetTimestampFrequency Returns the frequency used in the specified file to store the
timestamps.
GetDocEndTime Returns the maximum timestamp value (in seconds) for all the
document variables.
SetDocEndTime Sets the length of experimental session (in seconds) for the
document.
GetDocComment Returns the document comment string.
Functions returning lists of variable
names and lists of variables
Functions returning lists of variable names and lists of variables.
GetSelVarNames Returns the list of selected variables in the document.
GetDocStartTime Returns the minimum timestamp value (in seconds) for all the
document variables.
SetDocStartTime Sets the start of experimental session (in seconds) for the
document.
The following document properties functions are available in Python only
Function Description
GetAllNumericalResults Returns the list of all numerical results.
GetAllNumResSummaryData Returns the list of all the values of the summary of numerical
results.
GetNumResColumnNames Returns the list of column names in the Numerical Results window
of the first graphical view of the document.
GetNumResSummaryColumnNam
es
Returns the list of column names in the Summary of Numerical
Results Window of the first graphical view of the document.
SetProperty Sets a document property. Can be used to specify custom Y axis
minimums and maximums.
Functions returning lists of variable
names and lists of variables
Functions returning lists of variable names and lists of variables.
GetSelVarNames Returns the list of selected variables in the document.
GetDocStartTime Returns the minimum timestamp value (in seconds) for all the
document variables.
SetDocStartTime Sets the start of experimental session (in seconds) for the
document.
Page 262

6.5.2.1. GetDocPath
GetDocPath Function
Returns the full path of the data file.
Syntax
string GetDocPath(doc)
Parameters
Parameter Type Description
doc documentReference Reference to the document.
Returns
Returns the full path of the data file.
Comments
None
Usage
NexScript
doc = GetActiveDocument()
path = GetDocPath(doc)
Python
import nex
doc = nex.GetActiveDocument()
path = nex.GetDocPath(doc)
See Also
Introduction to NexScript and Python Programming
Function Categories
Page 264

6.5.2.2. GetDocTitle
GetDocTitle Function
Returns the data file name.
Syntax
string GetDocTitle(doc)
Parameters
Parameter Type Description
doc documentReference Reference to the document.
Returns
Returns the data file name. For example, if the document has the path "C:\Data\data1.nex", this function
will return "data1.nex"
Comments
None
Usage
NexScript
doc = GetActiveDocument()
fileName = GetDocTitle(doc)
Python
import nex
doc = nex.GetActiveDocument()
fileName = nex.GetDocTitle(doc)
See Also
Introduction to NexScript and Python Programming
Function Categories
Page 265

6.5.2.3. GetTimestampFrequency
GetTimestampFrequency Function
Returns the frequency used in the internal representation of the timestamps.
Syntax
number GetTimestampFrequency(doc)
Parameters
Parameter Type Description
doc documentReference Reference to the document.
Returns
Returns the frequency used in the specified file to store the timestamps.
Comments
Internally, the timestamps are stored as integers representing the number of time ticks from the start of
the experiment. The time tick is equal to 1./Timestamp_Frequency.
Usage
NexScript
doc = GetActiveDocument()
tsFreq = GetTimestampFrequency(doc)
Python
import nex
doc = nex.GetActiveDocument()
tsFreq = nex.GetTimestampFrequency(doc)
See Also
Introduction to NexScript and Python Programming
Function Categories
Page 266

6.5.2.4. GetDocEndTime
GetDocEndTime Function
Returns the maximum timestamp value (in seconds) for all the document variables.
Syntax
number GetDocEndTime(doc)
Parameters
Parameter Type Description
doc documentReference Reference to the document.
Returns
Returns the maximum timestamp value (in seconds) for all the document variables.
Comments
None
Usage
NexScript
doc = GetActiveDocument()
endTime = GetDocEndTime(doc)
Python
import nex
doc = nex.GetActiveDocument()
endTime = nex.GetDocEndTime(doc)
See Also
Introduction to NexScript and Python Programming
Function Categories
Page 267

6.5.2.5. SetDocEndTime
SetDocEndTime Function
Sets the length of experimental session for the document.
Syntax
SetDocEndTime(doc, endtime)
Parameters
Parameter Type Description
doc documentReference Reference to the document.
endtime number Document end time in seconds.
Returns
None
Comments
NeuroExplorer determines document end time when the document is loaded. Then, the duration of
experimental session (endTime - startTime) may be used in the calculations of the confidence limits. If
your script modifies or adds the variables, you may need to set the document end time directly to
maintain correctness of the confidence calculations.
Usage
NexScript
doc = GetActiveDocument()
SetDocEndTime(doc, 1200.3)
Python
import nex
doc = nex.GetActiveDocument()
nex.SetDocEndTime(doc, 1200.3)
See Also
Introduction to NexScript and Python Programming
Function Categories
Page 268

6.5.2.6. GetDocComment
GetDocComment Function
Returns the document comment string.
Syntax
string GetDocComment(doc)
Parameters
Parameter Type Description
doc documentReference Reference to the document.
Returns
Returns the document comment string.
Comments
None
Usage
NexScript
doc = GetActiveDocument()
comment = GetDocComment(doc)
Trace(comment)
Python
import nex
doc = nex.GetActiveDocument()
comment = nex.GetDocComment(doc)
print comment
See Also
Introduction to NexScript and Python Programming
Function Categories
Page 269
6.5.2.7. NeuronNames
Returns the list of neuron names in the document.
Syntax
list doc.NeuronNames()
Returns
Returns the list of neuron names in the document.
import nex
doc = nex.GetActiveDocument()
namesOfNeurons = doc.NeuronNames()
Returns the list of event variable names in the document.
Syntax
list doc.EventNames()
Returns
Returns the list of event variable names in the document.
import nex
doc = nex.GetActiveDocument()
namesOfEvents = doc.EventNames()
Returns the list of interval variable names in the document.
Syntax
list doc.IntervalNames()
Returns
Returns the list of interval variable names in the document.
import nex
doc = nex.GetActiveDocument()
namesOfIntervalVars = doc.IntervalNames()
Returns the list of waveform variable names in the document.
Syntax
list doc.WaveNames()
Returns
Returns the list of waveform variable names in the document.
import nex
doc = nex.GetActiveDocument()
namesOfWaveformVars = doc.WaveNames()
Returns the list of marker variable names in the document.
Syntax
list doc.MarkerNames()
Page 270
Returns
Returns the list of marker variable names in the document.
import nex
doc = nex.GetActiveDocument()
namesOfMarkerVars = doc.MarkerNames()
Returns the list of continuous variable names in the document.
Syntax
list doc.ContinuousNames()
Returns
Returns the list of continuous variable names in the document.
import nex
doc = nex.GetActiveDocument()
namesOfContVars = doc.ContinuousNames()
Returns the list of neuron variables in the document.
Syntax
list doc.NeuronVars()
Returns
Returns the list of neuron variables in the document.
import nex
doc = nex.GetActiveDocument()
neuronVars = doc.NeuronVars()
Returns the list of event variables in the document.
Syntax
list doc.EventVars()
Returns
Returns the list of event variables in the document.
import nex
doc = nex.GetActiveDocument()
eventVars = doc.EventVars()
Returns the list of interval variables in the document.
Syntax
list doc.IntervalVars()
Returns
Returns the list of interval variables in the document.
import nex
doc = nex.GetActiveDocument()
intervalVars = doc.IntervalVars()
Returns the list of waveform variables in the document.
Page 271
Syntax
list doc.WaveVars()
Returns
Returns the list of waveform variables in the document.
import nex
doc = nex.GetActiveDocument()
waveformVars = doc.WaveVars()
Returns the list of marker variables in the document.
Syntax
list doc.MarkerVars()
Returns
Returns the list of marker variables in the document.
import nex
doc = nex.GetActiveDocument()
markerVars = doc.MarkerVars()
Returns the list of continuous variables in the document.
Syntax
list doc.ContinuousVars()
Returns
Returns the list of continuous variables in the document.
import nex
doc = nex.GetActiveDocument()
contVars = doc.ContinuousVars()
See Also
Introduction to NexScript and Python Programming
Function Categories
Page 272
6.5.2.8. EventNames
Returns the list of neuron names in the document.
Syntax
list doc.NeuronNames()
Returns
Returns the list of neuron names in the document.
import nex
doc = nex.GetActiveDocument()
namesOfNeurons = doc.NeuronNames()
Returns the list of event variable names in the document.
Syntax
list doc.EventNames()
Returns
Returns the list of event variable names in the document.
import nex
doc = nex.GetActiveDocument()
namesOfEvents = doc.EventNames()
Returns the list of interval variable names in the document.
Syntax
list doc.IntervalNames()
Returns
Returns the list of interval variable names in the document.
import nex
doc = nex.GetActiveDocument()
namesOfIntervalVars = doc.IntervalNames()
Returns the list of waveform variable names in the document.
Syntax
list doc.WaveNames()
Returns
Returns the list of waveform variable names in the document.
import nex
doc = nex.GetActiveDocument()
namesOfWaveformVars = doc.WaveNames()
Returns the list of marker variable names in the document.
Syntax
list doc.MarkerNames()
Page 273
Returns
Returns the list of marker variable names in the document.
import nex
doc = nex.GetActiveDocument()
namesOfMarkerVars = doc.MarkerNames()
Returns the list of continuous variable names in the document.
Syntax
list doc.ContinuousNames()
Returns
Returns the list of continuous variable names in the document.
import nex
doc = nex.GetActiveDocument()
namesOfContVars = doc.ContinuousNames()
Returns the list of neuron variables in the document.
Syntax
list doc.NeuronVars()
Returns
Returns the list of neuron variables in the document.
import nex
doc = nex.GetActiveDocument()
neuronVars = doc.NeuronVars()
Returns the list of event variables in the document.
Syntax
list doc.EventVars()
Returns
Returns the list of event variables in the document.
import nex
doc = nex.GetActiveDocument()
eventVars = doc.EventVars()
Returns the list of interval variables in the document.
Syntax
list doc.IntervalVars()
Returns
Returns the list of interval variables in the document.
import nex
doc = nex.GetActiveDocument()
intervalVars = doc.IntervalVars()
Returns the list of waveform variables in the document.
Page 274
Syntax
list doc.WaveVars()
Returns
Returns the list of waveform variables in the document.
import nex
doc = nex.GetActiveDocument()
waveformVars = doc.WaveVars()
Returns the list of marker variables in the document.
Syntax
list doc.MarkerVars()
Returns
Returns the list of marker variables in the document.
import nex
doc = nex.GetActiveDocument()
markerVars = doc.MarkerVars()
Returns the list of continuous variables in the document.
Syntax
list doc.ContinuousVars()
Returns
Returns the list of continuous variables in the document.
import nex
doc = nex.GetActiveDocument()
contVars = doc.ContinuousVars()
See Also
Introduction to NexScript and Python Programming
Function Categories
Page 275
6.5.2.9. IntervalNames
Returns the list of neuron names in the document.
Syntax
list doc.NeuronNames()
Returns
Returns the list of neuron names in the document.
import nex
doc = nex.GetActiveDocument()
namesOfNeurons = doc.NeuronNames()
Returns the list of event variable names in the document.
Syntax
list doc.EventNames()
Returns
Returns the list of event variable names in the document.
import nex
doc = nex.GetActiveDocument()
namesOfEvents = doc.EventNames()
Returns the list of interval variable names in the document.
Syntax
list doc.IntervalNames()
Returns
Returns the list of interval variable names in the document.
import nex
doc = nex.GetActiveDocument()
namesOfIntervalVars = doc.IntervalNames()
Returns the list of waveform variable names in the document.
Syntax
list doc.WaveNames()
Returns
Returns the list of waveform variable names in the document.
import nex
doc = nex.GetActiveDocument()
namesOfWaveformVars = doc.WaveNames()
Returns the list of marker variable names in the document.
Syntax
list doc.MarkerNames()
Page 276
Returns
Returns the list of marker variable names in the document.
import nex
doc = nex.GetActiveDocument()
namesOfMarkerVars = doc.MarkerNames()
Returns the list of continuous variable names in the document.
Syntax
list doc.ContinuousNames()
Returns
Returns the list of continuous variable names in the document.
import nex
doc = nex.GetActiveDocument()
namesOfContVars = doc.ContinuousNames()
Returns the list of neuron variables in the document.
Syntax
list doc.NeuronVars()
Returns
Returns the list of neuron variables in the document.
import nex
doc = nex.GetActiveDocument()
neuronVars = doc.NeuronVars()
Returns the list of event variables in the document.
Syntax
list doc.EventVars()
Returns
Returns the list of event variables in the document.
import nex
doc = nex.GetActiveDocument()
eventVars = doc.EventVars()
Returns the list of interval variables in the document.
Syntax
list doc.IntervalVars()
Returns
Returns the list of interval variables in the document.
import nex
doc = nex.GetActiveDocument()
intervalVars = doc.IntervalVars()
Returns the list of waveform variables in the document.
Page 277
Syntax
list doc.WaveVars()
Returns
Returns the list of waveform variables in the document.
import nex
doc = nex.GetActiveDocument()
waveformVars = doc.WaveVars()
Returns the list of marker variables in the document.
Syntax
list doc.MarkerVars()
Returns
Returns the list of marker variables in the document.
import nex
doc = nex.GetActiveDocument()
markerVars = doc.MarkerVars()
Returns the list of continuous variables in the document.
Syntax
list doc.ContinuousVars()
Returns
Returns the list of continuous variables in the document.
import nex
doc = nex.GetActiveDocument()
contVars = doc.ContinuousVars()
See Also
Introduction to NexScript and Python Programming
Function Categories
Page 278
6.5.2.10. WaveNames
Returns the list of neuron names in the document.
Syntax
list doc.NeuronNames()
Returns
Returns the list of neuron names in the document.
import nex
doc = nex.GetActiveDocument()
namesOfNeurons = doc.NeuronNames()
Returns the list of event variable names in the document.
Syntax
list doc.EventNames()
Returns
Returns the list of event variable names in the document.
import nex
doc = nex.GetActiveDocument()
namesOfEvents = doc.EventNames()
Returns the list of interval variable names in the document.
Syntax
list doc.IntervalNames()
Returns
Returns the list of interval variable names in the document.
import nex
doc = nex.GetActiveDocument()
namesOfIntervalVars = doc.IntervalNames()
Returns the list of waveform variable names in the document.
Syntax
list doc.WaveNames()
Returns
Returns the list of waveform variable names in the document.
import nex
doc = nex.GetActiveDocument()
namesOfWaveformVars = doc.WaveNames()
Returns the list of marker variable names in the document.
Syntax
list doc.MarkerNames()
Page 279
Returns
Returns the list of marker variable names in the document.
import nex
doc = nex.GetActiveDocument()
namesOfMarkerVars = doc.MarkerNames()
Returns the list of continuous variable names in the document.
Syntax
list doc.ContinuousNames()
Returns
Returns the list of continuous variable names in the document.
import nex
doc = nex.GetActiveDocument()
namesOfContVars = doc.ContinuousNames()
Returns the list of neuron variables in the document.
Syntax
list doc.NeuronVars()
Returns
Returns the list of neuron variables in the document.
import nex
doc = nex.GetActiveDocument()
neuronVars = doc.NeuronVars()
Returns the list of event variables in the document.
Syntax
list doc.EventVars()
Returns
Returns the list of event variables in the document.
import nex
doc = nex.GetActiveDocument()
eventVars = doc.EventVars()
Returns the list of interval variables in the document.
Syntax
list doc.IntervalVars()
Returns
Returns the list of interval variables in the document.
import nex
doc = nex.GetActiveDocument()
intervalVars = doc.IntervalVars()
Returns the list of waveform variables in the document.
Page 280
Syntax
list doc.WaveVars()
Returns
Returns the list of waveform variables in the document.
import nex
doc = nex.GetActiveDocument()
waveformVars = doc.WaveVars()
Returns the list of marker variables in the document.
Syntax
list doc.MarkerVars()
Returns
Returns the list of marker variables in the document.
import nex
doc = nex.GetActiveDocument()
markerVars = doc.MarkerVars()
Returns the list of continuous variables in the document.
Syntax
list doc.ContinuousVars()
Returns
Returns the list of continuous variables in the document.
import nex
doc = nex.GetActiveDocument()
contVars = doc.ContinuousVars()
See Also
Introduction to NexScript and Python Programming
Function Categories
Page 281
6.5.2.11. MarkerNames
Returns the list of neuron names in the document.
Syntax
list doc.NeuronNames()
Returns
Returns the list of neuron names in the document.
import nex
doc = nex.GetActiveDocument()
namesOfNeurons = doc.NeuronNames()
Returns the list of event variable names in the document.
Syntax
list doc.EventNames()
Returns
Returns the list of event variable names in the document.
import nex
doc = nex.GetActiveDocument()
namesOfEvents = doc.EventNames()
Returns the list of interval variable names in the document.
Syntax
list doc.IntervalNames()
Returns
Returns the list of interval variable names in the document.
import nex
doc = nex.GetActiveDocument()
namesOfIntervalVars = doc.IntervalNames()
Returns the list of waveform variable names in the document.
Syntax
list doc.WaveNames()
Returns
Returns the list of waveform variable names in the document.
import nex
doc = nex.GetActiveDocument()
namesOfWaveformVars = doc.WaveNames()
Returns the list of marker variable names in the document.
Syntax
list doc.MarkerNames()
Page 282
Returns
Returns the list of marker variable names in the document.
import nex
doc = nex.GetActiveDocument()
namesOfMarkerVars = doc.MarkerNames()
Returns the list of continuous variable names in the document.
Syntax
list doc.ContinuousNames()
Returns
Returns the list of continuous variable names in the document.
import nex
doc = nex.GetActiveDocument()
namesOfContVars = doc.ContinuousNames()
Returns the list of neuron variables in the document.
Syntax
list doc.NeuronVars()
Returns
Returns the list of neuron variables in the document.
import nex
doc = nex.GetActiveDocument()
neuronVars = doc.NeuronVars()
Returns the list of event variables in the document.
Syntax
list doc.EventVars()
Returns
Returns the list of event variables in the document.
import nex
doc = nex.GetActiveDocument()
eventVars = doc.EventVars()
Returns the list of interval variables in the document.
Syntax
list doc.IntervalVars()
Returns
Returns the list of interval variables in the document.
import nex
doc = nex.GetActiveDocument()
intervalVars = doc.IntervalVars()
Returns the list of waveform variables in the document.
Page 283
Syntax
list doc.WaveVars()
Returns
Returns the list of waveform variables in the document.
import nex
doc = nex.GetActiveDocument()
waveformVars = doc.WaveVars()
Returns the list of marker variables in the document.
Syntax
list doc.MarkerVars()
Returns
Returns the list of marker variables in the document.
import nex
doc = nex.GetActiveDocument()
markerVars = doc.MarkerVars()
Returns the list of continuous variables in the document.
Syntax
list doc.ContinuousVars()
Returns
Returns the list of continuous variables in the document.
import nex
doc = nex.GetActiveDocument()
contVars = doc.ContinuousVars()
See Also
Introduction to NexScript and Python Programming
Function Categories
Page 284
6.5.2.12. ContinuousNames
Returns the list of neuron names in the document.
Syntax
list doc.NeuronNames()
Returns
Returns the list of neuron names in the document.
import nex
doc = nex.GetActiveDocument()
namesOfNeurons = doc.NeuronNames()
Returns the list of event variable names in the document.
Syntax
list doc.EventNames()
Returns
Returns the list of event variable names in the document.
import nex
doc = nex.GetActiveDocument()
namesOfEvents = doc.EventNames()
Returns the list of interval variable names in the document.
Syntax
list doc.IntervalNames()
Returns
Returns the list of interval variable names in the document.
import nex
doc = nex.GetActiveDocument()
namesOfIntervalVars = doc.IntervalNames()
Returns the list of waveform variable names in the document.
Syntax
list doc.WaveNames()
Returns
Returns the list of waveform variable names in the document.
import nex
doc = nex.GetActiveDocument()
namesOfWaveformVars = doc.WaveNames()
Returns the list of marker variable names in the document.
Syntax
list doc.MarkerNames()
Page 285
Returns
Returns the list of marker variable names in the document.
import nex
doc = nex.GetActiveDocument()
namesOfMarkerVars = doc.MarkerNames()
Returns the list of continuous variable names in the document.
Syntax
list doc.ContinuousNames()
Returns
Returns the list of continuous variable names in the document.
import nex
doc = nex.GetActiveDocument()
namesOfContVars = doc.ContinuousNames()
Returns the list of neuron variables in the document.
Syntax
list doc.NeuronVars()
Returns
Returns the list of neuron variables in the document.
import nex
doc = nex.GetActiveDocument()
neuronVars = doc.NeuronVars()
Returns the list of event variables in the document.
Syntax
list doc.EventVars()
Returns
Returns the list of event variables in the document.
import nex
doc = nex.GetActiveDocument()
eventVars = doc.EventVars()
Returns the list of interval variables in the document.
Syntax
list doc.IntervalVars()
Returns
Returns the list of interval variables in the document.
import nex
doc = nex.GetActiveDocument()
intervalVars = doc.IntervalVars()
Returns the list of waveform variables in the document.
Page 286
Syntax
list doc.WaveVars()
Returns
Returns the list of waveform variables in the document.
import nex
doc = nex.GetActiveDocument()
waveformVars = doc.WaveVars()
Returns the list of marker variables in the document.
Syntax
list doc.MarkerVars()
Returns
Returns the list of marker variables in the document.
import nex
doc = nex.GetActiveDocument()
markerVars = doc.MarkerVars()
Returns the list of continuous variables in the document.
Syntax
list doc.ContinuousVars()
Returns
Returns the list of continuous variables in the document.
import nex
doc = nex.GetActiveDocument()
contVars = doc.ContinuousVars()
See Also
Introduction to NexScript and Python Programming
Function Categories
Page 287
6.5.2.13. NeuronVars
Returns the list of neuron names in the document.
Syntax
list doc.NeuronNames()
Returns
Returns the list of neuron names in the document.
import nex
doc = nex.GetActiveDocument()
namesOfNeurons = doc.NeuronNames()
Returns the list of event variable names in the document.
Syntax
list doc.EventNames()
Returns
Returns the list of event variable names in the document.
import nex
doc = nex.GetActiveDocument()
namesOfEvents = doc.EventNames()
Returns the list of interval variable names in the document.
Syntax
list doc.IntervalNames()
Returns
Returns the list of interval variable names in the document.
import nex
doc = nex.GetActiveDocument()
namesOfIntervalVars = doc.IntervalNames()
Returns the list of waveform variable names in the document.
Syntax
list doc.WaveNames()
Returns
Returns the list of waveform variable names in the document.
import nex
doc = nex.GetActiveDocument()
namesOfWaveformVars = doc.WaveNames()
Returns the list of marker variable names in the document.
Syntax
list doc.MarkerNames()
Page 288
Returns
Returns the list of marker variable names in the document.
import nex
doc = nex.GetActiveDocument()
namesOfMarkerVars = doc.MarkerNames()
Returns the list of continuous variable names in the document.
Syntax
list doc.ContinuousNames()
Returns
Returns the list of continuous variable names in the document.
import nex
doc = nex.GetActiveDocument()
namesOfContVars = doc.ContinuousNames()
Returns the list of neuron variables in the document.
Syntax
list doc.NeuronVars()
Returns
Returns the list of neuron variables in the document.
import nex
doc = nex.GetActiveDocument()
neuronVars = doc.NeuronVars()
Returns the list of event variables in the document.
Syntax
list doc.EventVars()
Returns
Returns the list of event variables in the document.
import nex
doc = nex.GetActiveDocument()
eventVars = doc.EventVars()
Returns the list of interval variables in the document.
Syntax
list doc.IntervalVars()
Returns
Returns the list of interval variables in the document.
import nex
doc = nex.GetActiveDocument()
intervalVars = doc.IntervalVars()
Returns the list of waveform variables in the document.
Page 289
Syntax
list doc.WaveVars()
Returns
Returns the list of waveform variables in the document.
import nex
doc = nex.GetActiveDocument()
waveformVars = doc.WaveVars()
Returns the list of marker variables in the document.
Syntax
list doc.MarkerVars()
Returns
Returns the list of marker variables in the document.
import nex
doc = nex.GetActiveDocument()
markerVars = doc.MarkerVars()
Returns the list of continuous variables in the document.
Syntax
list doc.ContinuousVars()
Returns
Returns the list of continuous variables in the document.
import nex
doc = nex.GetActiveDocument()
contVars = doc.ContinuousVars()
See Also
Introduction to NexScript and Python Programming
Function Categories
Page 290
6.5.2.14. EventVars
Returns the list of neuron names in the document.
Syntax
list doc.NeuronNames()
Returns
Returns the list of neuron names in the document.
import nex
doc = nex.GetActiveDocument()
namesOfNeurons = doc.NeuronNames()
Returns the list of event variable names in the document.
Syntax
list doc.EventNames()
Returns
Returns the list of event variable names in the document.
import nex
doc = nex.GetActiveDocument()
namesOfEvents = doc.EventNames()
Returns the list of interval variable names in the document.
Syntax
list doc.IntervalNames()
Returns
Returns the list of interval variable names in the document.
import nex
doc = nex.GetActiveDocument()
namesOfIntervalVars = doc.IntervalNames()
Returns the list of waveform variable names in the document.
Syntax
list doc.WaveNames()
Returns
Returns the list of waveform variable names in the document.
import nex
doc = nex.GetActiveDocument()
namesOfWaveformVars = doc.WaveNames()
Returns the list of marker variable names in the document.
Syntax
list doc.MarkerNames()
Page 291
Returns
Returns the list of marker variable names in the document.
import nex
doc = nex.GetActiveDocument()
namesOfMarkerVars = doc.MarkerNames()
Returns the list of continuous variable names in the document.
Syntax
list doc.ContinuousNames()
Returns
Returns the list of continuous variable names in the document.
import nex
doc = nex.GetActiveDocument()
namesOfContVars = doc.ContinuousNames()
Returns the list of neuron variables in the document.
Syntax
list doc.NeuronVars()
Returns
Returns the list of neuron variables in the document.
import nex
doc = nex.GetActiveDocument()
neuronVars = doc.NeuronVars()
Returns the list of event variables in the document.
Syntax
list doc.EventVars()
Returns
Returns the list of event variables in the document.
import nex
doc = nex.GetActiveDocument()
eventVars = doc.EventVars()
Returns the list of interval variables in the document.
Syntax
list doc.IntervalVars()
Returns
Returns the list of interval variables in the document.
import nex
doc = nex.GetActiveDocument()
intervalVars = doc.IntervalVars()
Returns the list of waveform variables in the document.
Page 292
Syntax
list doc.WaveVars()
Returns
Returns the list of waveform variables in the document.
import nex
doc = nex.GetActiveDocument()
waveformVars = doc.WaveVars()
Returns the list of marker variables in the document.
Syntax
list doc.MarkerVars()
Returns
Returns the list of marker variables in the document.
import nex
doc = nex.GetActiveDocument()
markerVars = doc.MarkerVars()
Returns the list of continuous variables in the document.
Syntax
list doc.ContinuousVars()
Returns
Returns the list of continuous variables in the document.
import nex
doc = nex.GetActiveDocument()
contVars = doc.ContinuousVars()
See Also
Introduction to NexScript and Python Programming
Function Categories
Page 293
6.5.2.15. IntervalVars
Returns the list of neuron names in the document.
Syntax
list doc.NeuronNames()
Returns
Returns the list of neuron names in the document.
import nex
doc = nex.GetActiveDocument()
namesOfNeurons = doc.NeuronNames()
Returns the list of event variable names in the document.
Syntax
list doc.EventNames()
Returns
Returns the list of event variable names in the document.
import nex
doc = nex.GetActiveDocument()
namesOfEvents = doc.EventNames()
Returns the list of interval variable names in the document.
Syntax
list doc.IntervalNames()
Returns
Returns the list of interval variable names in the document.
import nex
doc = nex.GetActiveDocument()
namesOfIntervalVars = doc.IntervalNames()
Returns the list of waveform variable names in the document.
Syntax
list doc.WaveNames()
Returns
Returns the list of waveform variable names in the document.
import nex
doc = nex.GetActiveDocument()
namesOfWaveformVars = doc.WaveNames()
Returns the list of marker variable names in the document.
Syntax
list doc.MarkerNames()
Page 294
Returns
Returns the list of marker variable names in the document.
import nex
doc = nex.GetActiveDocument()
namesOfMarkerVars = doc.MarkerNames()
Returns the list of continuous variable names in the document.
Syntax
list doc.ContinuousNames()
Returns
Returns the list of continuous variable names in the document.
import nex
doc = nex.GetActiveDocument()
namesOfContVars = doc.ContinuousNames()
Returns the list of neuron variables in the document.
Syntax
list doc.NeuronVars()
Returns
Returns the list of neuron variables in the document.
import nex
doc = nex.GetActiveDocument()
neuronVars = doc.NeuronVars()
Returns the list of event variables in the document.
Syntax
list doc.EventVars()
Returns
Returns the list of event variables in the document.
import nex
doc = nex.GetActiveDocument()
eventVars = doc.EventVars()
Returns the list of interval variables in the document.
Syntax
list doc.IntervalVars()
Returns
Returns the list of interval variables in the document.
import nex
doc = nex.GetActiveDocument()
intervalVars = doc.IntervalVars()
Returns the list of waveform variables in the document.
Page 295
Syntax
list doc.WaveVars()
Returns
Returns the list of waveform variables in the document.
import nex
doc = nex.GetActiveDocument()
waveformVars = doc.WaveVars()
Returns the list of marker variables in the document.
Syntax
list doc.MarkerVars()
Returns
Returns the list of marker variables in the document.
import nex
doc = nex.GetActiveDocument()
markerVars = doc.MarkerVars()
Returns the list of continuous variables in the document.
Syntax
list doc.ContinuousVars()
Returns
Returns the list of continuous variables in the document.
import nex
doc = nex.GetActiveDocument()
contVars = doc.ContinuousVars()
See Also
Introduction to NexScript and Python Programming
Function Categories
Page 296
6.5.2.16. WaveVars
Returns the list of neuron names in the document.
Syntax
list doc.NeuronNames()
Returns
Returns the list of neuron names in the document.
import nex
doc = nex.GetActiveDocument()
namesOfNeurons = doc.NeuronNames()
Returns the list of event variable names in the document.
Syntax
list doc.EventNames()
Returns
Returns the list of event variable names in the document.
import nex
doc = nex.GetActiveDocument()
namesOfEvents = doc.EventNames()
Returns the list of interval variable names in the document.
Syntax
list doc.IntervalNames()
Returns
Returns the list of interval variable names in the document.
import nex
doc = nex.GetActiveDocument()
namesOfIntervalVars = doc.IntervalNames()
Returns the list of waveform variable names in the document.
Syntax
list doc.WaveNames()
Returns
Returns the list of waveform variable names in the document.
import nex
doc = nex.GetActiveDocument()
namesOfWaveformVars = doc.WaveNames()
Returns the list of marker variable names in the document.
Syntax
list doc.MarkerNames()
Page 297
Returns
Returns the list of marker variable names in the document.
import nex
doc = nex.GetActiveDocument()
namesOfMarkerVars = doc.MarkerNames()
Returns the list of continuous variable names in the document.
Syntax
list doc.ContinuousNames()
Returns
Returns the list of continuous variable names in the document.
import nex
doc = nex.GetActiveDocument()
namesOfContVars = doc.ContinuousNames()
Returns the list of neuron variables in the document.
Syntax
list doc.NeuronVars()
Returns
Returns the list of neuron variables in the document.
import nex
doc = nex.GetActiveDocument()
neuronVars = doc.NeuronVars()
Returns the list of event variables in the document.
Syntax
list doc.EventVars()
Returns
Returns the list of event variables in the document.
import nex
doc = nex.GetActiveDocument()
eventVars = doc.EventVars()
Returns the list of interval variables in the document.
Syntax
list doc.IntervalVars()
Returns
Returns the list of interval variables in the document.
import nex
doc = nex.GetActiveDocument()
intervalVars = doc.IntervalVars()
Returns the list of waveform variables in the document.
Page 298
Syntax
list doc.WaveVars()
Returns
Returns the list of waveform variables in the document.
import nex
doc = nex.GetActiveDocument()
waveformVars = doc.WaveVars()
Returns the list of marker variables in the document.
Syntax
list doc.MarkerVars()
Returns
Returns the list of marker variables in the document.
import nex
doc = nex.GetActiveDocument()
markerVars = doc.MarkerVars()
Returns the list of continuous variables in the document.
Syntax
list doc.ContinuousVars()
Returns
Returns the list of continuous variables in the document.
import nex
doc = nex.GetActiveDocument()
contVars = doc.ContinuousVars()
See Also
Introduction to NexScript and Python Programming
Function Categories
Page 299
6.5.2.17. MarkerVars
Returns the list of neuron names in the document.
Syntax
list doc.NeuronNames()
Returns
Returns the list of neuron names in the document.
import nex
doc = nex.GetActiveDocument()
namesOfNeurons = doc.NeuronNames()
Returns the list of event variable names in the document.
Syntax
list doc.EventNames()
Returns
Returns the list of event variable names in the document.
import nex
doc = nex.GetActiveDocument()
namesOfEvents = doc.EventNames()
Returns the list of interval variable names in the document.
Syntax
list doc.IntervalNames()
Returns
Returns the list of interval variable names in the document.
import nex
doc = nex.GetActiveDocument()
namesOfIntervalVars = doc.IntervalNames()
Returns the list of waveform variable names in the document.
Syntax
list doc.WaveNames()
Returns
Returns the list of waveform variable names in the document.
import nex
doc = nex.GetActiveDocument()
namesOfWaveformVars = doc.WaveNames()
Returns the list of marker variable names in the document.
Syntax
list doc.MarkerNames()
Page 300
Returns
Returns the list of marker variable names in the document.
import nex
doc = nex.GetActiveDocument()
namesOfMarkerVars = doc.MarkerNames()
Returns the list of continuous variable names in the document.
Syntax
list doc.ContinuousNames()
Returns
Returns the list of continuous variable names in the document.
import nex
doc = nex.GetActiveDocument()
namesOfContVars = doc.ContinuousNames()
Returns the list of neuron variables in the document.
Syntax
list doc.NeuronVars()
Returns
Returns the list of neuron variables in the document.
import nex
doc = nex.GetActiveDocument()
neuronVars = doc.NeuronVars()
Returns the list of event variables in the document.
Syntax
list doc.EventVars()
Returns
Returns the list of event variables in the document.
import nex
doc = nex.GetActiveDocument()
eventVars = doc.EventVars()
Returns the list of interval variables in the document.
Syntax
list doc.IntervalVars()
Returns
Returns the list of interval variables in the document.
import nex
doc = nex.GetActiveDocument()
intervalVars = doc.IntervalVars()
Returns the list of waveform variables in the document.
Page 301
Syntax
list doc.WaveVars()
Returns
Returns the list of waveform variables in the document.
import nex
doc = nex.GetActiveDocument()
waveformVars = doc.WaveVars()
Returns the list of marker variables in the document.
Syntax
list doc.MarkerVars()
Returns
Returns the list of marker variables in the document.
import nex
doc = nex.GetActiveDocument()
markerVars = doc.MarkerVars()
Returns the list of continuous variables in the document.
Syntax
list doc.ContinuousVars()
Returns
Returns the list of continuous variables in the document.
import nex
doc = nex.GetActiveDocument()
contVars = doc.ContinuousVars()
See Also
Introduction to NexScript and Python Programming
Function Categories
Page 302
6.5.2.18. ContinuousVars
Returns the list of neuron names in the document.
Syntax
list doc.NeuronNames()
Returns
Returns the list of neuron names in the document.
import nex
doc = nex.GetActiveDocument()
namesOfNeurons = doc.NeuronNames()
Returns the list of event variable names in the document.
Syntax
list doc.EventNames()
Returns
Returns the list of event variable names in the document.
import nex
doc = nex.GetActiveDocument()
namesOfEvents = doc.EventNames()
Returns the list of interval variable names in the document.
Syntax
list doc.IntervalNames()
Returns
Returns the list of interval variable names in the document.
import nex
doc = nex.GetActiveDocument()
namesOfIntervalVars = doc.IntervalNames()
Returns the list of waveform variable names in the document.
Syntax
list doc.WaveNames()
Returns
Returns the list of waveform variable names in the document.
import nex
doc = nex.GetActiveDocument()
namesOfWaveformVars = doc.WaveNames()
Returns the list of marker variable names in the document.
Syntax
list doc.MarkerNames()
Page 303
Returns
Returns the list of marker variable names in the document.
import nex
doc = nex.GetActiveDocument()
namesOfMarkerVars = doc.MarkerNames()
Returns the list of continuous variable names in the document.
Syntax
list doc.ContinuousNames()
Returns
Returns the list of continuous variable names in the document.
import nex
doc = nex.GetActiveDocument()
namesOfContVars = doc.ContinuousNames()
Returns the list of neuron variables in the document.
Syntax
list doc.NeuronVars()
Returns
Returns the list of neuron variables in the document.
import nex
doc = nex.GetActiveDocument()
neuronVars = doc.NeuronVars()
Returns the list of event variables in the document.
Syntax
list doc.EventVars()
Returns
Returns the list of event variables in the document.
import nex
doc = nex.GetActiveDocument()
eventVars = doc.EventVars()
Returns the list of interval variables in the document.
Syntax
list doc.IntervalVars()
Returns
Returns the list of interval variables in the document.
import nex
doc = nex.GetActiveDocument()
intervalVars = doc.IntervalVars()
Returns the list of waveform variables in the document.
Page 304
Syntax
list doc.WaveVars()
Returns
Returns the list of waveform variables in the document.
import nex
doc = nex.GetActiveDocument()
waveformVars = doc.WaveVars()
Returns the list of marker variables in the document.
Syntax
list doc.MarkerVars()
Returns
Returns the list of marker variables in the document.
import nex
doc = nex.GetActiveDocument()
markerVars = doc.MarkerVars()
Returns the list of continuous variables in the document.
Syntax
list doc.ContinuousVars()
Returns
Returns the list of continuous variables in the document.
import nex
doc = nex.GetActiveDocument()
contVars = doc.ContinuousVars()
See Also
Introduction to NexScript and Python Programming
Function Categories
Page 305
6.5.2.19. GetSelVarNames
GetSelVarNames NexDoc Method
Returns the list of selected variables in the document.
Syntax
doc.GetSelVarNames()
Returns
Returns the list of selected variables in the document.
Usage
Python
import nex
doc = nex.GetActiveDocument()
selNames = doc.GetSelVarNames()
See Also
Introduction to NexScript and Python Programming
Function Categories
Page 306

6.5.2.20. GetDocStartTime
GetDocStartTime Script Function
Returns the minimum timestamp value (in seconds) for all the document variables.
Syntax
GetDocStartTime(doc)
Parameters
Parameter Type Description
doc documentReference Reference to the document.
Returns
Returns the minimum timestamp value (in seconds) for all the document variables.
Comments
Usage
NexScript
doc = GetActiveDocument()
startTime = GetDocStartTime(doc)
Python
import nex
doc = nex.GetActiveDocument()
startTime = nex.GetDocStartTime(doc)
See Also
Introduction to NexScript and Python Programming
Function Categories
Page 307

6.5.2.21. SetDocStartTime
SetDocStartTime Script Function
Sets the start of experimental session (in seconds) for the document.
Syntax
SetDocStartTime(doc, start_time)
Parameters
Parameter Type Description
doc documentReference Reference to the document.
start_time number
Returns
None
Comments
Usage
NexScript
doc = GetActiveDocument()
start_time = 0.1
SetDocStartTime(doc, start_time)
Python
import nex
doc = nex.GetActiveDocument()
start_time = 0.1
nex.SetDocStartTime(doc, start_time)
See Also
Introduction to NexScript and Python Programming
Function Categories
Page 308
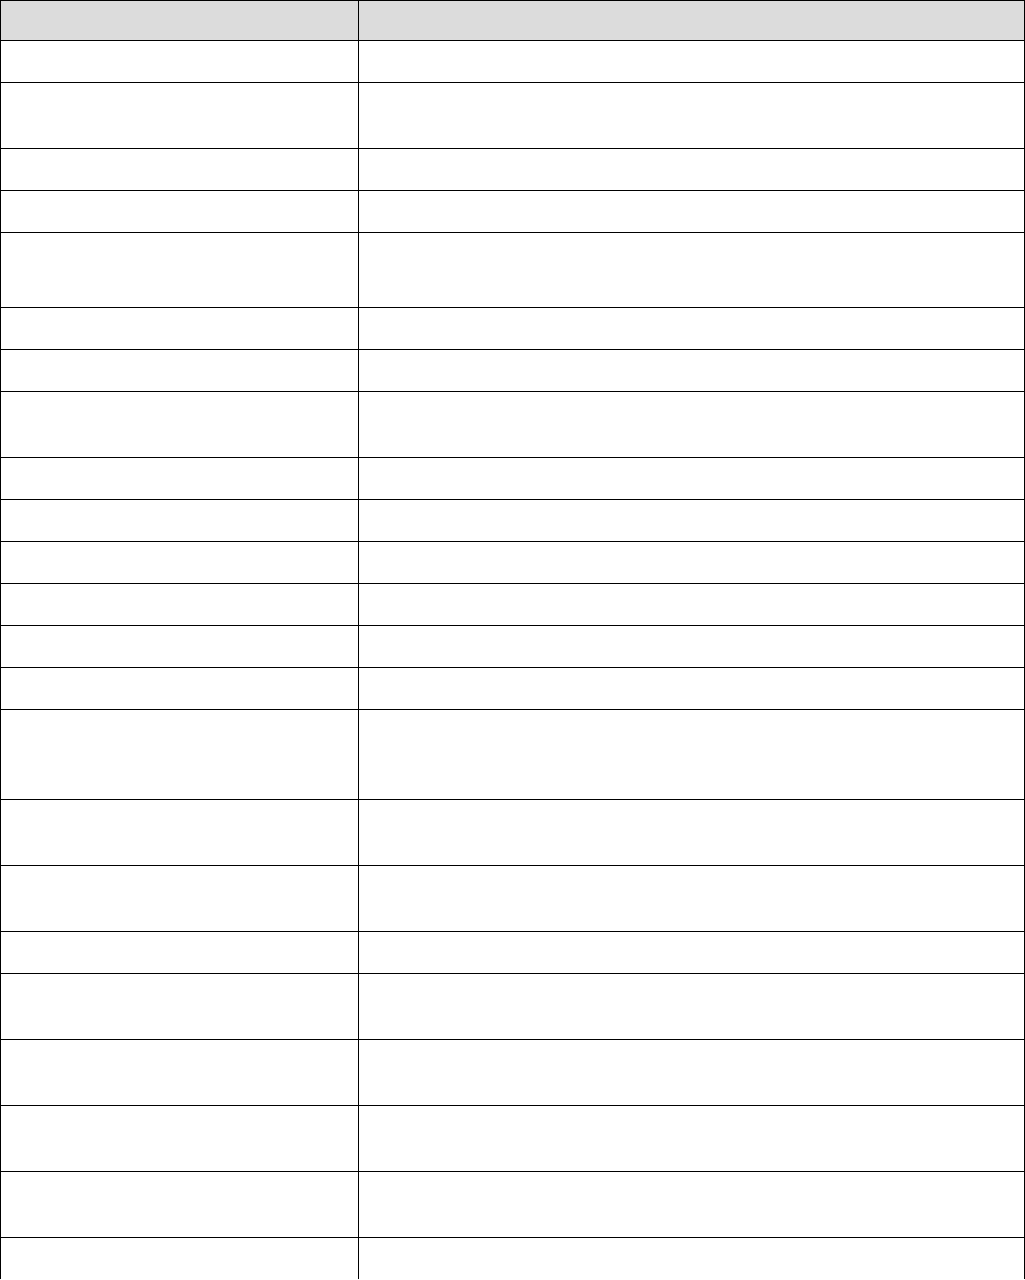
6.5.3. Document Variables Functions
The following document variables functions are available in NexScript and Python
Function Description
GetVarCount Returns the number of variables of the specified type in the file.
GetVarName Returns a string -- the name of the variable of the specified type in
the file.
GetVarSpikeCount Returns the number of timestamps in the variable.
GetVar Returns the reference to the specified variable.
Functions returning lists of variable
names and lists of variables
Functions returning lists of variable names and lists of variables.
DeleteVar Deletes the specified variable from the file.
Delete Deletes the specified variable from the file.
GetVarByName Returns the reference to the variable which has the specified
name.
NewEvent Creates a new timestamped variable.
NewIntEvent Creates a new interval variable.
NewPopVector Creates a new population vector.
GetContNumDataPoints Returns the number of data points in the continuous variable.
NewContVar Creates a new continuous variable.
CopySelectedVarsToAnotherFile Copies selected variables from one file to another.
NewContVarWithFloats Creates a new continuous variable, returns a reference to the new
variable. frequency specifies the sampling frequency of the new
variable (in Hz).
ContVarStoreValuesAsFloats Converts storage of continuous values from 16-bit integers to 32-
bit floats.
SetContVarTimestampsAndValues Sets the timestamps and continuous values of a NexVar object
representing continuous variable.
CreateWaveformVariable Creates a new waveform variable with specified values.
ContMin Returns minimum of continuous values of the NexVar object
representing continuous variable.
ContMax Returns maximum of continuous values of the NexVar object
representing continuous variable.
ContMean Returns the mean of continuous values of the NexVar object
representing continuous variable.
ContAdd Creates a new continuous variable with values
contVar[i]+numberToAdd, returns a reference to the new variable.
ContMult Creates a new continuous variable with values
Page 309
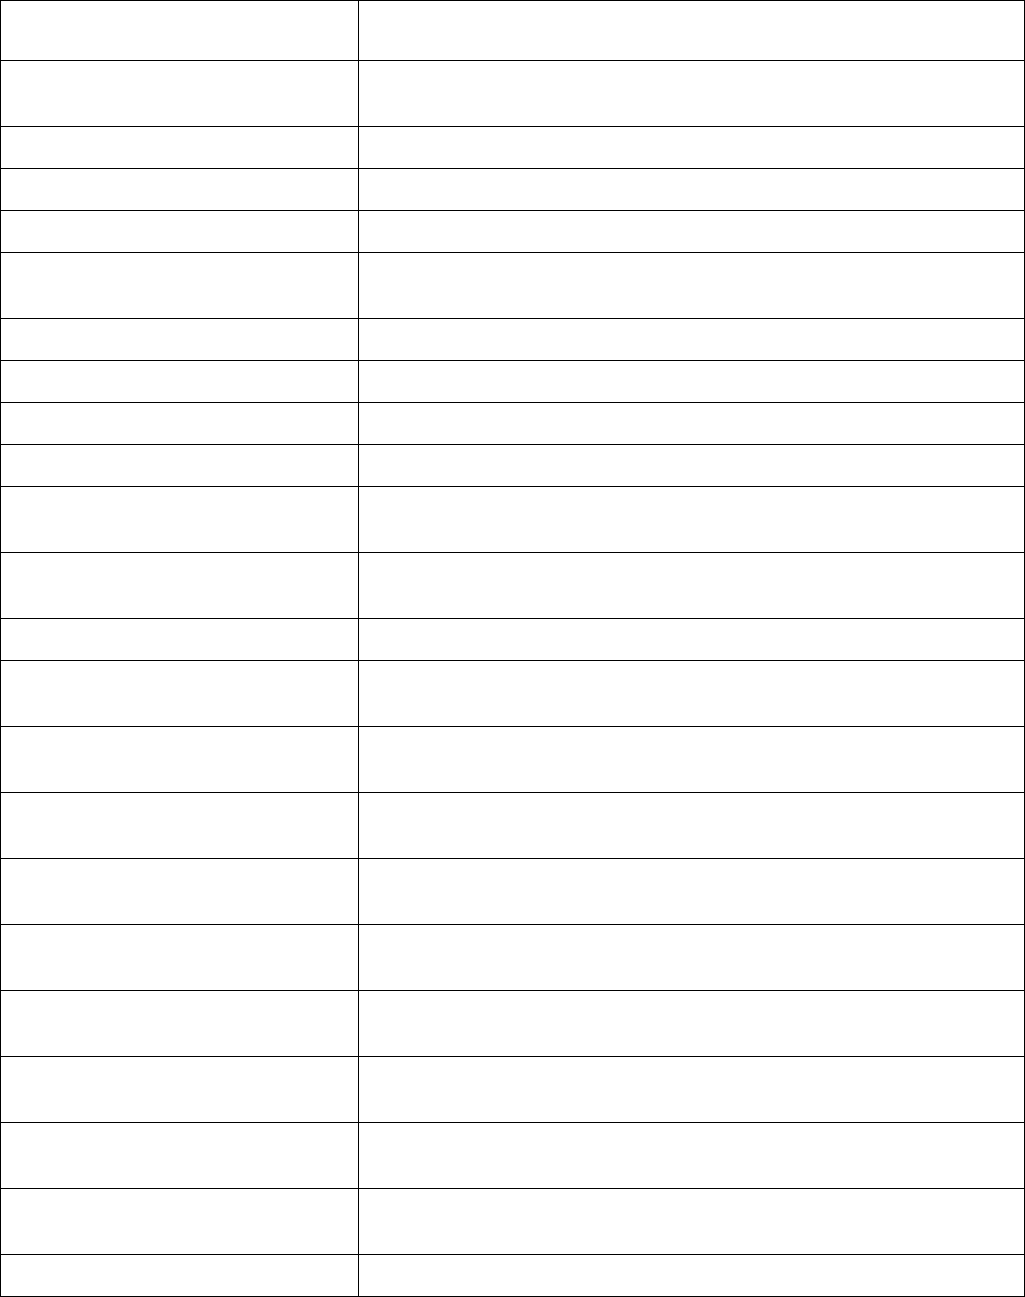
contVar[i]*numberToMultiply, returns a reference to the new
variable.
ContAddCont Creates a new continuous variable with values
contVar1[i]+contVar2[i], returns a reference to the new variable.
GetName Returns the name of the variable.
GetSpikeCount Returns the number of timestamps in the variable.
AddTimestamp Adds a new timestamp to the specified variable.
SetNeuronType Changes the type of the timestamp variable to either 'neuron' or
'event'.
AddContValue Adds a new data point to the specified continuous variable.
AddInterval Adds a new interval to the specified interval variable.
Name Returns the name of the NexVar object.
Metadata Returns metadata of the NexVar object.
SamplingRate Returns the sampling rate of the NexVar object representing
continuous channel.
NumPointsInWave Returns the number of data points in each waveform of the NexVar
object representing waveform variable.
Timestamps Returns the list of all the timestamps of the NexVar object.
Intervals Returns the list of all the intervals of the NexVar object
representing interval variable.
ContinuousValues Returns the list of all continuous values of the NexVar object
representing continuous variable.
FragmentTimestamps Returns the list of fragment timestamps of the NexVar object
representing continuous variable.
FragmentCounts Returns the list of fragment counts (numbers of data points in each
fragment) of the NexVar object representing continuous variable.
WaveformValues Returns the list of waveform values of the NexVar object
representing waveform variable.
Markers Returns the list of marker values of the NexVar object representing
marker variable.
MarkerFieldNames Returns the list of marker field names of the NexVar object
representing marker variable.
SetContVarTimestampsAndValues Sets the timestamps and continuous values of a NexVar object
representing continuous variable.
SetTimestamps Sets the timestamps of a NexVar object representing event or
neuron.
SetNeuronPosition Sets the position (used in 3D displays) of a neuron variable.
See Also
Page 310

6.5.3.1. GetVarCount
GetVarCount Function
Returns the number of variables of the specified type in the file.
Syntax
number GetVarCount(doc, varType)
Parameters
Parameter Type Description
doc documentReference Reference to the document.
varType string Variable type. Should be "neuron", "neuronorevent" ,
"event", "interval" "wave", "popvector", "continuous",
"marker" or "all".
Returns
Returns the number of variables of the specified type in the file.
Comments
None
Usage
NexScript
doc = GetActiveDocument()
% get the number of continuous variables
numContVars = GetVarCount(doc, "continuous")
Python
import nex
doc = nex.GetActiveDocument()
# get the number of continuous variables
numContVars = nex.GetVarCount(doc, "continuous")
See Also
Introduction to NexScript and Python Programming
Function Categories
Page 312

6.5.3.2. GetVarName
GetVarName Function
Returns the name of the specified variable.
Syntax
string GetVarName(doc, varNumber, varType)
Parameters
Parameter Type Description
doc documentReference Reference to the document.
varNumber number 1-based variable number within the group specified by
varType.
varType string Variable type. Should be "neuron", "neuronorevent" ,
"event", "interval" "wave", "popvector", "continuous",
"marker" or "all".
Returns
Returns the name of the specified variable.
Comments
None
Usage
NexScript
doc = GetActiveDocument()
% get the name of the first event variable
name = GetVarName(doc, 1, "event")
Python
import nex
doc = nex.GetActiveDocument()
# get the name of the first event variable
name = nex.GetVarName(doc, 1, "event")
See Also
Introduction to NexScript and Python Programming
Function Categories
Page 313

6.5.3.3. GetVarSpikeCount
GetVarSpikeCount Function
Returns the number of timestamps in the specified variable.
Syntax
number GetVarSpikeCount(doc, varNumber, varType)
Parameters
Parameter Type Description
doc documentReference Reference to the document
varNumber number 1-based variable number within the group specified by
varType.
varType string Variable type. Should be "neuron", "neuronorevent",
"event", "interval", "wave", "continuous", "marker" or
"all".
Returns
Returns the number of timestamps in the variable. For a continuous variable, returns the number of
fragments.
Comments
None
Usage
NexScript
doc = GetActiveDocument()
numSpikes = GetVarSpikeCount(doc, 3, "neuron")
Python
import nex
doc = nex.GetActiveDocument()
numSpikes = nex.GetVarSpikeCount(doc, 3, "neuron")
See Also
Introduction to NexScript and Python Programming
Function Categories
Page 314

6.5.3.4. GetVar
GetVar Function
Returns the reference to the specified variable.
Syntax
variableReference GetVar(doc, varNumber, varType)
Parameters
Parameter Type Description
doc documentReference Reference to the document
varNumber number 1-based variable number within the group specified by
varType.
varType string Variable type. Should be "neuron", "neuronorevent" ,
"event", "interval" "wave", "popvector", "continuous",
"marker" or "all".
Returns
Returns the reference to the specified variable.
Comments
None
Usage
NexScript
doc = GetActiveDocument()
% get the second event variable
event = GetVar(doc, 2, "event")
Python
import nex
doc = nex.GetActiveDocument()
# get the second event variable
event = nex.GetVar(doc, 2, "event")
See Also
Introduction to NexScript and Python Programming
Function Categories
Page 315

6.5.3.5. DeleteVar
DeleteVar Function
Deletes the specified variable from the file.
Syntax
DeleteVar(doc, number, varType)
Parameters
Parameter Type Description
doc documentReference Reference to the document.
number number 1-based variable number within the group specified by
varType.
varType string Variable type. Should be "neuron", "neuronorevent" ,
"event", "interval" "wave", "popvector", "continuous",
"marker" or "all".
Returns
None
Comments
All the analysis windows are closed before executing this function. Please note that this function
produces an immediate result - after the execution of this function, the number of variables of the
specified type is reduced by 1. Therefore, you cannot use a simple for loop to delete all the variables of a
certain type. You can use while loop as shown in the example script below.
Usage
NexScript
doc = GetActiveDocument()
% delete the first continuous variable
DeleteVar(doc, 1, "continuous")
% delete all waveform variables
% note that we always delete the first variable
while GetVarCount(doc, "wave") > 0
DeleteVar(doc, 1, "wave")
end
Python
import nex
doc = nex.GetActiveDocument()
# delete the first continuous variable
nex.DeleteVar(doc, 1, "continuous")
# delete all waveform variables
# note that we always delete the first variable
Page 316

6.5.3.6. Delete
Delete Function
Deletes the specified variable from the file.
Syntax
Delete(doc, var)
Parameters
Parameter Type Description
doc documentReference Reference to the document.
var variableReference Reference to the variable.
Returns
None
Comments
All the analysis windows are closed before executing this function.
Usage
NexScript
doc = GetActiveDocument()
var = GetVarByName(doc, "Event04")
Delete(doc, var)
Python
import nex
doc = nex.GetActiveDocument()
var = nex.GetVarByName(doc, "Event04")
nex.Delete(doc, var)
See Also
Introduction to NexScript and Python Programming
Function Categories
Page 318

6.5.3.7. GetVarByName
GetVarByName Function
Returns the reference to the variable which has the specified name.
Syntax
variableReference GetVarByName(doc, name)
Parameters
Parameter Type Description
doc documentReference Reference to the document.
name string Variable name.
Returns
Returns the reference to the variable which has the specified name.
Comments
None
Usage
NexScript
doc = GetActiveDocument()
% get the variable with the name TrialStart
start = GetVarByName(doc, "TrialStart")
Python
import nex
doc = nex.GetActiveDocument()
# get the variable with the name TrialStart
start = nex.GetVarByName(doc, "TrialStart")
See Also
Introduction to NexScript and Python Programming
Function Categories
Page 319

6.5.3.8. NewEvent
NewEvent Function
Creates a new timestamped variable.
Syntax
variableReference NewEvent(doc, count)
Parameters
Parameter Type Description
doc documentReference Reference to the document.
count number Initial number of the timestamps in the document.
Returns
Returns a reference to the new variable.
Comments
None
Usage
NexScript
doc = GetActiveDocument()
temp = NewEvent(doc, 10) % creates a script-only variable
doc["NewVar"] = NewEvent(doc, 0) % creates a new variable in the file
Python
import nex
doc = nex.GetActiveDocument()
temp = nex.NewEvent(doc, 10) # creates a script-only variable
doc["NewVar"] = nex.NewEvent(doc, 0) # creates a new variable in the file
See Also
Introduction to NexScript and Python Programming
Function Categories
Page 320

6.5.3.9. NewIntEvent
NewIntEvent Function
Creates a new interval variable.
Syntax
variableReference NewIntEvent(doc, count)
Parameters
Parameter Type Description
doc documentReference Reference to the document.
count number Initial number of intervals in the variable. This
parameter is optional.
Returns
Returns a reference to the new variable.
Comments
If initial number of intervals is positive, intervals are initialized with values [0, 0.5], [1, 1.5], etc.
Usage
NexScript
The following script creates a new interval variable that has two intervals: from 0 to 100 seconds and
from 200 to 300 seconds:
doc = GetActiveDocument()
doc["MyInterval"] = NewIntEvent(doc)
AddInterval(doc["MyInterval"], 0., 100.)
AddInterval(doc["MyInterval"], 200., 300.)
Python
import nex
doc = nex.GetActiveDocument()
doc["MyInterval"] = nex.NewIntEvent(doc)
nex.AddInterval(doc["MyInterval"], 0., 100.)
nex.AddInterval(doc["MyInterval"], 200., 300.)
See Also
Introduction to NexScript and Python Programming
Function Categories
Page 321
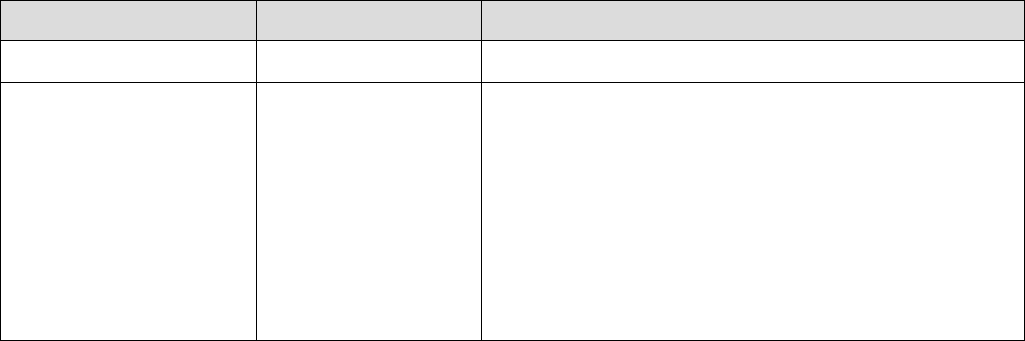
6.5.3.10. NewPopVector
NewPopVector Function
Creates a new population vector.
Syntax
variableReference NewPopVector(doc, type)
Parameters
Parameter Type Description
doc documentReference Reference to the document.
type number If type = 0, all weights of the new vector are equal to
zero. If type = 1, NeuroExplorer creates a vector
representing the average of all neurons in the file. If
type = 2, NeuroExplorer creates a vector representing
the sum of all neurons in the file. If type = 3,
NeuroExplorer creates a vector representing the
average of all selected neurons and events in the file.
If type = 4, NeuroExplorer creates a vector
representing the sum of all selected neurons and
events in the file.
Returns
Returns a reference to the new vector.
Comments
None
Usage
NexScript
doc = GetActiveDocument()
doc["neuronAverage"] = NewPopVector(doc, 1)
Python
import nex
doc = nex.GetActiveDocument()
doc["neuronAverage"] = nex.NewPopVector(doc, 1)
See Also
Introduction to NexScript and Python Programming
Function Categories
Page 322

6.5.3.11. GetContNumDataPoints
GetContNumDataPoints Function
Returns the number of data points in the continuous variable.
Syntax
number GetContNumDataPoints(var)
Parameters
Parameter Type Description
var variableReference Reference to a continuous variable.
Returns
Returns the number of data points in the continuous variable.
Comments
None
Usage
NexScript
doc = GetActiveDocument()
var = GetVarByName(doc, "AD_01")
numPoints = GetContNumDataPoints(var)
Python
import nex
doc = nex.GetActiveDocument()
var = nex.GetVarByName(doc, "AD_01")
numPoints = nex.GetContNumDataPoints(var)
See Also
Introduction to NexScript and Python Programming
Function Categories
Page 323
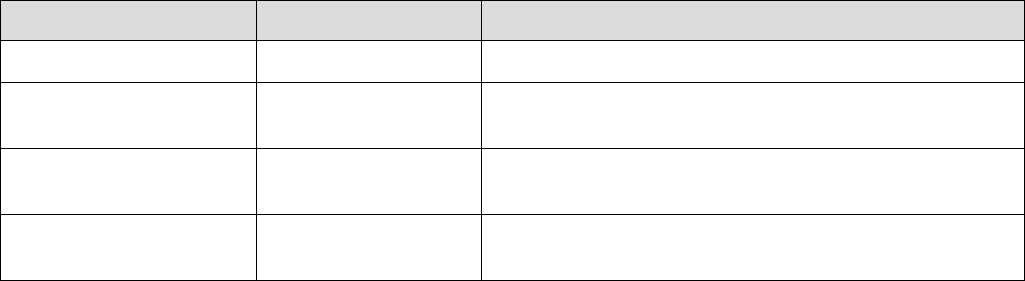
6.5.3.12. NewContVar
NewContVar Function
Creates a new continuous variable.
Syntax
variableReference NewContVar(doc, frequency, mVmin, mVmax)
Parameters
Parameter Type Description
doc documentReference Reference to the document.
frequency number Specifies the sampling frequency of the new variable
(in Hz).
mVmin number Minimum of the values of the new variable (in
milliVolts).
mVmax number Maximum of the values of the new variable (in
milliVolts).
Returns
Returns a reference to the new variable.
Comments
When you use this function, NeuroExplorer will store the values of the new continuous variable as scaled
2-byte integers. Specifying minimum and maximum of the variable values helps to determine the correct
scaling factor for the new variable.
It is recommended that you use NewContVarWithFloats function instead of this function.
Usage
NexScript
doc = GetActiveDocument()
freq = 1000.
% create new variable in the file
doc["SinValues"] = NewContVar(doc, freq, -500.,500.)
% add the values to the new variable
for i = 1 to 10000
% timestamp
ts = i/freq
% value
value = 500.*sin(ts)
AddContValue(doc["SinValues"], ts, value)
end
Python
import nex
import math
doc = nex.GetActiveDocument()
freq = 1000.
Page 324
# create new variable in the file
doc["SinValues"] = nex.NewContVar(doc, freq, - 500., 500.)
# add the values to the new variable
for i in range( int(1), int(10000) + 1):
# timestamp
ts = i / freq
# value
value = 500. * math.sin(ts)
nex.AddContValue(doc["SinValues"], ts, value)
See Also
Introduction to NexScript and Python Programming
Function Categories
Page 325

6.5.3.13. CopySelectedVarsToAnotherFile
CopySelectedVarsToAnotherFile Function
Copies selected variables from one file to another.
Syntax
CopySelectedVarsToAnotherFile(fromDoc, toDoc)
Parameters
Parameter Type Description
fromDoc documentReference Reference to the document. The variables are copied
from this document.
toDoc documentReference Reference to the document. The variables are copied
to this document.
Returns
None
Comments
In Python, backslash character (\) has a special meaning. When specifying a Windows path like
"C:\Data\File.nex" in Python, use either "C:/Data/File.nex" or "C:\\Data\\File.nex".
Usage
NexScript
fromDoc = OpenDocument("C:\Data\File1.nex")
toDoc = OpenDocument("C:\Data\File2.nex")
% copy all events from fromDoc to toDoc
% first, select all events
SelectAllEvents(fromDoc)
% call CopySelectedVarsToAnotherFile
CopySelectedVarsToAnotherFile(fromDoc, toDoc)
Python
import nex
fromDoc = nex.OpenDocument("C:\\Data\\File1.nex")
toDoc = nex.OpenDocument("C:\\Data\\File2.nex")
# copy all events from fromDoc to toDoc
# first, select all events
nex.SelectAllEvents(fromDoc)
# call CopySelectedVarsToAnotherFile
nex.CopySelectedVarsToAnotherFile(fromDoc, toDoc)
See Also
Introduction to NexScript and Python Programming
Function Categories
Page 326

6.5.3.14. NewContVarWithFloats
NewContVarWithFloats Function
Creates a new continuous variable, returns a reference to the new variable. Frequency specifies the
sampling frequency of the new variable (in Hz).
Syntax
variableReference NewContVarWithFloats(doc, frequency)
Parameters
Parameter Type Description
doc documentReference Reference to the document.
frequency number Sampling frequency of the new variable (in Hz).
Returns
Creates a new continuous variable, returns a reference to the new variable. frequency specifies the
sampling frequency of the new variable (in Hz).
Comments
None
Usage
NexScript
doc = GetActiveDocument()
freq = 1000.
% create new variable in the file
doc["SinValues"] = NewContVarWithFloats(doc, freq)
% add the values to the new variable
for i = 1 to 10000
% timestamp
ts = i/freq
% value
value = 500.*sin(ts)
AddContValue(doc["SinValues"], ts, value)
end
Python
import nex
import math
doc = nex.GetActiveDocument()
freq = 1000.
# create new variable in the file
doc["SinValues"] = nex.NewContVarWithFloats(doc, freq)
# add the values to the new variable
for i in range( int(1), int(10000) + 1):
# timestamp
ts = i / freq
# value
value = 500. * math.sin(ts)
Page 327

6.5.3.15. ContVarStoreValuesAsFloats
ContVarStoreValuesAsFloats Function
Converts storage of continuous values from 16-bit integers to 32-bit floats.
Syntax
ContVarStoreValuesAsFloats(contVar)
Parameters
Parameter Type Description
contVar variableReference Reference to the variable.
Returns
None
Comments
When you assign a value to a continuous variable that was imported from a file created by a data
acquisition system, the assigned value might be clipped.
Data acquisition systems usually store continuous values as 2-byte integers. NeuroExplorer also stores
imported analog data as 2-byte integers with some scaling factors.
For example, if analog to digital converter has input range from -1000mV to +1000mV, then maximum 2-
byte value 32767 corresponds to 1000mV and the scaling factor is 1000/32768. If we try to assign the
value that is outside the original input range, the value has to be clipped so that it could be stored as a 2-
byte integer (for example, if we try to assign 2000mV, the stored value will be 32767 or 1000mV).
To avoid data clipping, use ContVarStoreValuesAsFloats function to convert 2-byte integer storage to
4-byte float storage that does not have clipping problems.
Usage
NexScript
doc["FP01_Rectified"] = doc["FP01"]
rectified = doc["FP01_Rectified"]
ContVarStoreValuesAsFloats( rectified )
n = GetContNumDataPoints( rectified )
for i=1 to n
rectified[i,2] = abs( rectified[i,2] )
end
Python
import nex
doc["FP01_Rectified"] = doc["FP01"]
rectified = doc["FP01_Rectified"]
nex.ContVarStoreValuesAsFloats(rectified)
n = nex.GetContNumDataPoints(rectified)
for i in range( 1, int(n) + 1):
rectified[i, 2] = abs(rectified[i, 2])
Page 329
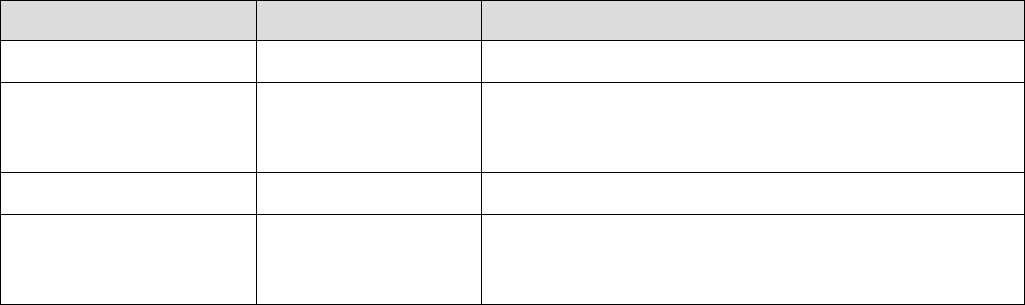
6.5.3.16. CreateWaveformVariable
CreateWaveformVariable NexDoc Method
Creates a new waveform variable with specified values.
Syntax
doc.CreateWaveformVariable(name, waveformSamplingRate, timestamps, waveformValues)
Parameters
Parameter Type Description
name string The name of the variable
waveformSamplingRate number Waveform sampling rate (sampling rate of the
continuous channel that was used to extract
waveforms).
timestamps list List of timestamps in seconds.
waveformValues list of lists List of waveform values in milliVolts. Each sub-list
represents a single waveform (values should be in
milliVolts). See sample code below.
Returns
None
Comments
Python only.
Usage
Python
import nex
doc = nex.GetActiveDocument()
# create waveform variable with 2 waveforms:
# waveform 1: timestamp = 10s; waveform values are 2, 3, 4 and 1 (mV)
# waveform 2: timestamp = 20s; waveform values are 5, 6, 7 and 2 (mV)
doc.CreateWaveformVariable('ScriptGenerated', 40000, [10,20], [ [2,3,4,1], [5,6,7,2]
] )
See Also
Introduction to NexScript and Python Programming
Function Categories
Page 331
6.5.3.17. ContMin
ContMin Script Function
Returns minimum of continuous values of the NexVar object representing continuous variable.
Syntax
ContMin()
Parameters
None
Returns
Returns minimum of continuous values of the NexVar object representing continuous variable.
Comments
Usage
Python
import nex
doc = nex.GetActiveDocument()
minFP01 = doc['FP01'].ContMin()
See Also
Introduction to NexScript and Python Programming
Function Categories
Page 332
6.5.3.18. ContMax
ContMax Script Function
Returns maximum of continuous values of the NexVar object representing continuous variable.
Syntax
ContMax()
Parameters
None
Returns
Returns maximum of continuous values of the NexVar object representing continuous variable.
Comments
Usage
Python
import nex
doc = nex.GetActiveDocument()
maxFP01 = doc['FP01'].ContMax()
See Also
Introduction to NexScript and Python Programming
Function Categories
Page 333
6.5.3.19. ContMean
ContMean Script Function
Returns the mean of continuous values of the NexVar object representing continuous variable.
Syntax
ContMean()
Parameters
None
Returns
Returns the mean of continuous values of the NexVar object representing continuous variable.
Comments
Usage
Python
import nex
doc = nex.GetActiveDocument()
meanFP01 = doc['FP01'].ContMean()
See Also
Introduction to NexScript and Python Programming
Function Categories
Page 334

6.5.3.20. ContAdd
ContAdd Script Function
Creates a new continuous variable with values contVar[i]+numberToAdd, returns a reference to the new
variable.
Syntax
variableReference ContAdd(contVar, numberToAdd)
Parameters
Parameter Type Description
contVar variableReference Reference to the variable.
numberToAdd number The number to add to each value of the contVar
Returns
Creates a new continuous variable with values contVar[i]+numberToAdd, returns a reference to the new
variable.
Comments
Usage
NexScript
doc = GetActiveDocument()
baseLine = 10.0
doc["subtractedBaseLine"] = ContAdd(doc["FP01"], -baseLine)
Python
import nex
doc = nex.GetActiveDocument()
baseLine = 10.0
doc["subtractedBaseLine"] = nex.ContAdd(doc["FP01"], -baseLine)
# you can also use arithmetic operations on continuous variables:
doc["subtractedBaseLine"] = doc["FP01"] - baseLine
doc["average of FP01 and FP02"] = ( doc["FP01"] + doc["FP02"] ) / 2
See Also
Introduction to NexScript and Python Programming
Function Categories
Page 335

6.5.3.21. ContMult
ContMult Script Function
Creates a new continuous variable with values contVar[i]*numberToMultiply, returns a reference to the
new variable.
Syntax
variableReference ContMult(contVar, numberToMultiply)
Parameters
Parameter Type Description
contVar variableReference Reference to the variable.
numberToMultiply number The result values will be contVar[i]*numberToMultiply.
Returns
Creates a new continuous variable with values contVar[i]*numberToMultiply, returns a reference to the
new variable.
Comments
Usage
NexScript
doc = GetActiveDocument()
coeff = -1.0
doc["invertedFP01"] = ContMult(doc["FP01"], coeff)
Python
import nex
doc = nex.GetActiveDocument()
coeff = -1.0
doc["invertedFP01"] = nex.ContMult(doc["FP01"], coeff)
# you can also use arithmetic operations on continuous variables:
doc["average of FP01 and FP02"] = ( doc["FP01"] + doc["FP02"] ) / 2
See Also
Introduction to NexScript and Python Programming
Function Categories
Page 336

6.5.3.22. ContAddCont
ContAddCont Script Function
Creates a new continuous variable with values contVar1[i]+contVar2[i], returns a reference to the new
variable.
Syntax
variableReference ContAddCont(contVar1, contVar2)
Parameters
Parameter Type Description
contVar1 variableReference Reference to the continuous variable.
contVar2 variableReference Reference to the continuous variable. contVar1 and
contVar2 should have the same number of continuous
values.
Returns
Creates a new continuous variable with values contVar1[i]+contVar2[i], returns a reference to the new
variable. The timestamps of the new variable are copied from contVar1. Timestamps of contVar2 are
ignored.
Comments
Usage
NexScript
doc = GetActiveDocument()
theSumOfFP1andFP2 = ContAddCont(doc["FP01"], doc["FP02"])
Python
import nex
doc = nex.GetActiveDocument()
theSumOfFP1andFP2 = nex.ContAddCont(doc["FP01"], doc["FP02"])
# you can also use arithmetic operations on continuous variables:
doc["average of FP01 and FP02"] = ( doc["FP01"] + doc["FP01"] ) / 2
See Also
Introduction to NexScript and Python Programming
Function Categories
Page 337

6.5.3.23. GetName
GetName Function
Returns the name of the variable.
Syntax
string GetName(var)
Parameters
Parameter Type Description
var variableReference Reference to the variable.
Returns
Returns the name of the variable.
Comments
None
Usage
NexScript
doc = GetActiveDocument()
% get the first neuron variable
var = GetVar(doc, 1, "neuron")
% get the variable name
name = GetName(var)
Python
import nex
doc = nex.GetActiveDocument()
# get the first neuron variable
var = nex.GetVar(doc, 1, "neuron")
# get the variable name
name = nex.GetName(var)
See Also
Introduction to NexScript and Python Programming
Function Categories
Page 338

6.5.3.24. GetSpikeCount
GetSpikeCount Function
Returns the number of timestamps in the variable.
Syntax
number GetSpikeCount(var)
Parameters
Parameter Type Description
var variableReference Reference to the variable.
Returns
Returns the number of timestamps in the variable. For a continuous variable, returns the number of
fragments.
Comments
None
Usage
NexScript
doc = GetActiveDocument()
count = GetSpikeCount( doc["Neuron04a"] )
Python
import nex
doc = nex.GetActiveDocument()
count = nex.GetSpikeCount(doc["Neuron04a"])
See Also
Introduction to NexScript and Python Programming
Function Categories
Page 339

6.5.3.25. AddTimestamp
AddTimestamp Function
Adds a new timestamp to the specified event or neuron variable.
Syntax
AddTimestamp(var, timestamp)
Parameters
Parameter Type Description
var variableReference Reference to the event or neuron variable.
timestamp number New timestamp (in seconds).
Returns
None
Comments
The new timestamp should not be equal to one of the existing timestamps of the specified variable.
Usage
NexScript
doc = GetActiveDocument()
eventVar = GetVarByName(doc, "Event04")
% add timestamp at 1.5 seconds
AddTimestamp(eventVar, 1.5)
Python
import nex
doc = nex.GetActiveDocument()
eventVar = nex.GetVarByName(doc, "Event04")
# add timestamp at 1.5 seconds
nex.AddTimestamp(eventVar, 1.5)
See Also
Introduction to NexScript and Python Programming
Function Categories
Page 340
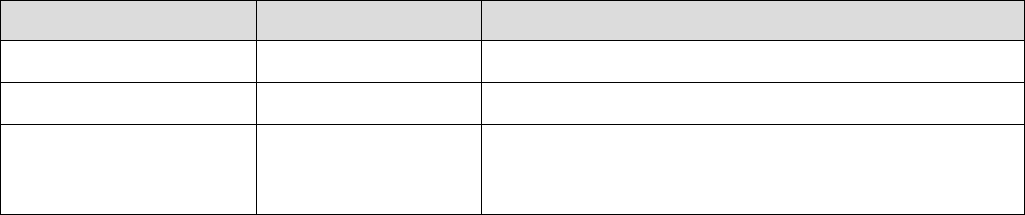
6.5.3.26. SetNeuronType
SetNeuronType Function
Changes the type of the specified timestamped variable.
Syntax
SetNeuronType(doc, var, type)
Parameters
Parameter Type Description
doc documentReference Reference to the document.
var variableReference Reference to the variable.
type number If type is positive, the variable type is set to 'neuron', if
type is zero or negative, the variable type is set to
'event'.
Returns
None
Comments
Neuron and event types are almost identical. The main difference is that when a data file is opened by
NeuroExplorer, all the neuron variables in this file are selected for analysis.
You may need to use this function when creating new neuron variables using NewEvent. NewEvent
creates an event variable and the variable type can later be changed to 'neuron' using SetNeuronType.
Usage
NexScript
doc = GetActiveDocument()
doc["neuron1"] = NewEvent(doc, 0)
SetNeuronType(doc, doc["neuron1"], 1)
Python
import nex
doc = nex.GetActiveDocument()
doc["neuron1"] = nex.NewEvent(doc, 0)
nex.SetNeuronType(doc, doc["neuron1"], 1)
See Also
Introduction to NexScript and Python Programming
Function Categories
Page 341

6.5.3.27. AddContValue
AddContValue Function
Adds a new data point to the specified continuous variable
Syntax
AddContValue(var, timestamp, value)
Parameters
Parameter Type Description
var variableReference Reference to the continuous variable.
timestamp number Timestamp value in seconds.
value number Voltage value in milliVolts.
Returns
None
Comments
None
Usage
NexScript
doc = GetActiveDocument()
contVar = GetVarByName(doc, "ContVar1")
% add voltage value of 25.7 mV at the time 100.3 seconds
AddContValue(contVar, 100.3, 25.7)
Python
import nex
doc = nex.GetActiveDocument()
contVar = nex.GetVarByName(doc, "ContVar1")
# add voltage value of 25.7 mV at the time 100.3 seconds
nex.AddContValue(contVar, 100.3, 25.7)
See Also
Introduction to NexScript and Python Programming
Function Categories
Page 342

6.5.3.28. AddInterval
AddInterval Function
Adds a new interval to the specified interval variable.
Syntax
AddInterval(var, interval_start, interval_end)
Parameters
Parameter Type Description
var variableReference Reference to the interval variable.
interval_start number Start of new interval (in seconds).
interval_end number End of new interval (in seconds).
Returns
None
Comments
The new interval should not overlap with any of the existing intervals of the specified interval variable.
Usage
NexScript
doc = GetActiveDocument()
intervalVar = GetVarByName(doc, "CorrectTrials")
% add interval [100s,120s]
AddInterval(intervalVar, 100, 120)
Python
import nex
doc = nex.GetActiveDocument()
intervalVar = nex.GetVarByName(doc, "CorrectTrials")
# add interval [100s,120s]
nex.AddInterval(intervalVar, 100, 120)
See Also
Introduction to NexScript and Python Programming
Function Categories
Page 343
6.5.3.29. Name
Name NexVar Object Method
Returns the name of the NexVar object.
Syntax
string var.Name()
Parameters
Name
Returns
Returns the name of the NexVar object.
Comments
Python only.
Usage
Python
import nex
doc = nex.GetActiveDocument()
var = nex.GetVar(doc, 1, 'neuron')
print(var.Name())
See Also
Introduction to NexScript and Python Programming
Function Categories
Page 344
6.5.3.30. Name
Metadata NexVar Object Method
Returns metadata of the NexVar object as Python dictionary.
Syntax
pythonDictionary var.Metadata()
Parameters
Name
Returns
Returns metadata of the NexVar object as Python dictionary (for example, wire and unit number for
neuron variable).
Comments
Python only.
Usage
Python
import nex
doc = nex.GetActiveDocument()
var = nex.GetVar(doc, 1, 'neuron')
meta = var.Metadata()
print(meta)
See Also
Introduction to NexScript and Python Programming
Function Categories
Page 345
6.5.3.31. SamplingRate
SamplingRate NexVar Method
Returns the sampling rate of the NexVar object representing continuous channel.
Syntax
number SamplingRate()
Parameters
None
Returns
Returns the sampling rate of the NexVar object representing continuous channel.
Comments
Python only.
Usage
Python
import nex
doc = nex.GetActiveDocument()
var = nex.GetVar(doc, 1, 'continuous')
print(var.SamplingRate())
See Also
Introduction to NexScript and Python Programming
Function Categories
Page 346
6.5.3.32. NumPointsInWave
NumPointsInWave NexVar Method
Returns the number of data points in each waveform of the NexVar object representing waveform
variable.
Syntax
number var.NumPointsInWave()
Parameters
None
Returns
Returns the number of data points in each waveform of the NexVar object representing waveform
variable.
Comments
Python only
Usage
Python
import nex
doc = nex.GetActiveDocument()
var = nex.GetVar(doc, 1, 'wave')
print var.NumPointsInWave()
See Also
Introduction to NexScript and Python Programming
Function Categories
Page 347
6.5.3.33. Timestamps
Timestamps NexVar Method
Returns the list of all the timestamps of the NexVar object.
Syntax
list var.Timestamps()
Parameters
None
Returns
Returns the list of all the timestamps of the NexVar object. The timestamp values are in seconds.
Comments
Python only.
Usage
Python
import nex
doc = nex.GetActiveDocument()
ts = doc['ResponseCorrect'].Timestamps()
# print the first timestamp
print(ts[0])
See Also
Introduction to NexScript and Python Programming
Function Categories
Page 348
6.5.3.34. Intervals
Intervals NexVar Method
Returns the list of all the intervals of the NexVar object representing interval variable.
Syntax
list var.Intervals()
Parameters
None
Returns
Returns the list of all the intervals of the NexVar object representing interval variable. The values are in
seconds.
Comments
Python only.
Usage
Python
import nex
doc = nex.GetActiveDocument()
intervals = doc['CorrectTrials'].Intervals()
print(intervals)
See Also
Introduction to NexScript and Python Programming
Function Categories
Page 349
6.5.3.35. ContinuousValues
ContinuousValues NexVar Method
Returns the list of all continuous values of the NexVar object representing continuous variable.
Syntax
list var.ContinuousValues()
Parameters
None
Returns
Returns the list of all continuous values of the NexVar object representing continuous variable. The
values are in milliVolts.
Comments
Python only.
Usage
Python
import nex
doc = nex.GetActiveDocument()
values = doc['FP01'].ContinuousValues()
# print first 10 values
print(values[0:10])
See Also
Introduction to NexScript and Python Programming
Function Categories
Page 350
6.5.3.36. FragmentTimestamps
FragmentTimestamps NexVar Method
Returns the list of fragment timestamps of the NexVar object representing continuous variable.
Syntax
list var.FragmentTimestamps()
Parameters
None
Returns
Returns the list of fragment timestamps of the NexVar object representing continuous variable. The
timestamps are in seconds.
Comments
Python only.
Usage
Python
import nex
doc = nex.GetActiveDocument()
fts = doc['FP01'].FragmentTimestamps()
#print the first fragment timestamp
print(fts[0])
See Also
Introduction to NexScript and Python Programming
Function Categories
Page 351
6.5.3.37. FragmentCounts
FragmentCounts NexVar Method
Returns the list of fragment counts (numbers of data points in each fragment) of the NexVar object
representing continuous variable.
Syntax
list var.FragmentCounts()
Parameters
None
Returns
Returns the list of fragment counts (numbers of data points in each fragment) of the NexVar object
representing continuous variable.
Comments
Python only.
Usage
Python
import nex
doc = nex.GetActiveDocument()
counts = doc['FP01'].FragmentCounts()
#print number of points in the first fragment
print(counts[0])
See Also
Introduction to NexScript and Python Programming
Function Categories
Page 352
6.5.3.38. WaveformValues
WaveformValues NexVar Method
Returns the list of waveform values of the NexVar object representing waveform variable.
Syntax
list var.WaveformValues()
Parameters
None
Returns
Returns the list of waveform values of the NexVar object representing waveform variable.
Comments
Python only.
Usage
Python
import nex
doc = nex.GetActiveDocument()
waveforms = doc['sig001a_wf'].WaveformValues()
#print the values of the first waveform
print(waveforms[0])
See Also
Introduction to NexScript and Python Programming
Function Categories
Page 353

6.5.3.39. Markers
Markers NexVar Method
Returns the list of marker values of the NexVar object representing marker variable.
Syntax
list var.Markers()
Parameters
Parameter Type Description
Returns
Returns the list of marker values of the NexVar object representing marker variable.
Comments
Python only.
Usage
Python
import nex
doc = nex.GetActiveDocument()
markerValues = doc['Strobed'].Markers()
#print the second marker value of the first marker field
print(markerValues[0][1])
See Also
Introduction to NexScript and Python Programming
Function Categories
Page 354
6.5.3.40. MarkerFieldNames
MarkerFieldNames NexVar Method
Returns the list of marker field names of the NexVar object representing marker variable.
Syntax
list var.MarkerFieldNames()
Parameters
None
Returns
Returns the list of marker field names of the NexVar object representing marker variable.
Comments
Python only.
Usage
Python
import nex
doc = nex.GetActiveDocument()
fieldNames = doc['Strobed'].MarkerFieldNames()
#print the name of the first marker field
print(fieldNames[0])
See Also
Introduction to NexScript and Python Programming
Function Categories
Page 355

6.5.3.41. SetContVarTimestampsAndValues
SetContVarTimestampsAndValues NexVar Method
Sets the timestamps and continuous values of a NexVar object representing continuous variable.
Syntax
var.SetContVarTimestampsAndValues(timestamps, values)
Parameters
Parameter Type Description
timestamps list list containing timestamps in seconds.
values list list containing values in milliVolts.
Returns
None
Comments
Python only.
Usage
Python
import nex
doc = nex.GetActiveDocument()
doc["ScriptGenerated"] = nex.NewContVarWithFloats(doc, 1000)
doc["ScriptGenerated"].SetContVarTimestampsAndValues([0,0.001,0.002],[1,2,22])
See Also
Introduction to NexScript and Python Programming
Function Categories
Page 356

6.5.3.42. SetTimestamps
SetTimestamps NexVar Method
Sets the timestamps of a NexVar object representing event or neuron.
Syntax
var.SetTimestamps(timestamps)
Parameters
Parameter Type Description
timestamps list list containing timestamps in seconds
Returns
None
Comments
Python only.
Usage
Python
doc = nex.GetActiveDocument()
doc["ScriptGeneratedEvent"] = nex.NewEvent(doc, 0)
doc["ScriptGeneratedEvent"].SetTimestamps([ 1.0025, 2.5, 34.5])
See Also
Introduction to NexScript and Python Programming
Function Categories
Page 357

6.5.3.43. SetNeuronPosition
SetNeuronPosition NexDoc Method
Sets the position (used in 3D displays) of a neuron variable.
Syntax
doc.SetNeuronPosition(neuronVar, x, y)
Parameters
Parameter Type Description
neuronVar variable reference Reference to the neuron variable.
x number x coordinate of position (within [0,100] range)
y number y coordinate of position (within [0,100] range)
Returns
None
Comments
Usage
Python
import nex
doc = nex.GetActiveDocument()
doc.SetNeuronPosition(doc['SPK01a'], 8.0, 12.5)
See Also
Introduction to NexScript and Python Programming
Function Categories
Page 358

6.5.4. Variable Selection Functions
The following selection functions are available in NexScript and Python:
Function Description
IsSelected Returns selection status of the specified variable.
Select Selects the specified variable (with variable type and index) for
analysis.
Deselect Deselects the specified variable (with variable type and index).
SelectVar Selects the specified variable for analysis.
DeselectVar Deselects the specified variable.
SelectAll Selects all variables for analysis.
DeselectAll Deselects all variables.
SelectAllNeurons Selects all the neuron type variables for analysis.
SelectAllEvents Selects all the event type variables for analysis.
EnableRecalcOnSelChange Enables recalculation of analyses when the list of selected
variables changes.
DisableRecalcOnSelChange Disables recalculation of analyses when the list of selected
variables changes.
See Also
Introduction to NexScript and Python Programming
Function Categories
Page 359

6.5.4.1. IsSelected
IsSelected Function
Returns 1 if the variable var is selected, 0 otherwise.
Syntax
number IsSelected(var)
Parameters
Parameter Type Description
var variableReference Reference to the variable.
Returns
Returns 1 if the variable var is selected, 0 otherwise.
Comments
Only selected variables used in analysis.
Usage
NexScript
doc = GetActiveDocument()
isSel = IsSelected(doc["Neuron1"])
Python
import nex
doc = nex.GetActiveDocument()
isSel = nex.IsSelected(doc["Neuron1"])
See Also
Introduction to NexScript and Python Programming
Function Categories
Page 360

6.5.4.2. Select
Select Function
Selects the specified variable for analysis.
Syntax
Select(doc, var)
Parameters
Parameter Type Description
doc documentReference Reference to the document.
var variableReference Reference to the variable.
Returns
None
Comments
Only selected variables used in analysis. Use select and deselect functions to specify what variables you
want to analyze.
Usage
NexScript
doc = GetActiveDocument()
Select(doc, doc["Neuron1"])
Python
import nex
doc = nex.GetActiveDocument()
nex.Select(doc, doc["Neuron1"])
See Also
Introduction to NexScript and Python Programming
Function Categories
Page 361

6.5.4.3. Deselect
Deselect Function
Deselects the specified variable.
Syntax
Deselect(doc, var)
Parameters
Parameter Type Description
doc documentReference Reference to the document.
var variableReference Reference to the variable.
Returns
None
Comments
Only selected variables used in analysis. Use select and deselect functions to specify what variables you
want to analyze.
Usage
NexScript
doc = GetActiveDocument()
% deselect variable Neuro04a from analysis
Deselect(doc, doc["Neuron04a"])
Python
import nex
doc = nex.GetActiveDocument()
# deselect variable Neuro04a from analysis
nex.Deselect(doc, doc["Neuron04a"])
See Also
Introduction to NexScript and Python Programming
Function Categories
Page 362
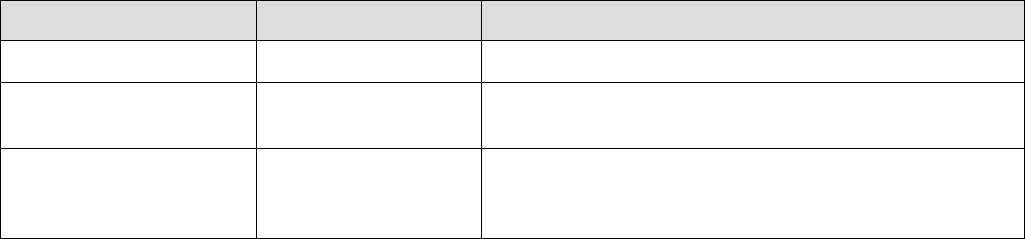
6.5.4.4. SelectVar
SelectVar Function
Selects the specified variable for analysis.
Syntax
SelectVar(doc, number, varType)
Parameters
Parameter Type Description
doc documentReference Reference to the document.
number number Variable number within the group specified by
varType.
varType string Variable type. Should be "neuron", "neuronorevent" ,
"event", "interval" "wave", "popvector", "continuous",
"marker" or "all".
Returns
None
Comments
Only selected variables used in analysis. Use select and deselect functions to specify what variables you
want to analyze.
Usage
NexScript
doc = GetActiveDocument()
% select the second neuron for analysis
SelectVar(doc, 2, "neuron")
Python
import nex
doc = nex.GetActiveDocument()
# select the second neuron for analysis
nex.SelectVar(doc, 2, "neuron")
See Also
Introduction to NexScript and Python Programming
Function Categories
Page 363

6.5.4.5. DeselectVar
DeselectVar Function
Deselects the specified variable.
Syntax
DeselectVar(doc, number, varType)
Parameters
Parameter Type Description
doc documentReference Reference to the document.
number number Variable number within the group specified by
varType.
varType string Variable type. Should be "neuron", "neuronorevent" ,
"event", "interval" "wave", "popvector", "continuous",
"marker" or "all".
Returns
None
Comments
Only selected variables used in analysis. Use select and deselect functions to specify what variables you
want to analyze.
Usage
NexScript
doc = GetActiveDocument()
% deselect the second neuron
DeselectVar(doc, 2, "neuron")
Python
import nex
doc = nex.GetActiveDocument()
# deselect the second neuron
nex.DeselectVar(doc, 2, "neuron")
See Also
Introduction to NexScript and Python Programming
Function Categories
Page 364

6.5.4.6. Select
Select Function
Selects the specified variable for analysis.
Syntax
Select(doc, var)
Parameters
Parameter Type Description
doc documentReference Reference to the document.
var variableReference Reference to the variable.
Returns
None
Comments
Only selected variables used in analysis. Use select and deselect functions to specify what variables you
want to analyze.
Usage
NexScript
doc = GetActiveDocument()
Select(doc, doc["Neuron1"])
Python
import nex
doc = nex.GetActiveDocument()
nex.Select(doc, doc["Neuron1"])
See Also
Introduction to NexScript and Python Programming
Function Categories
Page 365

6.5.4.7. Deselect
Deselect Function
Deselects the specified variable.
Syntax
Deselect(doc, var)
Parameters
Parameter Type Description
doc documentReference Reference to the document.
var variableReference Reference to the variable.
Returns
None
Comments
Only selected variables used in analysis. Use select and deselect functions to specify what variables you
want to analyze.
Usage
NexScript
doc = GetActiveDocument()
% deselect variable Neuro04a from analysis
Deselect(doc, doc["Neuron04a"])
Python
import nex
doc = nex.GetActiveDocument()
# deselect variable Neuro04a from analysis
nex.Deselect(doc, doc["Neuron04a"])
See Also
Introduction to NexScript and Python Programming
Function Categories
Page 366

6.5.4.8. SelectAll
SelectAll Function
Selects all the variables for analysis.
Syntax
SelectAll(doc)
Parameters
Parameter Type Description
doc documentReference Reference to the document.
Returns
None
Comments
Only selected variables used in analysis. Use select and deselect functions to specify what variables you
want to analyze.
Usage
NexScript
doc = GetActiveDocument()
SelectAll(doc)
Python
import nex
doc = nex.GetActiveDocument()
nex.SelectAll(doc)
See Also
Introduction to NexScript and Python Programming
Function Categories
Page 367

6.5.4.9. DeselectAll
DeselectAll Function
Deselects all variables.
Syntax
DeselectAll(doc)
Parameters
Parameter Type Description
doc documentReference Reference to the document.
Returns
None
Comments
Only selected variables used in analysis. Use select and deselect functions to specify what variables you
want to analyze.
Usage
NexScript
doc = GetActiveDocument()
DeselectAll(doc)
Python
import nex
doc = nex.GetActiveDocument()
nex.DeselectAll(doc)
See Also
Introduction to NexScript and Python Programming
Function Categories
Page 368

6.5.4.10. SelectAllNeurons
SelectAllNeurons Function
Selects all neuron type variables for analysis.
Syntax
SelectAllNeurons(doc)
Parameters
Parameter Type Description
doc documentReference Reference to the document.
Returns
None
Comments
Only selected variables used in analysis. Use select and deselect functions to specify what variables you
want to analyze.
Usage
NexScript
doc = GetActiveDocument()
SelectAllNeurons(doc)
Python
import nex
doc = nex.GetActiveDocument()
nex.SelectAllNeurons(doc)
See Also
Introduction to NexScript and Python Programming
Function Categories
Page 369

6.5.4.11. SelectAllEvents
SelectAllEvents Function
Selects all event type variables for analysis.
Syntax
SelectAllEvents(doc)
Parameters
Parameter Type Description
doc documentReference Reference to the document.
Returns
None
Comments
Only selected variables used in analysis. Use select and deselect functions to specify what variables you
want to analyze.
Usage
NexScript
doc = GetActiveDocument()
SelectAllEvents(doc)
Python
import nex
doc = nex.GetActiveDocument()
nex.SelectAllEvents(doc)
See Also
Introduction to NexScript and Python Programming
Function Categories
Page 370
6.5.4.12. EnableRecalcOnSelChange
EnableRecalcOnSelChange Function
Enables recalculation of analyses when the list of selected variables changes.
Syntax
EnableRecalcOnSelChange ()
Parameters
None
Returns
None
Comments
If there is an analysis window open in NeuroExplorer (for example, if an analysis window was open
before script began or ApplyTemplate was called in the script) and a list of selected variables changes,
NeuroExplorer can automatically recalculate the analysis results. This automatic recalculation is disabled
by default. This function allows you to enable automatic recalculation on selection change.
Usage
NexScript
EnableRecalcOnSelChange ()
Python
import nex
nex.EnableRecalcOnSelChange()
See Also
Introduction to NexScript and Python Programming
Function Categories
Page 371
6.5.4.13. DisableRecalcOnSelChange
DisableRecalcOnSelChange Function
Disables recalculation of analyses when the list of selected variables changes.
Syntax
DisableRecalcOnSelChange()
Parameters
None
Returns
None
Comments
If there is an analysis window open in NeuroExplorer (for example, if an analysis window was open
before script began or ApplyTemplate was called in the script) and a list of selected variables changes,
NeuroExplorer can automatically recalculate the analysis results. This function allows you to disable
automatic recalculation on selection change.
Usage
NexScript
DisableRecalcOnSelChange()
Python
import nex
nex.DisableRecalcOnSelChange()
See Also
Introduction to NexScript and Python Programming
Function Categories
Page 372
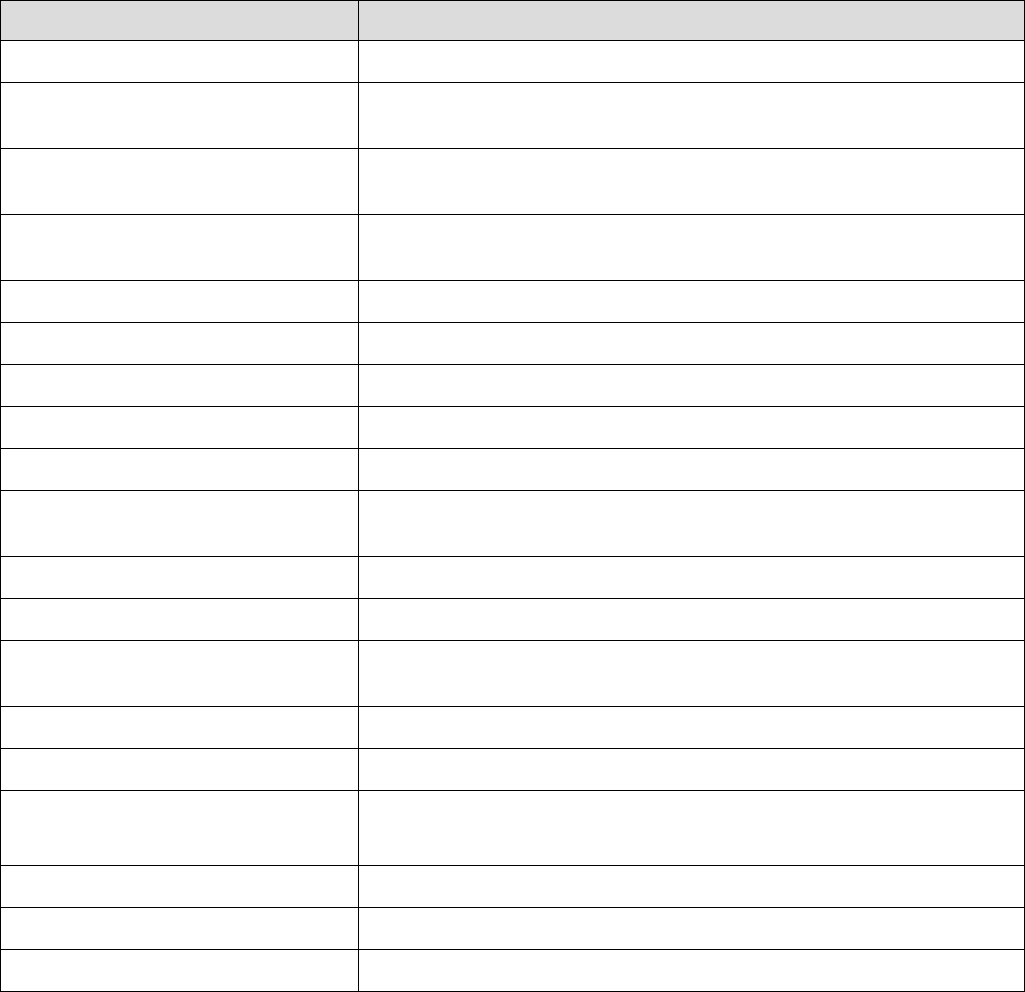
6.5.5. Analysis Functions
The following analysis functions are available in NexScript and Python
Function Description
ApplyTemplate Runs the analysis specified in the template.
ApplyTemplateToWindow Runs the analysis specified in the template and shows the result in
the specified Graph window.
EnableRecalcOnSelChange Enables recalculation of analyses when the list of selected
variables changes.
DisableRecalcOnSelChange Disables recalculation of analyses when the list of selected
variables changes.
PrintGraphics Prints the contents of the first graphical window of the document.
Dialog Shows a dialog allowing to set script parameters.
ModifyTemplate Modifies one of the template parameters.
GetTemplateParValue Returns the value of the template parameter.
RecalculateAnalysisInWindow Forces recalculation of analysis in the specified graphic window.
SendGraphicsToPowerPoint Sends the contents of the first graphical window of the document
to the specified PowerPoint presentation.
SaveGraphics Saves the graphics to a WMF, PNG or SVG file.
ExecuteMenuCommand Executes specified menu command.
SaveResults Saves numerical and graphical results to a file with the specified
name.
SelectVariablesIn1DView Selects variables in 1D View.
SetProperty Sets custom analysis result.
GetPostProcessingScriptParamete
r
Returns post-processing script parameter value.
GetAllAnalysisParameters Returns all analysis parameters.
ActivateWindow Activates specified child window.
CloseWindow Closes specified child window.
See also Numerical Results functions.
See Also
Introduction to NexScript and Python Programming
Function Categories
Page 373

6.5.5.1. ApplyTemplate
ApplyTemplate Function
Runs the analysis specified in the analysis template.
Syntax
ApplyTemplate(doc, templateName)
Parameters
Parameter Type Description
doc documentReference Reference to the document.
templateName string The name of the template. See Comments below for
details on how to specify template name parameter.
Returns
None
Comments
How to specify template names.
By default, the templates are stored in directory:
C:\Users\current_user\Documents\NeuroExplorer 5\Templates\
(where current_user is your Windows user name). You can also specify custom templates directory using
Templates | Template Properties... menu command. The following discussion assumes that you are
using default templates directory.
When the template name is specified as "PSTH", for example:
ApplyTemplate(doc, "PSTH")
NeuroExplorer will use the following template file
C:\Users\current_user\Documents\NeuroExplorer 5\Templates\PSTH.ntp
You can also specify the template name relative to the main templates folder
For example, the template name "Grant\Auto.ntp" used in
ApplyTemplate(doc, "Grant\Auto.ntp")
means that the template file
C:\Users\current_user\Documents\NeuroExplorer 5\Templates\Grant\Auto.ntp
will be used.
Finally, you can specify the absolute path of the template file:
ApplyTemplate(doc, "C:\MyTemplates\Auto.ntp")
Usage
NexScript
doc = GetActiveDocument()
% run PSTH analysis saved in the template Peri1
Page 374

6.5.5.2. ApplyTemplateToWindow
ApplyTemplateToWindow Function
Runs the analysis specified in the template and shows the result in the specified Graph window.
Syntax
ApplyTemplateToWindow(doc, templatename, windownumber)
Parameters
Parameter Type Description
doc documentReference Reference to the document.
templatename string The name of the template. See Comments below for
details on how to specify template name parameter.
windownumber number The number of the graph window of the document.
Graph windows are named Graphs1, Graphs2, etc.
Thus, if you need to specify window Graphs2,
windownumber should be equal to 2. If the Graph
window with the specified number does not exist, a
new Graph window is created
Returns
None
Comments
How to specify template names.
By default, the templates are stored in directory:
C:\Users\current_user\Documents\NeuroExplorer 5\Templates\
(where current_user is your Windows user name). You can also specify custom templates directory using
Templates | Template Properties... menu command. The following discussion assumes that you are
using default templates directory.
When the template name is specified as "PSTH", for example:
ApplyTemplateToWindow(doc, "PSTH", 2)
NeuroExplorer will use the following template file
C:\Users\current_user\Documents\NeuroExplorer 5\Templates\PSTH.ntp
You can also specify the template name relative to the main templates folder
For example, the template name "Grant\Auto.ntp" used in
ApplyTemplateToWindow(doc, "Grant\Auto.ntp", 2)
means that the template file
C:\Users\current_user\Documents\NeuroExplorer 5\Templates\Grant\Auto.ntp
will be used.
Finally, you can specify the absolute path of the template file:
Page 376
ApplyTemplateToWindow(doc, "C:\MyTemplates\Auto.ntp", 2)
Usage
NexScript
doc = GetActiveDocument()
% Run PSTH analysis saved in the template Peri1 and show the results in Graph2 window
% We specify template name as "Peri1". This means that the template file
% C:\Users\current_user\Documents\NeuroExplorer 5\Templates\Peri1.ntp
% will be used (where current_user is your Windows user name)
ApplyTemplateToWindow(doc, "Peri1", 2)
Python
import nex
doc = nex.GetActiveDocument()
# Run PSTH analysis saved in the template Peri1 and show the results in Graph2 window
# We specify template name as "Peri1". This means that the template file
# C:\Users\current_user\Documents\NeuroExplorer 5\Templates\Peri1.ntp
# will be used (where current_user is your Windows user name)
nex.ApplyTemplateToWindow(doc, "Peri1", 2)
See Also
Introduction to NexScript and Python Programming
Function Categories
Page 377

6.5.5.3. PrintGraphics
PrintGraphics Function
Prints the contents of the first graphical window of the document.
Syntax
PrintGraphics(doc)
Parameters
Parameter Type Description
doc documentReference Reference to the document.
Returns
None
Comments
None
Usage
NexScript
doc = GetActiveDocument()
PrintGraphics(doc)
Python
import nex
doc = nex.GetActiveDocument()
nex.PrintGraphics(doc)
See Also
Introduction to NexScript and Python Programming
Function Categories
Page 378
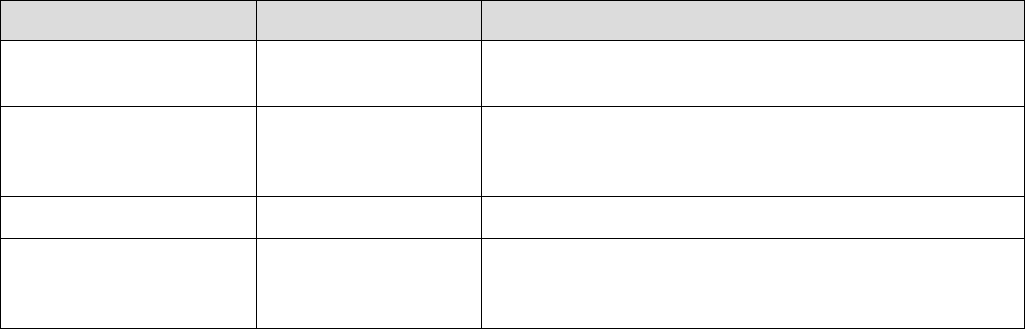
6.5.5.4. Dialog
Dialog Function
Shows a dialog that can be used to specify the script parameters.
Syntax
number Dialog(doc, par1, name1, type1, par2, name2, type2, ...)
Parameters
Parameter Type Description
doc documentReference Reference to the document. Could be zero if all the
type values are "number" or "string".
par1 variable A variable that will be assigned a value after Dialog
exits. The variable should be created before the
Dialog function is called
name1 string Prompt that will be shown in the dialog.
type1 string Parameter type. It should be one of: "number",
"string", "neuron", "neuronorevent", "event", "interval",
"wave", "continuous", "marker" or "all".
Returns
Dialog function returns 1 if user pressed OK button or 0, if user pressed Cancel button.
Comments
None
Usage
NexScript
% create a string variable
filefilter = "C:\Data\*.nex"
% show the dialog to the user
res = Dialog(0., filefilter , "File Filter:", "string")
Python
filefilter = "C:\\Data\\*.nex"
# show the dialog to the user
__wrapper = []
res = nex.Dialog(0., filefilter, "File Filter:", "string", __wrapper )
filefilter = __wrapper[0];
The following dialog will be shown:
Page 379
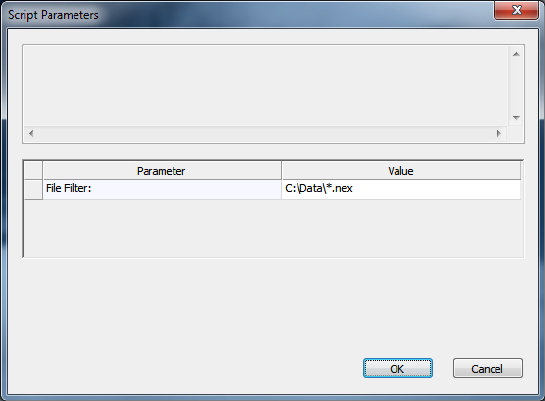
Now a user can type the new value in the File Filter edit box. If the user presses OK button, the Dialog
function returns 1, otherwise, it returns 0.
The following script will allow a user to choose one of the neurons in the active document and select this
neuron for analysis:
doc = GetActiveDocument()
Neuron_Number = 1
% choose a neuron
res = Dialog(doc, Neuron_Number, "Select Neuron", "neuron")
% get the neuron variable and select it
Neuron_Var = GetVar(doc, Neuron_Number, "neuron")
Select(doc, Neuron_Var)
Here is the Python equivalent:
import nex
doc = nex.GetActiveDocument()
Neuron_Number = 1
# choose a neuron
__wrapper = []
res = nex.Dialog(doc, Neuron_Number, "Select Neuron", "neuron", __wrapper )
Neuron_Number = __wrapper[0];
# get the neuron variable and select it
Neuron_Var = nex.GetVar(doc, Neuron_Number, "neuron")
nex.Select(doc, Neuron_Var)
See Also
Introduction to NexScript and Python Programming
Function Categories
Page 380
6.5.5.5. ModifyTemplate
ModifyTemplate Function
Modifies one of the template parameters.
Syntax
ModifyTemplate(doc, templateName, paramName, newParValue)
Parameters
Parameter Type Description
doc documentReference Reference to the document.
templateName string The name of the template. See Comments below for
details on how to specify template name parameter.
paramName string The name of the parameter to be modified.
newParValue string The new value of the parameter (as a string).
Returns
None
Comments
How to specify template names.
When the template name is specified as "PSTH", for example:
ModifyTemplate(doc, "PSTH", "Bin (sec)", "5.0")
NeuroExplorer will modify the following template file
C:\Users\current_user\Documents\NeuroExplorer 5\Templates\PSTH.ntp
(where current_user is your Windows user name).
You can also specify the template name relative to the main templates folder
C:\Users\current_user\Documents\NeuroExplorer 5\Templates\
For example, the template name "Grant\Auto.ntp"
ModifyTemplate(doc, "Grant\Auto.ntp", "Bin (sec)", "5.0")
means that the template file
C:\Users\current_user\Documents\NeuroExplorer 5\Templates\Grant\Auto.ntp
will be modified.
Finally, you can specify the absolute path of the template file:
ModifyTemplate(doc, "C:\MyTemplates\Auto.ntp", "Bin (sec)", "5.0")
Usage
NexScript
Page 381
To set the new bin value in the Rate Histograms template, you need to write:
ModifyTemplate(doc, "Rate Histograms", "Bin (sec)", "5.0")
Note that parameter name should be specified exactly as it is shown in the left column of the Properties
Panel (e.g. not "Bin", but "Bin (sec)" as in the example above). You can select the parameter name in the
left column of Properties Panel and press Ctrl+C to copy the parameter name to the clipboard and then
paste the name of the parameter into your script.
If you need to use a numeric value as newparvalue, you need to convert it to string using NumToStr
function. For example, if you need to set Select Data From = doc["Start"][1]:
ModifyTemplate(doc, "Peri", "Select Data From (sec)", NumToStr(doc["Start"][1]))
ModifyTemplate can be used to specify multiple references in Perievent Histograms, Crosscorrelograms
and Perievent Rasters by using "+":
doc = GetActiveDocument()
ModifyTemplate(doc, "Peri", "Ref. type", "Table (row)")
ModifyTemplate(doc, "Peri", "Reference", "Event04+Event05+Event06")
ApplyTemplate(doc, "Peri")
You can also use "+" to specify multiple interval filters in Perievent Histograms, Crosscorrelograms and
Perievent Rasters.
In Python, you can also use JSON array notation '["Event04", "Event05", "Event06"]':
nex.ModifyTemplate(doc, "Peri", "Reference", '["Event04", "Event05", "Event06"]')
To modify Markers parameter in Perievent Rasters template, you can use the parameter values than
start with either Size:, Clear or AddMarker: .
For example, "Size:8" sets the marker size at 8 points. "Clear" removes all marker events.
"AddMarker:Event06,Triangle Down,0,0,0,0,255,0" adds new marker event Event06 with marker shape
Triangle Down, border color (0,0,0) [meaning red=0,green=0,blue=0] and interior color (0,255,0)
[red=0,green=255,blue=0]. Color values should be numbers from 0 to 255. Valid marker shapes are:
Triangle Down, Triangle Up, Diamond, Square and Circle.
doc = GetActiveDocument()
ModifyTemplate(doc, "PRaster", "Markers", "Size:8") % specifies marker size in points
(8)
ModifyTemplate(doc, "PRaster", "Markers", "Clear") % removes all marker events
ModifyTemplate(doc, "PRaster", "Markers", "AddMarker:Event06,Triangle
Down,0,0,0,0,255,0") % adds new marker Event6
ModifyTemplate(doc, "PRaster", "Markers",
"AddMarker:Neuron07a,Circle,255,0,0,0,0,255") % adds new marker Neuron07a
ModifyTemplate can be used to specify graphics parameters. To change the Graph parameter, you need
to add Graph| before the parameter name:
doc = GetActiveDocument()
ModifyTemplate(doc, "Peri", "Graph|Graph Style", "Histogram")
ModifyTemplate(doc, "Peri", "Graph|Line color", "1")
ModifyTemplate(doc, "Peri", "Graph|Fill under line", "0")
To change the Y Axis parameter, you need to add YAxis| before the parameter name:
ModifyTemplate(doc, "Peri", "YAxis|Max Type", "Fixed")
ModifyTemplate(doc, "Peri", "YAxis|Fixed Max", "50.")
Page 382

6.5.5.6. GetTemplateParValue
GetTemplateParValue Function
Returns the value of the specified template parameter as string.
Syntax
string GetTemplateParValue(templateName, paramName)
Parameters
Parameter Type Description
templateName string The name of the template. See Comments below for
details on how to specify template name parameter.
paramName string The name of the parameter.
Returns
None
Comments
How to specify template names.
By default, the templates are stored in directory:
C:\Users\current_user\Documents\NeuroExplorer 5\Templates\
(where current_user is your Windows user name). You can also specify custom templates directory using
Templates | Template Properties... menu command. The following discussion assumes that you are
using default templates directory.
When the template name is specified as "PSTH", for example:
GetTemplateParValue("PSTH", "Bin (sec)")
NeuroExplorer will use the following template file
C:\Users\current_user\Documents\NeuroExplorer 5\Templates\PSTH.ntp
You can also specify the template name relative to the main templates folder
For example, the template name "Grant\Auto.ntp" used in
GetTemplateParValue("Grant\Auto.ntp", "Bin (sec)")
means that the template file
C:\Users\current_user\Documents\NeuroExplorer 5\Templates\Grant\Auto.ntp
will be used.
Finally, you can specify the absolute path of the template file:
GetTemplateParValue("C:\MyTemplates\Auto.ntp", "Bin (sec)")
Usage
NexScript
To get the bin value in the Rate Histograms template, you need to write:
Page 384
valueAsString = GetTemplateParValue("Rate Histograms", "Bin (sec)")
Note that the parameter name should be specified exactly as it is shown in the left column of the
Properties Panel (e.g. not "Bin", but "Bin (sec)" as in the example above). You can select the parameter
name in the left column of Properties Panel and press Ctrl+C to copy the parameter name to the
clipboard and then paste the name of the parameter into your script.
If you need to use a numeric value of the parameter, you need to convert the string to number using
StrToNum function.
See Also
Introduction to NexScript and Python Programming
Function Categories
Page 385

6.5.5.7. RecalculateAnalysisInWindow
RecalculateAnalysisInWindow Function
Forces recalculation of analysis in the specified graphic window.
Syntax
RecalculateAnalysisInWindow(doc, graphWindowNumber)
Parameters
Parameter Type Description
doc documentReference Reference to the document.
graphWindowNumber number Index of the Graph window.
Returns
None
Comments
None
Usage
NexScript
doc = GetActiveDocument()
RecalculateAnalysisInWindow(doc, 1)
Python
import nex
doc = nex.GetActiveDocument()
nex.RecalculateAnalysisInWindow(doc, 1)
See Also
Introduction to NexScript and Python Programming
Function Categories
Page 386
6.5.5.8. EnableRecalcOnSelChange
EnableRecalcOnSelChange Function
Enables recalculation of analyses when the list of selected variables changes.
Syntax
EnableRecalcOnSelChange ()
Parameters
None
Returns
None
Comments
If there is an analysis window open in NeuroExplorer (for example, if an analysis window was open
before script began or ApplyTemplate was called in the script) and a list of selected variables changes,
NeuroExplorer can automatically recalculate the analysis results. This automatic recalculation is disabled
by default. This function allows you to enable automatic recalculation on selection change.
Usage
NexScript
EnableRecalcOnSelChange ()
Python
import nex
nex.EnableRecalcOnSelChange()
See Also
Introduction to NexScript and Python Programming
Function Categories
Page 387
6.5.5.9. DisableRecalcOnSelChange
DisableRecalcOnSelChange Function
Disables recalculation of analyses when the list of selected variables changes.
Syntax
DisableRecalcOnSelChange()
Parameters
None
Returns
None
Comments
If there is an analysis window open in NeuroExplorer (for example, if an analysis window was open
before script began or ApplyTemplate was called in the script) and a list of selected variables changes,
NeuroExplorer can automatically recalculate the analysis results. This function allows you to disable
automatic recalculation on selection change.
Usage
NexScript
DisableRecalcOnSelChange()
Python
import nex
nex.DisableRecalcOnSelChange()
See Also
Introduction to NexScript and Python Programming
Function Categories
Page 388

6.5.5.10. SendGraphicsToPowerPoint
SendGraphicsToPowerPoint Function
Sends the contents of the first graphical window of the document to the specified PowerPoint
presentation.
Syntax
SendGraphicsToPowerPoint (doc, presentationPath, slideTitle, comment, addParameters, useBitmap)
Parameters
Parameter Type Description
doc documentReference Reference to the document.
presentationPath string Path of the presentation file. File extension should be
.ppt (NeuroExplorer cannot save .pptx files). If file
extension is not .ppt, .ppt extension is added to the file
path.
slideTitle string Slide title.
comment string Slide comment. Will be shown below graphics.
addParameters number If 1, add a text box with analysis parameter values.
useBitmap number If 1, transfer graphics as a bitmap, otherwise, transfer
graphics as a metafile.
Returns
None
Comments
None
Usage
NexScript
doc = GetActiveDocument()
SendGraphicsToPowerPoint(doc, "C:\Data\NexResults.ppt", "Slide 1", "Sample slide", 1,
0)
Python
import nex
doc = nex.GetActiveDocument()
nex.SendGraphicsToPowerPoint(doc, "C:\\Data\\NexResults.ppt", "Slide 1", "Sample
slide", 1, 0)
See Also
Introduction to NexScript and Python Programming
Function Categories
Page 389
6.5.5.11. SaveGraphics
SaveGraphics Function
Saves the graphics of the first graphics window of the document to a WMF, PNG or SVG (Scalable
Vector Graphics) file. Use SVG file type if you plan to edit graphics in Adobe Illustrator.
Syntax
SaveGraphics(doc, filePath, graphicsFileType)
Parameters
Parameter Type Description
doc documentReference Reference to the document.
filePath string Graphics file path
graphicsFileType number If this parameter value is zero, graphics is saved in
Windows Metafile format. If graphicsFileType is 1, the
graphics is saved in PNG format. If graphicsFileType
is 2, the graphics is saved in SVG format.
Returns
None
Comments
None
Usage
NexScript
doc = GetActiveDocument()
SaveGraphics(doc, "C:\Data\NexGraphics.wmf", 0)
SaveGraphics(doc, "C:\Data\NexGraphics.png", 1)
SaveGraphics(doc, "C:\Data\NexGraphics.svg", 2)
Python
import nex
doc = nex.GetActiveDocument()
nex.SaveGraphics(doc, "C:\\Data\\NexGraphics.wmf", 0)
nex.SaveGraphics(doc, "C:\\Data\\NexGraphics.png", 1)
nex.SaveGraphics(doc, "C:\\Data\\NexGraphics.svg", 2)
See Also
Introduction to NexScript and Python Programming
Function Categories
Page 390
6.5.5.12. ExecuteMenuCommand
ExecuteMenuCommand Script Function
Executes specified menu command.
Syntax
ExecuteMenuCommand(menuName)
Parameters
Parameter Type Description
menuName string Menu name. Submenus are separated by vertical bar
(|). For example:
ExecuteMenuCommand("SavedResults|Quick Save
Results"). See Comments below for the list of
supported menu commands. Some menu commands
require user interaction. These menu commands have
ellipsis (...) at the end of the menu title (for example,
"File|Open..."). Since user interaction is required,
these commands cannot be used in a script. Use
History to record these commands with proper
command parameters.
Returns
None
Comments
The following menu commands are supported: File|New File|Restore Last Analysis File|Load Selected
Cont. Channels from 3Brain Files File|Close File|Save File|Connect to Plexon Server View|1D Data
Viewer Window View|Numerical Results Window View|Average/Overlay Chart Window View|Results
Folder Summary Analysis|Increase X Range Analysis|Decrease X Range Results|Graphical
Results|Copy Graphics to the Clipboard Results|Numerical Results|View Numerical Results Window
Results|Numerical Results|Copy Numerical Results to the Clipboard Results|Numerical Results|Add
Numerical Results as New Continuous Variables Results|Numerical Results|Send Numerical Results to
Matlab SavedResults|Quick Save Results SavedResults|Results Folder Summary Graphics|Export
Graphics|Copy Graphics to the Clipboard Graphics|Fonts|Enable Font AutoScale
Graphics|Fonts|Increase font size Graphics|Fonts|Decrease font size Graphics|Zoom|Fit to Window
Template|Save As Default Template 3DView|View Histograms in 3D 3DView|View Histogram Variations
in 3D Matlab|Get Data From Matlab|Open Matlab As Engine Matlab|Send Selected Variables to Matlab
Matlab|Send Numerical Results to Matlab Online|Connect to Plexon Server Online|Connect to Cerebus
Server Online|Connect to Neuralynx Server Online|Connect to AlphaMap Server Online|Pause Online
Data Server Updates Online|Reset Online Data File Online|Disconnect from Online Data Server
Window|Numerical Results Window Window|Close All Windows Window|Close All Windows Except
Currently Active Window
Usage
NexScript
Page 391

6.5.5.13. SaveResults
SaveResults Script Function
Saves numerical and graphical results as well as an analysis template for the first graphical view of the
document.
Syntax
SaveResults(doc, fileName, comment)
Parameters
Parameter Type Description
doc documentReference Reference to the document.
fileName string The path of the .nexresult file. Use
SavedResults|Open Saved Results File... menu
command to open saved result.
comment string The user comment for the result.
Returns
None
Comments
Usage
NexScript
doc = GetActiveDocument()
SaveResults(doc, "C:\Data\MyResult.nexresult", "some comment")
Python
import nex
doc = nex.GetActiveDocument()
nex.SaveResults(doc, "C:\\Data\\MyResult.nexresult", "some comment")
See Also
Introduction to NexScript and Python Programming
Function Categories
Page 393

6.5.5.14. SelectVariablesIn1DView
SelectVariablesIn1DView Script Function
Selects variables in 1D View.
Syntax
SelectVariablesIn1DView(doc, listOfVarNames)
Parameters
Parameter Type Description
doc documentReference Reference to the document.
listOfVarNames string A string containing comma-separated list of variable
names.
Returns
None
Comments
There should be no spaces before or after commas in the variables list. If a variable name contains
comma(s) and Python is used, the variable name should be enclosed in double quotes. See sample code
below.
Usage
NexScript
doc = nex.GetActiveDocument()
SelectVariablesIn1DView(doc, "Neuron04a,Neuron05b,Neuron05c")
Python
import nex
doc = nex.GetActiveDocument()
nex.SelectVariablesIn1DView(doc, 'Neuron04a,Neuron05b,Neuron05c')
# if we want to select a variable with a name containing comma(s),
# the variable name should be enclosed in double quotes. For example,
# if variable name is
# channel 1, cluster2:
nex.SelectVariablesIn1DView(doc, 'Neuron04a,Neuron05b,Neuron05c,"channel 1,
cluster2"')
See Also
Introduction to NexScript and Python Programming
Function Categories
Page 394
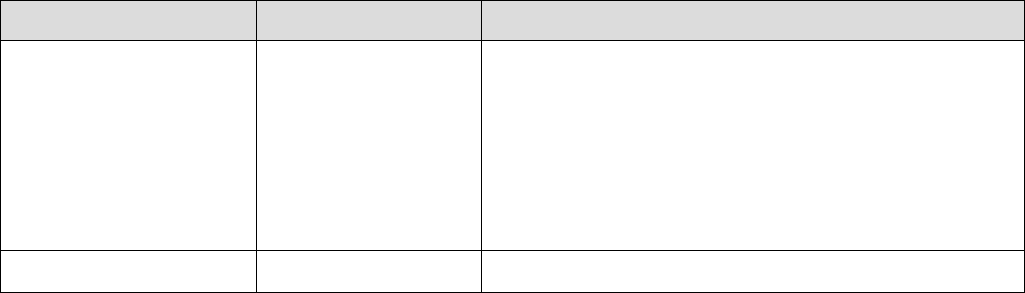
6.5.5.15. SetProperty
SetProperty NexDoc Method
Sets custom analysis result property.
Syntax
doc.SetProperty(propertyName, propertyValue)
Parameters
Parameter Type Description
propertyName string Property name. Supported property names are:
'YAxisMinimumsAndMaximums' (sets Y axis
minimums and maximums, see code sample below);
'AdditionalNumResColumns' (sets additional columns
in Summary of Numerical Results, see code sample
below); 'AdditionalGraphicsCommands' (sets
additional graphics commands, see code sample
below)
propertyValue Python object Property value. See code sample below for details.
Returns
None.
Comments
This method sets properties of the first graphical view of the document (or numerical results of the first
graphical view).
Usage
Python
import nex
import math
import sys
import json
def SpecifyCustomYMinimumsAndMaximums():
doc = nex.GetActiveDocument()
sumColNames = doc.GetNumResSummaryColumnNames()
sumResults = doc.GetAllNumResSummaryData()
# loop over values in Mean column of the Numerical Results Summary
# and, for each graph, set Y axis minimum to mean-10, Y axis maximum to mean+10
# 'YAxisMinimumsAndMaximums' property value should be a list of 2-element numeric
lists
allMinsAndMaxes = []
meanColumnIndex = sumColNames.index('Mean')
# sumResults[meanColumnIndex] returns a list of values in the column 'Mean'
Page 395
for m in sumResults[meanColumnIndex]:
ymin = float(m) - 10
ymax = float(m) + 10
allMinsAndMaxes.append([ymin, ymax])
doc.SetProperty('YAxisMinimumsAndMaximums', allMinsAndMaxes)
def PeakDetect(x, y, delta):
# Converted from MATLAB script at http://billauer.co.il/peakdet.html
# Finds the local maxima in the vector y.
# A point is considered a maximum peak if it has the maximal
# value, and was preceded (to the left) by a value lower by delta.
maximums = []
minimums = []
if len(y) != len(x):
# Input vectors v and x must have same length
return []
if delta <= 0:
# Input argument delta must be positive
return []
theMinimum = float('inf')
theMaximum = float('-inf')
minPos = float('nan')
maxPos = float('nan')
lookformax = True
for i in range(len(y)):
this = y[i]
if this > theMaximum:
theMaximum = this
maxPos = x[i]
if this < theMinimum:
theMinimum = this
minPos = x[i]
if lookformax:
if this < theMaximum-delta:
maximums.append((maxPos, theMaximum))
theMinimum = this
minPos = x[i]
lookformax = False
else:
if this > theMinimum+delta:
minimums.append((minPos, theMinimum))
theMaximum = this
maxPos = x[i]
lookformax = True
return maximums
def MakeEmptyColumn(name, numValues):
# creates empty column object that can be used in
Page 396
# doc.SetProperty('AdditionalNumResColumns', columns)
col = {}
col['name'] = name
col['values'] = []
for row in range(numValues):
col['values'].append('')
return col
def MakeLine(graphIndex,xFrom,yFrom,xTo,yTo,thickness=0.5,color='(0;0;0)'):
# creates line drawing command that can be used in
# doc.SetProperty('AdditionalGraphicsCommands', graphicsCommands)
line = {}
line['type'] = 'line'
line['graphNumber'] = graphIndex
line['thickness'] = thickness
line['color'] = color
line['xFrom'] = xFrom
line['xTo'] = xTo
line['yFrom'] = yFrom
line['yTo'] = yTo
return line
def MakeText(graphIndex,x,y,text,fontsize=8,color='(0;0;0)'):
# creates text command that can be used in
# doc.SetProperty('AdditionalGraphicsCommands', graphicsCommands)
textCommand = {}
textCommand['type'] = 'text'
textCommand['graphNumber'] = graphIndex
# font size is in points
textCommand['fontsize'] = fontsize
textCommand['color'] = color
# x and y are the coordinates of the lower-left corner of text
textCommand['x'] = x
textCommand['y'] = y
textCommand['text'] = text
return textCommand
def FindPeaksAndAddColumnsAndGraphicsCommands():
doc = nex.GetActiveDocument()
deltaPercentString = doc.GetPostProcessingScriptParameter()
try:
deltaPercent = float(deltaPercentString)
except:
deltaPercent = 25
res = doc.GetAllNumericalResults()
resNames = doc.GetNumResColumnNames()
if len(resNames) < 2:
return
# the first column should contain X axis values
if not resNames[0] in ['Bin Left', 'Bin Middle', 'Bin Right', 'Frequency Value',
'Time']:
print 'no x data'
Page 397
return
# select only columns with real graph names
# (we may have columns with confidence, standard deviation, etc.)
sumNumRes = doc.GetAllNumResSummaryData()
# real graph names are specified in the first column
# of summary of numerical results
realGraphNames = sumNumRes[0]
graphIndexes = []
for i in range(len(resNames)):
if resNames[i] in realGraphNames:
graphIndexes.append(i)
numResults = len(graphIndexes)
# first column of numerical results contains x values
x = res[0]
xRange = max(x) - min(x)
# we may need to adjust x to draw peak center at bin center
step = x[1]-x[0]
xAdjustment = 0
if resNames[0] == 'Bin Left':
xAdjustment = step*0.5
if resNames[0] == 'Bin Right':
xAdjustment = -step*0.5
# prepare empty columns with peak info
columns = []
# we will report up to 5 peaks
maxNumPeaks = 5
for i in range(maxNumPeaks):
columns.append(MakeEmptyColumn('PeakValue' + str(i+1),numResults))
columns.append(MakeEmptyColumn('PeakPosition' + str(i+1),numResults))
graphicsCommands = []
# for each graph, find peaks and add columns and graphical commands
for igraph in range(len(graphIndexes)):
y = res[graphIndexes[igraph]]
yRange = max(y) - min(y)
if yRange > 0 :
delta = yRange*deltaPercent/100.0
peaks = PeakDetect(x, y, delta)
for ip in range(len(peaks)):
xp = peaks[ip][0] + xAdjustment
yp = peaks[ip][1]
if ip < maxNumPeaks:
# fill extra columns
columns[ip*2]['values'][igraph] = '%.6f' % (yp)
columns[ip*2+1]['values'][igraph] = '%.6f' % (xp)
# add graphics commands
dx = xRange*0.010
dy = yRange*0.015
# add graphics commands to draw 'x' (red diagonal lines) at each peak
graphicsCommands.append(MakeLine(igraph,xp-dx,yp-
dy,xp+dx,yp+dy,1.0,'(255;0;0)'))
graphicsCommands.append(MakeLine(igraph,xp-dx,yp+dy,xp+dx,yp-
dy,1.0,'(255;0;0)'))
# add text command showing x value of the peak
Page 398
# if you want both x and y, use
# peakText = '(%.3f,%.3f)'%(xp,yp)
peakText = '%.3f'%(xp)
graphicsCommands.append(MakeText(igraph,xp,yp+dy,peakText,7,'(0;64;255)'))
doc.SetProperty('AdditionalNumResColumns', columns)
doc.SetProperty('AdditionalGraphicsCommands', graphicsCommands)
FindPeaksAndAddColumnsAndGraphicsCommands()
See Also
Introduction to NexScript and Python Programming
Function Categories
Page 399
6.5.5.16. GetPostProcessingScriptParameter
GetPostProcessingScriptParameter NexDoc Method
Gets the value of a post-processing script parameter as string.
Syntax
string doc.GetPostProcessingScriptParameter()
Returns
Post-processing script parameter as string. The parameter value is specified in the Post-Processing tab
of the analysis parameters dialog.
Usage
Python
import nex
doc = nex.GetActiveDocument()
deltaPercentString = doc.GetPostProcessingScriptParameter()
try:
deltaPercent = float(deltaPercentString)
except:
deltaPercent = 15
See Also
Introduction to NexScript and Python Programming
Function Categories
Page 400
6.5.5.17. GetAllAnalysisParameters
GetAllAnalysisParameters NexDoc Method
Returns the values of all analysis parameters of the first graphical view of a document.
Syntax
stringInJSONFormat doc.GetAllAnalysisParameters()
Returns
All analysis parameters as JSON string (name:value pairs).
Comments
Use json.loads to convert returned string to a Python dictionary object (see sample code below).
Parameter values are returned as strings. Use float() to convert strings to numbers.
Usage
Python
import nex
import json
doc = nex.GetActiveDocument()
anParsString = doc.GetAllAnalysisParameters()
pars = json.loads(anParsString)
# print all parameter names and values
for p in pars:
print("{}={}".format(p, pars[p]))
# get xmin and xmax values
xmin = float(pars['XMin (sec)'])
xmax = float(pars['XMax (sec)'])
print("xmin={}, xmax={}, range={}".format(xmin, xmax, xmax-xmin))
See Also
Introduction to NexScript and Python Programming
Function Categories
Page 401

6.5.5.18. ActivateWindow
ActivateWindow Script Function
Activates specified child window.
Syntax
ActivateWindow(docPath, windowName)
Parameters
Parameter Type Description
docPath string Document (data file) path.
windowName string Window name, for example [Graphs1]
Returns
None
Comments
Usage
NexScript
doc = nex.GetActiveDocument()
docPath = GetDocPath(doc)
ActivateWindow(docPath, "[Graphs1]")
Python
import nex
doc = nex.GetActiveDocument()
docPath = nex.GetDocPath(doc)
nex.ActivateWindow(docPath, '[Graphs1]')
See Also
Introduction to NexScript and Python Programming
Function Categories
Page 402

6.5.5.19. CloseWindow
CloseWindow Script Function
Closes specified child window.
Syntax
CloseWindow(docPath, windowName)
Parameters
Parameter Type Description
docPath string Document (data file) path.
windowName string Window name, for example [Graphs1]
Returns
None
Comments
Usage
NexScript
doc = nex.GetActiveDocument()
docPath = GetDocPath(doc)
CloseWindow(docPath, "[Graphs1]")
Python
import nex
doc = nex.GetActiveDocument()
docPath = nex.GetDocPath(doc)
nex.CloseWindow(docPath, '[Graphs1]')
See Also
Introduction to NexScript and Python Programming
Function Categories
Page 403
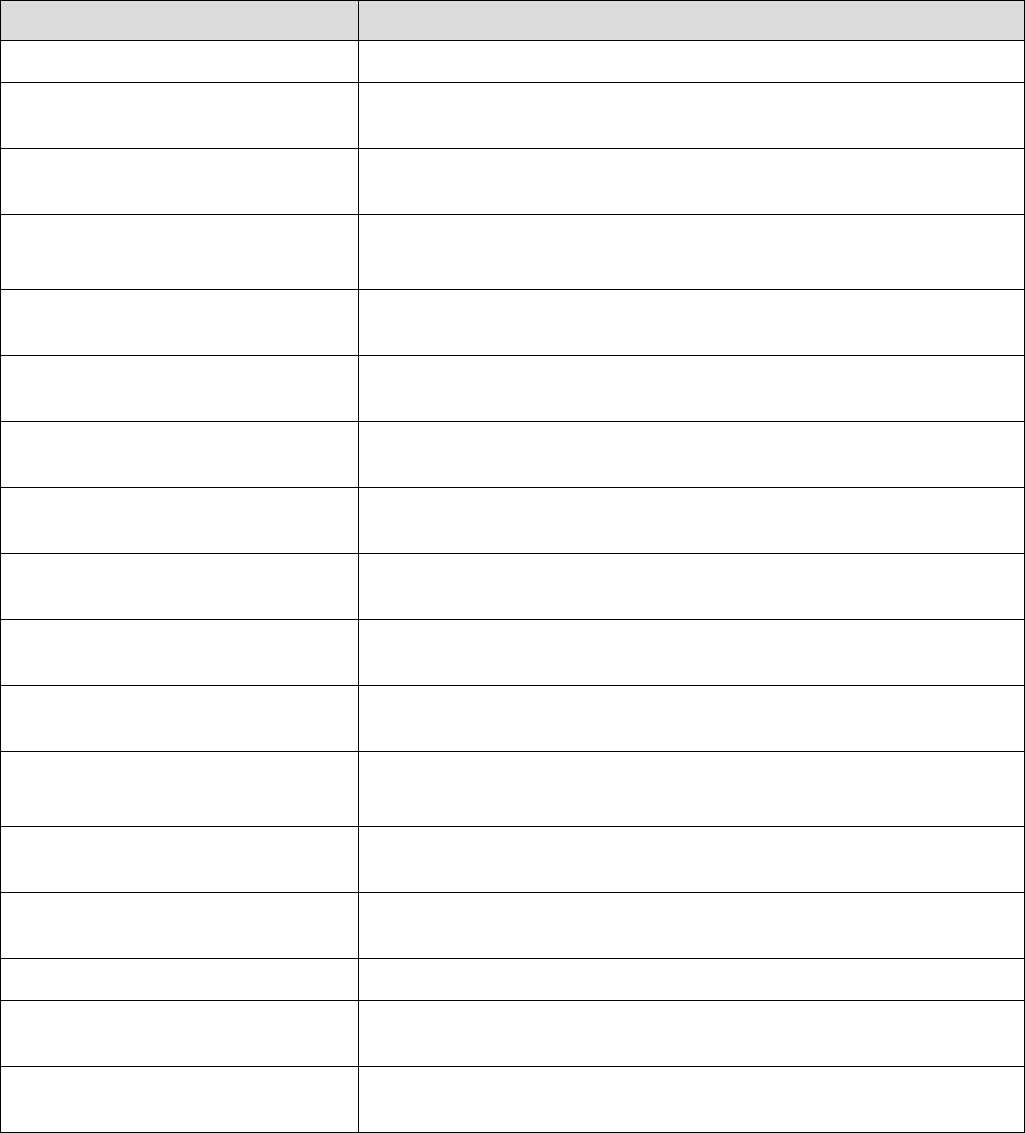
6.5.6. Numerical Results Functions
The following numerical results functions are available in NexScript and Python
Function Description
GetAllNumericalResults Returns the list of all numerical results.
GetAllNumResSummaryData Returns the list of all the values of the summary of numerical
results.
GetNumResColumnNames Returns the list of column names in the Numerical Results window
of the first graphical view of the document.
GetNumResSummaryColumnNam
es
Returns the list of column names in the Summary of Numerical
Results Window of the first graphical view of the document.
GetNumRes Returns the value of the specified cell in the Numerical Results
Window of the first graphical view of the document.
GetNumResNCols Returns the number of columns of the Numerical Results Window
of the first graphical view of the document.
GetNumResNRows Returns the number of rows of the Numerical Results Window of
the first graphical view of the document.
GetNumResColumnName Returns the name of the specified column of the Numerical Results
Window of the first graphical view of the document.
SendResultsToExcel Sends numerical results (of the first graphics window of the
document) to Excel.
GetNumResSummaryNCols Returns the number of columns of the Numerical Results Summary
Window of the first graphical view of the document.
GetNumResSummaryNRows Returns the number of rows of the Numerical Results Summary
Window of the first graphical view of the document.
GetNumResSummaryColumnNam
e
Returns the name of the specified column of the Numerical Results
Summary Window of the first graphical view of the document.
GetNumResSummaryData Returns the value of the specified cell in the Numerical Results
Summary Window of the first graphical view of the document.
SendResultsSummaryToExcel Sends summary of numerical results (of the first graphics window
of the document) to Excel.
SaveNumResults Saves the numerical results to a text file with the specified name.
SaveNumSummary Saves the summary of numerical results to a text file with the
specified name.
GetAllNumericalResultsAsCOM Returns the list of all values (as a list or rows) in the Numerical
Results Window of the first graphical view of the document.
See Also
Introduction to NexScript and Python Programming
Page 404
6.5.6.1. GetAllNumericalResults
GetAllNumericalResults NexDoc Method
Returns the list of all values (as a list of columns) in the Numerical Results Window of the first graphical
view of the document.
Syntax
list doc.GetAllNumericalResults()
Parameters
None.
Returns
Returns the list of all values (as a list of columns) in the Numerical Results Window of the first graphical
view of the document.
Comments
GetAllNumericalResults() returns a list object with all the numerical results. Each element of the list is a
list containing results from a single column in Numerical Results table. For example to get the 10-th value
of the first column of numerical results, use allNumRes[0][9] (see Usage below).
Usage
Python
import nex
doc = nex.GetActiveDocument()
allNumRes = doc.GetAllNumericalResults()
# allNumRes now contains a list object with all numerical results.
# for example, to get the 10-th value of the first column of numerical results, use
allNumRes[0][9]
# thus, allNumRes[0][9] equals to the result of nex.GetNumRes(doc, 10, 1)
See Also
Introduction to NexScript and Python Programming
Function Categories
Page 406
6.5.6.2. GetAllNumResSummaryData
GetAllNumResSummaryData NexDoc Method
Returns the list of all the values in the Numerical Results Summary Window of the first graphical view of
the document.
Syntax
list doc.GetAllNumResSummaryData()
Parameters
None
Returns
Returns the list of all the values in the Numerical Results Summary Window of the first graphical view of
the document.
Comments
Available only in Python.
Usage
Python
import nex
doc = nex.GetActiveDocument()
summary = doc.GetAllNumResSummaryData()
# summary now contains a list object with all the values of summary of numerical
results window
# for example, to get the 5-th value of the first column of summary of numerical
results, use summary[0][4]
See Also
Introduction to NexScript and Python Programming
Function Categories
Page 407

6.5.6.3. SetProperty
SetProperty NexDoc Method
Sets custom analysis result property.
Syntax
doc.SetProperty(propertyName, propertyValue)
Parameters
Parameter Type Description
propertyName string Property name. Supported property names are:
'YAxisMinimumsAndMaximums' (sets Y axis
minimums and maximums, see code sample below);
'AdditionalNumResColumns' (sets additional columns
in Summary of Numerical Results, see code sample
below); 'AdditionalGraphicsCommands' (sets
additional graphics commands, see code sample
below)
propertyValue Python object Property value. See code sample below for details.
Returns
None.
Comments
This method sets properties of the first graphical view of the document (or numerical results of the first
graphical view).
Usage
Python
import nex
import math
import sys
import json
def SpecifyCustomYMinimumsAndMaximums():
doc = nex.GetActiveDocument()
sumColNames = doc.GetNumResSummaryColumnNames()
sumResults = doc.GetAllNumResSummaryData()
# loop over values in Mean column of the Numerical Results Summary
# and, for each graph, set Y axis minimum to mean-10, Y axis maximum to mean+10
# 'YAxisMinimumsAndMaximums' property value should be a list of 2-element numeric
lists
allMinsAndMaxes = []
meanColumnIndex = sumColNames.index('Mean')
# sumResults[meanColumnIndex] returns a list of values in the column 'Mean'
Page 408
for m in sumResults[meanColumnIndex]:
ymin = float(m) - 10
ymax = float(m) + 10
allMinsAndMaxes.append([ymin, ymax])
doc.SetProperty('YAxisMinimumsAndMaximums', allMinsAndMaxes)
def PeakDetect(x, y, delta):
# Converted from MATLAB script at http://billauer.co.il/peakdet.html
# Finds the local maxima in the vector y.
# A point is considered a maximum peak if it has the maximal
# value, and was preceded (to the left) by a value lower by delta.
maximums = []
minimums = []
if len(y) != len(x):
# Input vectors v and x must have same length
return []
if delta <= 0:
# Input argument delta must be positive
return []
theMinimum = float('inf')
theMaximum = float('-inf')
minPos = float('nan')
maxPos = float('nan')
lookformax = True
for i in range(len(y)):
this = y[i]
if this > theMaximum:
theMaximum = this
maxPos = x[i]
if this < theMinimum:
theMinimum = this
minPos = x[i]
if lookformax:
if this < theMaximum-delta:
maximums.append((maxPos, theMaximum))
theMinimum = this
minPos = x[i]
lookformax = False
else:
if this > theMinimum+delta:
minimums.append((minPos, theMinimum))
theMaximum = this
maxPos = x[i]
lookformax = True
return maximums
def MakeEmptyColumn(name, numValues):
# creates empty column object that can be used in
Page 409
# doc.SetProperty('AdditionalNumResColumns', columns)
col = {}
col['name'] = name
col['values'] = []
for row in range(numValues):
col['values'].append('')
return col
def MakeLine(graphIndex,xFrom,yFrom,xTo,yTo,thickness=0.5,color='(0;0;0)'):
# creates line drawing command that can be used in
# doc.SetProperty('AdditionalGraphicsCommands', graphicsCommands)
line = {}
line['type'] = 'line'
line['graphNumber'] = graphIndex
line['thickness'] = thickness
line['color'] = color
line['xFrom'] = xFrom
line['xTo'] = xTo
line['yFrom'] = yFrom
line['yTo'] = yTo
return line
def MakeText(graphIndex,x,y,text,fontsize=8,color='(0;0;0)'):
# creates text command that can be used in
# doc.SetProperty('AdditionalGraphicsCommands', graphicsCommands)
textCommand = {}
textCommand['type'] = 'text'
textCommand['graphNumber'] = graphIndex
# font size is in points
textCommand['fontsize'] = fontsize
textCommand['color'] = color
# x and y are the coordinates of the lower-left corner of text
textCommand['x'] = x
textCommand['y'] = y
textCommand['text'] = text
return textCommand
def FindPeaksAndAddColumnsAndGraphicsCommands():
doc = nex.GetActiveDocument()
deltaPercentString = doc.GetPostProcessingScriptParameter()
try:
deltaPercent = float(deltaPercentString)
except:
deltaPercent = 25
res = doc.GetAllNumericalResults()
resNames = doc.GetNumResColumnNames()
if len(resNames) < 2:
return
# the first column should contain X axis values
if not resNames[0] in ['Bin Left', 'Bin Middle', 'Bin Right', 'Frequency Value',
'Time']:
print 'no x data'
Page 410
return
# select only columns with real graph names
# (we may have columns with confidence, standard deviation, etc.)
sumNumRes = doc.GetAllNumResSummaryData()
# real graph names are specified in the first column
# of summary of numerical results
realGraphNames = sumNumRes[0]
graphIndexes = []
for i in range(len(resNames)):
if resNames[i] in realGraphNames:
graphIndexes.append(i)
numResults = len(graphIndexes)
# first column of numerical results contains x values
x = res[0]
xRange = max(x) - min(x)
# we may need to adjust x to draw peak center at bin center
step = x[1]-x[0]
xAdjustment = 0
if resNames[0] == 'Bin Left':
xAdjustment = step*0.5
if resNames[0] == 'Bin Right':
xAdjustment = -step*0.5
# prepare empty columns with peak info
columns = []
# we will report up to 5 peaks
maxNumPeaks = 5
for i in range(maxNumPeaks):
columns.append(MakeEmptyColumn('PeakValue' + str(i+1),numResults))
columns.append(MakeEmptyColumn('PeakPosition' + str(i+1),numResults))
graphicsCommands = []
# for each graph, find peaks and add columns and graphical commands
for igraph in range(len(graphIndexes)):
y = res[graphIndexes[igraph]]
yRange = max(y) - min(y)
if yRange > 0 :
delta = yRange*deltaPercent/100.0
peaks = PeakDetect(x, y, delta)
for ip in range(len(peaks)):
xp = peaks[ip][0] + xAdjustment
yp = peaks[ip][1]
if ip < maxNumPeaks:
# fill extra columns
columns[ip*2]['values'][igraph] = '%.6f' % (yp)
columns[ip*2+1]['values'][igraph] = '%.6f' % (xp)
# add graphics commands
dx = xRange*0.010
dy = yRange*0.015
# add graphics commands to draw 'x' (red diagonal lines) at each peak
graphicsCommands.append(MakeLine(igraph,xp-dx,yp-
dy,xp+dx,yp+dy,1.0,'(255;0;0)'))
graphicsCommands.append(MakeLine(igraph,xp-dx,yp+dy,xp+dx,yp-
dy,1.0,'(255;0;0)'))
# add text command showing x value of the peak
Page 411
# if you want both x and y, use
# peakText = '(%.3f,%.3f)'%(xp,yp)
peakText = '%.3f'%(xp)
graphicsCommands.append(MakeText(igraph,xp,yp+dy,peakText,7,'(0;64;255)'))
doc.SetProperty('AdditionalNumResColumns', columns)
doc.SetProperty('AdditionalGraphicsCommands', graphicsCommands)
FindPeaksAndAddColumnsAndGraphicsCommands()
See Also
Introduction to NexScript and Python Programming
Function Categories
Page 412

6.5.6.4. GetNumRes
GetNumRes Function
Returns the value of the specified cell in the Numerical Results Window of the first graphical view of the
document.
Syntax
number GetNumRes(doc, row, col)
Parameters
Parameter Type Description
doc documentReference Reference to the document.
row number 1-based row number.
col number 1-based column number.
Returns
Returns the numeric value of the specified cell in the Numerical Results Window of the first graphical
view of the document.
Comments
In Python, you can also use NexDoc object GetAllNumericalResults method. GetAllNumericalResults
returns a list object with all the numerical results. Each element of the list is a list containing results from
a single column in Numerical Results table. For example:
import nex
doc = nex.GetActiveDocument()
allNumRes = doc.GetAllNumericalResults()
# allNumRes now contains a list object with all numerical results.
# for example, to get the 10-th value of the first column of numerical results, use
allNumRes[0][9]
# thus, allNumRes[0][9] equals to the result of nex.GetNumRes(doc, 10, 1)
Usage
NexScript
doc = GetActiveDocument()
ApplyTemplate(doc, "PSTH")
% get the value of the second bin of the first histogram
binCount = GetNumRes(doc, 2, 1)
Python
import nex
doc = nex.GetActiveDocument()
nex.ApplyTemplate(doc, "PSTH")
# get the value of the second bin of the first histogram
binCount = nex.GetNumRes(doc, 2, 1)
Page 413

6.5.6.5. GetNumResNCols
GetNumResNCols Function
Returns the number of columns of the Numerical Results Window of the first graphical view of the
document.
Syntax
number GetNumResNCols(doc)
Parameters
Parameter Type Description
doc documentReference Reference to the document.
Returns
Returns the number of columns of the Numerical Results Window of the first graphical view of the
document.
Comments
None
Usage
NexScript
doc = GetActiveDocument()
numCols = GetNumResNCols(doc)
Python
import nex
doc = nex.GetActiveDocument()
numCols = nex.GetNumResNCols(doc)
See Also
Introduction to NexScript and Python Programming
Function Categories
Page 415

6.5.6.6. GetNumResNRows
GetNumResNRows Function
Returns the number of rows of the Numerical Results Window of the first graphical view of the document.
Syntax
number GetNumResNRows(doc)
Parameters
Parameter Type Description
doc documentReference Reference to the document.
Returns
Returns the number of rows of the Numerical Results Window of the first graphical view of the document.
Comments
None
Usage
NexScript
doc = GetActiveDocument()
numRows = GetNumResNRows(doc)
Python
import nex
doc = nex.GetActiveDocument()
numRows = nex.GetNumResNRows(doc)
See Also
Introduction to NexScript and Python Programming
Function Categories
Page 416

6.5.6.7. GetNumResColumnName
GetNumResColumnName Function
Returns the name of the specified column of the Numerical Results Window.
Syntax
string GetNumResColumnName(doc, col)
Parameters
Parameter Type Description
doc documentReference Reference to the document.
col number 1-based column number.
Returns
Returns the name of the column of the Numerical Results Window of the first graphical view of the
document.
Comments
None
Usage
NexScript
doc = GetActiveDocument()
% get the name of the second column of the Numerical Results Window
colName = GetNumResColumnName(doc, 2)
Python
import nex
doc = nex.GetActiveDocument()
# get the name of the second column of the Numerical Results Window
colName = nex.GetNumResColumnName(doc, 2)
See Also
Introduction to NexScript and Python Programming
Function Categories
Page 417
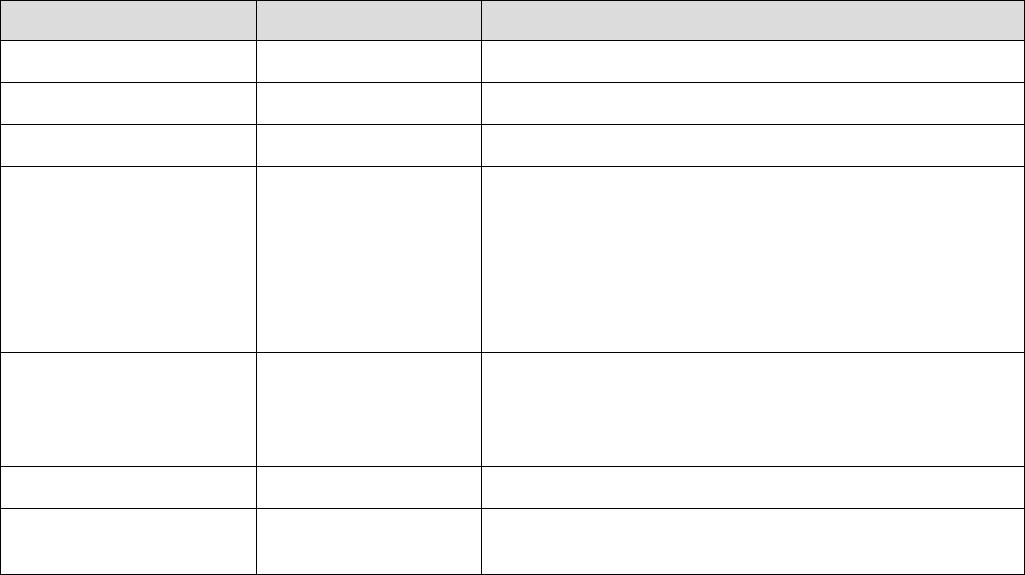
6.5.6.8. SendResultsToExcel
SendResultsToExcel Function
Sends numerical results (of the first graphics window of the document) to Excel.
Syntax
SendResultsToExcel(doc, fileName, worksheetName, useFirstEmptyRow, cellName, includeHeader,
includeFileName)
Parameters
Parameter Type Description
doc documentReference Reference to the document.
fileName string Excel file path.
worksheetName string Excel worksheet name.
useFirstEmptyRow number If 1, NeuroExplorer will ignore cellName parameter
and add the results to the first row where the cell in
column A is empty. If 2, NeuroExplorer will ignore
cellName parameter and add the results to the first
column where the cell in row 1 is empty. If 0,
NeuroExplorer will copy the data starting with the cell
specified in cellName.
cellName string Excel cell where to copy the results. Should be in the
form CR where C is Excel column name, R is the row
number. For example, A1 is the top-left cell in the
worksheet.
includeHeader number If 1, NeuroExplorer will paste column names.
includeFileName number If 1, NeuroExplorer will add a column with the data file
name.
Returns
None
Comments
None
Usage
NexScript
doc = GetActiveDocument()
SendResultsToExcel(doc, "C:\Data\NexResults.xlsx", "Nex", 0, "A1", 1, 0)
Python
import nex
doc = nex.GetActiveDocument()
nex.SendResultsToExcel(doc, "C:\\Data\\NexResults.xlsx", "Nex", 0, "A1", 1, 0)
Page 418

6.5.6.9. GetNumResSummaryNCols
GetNumResSummaryNCols Function
Returns the number of columns of the Numerical Results Summary Window of the first graphical view of
the document.
Syntax
number GetNumResSummaryNCols(doc)
Parameters
Parameter Type Description
doc documentReference Reference to the document.
Returns
Returns the number of columns of the Numerical Results Summary Window of the first graphical view of
the document.
Comments
None
Usage
NexScript
doc = GetActiveDocument()
nCols = GetNumResSummaryNCols(doc)
Python
import nex
doc = nex.GetActiveDocument()
nCols = nex.GetNumResSummaryNCols(doc)
See Also
Introduction to NexScript and Python Programming
Function Categories
Page 420

6.5.6.10. GetNumResSummaryNRows
GetNumResSummaryNRows Function
Returns the number of rows of the Numerical Results Summary Window of the first graphical view of the
document.
Syntax
number GetNumResSummaryNRows(doc)
Parameters
Parameter Type Description
doc documentReference Reference to the document.
Returns
Returns the number of rows of the Numerical Results Summary Window of the first graphical view of the
document.
Comments
None
Usage
NexScript
doc = GetActiveDocument()
nRows = GetNumResSummaryNRows(doc)
Python
import nex
doc = nex.GetActiveDocument()
nRows = nex.GetNumResSummaryNRows(doc)
See Also
Introduction to NexScript and Python Programming
Function Categories
Page 421

6.5.6.11. GetNumResSummaryColumnName
GetNumResSummaryColumnName Function
Returns the name of the specified column of the Numerical Results Summary Window of the first
graphical view of the document.
Syntax
string GetNumResSummaryColumnName(doc, col)
Parameters
Parameter Type Description
doc documentReference Reference to the document.
col number 1-based column number.
Returns
Returns the name of the column of the Numerical Results Summary Window of the first graphical view of
the document.
Comments
None
Usage
NexScript
doc = GetActiveDocument()
% get the name of the third column in Numerical Results Summary
colName = GetNumResSummaryColumnName(doc, 3)
Python
import nex
doc = nex.GetActiveDocument()
# get the name of the third column in Numerical Results Summary
colName = nex.GetNumResSummaryColumnName(doc, 3)
See Also
Introduction to NexScript and Python Programming
Function Categories
Page 422

6.5.6.12. GetNumResSummaryData
GetNumResSummaryData Function
Returns the string value of the specified cell in the Numerical Results Summary Window of the first
graphical view of the document.
Syntax
string GetNumResSummaryData(doc, row, col)
Parameters
Parameter Type Description
doc documentReference Reference to the document
row number 1-based row number.
col number 1-based column number.
Returns
Returns the string value of the specified cell in the Numerical Results Summary Window of the first
graphical view of the document.
Comments
In Python, use GetAllNumResSummaryData NexDoc method to get all summary values at once.
Usage
NexScript
doc = GetActiveDocument()
% get the value of the cell in row 3, column 2
summaryCellString = GetNumResSummaryData(doc, 3, 2)
Python
import nex
doc = nex.GetActiveDocument()
# get the value of the cell in row 3, column 2
summaryCellString = nex.GetNumResSummaryData(doc, 3, 2)
# get all the values in summary
summary = doc.GetAllNumResSummaryData()
# summary now contains a list object with all the values of summary of numerical
results window
# for example, to get the 5-th value of the first column of summary of numerical
results, use summary[0][4]
See Also
Introduction to NexScript and Python Programming
Function Categories
Page 423

6.5.6.13. SendResultsSummaryToExcel
SendResultsSummaryToExcel Function
Sends summary of numerical results (of the first graphics window of the document) to Excel.
Syntax
SendResultsSummaryToExcel(doc, fileName, worksheetName, useFirstEmptyRow, cellName,
includeHeader, includeFileName)
Parameters
Parameter Type Description
doc documentReference Reference to the document.
fileName string Excel file path.
worksheetName string Excel worksheet name.
useFirstEmptyRow number If 1, NeuroExplorer will ignore cellName parameter
and add the results to the first row where the cell in
column A is empty. If 2, NeuroExplorer will ignore
cellName parameter and add the results to the first
column where the cell in row 1 is empty. If 0,
NeuroExplorer will paste data starting with the cell
specified in cellName.
cellName string Excel cell where to paste the results. Should be in the
form CR where C is Excel column name, R is the row
number. For example, A1 is the top-left cell in the
worksheet.
includeHeader number If 1, will paste column names.
includeFileName number If 1, will add a column with the data file name.
Returns
None
Comments
None
Usage
NexScript
doc = GetActiveDocument()
SendResultsSummaryToExcel(doc, "C:\Data\res.xlsx", "FromNex", 0, "A1", 1, 0)
Python
import nex
doc = nex.GetActiveDocument()
nex.SendResultsSummaryToExcel(doc, "C:\\Data\\res.xlsx", "FromNex", 0, "A1", 1, 0)
Page 424

6.5.6.14. SaveNumResults
SaveNumResults Function
Saves the numerical results to a text file with the specified name.
Syntax
SaveNumResults(doc, fileName)
Parameters
Parameter Type Description
doc documentReference Reference to the document.
fileName string File path for saved results.
Returns
None
Comments
None
Usage
NexScript
doc = GetActiveDocument()
SaveNumResults(doc, "C:\Data\res1.txt")
Python
import nex
doc = nex.GetActiveDocument()
nex.SaveNumResults(doc, "C:\\Data\\res1.txt")
See Also
Introduction to NexScript and Python Programming
Function Categories
Page 426

6.5.6.15. SaveNumSummary
SaveNumSummary Function
Saves the summary of numerical results to a text file with the specified name.
Syntax
SaveNumSummary(doc, filename)
Parameters
Parameter Type Description
doc documentReference Reference to the document.
filename string File path for saved results.
Returns
None
Comments
None
Usage
NexScript
doc = GetActiveDocument()
SaveNumSummary(doc, "C:\Data\res1summary.txt")
Python
import nex
doc = nex.GetActiveDocument()
nex.SaveNumSummary(doc, "C:\\Data\\res1summary.txt")
See Also
Introduction to NexScript and Python Programming
Function Categories
Page 427
6.5.6.16. GetNumResSummaryColumnNames
GetNumResSummaryColumnNames NexDoc Method
Returns the list of column names in the Summary of Numerical Results Window of the first graphical view
of the document.
Syntax
list doc.GetNumResSummaryColumnNames()
Parameters
None
Returns
Returns the list of column names in the Summary of Numerical Results Window of the first graphical view
of the document.
Comments
Python only.
Usage
Python
import nex
doc = nex.GetActiveDocument()
names = doc.GetNumResSummaryColumnNames()
See Also
Introduction to NexScript and Python Programming
Function Categories
Page 428
6.5.6.17. GetNumResColumnNames
GetNumResColumnNames NexDoc Method
Returns the list of column names in the Numerical Results window of the first graphical view of the
document.
Syntax
list doc.GetNumResColumnNames()
Parameters
None
Returns
Returns the list of column names in the Numerical Results window of the first graphical view of the
document.
Comments
Python only.
Usage
Python
import nex
doc = nex.GetActiveDocument()
names = doc.GetNumResColumnNames()
See Also
Introduction to NexScript and Python Programming
Function Categories
Page 429
6.5.6.18. GetAllNumericalResultsAsCOM
GetAllNumericalResultsAsCOM NexDoc Method
Returns the list of all values (as a list or rows, similar to GetNumericalResults() COM method) in the
Numerical Results Window of the first graphical view of the document.
Syntax
list doc.GetAllNumericalResultsAsCOM()
Parameters
None.
Returns
Returns the list of all values (as a list or rows) in the Numerical Results Window of the first graphical view
of the document.
Comments
GetAllNumericalResultsAsCOM() returns a list object with all the numerical results. Each element of the
list is a list containing results from a single row in Numerical Results table. For example to get the 10-th
value of the first column of numerical results, use allNumRes[9][0] (see Usage below).
Usage
Python
import nex
doc = nex.GetActiveDocument()
allNumResAsCOM = doc.GetAllNumericalResultsAsCOM()
# allNumRes now contains a list object with all numerical results.
# for example, to get the 10-th value of the first column of numerical results, use
allNumResAsCOM[9][0]
# thus, allNumResAsCOM[9][0] equals to the result of nex.GetNumRes(doc, 10, 1)
See Also
Introduction to NexScript and Python Programming
Function Categories
Page 430
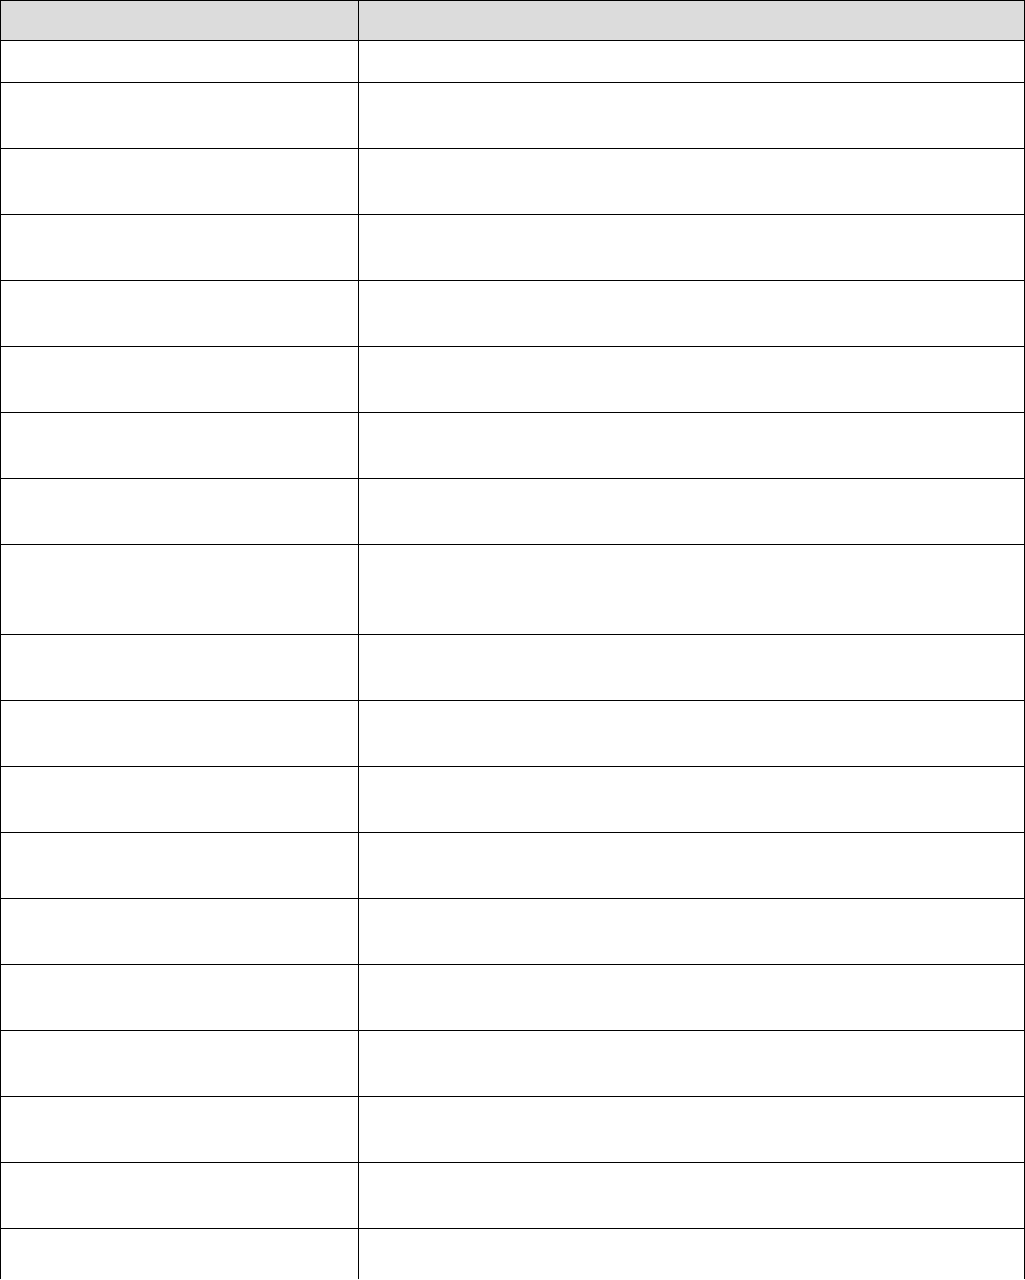
6.5.7. Operations on Variables Functions
The following operations on variables functions are available in NexScript and Python
Function Description
Rename Renames the specified variable.
Join Creates the new event that contains both the timestamps of var1
and the timestamps of var2.
Sync Creates the new event containing all the timestamps of var1 that
are in the intervals [var2+from, var2+to].
NotSync Creates the new event containing all the timestamps of var1 that
are NOT in the intervals [var2+from, var2+to].
FirstAfter Creates the new event containing the first timestamp of var1 in
each of the intervals [var2+from, var2+to].
FirstNAfter Creates the new event containing the first N timestamps of var1
after each of the var2 timestamps.
LastBefore Creates the new event containing the last timestamp of var1 in
each of the intervals [var2+from, var2+to].
IntervalFilter Creates the new event containing all the timestamps of var that are
in the intervals of the intervalVar.
SelectTrials Creates the new event containing the specified timestamps of
variable var. selectList can contain comma-separated indexes or
ranges of timestamps for example: 1,3-5,10.
SelectRandom Creates the new event containing randomly selected timestamps
of variable var.
SelectEven Creates the new event containing even (2nd, 4th, etc.) timestamps
of variable var.
SelectOdd Creates the new event containing odd (1st, 3rd, etc.) timestamps
of variable var.
ISIFilter Creates the new event containing timestamps of the variable var
that have preceding interspike intervals larger than min ISI.
FirstInInterval Creates the new event. For each interval of intervalVar, the first var
timestamp in this interval is copied to the result.
LastInInterval Creates the new event. For each interval of intervalVar, the last var
timestamp in this interval is copied to the result.
StartOfInterval Creates the new event. Copies the start of each interval of
intervalVar the result.
EndOfInterval Creates the new event. Copies the end of each interval of
intervalVar the result.
MakeIntervals Creates new interval variable with intervals
[varTimestamp+shiftmin, varTimestamp+shiftMax].
MakeIntFromStart Creates new interval variable. For each timestamp (tstart) of
Page 431
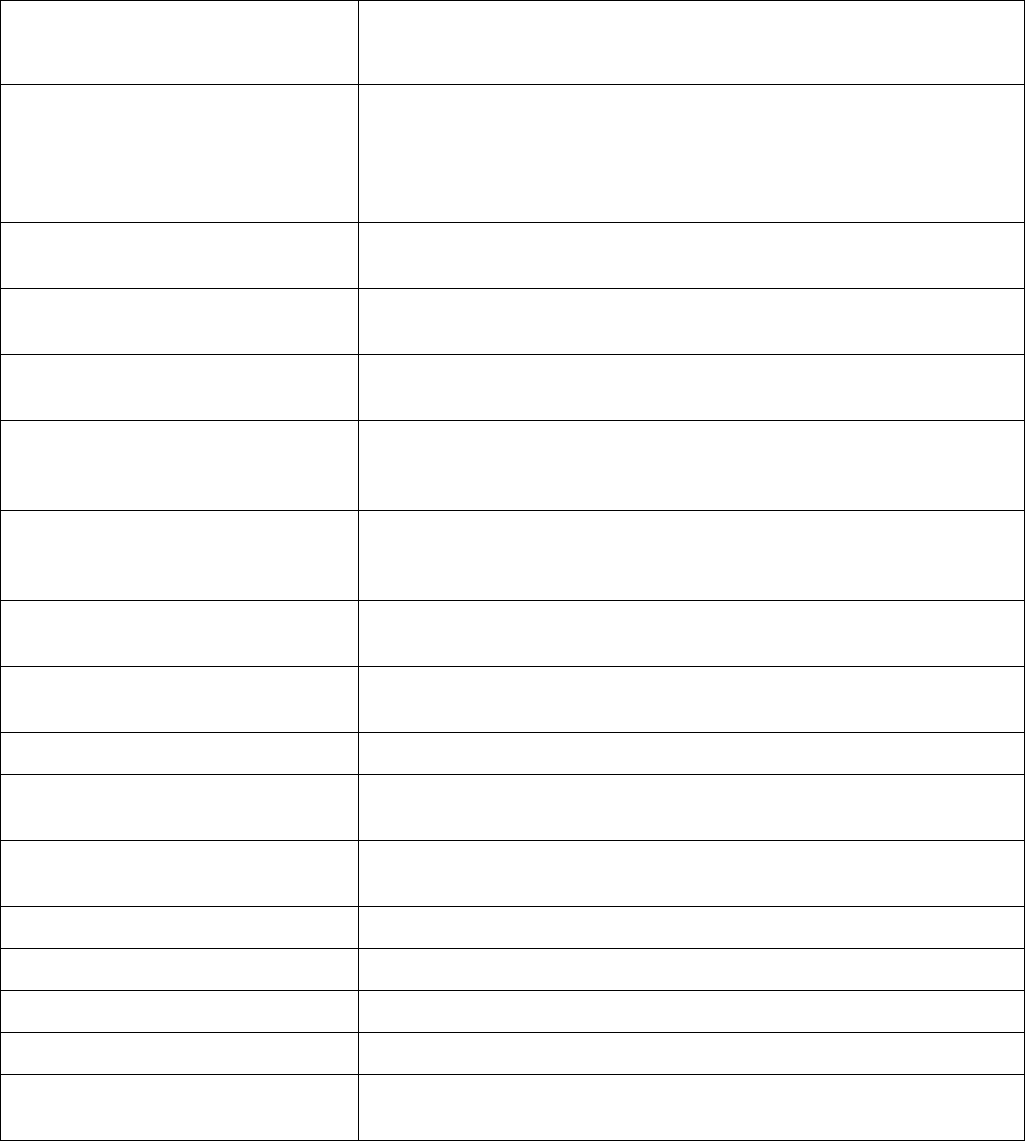
intStartVar, it looks for the first timestamp (tend) of the intEndVar
after tstart. If tend is before the next timestamp of intStartVar, it
adds the interval [tstart+shift1, tend+shift2] to the result.
MakeIntFromEnd Creates new interval variable. For each timestamp of the
intEndVar (tend), it looks for the last timestamp (tstart) of the
intStartVar before tend. If tstart is after the previous timestamp of
intEndVar, it adds the interval [tstart+shift1, tend+shift2] to the
result.
IntOpposite Creates a new interval variable that contains intervals
'complementary' to the intervals of intervalvar.
IntOr Creates a new Interval Variable that contains unions of the
intervals of intervalVar1 and intervalVar2.
IntAnd Creates a new Interval Variable that contains intersections of the
intervals of intervalVar1 and intervalVar2.
IntSize Creates a new Interval Variable that contains all of the intervals of
intervalVar that have the length which is more or equal to minInt
and less than or equal to intMax.
IntFind Creates a new Interval Variable. Each interval of intervalVar that
contains one or more timestamps of eventVar is copied to the
result.
MarkerExtract Creates a new event variable based on an existing marker
variable.
Shift Returns a new variable with all the timestamps of variable var
shifted in time by shiftBy seconds.
NthAfter Returns the N-th timestamp in var1 after the timestamp in var2.
PositionSpeed Calculates position speed from X and Y coordinate variables.
Speed is calculated from positions at times (t-deltaT, t+deltaT).
FilterContinuousVariable Applies the specified frequency filter to the specified continuous
variable.
LinearCombinationOfContVars Calculates a linear combination of two continuous variables.
DecimateContVar Decimates a continuous variable.
ContAdd Creates new continuous variable with values cont[i]+number.
ContMult Creates new continuous variable with values cont[i]*number.
ContAddCont Creates a new continuous variable with values
contVar1[i]+contVar2[i], returns a reference to the new variable.
See Also
Introduction to NexScript and Python Programming
Function Categories
Page 432

6.5.7.1. Rename
Rename Function
Renames the specified variable.
Syntax
Rename(doc, var, newName)
Parameters
Parameter Type Description
doc documentReference Reference to the document.
var variableReference Reference to the variable.
newName string The new name of the variable.
Returns
None
Usage
NexScript
doc = GetActiveDocument()
Rename(doc, doc["Strobed_01"], "LightOn")
Python
import nex
doc = nex.GetActiveDocument()
nex.Rename(doc, doc["Strobed_01"], "LightOn")
See Also
Introduction to NexScript and Python Programming
Function Categories
Page 433

6.5.7.2. Join
Join Function
Creates the new event that contains the timestamps of the two specified variables.
Syntax
variableReference Join(var1, var2)
Parameters
Parameter Type Description
var1 variableReference Reference to the variable.
var2 variableReference Reference to the variable.
Returns
Reference to the new variable.
Comments
Creates the new event that contains both the timestamps of var1 and the timestamps of var2.
Usage
NexScript
doc = GetActiveDocument()
doc["Events4and5"] = Join(doc["Event4"], doc["Event5"])
Python
import nex
doc = nex.GetActiveDocument()
doc["Events4and5"] = nex.Join(doc["Event4"], doc["Event5"])
See Also
Introduction to NexScript and Python Programming
Function Categories
Page 434

6.5.7.3. Sync
Sync Function
Creates the new event containing all the timestamps of var1 that are in the intervals [var2+fromTime,
var2+toTime].
Syntax
variableReference Sync(var1, var2, fromTime, toTime)
Parameters
Parameter Type Description
var1 variableReference Reference to the variable.
var2 variableReference Reference to the variable.
fromTime number Offset minimum (seconds).
toTime number Offset maximum (seconds).
Returns
Reference to the new variable.
Comments
Creates the new event containing all the timestamps of var1 that are in the intervals [var2+from, var2+to]
Usage
NexScript
doc = GetActiveDocument()
doc["synced_1_and_2"] = Sync(doc["Neuron1"], doc["Neuron2"], -0.01, 0.01)
Python
import nex
doc = nex.GetActiveDocument()
doc["synced_1_and_2"] = nex.Sync(doc["Neuron1"], doc["Neuron2"], -0.01, 0.01)
See Also
Introduction to NexScript and Python Programming
Function Categories
Page 435

6.5.7.4. NotSync
NotSync Function
Creates the new event containing all the timestamps of var1 that are NOT in the intervals
[var2+fromTime, var2+toTime].
Syntax
variableReference NotSync(var1, var2, fromTime, toTime)
Parameters
Parameter Type Description
var1 variableReference Reference to the variable.
var2 variableReference Reference to the variable.
fromTime number Offset minimum (seconds).
toTime number Offset maximum (seconds).
Returns
Reference to the new variable.
Comments
None
Usage
NexScript
doc = GetActiveDocument()
doc["notSync_4_and_5"] = NotSync(doc["Neuron04"], doc["Neuron05"], -0.01, 0.01)
Python
import nex
doc = nex.GetActiveDocument()
doc["notSync_4_and_5"] = nex.NotSync(doc["Neuron04"], doc["Neuron05"], - 0.01, 0.01)
See Also
Introduction to NexScript and Python Programming
Function Categories
Page 436

6.5.7.5. FirstAfter
FirstAfter Function
Creates the new event containing the first timestamp of var1 in each of the intervals [var2+fromTime,
var2+toTime].
Syntax
variableReference FirstAfter(var1, var2, fromTime, toTime)
Parameters
Parameter Type Description
var1 variableReference Reference to the variable.
var2 variableReference Reference to the variable.
fromTime number Offset of interval start around var2 timestamps.
toTime number Offset of interval end around var2 timestamps.
Returns
Reference to the new variable.
Comments
Creates the new event containing the first timestamp of var1 in each of the intervals [var2+from, var2+to].
Usage
NexScript
doc = GetActiveDocument()
% find the first spike of Neuron1 after each stimulus (in the first second after
stimulus)
doc["FirstN1"] = FirstAfter(doc["Neuron1"], doc["Stimulus"], 0, 1)
Python
import nex
doc = nex.GetActiveDocument()
# find the first spike of Neuron1 after each stimulus (in the first second after
stimulus)
doc["FirstN1"] = nex.FirstAfter(doc["Neuron1"], doc["Stimulus"], 0, 1)
See Also
Introduction to NexScript and Python Programming
Function Categories
Page 437

6.5.7.6. FirstNAfter
FirstNAfter Function
Creates the new event containing the first N timestamps of one variable after each of the timestamps of
the second variable.
Syntax
variableReference FirstNAfter(var1, var2, count)
Parameters
Parameter Type Description
var1 variableReference Reference to the variable.
var2 variableReference Reference to the variable.
count number How many timestamps of var1 (that are after each
timestamp of var2) to copy to the result.
Returns
The reference to the new variable.
Comments
None
Usage
NexScript
doc = GetActiveDocument()
doc["first5SpikesAfterStimulus"] = FirstNAfter(doc["Neuron1"], doc["Stimulus"], 5)
Python
import nex
doc = nex.GetActiveDocument()
doc["first5SpikesAfterStimulus"] = nex.FirstNAfter(doc["Neuron1"], doc["Stimulus"],
5)
See Also
Introduction to NexScript and Python Programming
Function Categories
Page 438
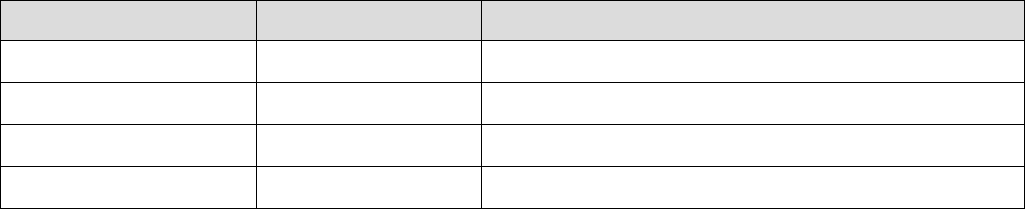
6.5.7.7. LastBefore
LastBefore Function
Creates the new event containing the last timestamp of var1 in each of the intervals [var2+fromTime,
var2+toTime].
Syntax
variableReference LastBefore(var1, var2, fromTime, toTime)
Parameters
Parameter Type Description
var1 variableReference Reference to the variable.
var2 variableReference Reference to the variable.
fromTime number Interval start offset (seconds).
toTime number Interval end offset (seconds).
Returns
Reference to the new variable.
Comments
Creates the new event containing the last timestamp of var1 in each of the intervals [var2+from, var2+to].
Usage
NexScript
doc = GetActiveDocument()
doc["lastBefore"] = LastBefore(doc["Neuron1"], doc["Event4"], 0, 5)
Python
import nex
doc = nex.GetActiveDocument()
doc["lastBefore"] = nex.LastBefore(doc["Neuron1"], doc["Event4"], 0, 5)
See Also
Introduction to NexScript and Python Programming
Function Categories
Page 439

6.5.7.8. IntervalFilter
IntervalFilter Function
Creates the new event containing all the timestamps of the specified event or neuron variable that are in
the intervals of the specified interval variable.
Syntax
variableReference IntervalFilter(var, intervalVar)
Parameters
Parameter Type Description
var variableReference Reference to the variable.
intervalVar variableReference Reference to the interval variable.
Returns
Reference to the new variable.
Comments
Creates the new event containing all the timestamps of var that are in the intervals of the intervalVar
Usage
NexScript
doc = GetActiveDocument()
doc["filtered"] = IntervalFilter(doc["Neuron1"], doc["Trials"])
Python
import nex
doc = nex.GetActiveDocument()
doc["filtered"] = nex.IntervalFilter(doc["Neuron1"], doc["Trials"])
See Also
Introduction to NexScript and Python Programming
Function Categories
Page 440

6.5.7.9. SelectTrials
SelectTrials Function
Creates the new event containing the specified timestamps of a variable.
Syntax
variableReference SelectTrials(var, selectList)
Parameters
Parameter Type Description
var variableReference Reference to the variable.
selectList string A list of comma-separated indexes or ranges of
timestamps. for example: 1,3-5,10.
Returns
The reference to the new variable.
Comments
None
Usage
NexScript
doc = GetActiveDocument()
doc["selectedEvents"] = SelectTrials(doc["Event04"], "1,5-10")
Python
import nex
doc = nex.GetActiveDocument()
doc["selectedEvents"] = nex.SelectTrials(doc["Event04"], "1,5-10")
See Also
Introduction to NexScript and Python Programming
Function Categories
Page 441

6.5.7.10. SelectRandom
SelectRandom Function
Creates the new event containing randomly selected timestamps of the specified variable.
Syntax
variableReference SelectRandom(var, nSelect)
Parameters
Parameter Type Description
var variableReference Reference to the variable.
nSelect number Number of timestamps to select.
Returns
The reference to the new event containing randomly selected timestamps of the specified variable.
Comments
None
Usage
NexScript
doc = GetActiveDocument()
doc["randomEvents04"] = SelectRandom(doc["Event04"], 10)
Python
import nex
doc = nex.GetActiveDocument()
doc["randomEvents04"] = nex.SelectRandom(doc["Event04"], 10)
See Also
Introduction to NexScript and Python Programming
Function Categories
Page 442

6.5.7.11. SelectEven
SelectEven Function
Creates the new event containing even (2nd, 4th, etc.) timestamps of the specified variable.
Syntax
variableReference SelectEven(var)
Parameters
Parameter Type Description
var variableReference Reference to the variable.
Returns
The reference to the new event containing even (2nd, 4th, etc.) timestamps of the specified variable.
Comments
None
Usage
NexScript
doc = GetActiveDocument()
doc["evenEvents04"] = SelectEven(doc["Event04"])
Python
import nex
doc = nex.GetActiveDocument()
doc["evenEvents04"] = nex.SelectEven(doc["Event04"])
See Also
Introduction to NexScript and Python Programming
Function Categories
Page 443

6.5.7.12. SelectOdd
SelectOdd Function
Creates the new event containing the odd (1st, 3rd, etc.) timestamps of the specified variable.
Syntax
variableReference SelectOdd(var)
Parameters
Parameter Type Description
var variableReference Reference to the variable.
Returns
The reference to the new event containing the odd (1st, 3rd, etc.) timestamps of the specified variable.
Comments
None
Usage
NexScript
doc = GetActiveDocument()
doc["oddEvents04"] = SelectOdd(doc["Event04"])
Python
import nex
doc = nex.GetActiveDocument()
doc["oddEvents04"] = nex.SelectOdd(doc["Event04"])
See Also
Introduction to NexScript and Python Programming
Function Categories
Page 444

6.5.7.13. ISIFilter
ISIFilter Function
Creates the new event containing the timestamps of the specified variable that have preceding interspike
intervals larger than the specified value.
Syntax
variableReference ISIFilter(var, minISI)
Parameters
Parameter Type Description
var variableReference Reference to the variable.
minISI number Minimum ISI (in seconds).
Returns
Reference to the new variable.
Comments
Creates the new event containing timestamps of the variable var that have preceding interspike intervals
larger than minISI.
Usage
NexScript
doc = GetActiveDocument()
doc["RemovedSmallISI"] = ISIFilter(doc["Neuron1"], 0.1)
Python
import nex
doc = nex.GetActiveDocument()
doc["RemovedSmallISI"] = nex.ISIFilter(doc["Neuron1"], 0.1)
See Also
Introduction to NexScript and Python Programming
Function Categories
Page 445

6.5.7.14. FirstInInterval
FirstInInterval Function
Creates the new event. For each interval of the specified interval variable, the first timestamp in this
interval is copied to the result.
Syntax
variableReference FirstInInterval(var, intervalVar)
Parameters
Parameter Type Description
var variableReference Reference to the neuron or event variable.
intervalVar variableReference Reference to the interval variable.
Returns
The reference to the new variable.
Comments
Creates the new event. For each interval of intervalVar, the first var timestamp in this interval is copied to
the result.
Usage
NexScript
doc = GetActiveDocument()
doc["firstInTrial"] = FirstInInterval(doc["Neuron1"], doc["Trials"])
Python
import nex
doc = nex.GetActiveDocument()
doc["firstInTrial"] = nex.FirstInInterval(doc["Neuron1"], doc["Trials"])
See Also
Introduction to NexScript and Python Programming
Function Categories
Page 446

6.5.7.15. LastInInterval
LastInInterval Function
Creates the new event. For each interval of the specified interval variable, the last timestamp in this
interval is copied to the result.
Syntax
variableReference LastInInterval(var, intervalVar)
Parameters
Parameter Type Description
var variableReference Reference to the variable.
intervalVar variableReference Reference to the interval variable.
Returns
Reference to the new variable.
Comments
Creates the new event. For each interval of intervalVar, the last var timestamp in this interval is copied to
the result.
Usage
NexScript
doc = GetActiveDocument()
doc["LastSpikeInTrial"] = LastInInterval(doc["Neuron1"], doc["Trials"])
Python
import nex
doc = nex.GetActiveDocument()
doc["LastSpikeInTrial"] = nex.LastInInterval(doc["Neuron1"], doc["Trials"])
See Also
Introduction to NexScript and Python Programming
Function Categories
Page 447

6.5.7.16. StartOfInterval
StartOfInterval Function
Creates the new event. Copies the start of each interval of the specified interval variable to the result.
Syntax
variableReference StartOfInterval(intervalVar)
Parameters
Parameter Type Description
intervalVar variableReference Reference to the interval variable.
Returns
Reference to the new variable.
Comments
Creates the new event. Copies the start of each interval of intervalVar to the result.
Usage
NexScript
doc = GetActiveDocument()
doc["TrialStarts"] = StartOfInterval(doc["Trials"])
Python
import nex
doc = nex.GetActiveDocument()
doc["TrialStarts"] = nex.StartOfInterval(doc["Trials"])
See Also
Introduction to NexScript and Python Programming
Function Categories
Page 448

6.5.7.17. EndOfInterval
EndOfInterval Function
Creates the new event based on the specified interval variable. Copies the end of each interval of the
interval variable to the result.
Syntax
variableReference EndOfInterval(intervalVar)
Parameters
Parameter Type Description
intervalVar variableReference Reference to an interval variable.
Returns
Reference to the new variable.
Comments
Creates the new event based on the specified interval variable. Copies the end of each interval of the
interval variable to the result.
Usage
NexScript
doc = GetActiveDocument()
doc["trialEnds"] = EndOfInterval(doc["Trials"])
Python
import nex
doc = nex.GetActiveDocument()
doc["trialEnds"] = nex.EndOfInterval(doc["Trials"])
See Also
Introduction to NexScript and Python Programming
Function Categories
Page 449
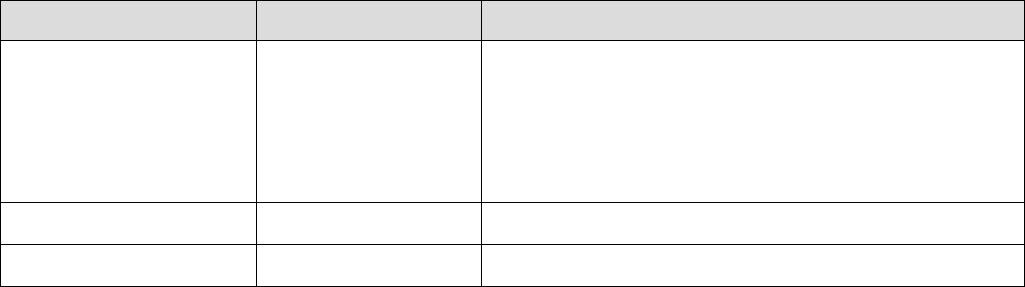
6.5.7.18. MakeIntervals
MakeIntervals Function
Creates new interval variable with intervals [varTimestamp+shiftMin, varTimestamp+shiftMax].
Overlapping intervals are merged.
Syntax
variableReference MakeIntervals(var, shiftMin, shiftMax)
Parameters
Parameter Type Description
var variableReferenceUs
eTimestamps
Reference to neuron, event, marker, interval or
waveform variable. For neuron, event or marker
variable, the variable timestamps are used. For
interval variable, interval start times are used as
timestamps. For waveform variable, wave timestamps
are used.
shiftMin number Shift minimum in seconds.
shiftMax number Shift maximum in seconds.
Returns
Reference to the new variable.
Comments
Creates new interval variable with intervals [varTimestamp+shiftMin, varTimestamp+shiftMax].
Overlapping intervals are merged.
Usage
NexScript
doc = GetActiveDocument()
doc["IntAroundEvent04"] = MakeIntervals(doc["Event04"], 0, 2)
Python
import nex
doc = nex.GetActiveDocument()
doc["IntAroundEvent04"] = nex.MakeIntervals(doc["Event04"], 0, 2)
See Also
Introduction to NexScript and Python Programming
Function Categories
Page 450

6.5.7.19. MakeIntFromStart
MakeIntFromStart Function
Creates new interval variable. For each timestamp tstart of intStartVar, it looks for the first timestamp
tend of the intEndVar after tstart. If tend is before the next timestamp of intStartVar, it adds the interval [
tstart +shift1, tend +shift2] to the result.
Syntax
variableReference MakeIntFromStart(intStartVar, intEndVar, shift1, shift2)
Parameters
Parameter Type Description
intStartVar variableReference Reference to the variable
intEndVar variableReference Reference to the variable
shift1 number Shift minimum (seconds).
shift2 number Shift maximum (seconds).
Returns
Reference to the new variable.
Comments
None
Usage
NexScript
doc = GetActiveDocument()
doc["Int2"] = MakeIntFromStart(doc["Event04"], doc["Event05"], -0.1, 0.1)
Python
import nex
doc = nex.GetActiveDocument()
doc["Int2"] = nex.MakeIntFromStart(doc["Event04"], doc["Event05"], - 0.1, 0.1)
See Also
Introduction to NexScript and Python Programming
Function Categories
Page 451
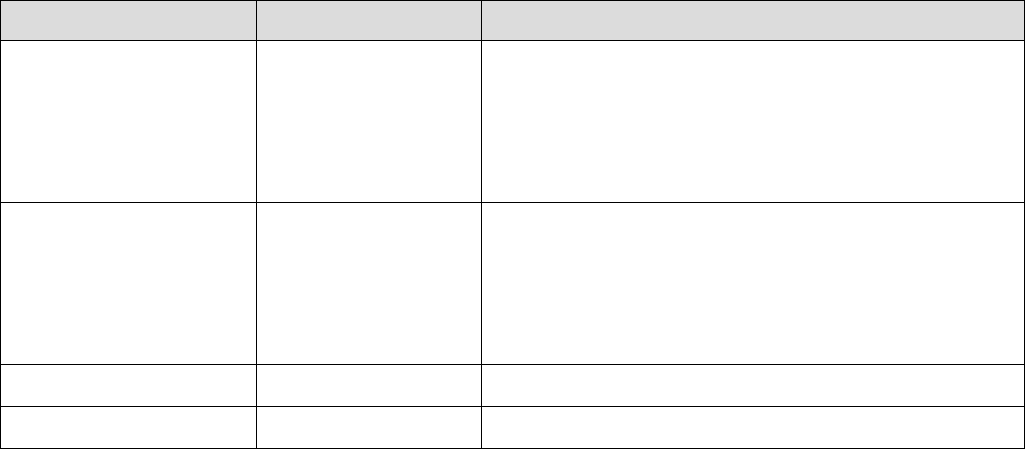
6.5.7.20. MakeIntFromEnd
MakeIntFromEnd Function
Creates new interval variable. For each timestamp tend of the intEndVar, it looks for the last timestamp (
tstart ) of the intStartVar before tend. If tstart is after the previous timestamp of intEndVar, it adds the
interval [ tstart +shift1, tend +shift2] to the result.
Syntax
variableReference MakeIntFromEnd(intStartVar, intEndVar, shift1, shift2)
Parameters
Parameter Type Description
intStartVar variableReferenceUs
eTimestamps
Reference to neuron, event, marker, interval or
waveform variable. For neuron, event or marker
variable, the variable timestamps are used. For
interval variable, interval start times are used as
timestamps. For waveform variable, wave timestamps
are used.
intEndVar variableReferenceUs
eTimestamps
Reference to neuron, event, marker, interval or
waveform variable. For neuron, event or marker
variable, the variable timestamps are used. For
interval variable, interval start times are used as
timestamps. For waveform variable, wave timestamps
are used.
shift1 number Shift minimum (seconds).
shift2 number Shift maximum (seconds).
Returns
Reference to the new variable.
Comments
None
Usage
NexScript
doc = GetActiveDocument()
doc["Int2"] = MakeIntFromEnd(doc["Event04"], doc["Event05"], -0.1, 0.1)
Python
import nex
doc = nex.GetActiveDocument()
doc["Int2"] = nex.MakeIntFromEnd(doc["Event04"], doc["Event05"], - 0.1, 0.1)
See Also
Introduction to NexScript and Python Programming
Page 452

6.5.7.21. IntOpposite
IntOpposite Function
Creates a new interval variable that contains intervals 'complementary' to the intervals of the specified
interval variable.
Syntax
variableReference IntOpposite(doc, intervalVariable)
Parameters
Parameter Type Description
doc documentReference Reference to the document
intervalVariable variableReference Reference to the interval variable.
Returns
Reference to the new interval variable.
Comments
Creates a new interval variable that contains intervals 'complementary' to the intervals of intervalVariable.
Usage
NexScript
doc = GetActiveDocument()
doc["OusideTrials"] = IntOpposite(doc, doc["Trials"])
Python
import nex
doc = nex.GetActiveDocument()
doc["OusideTrials"] = nex.IntOpposite(doc, doc["Trials"])
See Also
Introduction to NexScript and Python Programming
Function Categories
Page 454

6.5.7.22. IntOr
IntOr Function
Creates a new Interval Variable that contains unions of the intervals of intervalVar1 and intervalVar2.
Syntax
variableReference IntOr(doc, intervalVar1, intervalVar2)
Parameters
Parameter Type Description
doc documentReference Reference to the document.
intervalVar1 variableReference Reference to the interval variable.
intervalVar2 variableReference Reference to the interval variable.
Returns
Reference to the new interval variable.
Comments
Creates a new Interval Variable that contains unions of the intervals of intervalVar1 and intervalVar2
Usage
NexScript
doc = GetActiveDocument()
doc["Trials1and2"] = IntOr(doc, doc["Trials1"], doc["Trials2"])
Python
import nex
doc = nex.GetActiveDocument()
doc["Trials1and2"] = nex.IntOr(doc, doc["Trials1"], doc["Trials2"])
See Also
Introduction to NexScript and Python Programming
Function Categories
Page 455

6.5.7.23. IntAnd
IntAnd Function
Creates a new Interval Variable that contains intersections of the intervals of intervalVar1 and
intervalVar2.
Syntax
variableReference IntAnd(intervalVar1, intervalVar2)
Parameters
Parameter Type Description
intervalVar1 variableReference Reference to the interval variable.
intervalVar2 variableReference Reference to the interval variable.
Returns
The reference to the new interval variable.
Comments
Creates a new Interval Variable that contains intersections of the intervals of intervalVar1 and
intervalVar2
Usage
NexScript
doc["Int3"] = IntAnd(doc["Interval1"], doc["Interval2"])
Python
import nex
doc["Int3"] = nex.IntAnd(doc["Interval1"], doc["Interval2"])
See Also
Introduction to NexScript and Python Programming
Function Categories
Page 456

6.5.7.24. IntSize
IntSize Function
Creates a new Interval Variable that contains the intervals with the specified length range.
Syntax
variableReference IntSize(intervalVar, minInt, maxInt)
Parameters
Parameter Type Description
intervalVar variableReference Reference to the interval variable.
minInt number Minimum interval length (in seconds).
maxInt number Maximum interval length (in seconds).
Returns
Reference to the new interval variable.
Comments
Creates a new Interval Variable that contains all of the intervals of intervalVar that have the length which
is more or equal to minInt and less than or equal to intMax.
Usage
NexScript
doc = GetActiveDocument()
doc["TrialsLessThan10secDuration"] = IntSize(doc["Trials"], 0, 10)
Python
import nex
doc = nex.GetActiveDocument()
doc["TrialsLessThan10secDuration"] = nex.IntSize(doc["Trials"], 0, 10)
See Also
Introduction to NexScript and Python Programming
Function Categories
Page 457

6.5.7.25. IntFind
IntFind Function
Finds all intervals that contain at least one timestamp of the specified event or neuron variable.
Syntax
variableReference IntFind(intervalVar, eventVar)
Parameters
Parameter Type Description
intervalVar variableReference Reference to the interval variable.
eventVar variableReference Reference to the event or neuron variable.
Returns
None
Comments
Creates a new Interval Variable. Each interval of intervalVar that contains one or more timestamps of
eventVar is copied to the result.
Usage
NexScript
doc = GetActiveDocument()
doc["IntervalsWithEvent04"] = IntFind(doc["Interval1"], doc["Event4"])
Python
import nex
doc = nex.GetActiveDocument()
doc["IntervalsWithEvent04"] = nex.IntFind(doc["Interval1"], doc["Event4"])
See Also
Introduction to NexScript and Python Programming
Function Categories
Page 458

6.5.7.26. MarkerExtract
MarkerExtract Function
Creates a new event variable based on existing marker variable.
Syntax
variableReference MarkerExtract(doc, MarkerVariableName, ExtractString)
Parameters
Parameter Type Description
doc documentReference Reference to the document
MarkerVariableName string The name of the marker variable.
ExtractString string Extract string. See comments.
Returns
None
Comments
ExtractString contains a list of items separated by commas. Items AND or OR should be placed
between the conditions for the sample field. Conditions for each marker field should end with the item
EOF. The last item in ExtractString list should be END.
For example, assume that we have a marker variable Strobed with one field that contains integer values.
To extract all the timestamps with the field value 3 you may use the following command:
doc["NewEvent"] = MarkerExtract(doc, "Strobed", "=3,EOF,END")
To extract all the timestamps with the field values 3, 4 and 5 you may use the command:
doc["NewEvent"] = MarkerExtract(doc, "Strobed", ">2,AND,<6,EOF,END")
To use string comparisons in timestamp extraction, add $ sign at the beginning of the string. For
example, to extract timestamps with Ev_Marker field value WL, use:
doc["NewEvent1"] = MarkerExtract(doc, "Ev_Marker", "=$WL,EOF,END")
Usage
NexScript
doc = GetActiveDocument()
doc["NewEvent"] = MarkerExtract(doc, "Strobed", "=3,EOF,END")
Python
import nex
doc = nex.GetActiveDocument()
doc["NewEvent"] = nex.MarkerExtract(doc, "Strobed", "=3,EOF,END")
See Also
Introduction to NexScript and Python Programming
Page 459

6.5.7.27. Shift
Shift Function
Returns a new variable with all the timestamps of variable var shifted in time by shiftBy seconds.
Syntax
variableReference Shift(var, shiftBy)
Parameters
Parameter Type Description
var variableReference Reference to the variable.
shiftBy number Shift value (in seconds).
Returns
Reference to the new variable.
Comments
Returns a new variable with all the timestamps of variable var shifted in time by shiftBy seconds.
Usage
NexScript
doc = GetActiveDocument()
doc["Event04Shifted"] = Shift(doc["Event04"], 10)
Python
import nex
doc = nex.GetActiveDocument()
doc["Event04Shifted"] = nex.Shift(doc["Event04"], 10)
See Also
Introduction to NexScript and Python Programming
Function Categories
Page 461

6.5.7.28. NthAfter
NthAfter Function
Creates the new variable with the N-th timestamp in var1 after each timestamp in var2.
Syntax
variableReference NthAfter(var1, var2, N)
Parameters
Parameter Type Description
var1 variableReference Reference to the variable
var2 variableReference Reference to the variable
N number Spike number.
Returns
Reference to the new variable.
Comments
Creates the new variable with the N-th timestamp in var1 after each timestamp in var2.
Usage
NexScript
doc = GetActiveDocument()
doc["SecondSpike"] = NthAfter(doc["Neuron1"], doc["Neuron2"], 2)
Python
import nex
doc = nex.GetActiveDocument()
doc["SecondSpike"] = nex.NthAfter(doc["Neuron1"], doc["Neuron2"], 2)
See Also
Introduction to NexScript and Python Programming
Function Categories
Page 462

6.5.7.29. PositionSpeed
PositionSpeed Function
Calculates the position speed from X and Y coordinate variables and creates a new continuous variable.
Syntax
variableReference PositionSpeed(varX, varY, deltaT, smoothRadius)
Parameters
Parameter Type Description
varX variableReference Reference to the variable.
varY variableReference Reference to the variable.
deltaT number Time step for speed calculation.
smoothRadius number Smooth parameter. See Comments.
Returns
Reference to the new variable
Comments
PositionSpeed operation calculates the scalar speed of a pair of the position variables.
1. First, for each data point of Position variable PosX[T], where T is time, the raw scalar speed is
calculated:
dX = PosX[ T + DeltaT ] - PosX[ T ]
dY = PosY[ T + DeltaT ] - PosY[ T ]
RawScalarSpeed[ T ] = sqrt( dX*dX + dY*dY ) / DeltaT
If there is no data point at time T + DeltaT, a linear interpolation is used to calculate PosX[T + DeltaT]
and PosY[T + DeltaT].
2. Second, RawScalarSpeed is smoothed with the Gaussian filter. The parameters of the filter are such
that the width (in seconds) of the Gaussian curve at half the height is equal to the value of Smooth
parameter. If Smooth = 0, Gaussian filter is not applied.
Usage
NexScript
doc = GetActiveDocument()
doc["speed"] = PositionSpeed(doc["LED1_X"], doc["LED1_Y"], 0.1, 0.5)
Python
import nex
doc = nex.GetActiveDocument()
doc["speed"] = nex.PositionSpeed(doc["LED1_X"], doc["LED1_Y"], 0.1, 0.5)
See Also
Page 463
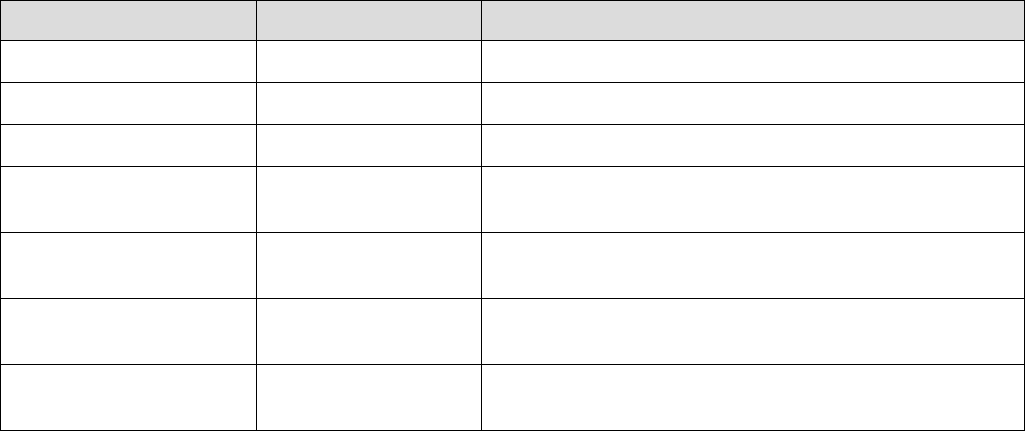
6.5.7.30. FilterContinuousVariable
FilterContinuousVariable Function
Filters the specified continuous variable using the specified frequency filter.
Syntax
FilterContinuousVariable(doc, contVar, filteredVarName, filterType, filterOrder, freq1, freq2)
Parameters
Parameter Type Description
doc documentReference Reference to the document.
contVar variableReference Reference to the variable.
filteredVarName string The name of the filtered variable.
filterType string The type of the filter. Should be "Lowpass",
"Highpass", "Bandpass", "Bandstop" or "Notch".
filterOrder number The number specifying the filter order. Should be
between 3 and 11 inclusive.
freq1 number Filter frequency parameter (in Hz). See comments
below.
freq2 number Filter frequency parameter (in Hz). See comments
below.
Returns
None
Comments
If the filter type is Lowpass or Highpass, freq1 is a cutoff frequency and freq2 is not used. Butterworth
filter is used.
If the filter type is Bandpass or Bandstop, freq1 is a minimum of the frequency range and freq2 is a
maximum of the frequency range. Butterworth filter is used.
If the filter type is Notch, freq1 is the center of the Notch filter and freq2 is the width of the Notch filter.
Standard Notch filter is used.
Usage
NexScript
The following sample script applies Bandpass filter to the variable ContChannel01. The result of filtering
will be saved in continuous variable Cont1BandFiltered. The filter order is 5 and the frequency band is
from 1000 Hz to 2000 Hz:
doc = GetActiveDocument()
var = GetVarByName(doc, "ContChannel01")
FilterContinuousVariable(doc, var, "Cont1BandFiltered", "Bandpass", 5, 1000, 2000)
Page 465
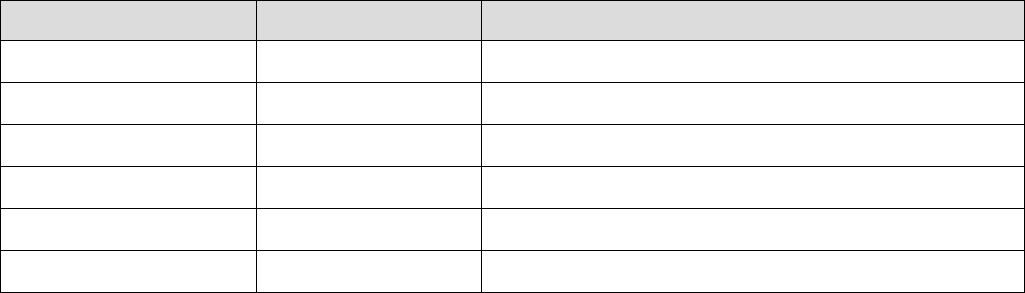
6.5.7.31. LinearCombinationOfContVars
LinearCombinationOfContVars Function
Calculates a linear combination of two continuous variables.
Syntax
LinearCombinationOfContVars(doc, resultName, contVar1, coeff1, contVar2, coeff2)
Parameters
Parameter Type Description
doc documentReference Reference to the document.
resultName string The name of the result.
contVar1 variableReference Reference to the first continuous variable.
coeff1 number Coefficient for the first continuous variable
contVar2 variableReference Reference to the second continuous variable.
coeff2 number Coefficient for the second continuous variable
Returns
None
Comments
This function calculates a linear combination of two continuous variables. The values of the resulting
variable are:
contVar1_value*coeff1 + contVar2_value*coeff2
Starting with version 5.104, you can get the same result by using math operations (multiplication and
addition) on document continuous variables:
doc['contVar1_2_Average'] = doc['contVar1']*0.5 + doc['contVar2']*0.5
Usage
NexScript
doc = GetActiveDocument()
% calculate average of contVar1 and contVar2
LinearCombinationOfContVars(doc, "average", doc["contVar1"], 0.5, doc["contVar2"],
0.5)
Python
import nex
doc = nex.GetActiveDocument()
# calculate average of contVar1 and contVar2
nex.LinearCombinationOfContVars(doc, "average", doc["contVar1"], 0.5,
doc["contVar2"], 0.5)
Page 467

6.5.7.32. AbsOfContVar
AbsOfContVar Function
Calculates an absolute value of the signal of a continuous variable.
Syntax
AbsOfContVar(doc, resultName, contVar)
Parameters
Parameter Type Description
doc documentReference Reference to the document.
resultName string The name of the result.
contVar variableReference Reference to continuous variable.
Returns
None
Comments
This function calculates an absolute value of the signal of a continuous variable. The values of the
resulting variable are:
abs(contVar_value)
Usage
NexScript
doc = GetActiveDocument()
% calculate abs of FP01 and store result in document variable with the name
'absOfFP01'
AbsOfContVar(doc, "absOfFP01", doc["FP01"])
Python
import nex
doc = nex.GetActiveDocument()
# calculate abs of FP01 and store result in document variable with the name
'absOfFP01'
nex.AbsOfContVar(doc, "absOfFP01", doc["FP01"])
See Also
Introduction to NexScript and Python Programming
Function Categories
Page 469

6.5.7.33. DecimateContVar
DecimateContVar Function
Decimates a continuous variable.
Syntax
DecimateContVar(doc, resultName, contVar, decimationFactor)
Parameters
Parameter Type Description
doc documentReference Reference to the document.
resultName string The name of the decimated continuous variable.
contVar variableReference Reference to the variable.
decimationFactor number If decimationFactor = 2, every second data point of
contVar is copied to the result, if decimationFactor =
3, every third, etc.
Returns
None
Comments
None
Usage
NexScript
doc = GetActiveDocument()
DecimateContVar(doc, "decimated", doc["ContVar1"], 10)
Python
import nex
doc = nex.GetActiveDocument()
nex.DecimateContVar(doc, "decimated", doc["ContVar1"], 10)
See Also
Introduction to NexScript and Python Programming
Function Categories
Page 470

6.5.7.34. ContAdd
ContAdd Script Function
Creates a new continuous variable with values contVar[i]+numberToAdd, returns a reference to the new
variable.
Syntax
variableReference ContAdd(contVar, numberToAdd)
Parameters
Parameter Type Description
contVar variableReference Reference to the variable.
numberToAdd number The number to add to each value of the contVar
Returns
Creates a new continuous variable with values contVar[i]+numberToAdd, returns a reference to the new
variable.
Comments
Usage
NexScript
doc = GetActiveDocument()
baseLine = 10.0
doc["subtractedBaseLine"] = ContAdd(doc["FP01"], -baseLine)
Python
import nex
doc = nex.GetActiveDocument()
baseLine = 10.0
doc["subtractedBaseLine"] = nex.ContAdd(doc["FP01"], -baseLine)
# you can also use arithmetic operations on continuous variables:
doc["subtractedBaseLine"] = doc["FP01"] - baseLine
doc["average of FP01 and FP02"] = ( doc["FP01"] + doc["FP02"] ) / 2
See Also
Introduction to NexScript and Python Programming
Function Categories
Page 471

6.5.7.35. ContMult
ContMult Script Function
Creates a new continuous variable with values contVar[i]*numberToMultiply, returns a reference to the
new variable.
Syntax
variableReference ContMult(contVar, numberToMultiply)
Parameters
Parameter Type Description
contVar variableReference Reference to the variable.
numberToMultiply number The result values will be contVar[i]*numberToMultiply.
Returns
Creates a new continuous variable with values contVar[i]*numberToMultiply, returns a reference to the
new variable.
Comments
Usage
NexScript
doc = GetActiveDocument()
coeff = -1.0
doc["invertedFP01"] = ContMult(doc["FP01"], coeff)
Python
import nex
doc = nex.GetActiveDocument()
coeff = -1.0
doc["invertedFP01"] = nex.ContMult(doc["FP01"], coeff)
# you can also use arithmetic operations on continuous variables:
doc["average of FP01 and FP02"] = ( doc["FP01"] + doc["FP02"] ) / 2
See Also
Introduction to NexScript and Python Programming
Function Categories
Page 472

6.5.7.36. ContAddCont
ContAddCont Script Function
Creates a new continuous variable with values contVar1[i]+contVar2[i], returns a reference to the new
variable.
Syntax
variableReference ContAddCont(contVar1, contVar2)
Parameters
Parameter Type Description
contVar1 variableReference Reference to the continuous variable.
contVar2 variableReference Reference to the continuous variable. contVar1 and
contVar2 should have the same number of continuous
values.
Returns
Creates a new continuous variable with values contVar1[i]+contVar2[i], returns a reference to the new
variable. The timestamps of the new variable are copied from contVar1. Timestamps of contVar2 are
ignored.
Comments
Usage
NexScript
doc = GetActiveDocument()
theSumOfFP1andFP2 = ContAddCont(doc["FP01"], doc["FP02"])
Python
import nex
doc = nex.GetActiveDocument()
theSumOfFP1andFP2 = nex.ContAddCont(doc["FP01"], doc["FP02"])
# you can also use arithmetic operations on continuous variables:
doc["average of FP01 and FP02"] = ( doc["FP01"] + doc["FP01"] ) / 2
See Also
Introduction to NexScript and Python Programming
Function Categories
Page 473
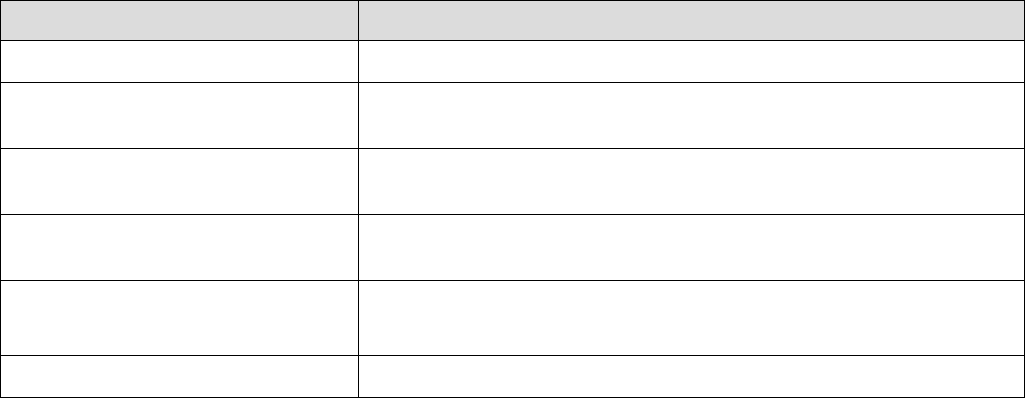
6.5.8. Matlab Functions
The following matlab functions are available in NexScript and Python
Function Description
SendSelectedVarsToMatlab Sends the selected variables to Matlab.
ExecuteMatlabCommand Sends the string command to Matlab and executes the command
in Matlab.
GetVarFromMatlab Gets the specified timestamped variable (array of timestamps)
from Matlab.
GetContVarFromMatlab Imports the specified matrix containing continuous variable data
from Matlab.
GetContVarWithTimestampsFrom
Matlab
Imports the specified matrix containing continuous variable data
from Matlab.
GetIntervalVarFromMatlab Imports the specified matrix containing intervals from Matlab.
See Also
Introduction to NexScript and Python Programming
Function Categories
Page 474

6.5.8.1. SendSelectedVarsToMatlab
SendSelectedVarsToMatlab Function
Sends selected variables to Matlab.
Syntax
SendSelectedVarsToMatlab(doc)
Parameters
Parameter Type Description
doc documentReference Reference to the document.
Returns
None
Comments
None
Usage
NexScript
doc = GetActiveDocument()
SendSelectedVarsToMatlab(doc)
Python
import nex
doc = nex.GetActiveDocument()
nex.SendSelectedVarsToMatlab(doc)
See Also
Introduction to NexScript and Python Programming
Function Categories
Page 475

6.5.8.2. ExecuteMatlabCommand
ExecuteMatlabCommand Function
Sends the string command to Matlab and executes the command in Matlab.
Syntax
string ExecuteMatlabCommand(command)
Parameters
Parameter Type Description
command string Matlab command to be run.
Returns
String with the result of Matlab command.
Comments
Any valid Matlab command that you can type at Matlab prompt can be used. For example, you can call a
Matlab script or a function.
Usage
NexScript
ExecuteMatlabCommand("x=randn(10,1);plot(x)")
varList = ExecuteMatlabCommand("who")
Python
import nex
nex.ExecuteMatlabCommand("x=randn(10,1);plot(x)")
varList = nex.ExecuteMatlabCommand("who")
See Also
Introduction to NexScript and Python Programming
Function Categories
Page 476
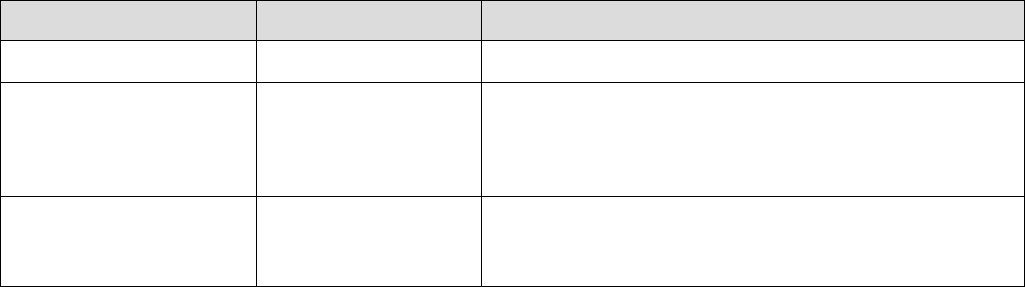
6.5.8.3. GetVarFromMatlab
GetVarFromMatlab Function
Gets the specified neuron or event variable from Matlab.
Syntax
GetVarFromMatlab(doc, varname, isneuron)
Parameters
Parameter Type Description
doc documentReference Reference to the document.
varname string The name of the matrix in Matlab workspace. The
matrix should be a number matrix with either one row
or one column of data containing timestamps in
seconds.
isneuron number If isneuron is 1, the imported variable is added to the
list of Neurons. Otherwise, the variable is added to the
list of events.
Returns
None
Comments
None
Usage
NexScript
doc = GetActiveDocument()
% get the 1-column matrix ev1 and add it to the list of events
GetVarFromMatlab(doc, "ev1", 0)
Python
import nex
doc = nex.GetActiveDocument()
# get the 1-column matrix ev1 and add it to the list of events
nex.GetVarFromMatlab(doc, "ev1", 0)
See Also
Introduction to NexScript and Python Programming
Function Categories
Page 477
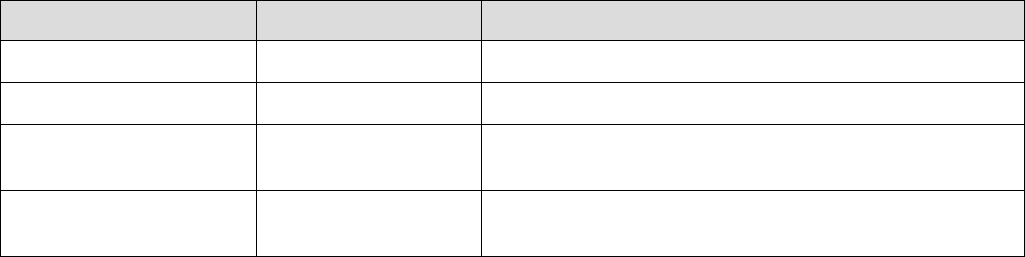
6.5.8.4. GetContVarFromMatlab
GetContVarFromMatlab Function
Imports the specified matrix from Matlab. Each column of the matrix is imported as a continuous variable.
Syntax
GetContVarFromMatlab(doc, MatrixName, TimestampOfFirstValue, TimeStep)
Parameters
Parameter Type Description
doc documentReference Reference to the document.
MatrixName string The name of a matrix in Matlab workspace.
TimestampOfFirstValue number The timestamp (in seconds) of the first value of each
continuous variable.
TimeStep number Digitizing time step (in seconds) of the imported
variables.
Returns
None
Comments
This function adds continuous variables to the specified document. The names of the variables include
the MatrixName and the column number.
Usage
NexScript
doc = GetActiveDocument()
% import matrix contData from Matlab. first timestamp is 0, time step is 0.001s.
GetContVarFromMatlab(doc, "contData", 0, 0.001)
Python
import nex
doc = nex.GetActiveDocument()
# import matrix contData from Matlab. first timestamp is 0, time step is 0.001s.
nex.GetContVarFromMatlab(doc, "contData", 0, 0.001)
See Also
Introduction to NexScript and Python Programming
Function Categories
Page 478

6.5.8.5. GetContVarWithTimestampsFromMatlab
GetContVarWithTimestampsFromMatlab Function
Imports the specified 2-column matrix containing continuous variable data from Matlab.
Syntax
GetContVarWithTimestampsFromMatlab(doc, MatrixName, UseFirstDeltaAsDigRate)
Parameters
Parameter Type Description
doc documentReference Reference to the document
MatrixName string The name of the Matrix in Matlab workspace. The first
column of the matrix should contain the values of a
continuous variable, the second column - the
corresponding timestamps.
UseFirstDeltaAsDigRate number Valid values are 0 or 1. If this parameter is positive,
the difference between the second and the first
timestamp is used as the variable digitizing rate.
Returns
None
Comments
This function adds a continuous variable to the specified document. The name of the new variable is the
MatrixName.
Usage
NexScript
doc = GetActiveDocument()
GetContVarWithTimestampsFromMatlab(doc, "contData", 1)
Python
import nex
doc = nex.GetActiveDocument()
nex.GetContVarWithTimestampsFromMatlab(doc, "contData", 1)
See Also
Introduction to NexScript and Python Programming
Function Categories
Page 479

6.5.8.6. GetIntervalVarFromMatlab
GetIntervalVarFromMatlab Function
Imports the specified matrix containing intervals from Matlab.
Syntax
GetIntervalVarFromMatlab(doc, MatrixName)
Parameters
Parameter Type Description
doc documentReference Reference to the document.
MatrixName string The name of the 2-column matrix in Matlab
workspace.
Returns
None
Comments
Imports the specified 2-column matrix from Matlab. The first column of the matrix should contain interval
start times in seconds, the second column - interval end times in seconds.
Usage
NexScript
doc = GetActiveDocument()
GetIntervalVarFromMatlab(doc, "trials")
Python
import nex
doc = nex.GetActiveDocument()
nex.GetIntervalVarFromMatlab(doc, "trials")
See Also
Introduction to NexScript and Python Programming
Function Categories
Page 480
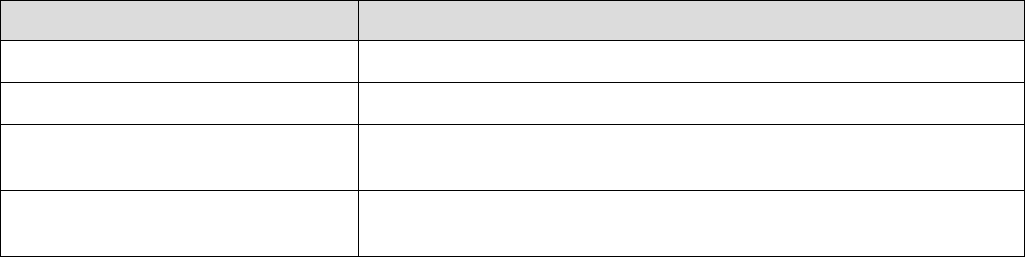
6.5.9. Excel Functions
The following Excel functions are available in NexScript and Python
Function Description
SetExcelCell Sets the text value of the specified cell in Excel.
CloseExcelFile Closes the specified Excel file if the file is open.
SendResultsToExcel Sends numerical results (of the first graphics window of the
document) to Excel.
SendResultsSummaryToExcel Sends summary of numerical results (of the first graphics window
of the document) to Excel.
See Also
Introduction to NexScript and Python Programming
Function Categories
Page 481
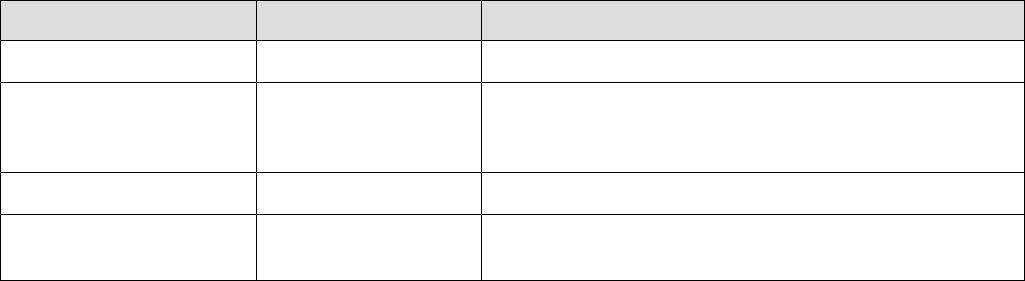
6.5.9.1. SetExcelCell
SetExcelCell Function
Sets the text value of the specified cell in Excel.
Syntax
SetExcelCell(worksheet, cell, text, excelFilePath)
Parameters
Parameter Type Description
worksheet string The name of the worksheet.
cell string Excel cell specification, Should be in the form CR
where C is Excel column name, R is the row number.
For example, "A1" is the top-left cell in the worksheet.
text string The text to be copied to the cell.
excelFilePath string Full path of the Excel file. This parameter is optional.
See Usage below.
Returns
None
Comments
None
Usage
NexScript
% this call will open Excel, Excel will create
% a new workbook (Excel file) and paste the text to the specified cell
SetExcelCell("fromNex", "A1", "cell text")
% this call will set the cell in the specified Excel file
SetExcelCell("fromNex", "A1", "cell text", "C:\Data\Results.xlsx")
Python
import nex
# this call will open Excel, Excel will create
# a new workbook (Excel file) and paste the text to the specified cell
nex.SetExcelCell("fromNex", "A1", "cell text")
# this call will set the cell in the specified Excel file
nex.SetExcelCell("fromNex", "A1", "cell text", "C:\\Data\\Results.xlsx")
See Also
Introduction to NexScript and Python Programming
Function Categories
Page 482

6.5.9.2. CloseExcelFile
CloseExcelFile Function
Closes the specified Excel file if the file is open.
Syntax
CloseExcelFile(filePath)
Parameters
Parameter Type Description
filePath string Full path of the Excel file.
Returns
None
Comments
In Python, backslash character (\) has a special meaning. When specifying a Windows path like
"C:\Data\NexResults.xlsx" in Python, use either "C:/Data/NexResults.xlsx" or "C:\\Data\\NexResults.xlsx".
Usage
NexScript
excelFilePath = "C:\Data\NexResults.xlsx"
SendResultsToExcel(doc, excelFilePath, "Nex", 0, "A1", 1, 0)
CloseExcelFile(excelFilePath)
Python
import nex
excelFilePath = "C:\\Data\\NexResults.xlsx"
nex.SendResultsToExcel(doc, excelFilePath, "Nex", 0, "A1", 1, 0)
nex.CloseExcelFile(excelFilePath)
See Also
Introduction to NexScript and Python Programming
Function Categories
Page 483

6.5.10. PowerPoint Functions
The following PowerPoint functions are available in NexScript and Python
Function Description
SendGraphicsToPowerPoint Sends analysis graphics to the specified PowerPoint file.
ClosePowerPointFile Closes the specified PowerPoint file if the file is open.
See Also
Introduction to NexScript and Python Programming
Function Categories
Page 484
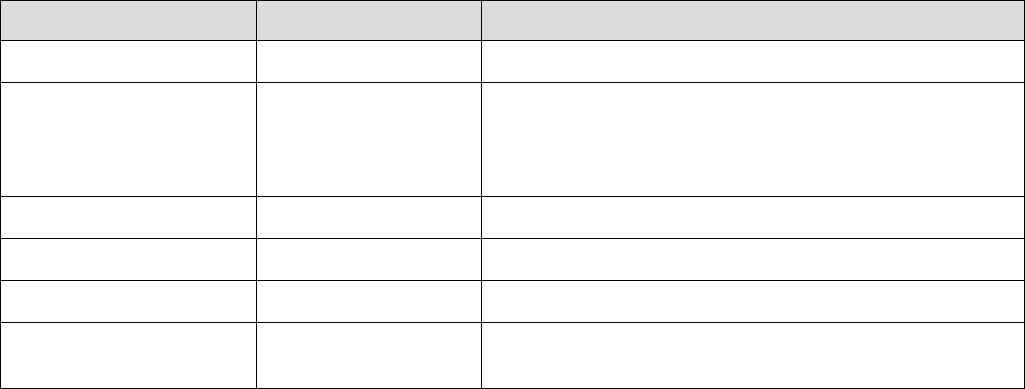
6.5.10.1. SendGraphicsToPowerPoint
SendGraphicsToPowerPoint Function
Sends the contents of the first graphical window of the document to the specified PowerPoint
presentation.
Syntax
SendGraphicsToPowerPoint (doc, presentationPath, slideTitle, comment, addParameters, useBitmap)
Parameters
Parameter Type Description
doc documentReference Reference to the document.
presentationPath string Path of the presentation file. File extension should be
.ppt (NeuroExplorer cannot save .pptx files). If file
extension is not .ppt, .ppt extension is added to the file
path.
slideTitle string Slide title.
comment string Slide comment. Will be shown below graphics.
addParameters number If 1, add a text box with analysis parameter values.
useBitmap number If 1, transfer graphics as a bitmap, otherwise, transfer
graphics as a metafile.
Returns
None
Comments
None
Usage
NexScript
doc = GetActiveDocument()
SendGraphicsToPowerPoint(doc, "C:\Data\NexResults.ppt", "Slide 1", "Sample slide", 1,
0)
Python
import nex
doc = nex.GetActiveDocument()
nex.SendGraphicsToPowerPoint(doc, "C:\\Data\\NexResults.ppt", "Slide 1", "Sample
slide", 1, 0)
See Also
Introduction to NexScript and Python Programming
Function Categories
Page 485

6.5.10.2. ClosePowerPointFile
ClosePowerPointFile Function
Closes the specified PowerPoint file if the file is open.
Syntax
ClosePowerPointFile(filePath)
Parameters
Parameter Type Description
filePath string Full path of the PowerPoint file.
Returns
None
Comments
In Python, backslash character (\) has a special meaning. When specifying a Windows path like
"C:\Data\NexResults.ppt" in Python, use either "C:/Data/NexResults.ppt" or "C:\\Data\\NexResults.ppt".
Usage
NexScript
pptFilePath = "C:\Data\NexResults.ppt"
SendGraphicsToPowerPoint(doc, pptFilePath, "Slide 1", "Sample slide", 1, 0)
ClosePowerPointFile(pptFilePath)
Python
import nex
pptFilePath = "C:\\Data\\NexResults.ppt"
nex.SendGraphicsToPowerPoint(doc, pptFilePath, "Slide 1", "Sample slide", 1, 0)
nex.ClosePowerPointFile(pptFilePath)
See Also
Introduction to NexScript and Python Programming
Function Categories
Page 486

6.5.11. Running Script Functions
The following running script functions are available in NexScript and Python
Function Description
RunScript Runs the script with the specified file name.
Sleep Pauses execution of the script.
See Also
Introduction to NexScript and Python Programming
Function Categories
Page 487

6.5.11.1. RunScript
RunScript Function
Runs NexScript saved in a file with the specified name.
Syntax
RunScript(scriptName)
Parameters
Parameter Type Description
scriptName string The name of the script. See Comments below for
details on how to specify script name parameter.
Returns
None
Comments
How to specify script names.
When the script name is specified as "MyScript", for example:
RunScript("MyScript")
NeuroExplorer will use the following script file
C:\Users\current_user\Documents\NeuroExplorer 5\Scripts\MyScript.nsc
(where current_user is your Windows user name).
You can also specify the script name relative to the main scripts folder
C:\Users\current_user\Documents\NeuroExplorer 5\Scripts\
For example, the script name "Grant\MyScript.nsc"
RunScript("Grant\MyScript.nsc")
means that the script file
C:\Users\current_user\Documents\NeuroExplorer 5\Scripts\Grant\MyScript.nsc
will be used
Finally, you can specify the absolute path of the script file:
RunScript("C:\MyScripts\Script.nsc")
In Python:
- You can run another Python script using execfile:
execfile('C:\\MyScripts\\Grant\\AnotherScript.py') )
- You can run NexScript script from Python script:
nex.RunScript('AnotherScript')
nex.RunScript('\\Grant\\AnotherScript.nsc')
Page 488
nex.RunScript('C:\\MyScripts\\Grant\\AnotherScript.nsc')
Usage
NexScript
RunScript("MyOtherScript")
Python
# run NexScript
nex.RunScript('C:\\Scripts\\SomeNexScript.nsc')
# run Python script
execfile('C:\\Scripts\\SomePythonScript.py')
See Also
Introduction to NexScript and Python Programming
Function Categories
Page 489

6.5.11.2. Sleep
Sleep Function
Pauses execution of the script for nms milliseconds.
Syntax
Sleep(nms)
Parameters
Parameter Type Description
nms number The number of milliseconds to pause.
Returns
None
Comments
None
Usage
NexScript
% pause for 2 seconds
Sleep(2000)
Python
import nex
# pause for 2 seconds
nex.Sleep(2000)
See Also
Introduction to NexScript and Python Programming
Function Categories
Page 490
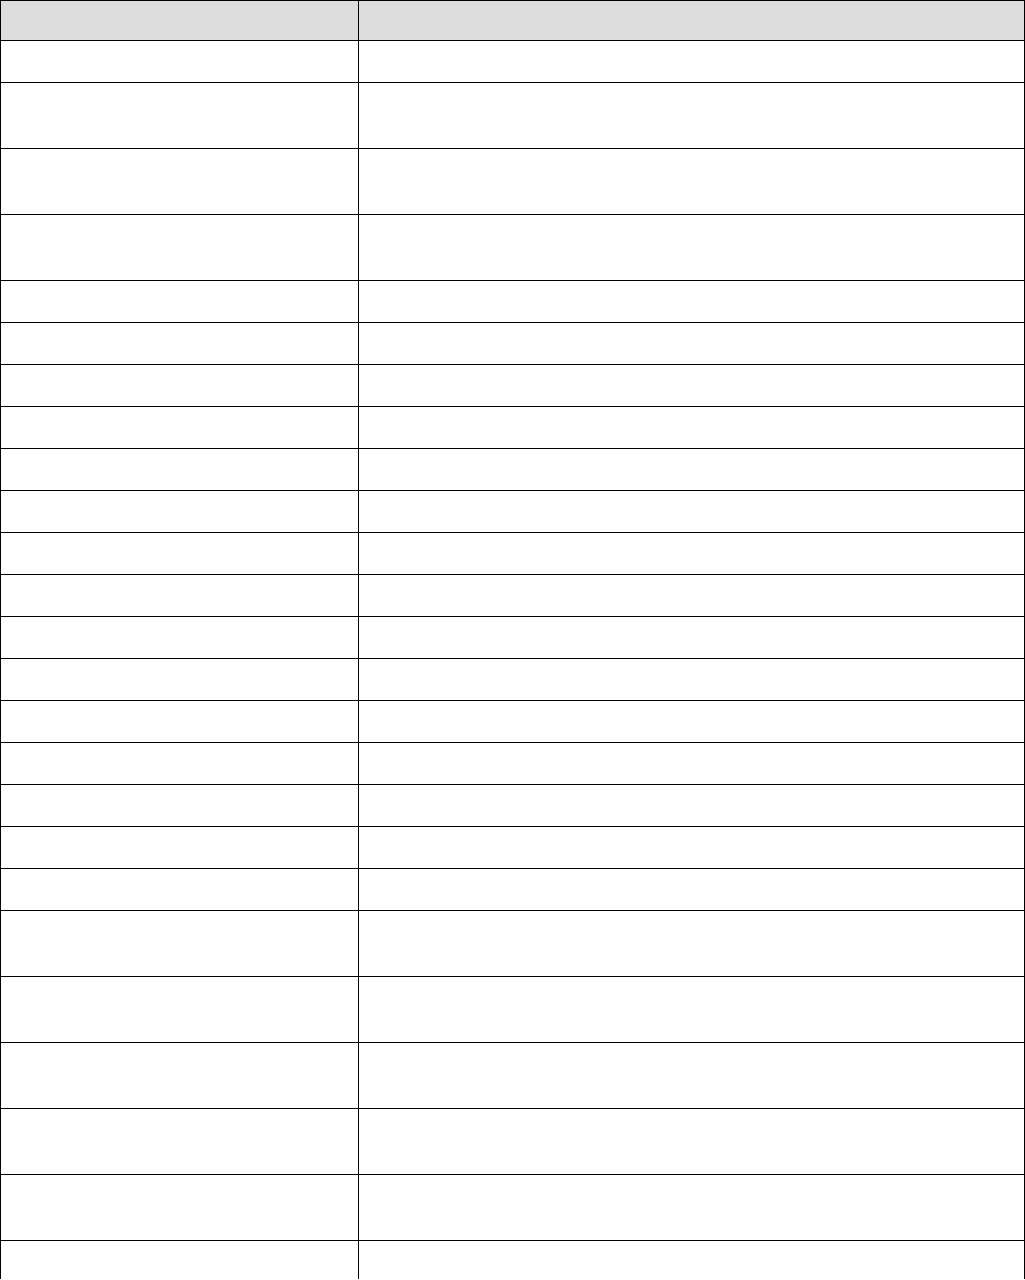
6.5.12. Math Functions
The following math functions are available in NexScript and Python
Function Description
seed Initializes random number generator.
expo Generates a random value exponentially distributed with the
specified mean.
floor Returns the largest integer that is less than or equal to the
specified number.
ceil Returns the smallest integer that is greater than or equal to the
specified number.
round Rounds the specified number to the nearest integer.
abs Returns the absolute value of the specified number.
sqrt Returns square root of the specified number.
pow Returns the specified number raised to the specified power.
exp Returns exponential of the specified number.
min Returns minimum of two numbers.
max Returns maximum two number.
log Returns logarithm of the specified number.
sin Returns sine of the specified number.
cos Returns cosine of the specified number.
tan Returns tangent of the specified number.
acos Returns arccosine of the specified number.
asin Returns arcsine of the specified number.
atan Returns arctangent of the specified number.
RoundToTS Rounds the number to the nearest timestamp value.
GetFirstGE Returns the index of the first timestamp in the specified variable
that is greater or equal to the specified number.
GetFirstGT Returns the index of the first timestamp in the specified variable
that is greater than the specified number.
GetBinCount Calculates the number of timestamps in neuron the specified time
interval.
BitwiseAnd Converts values to unsigned integers and performs bitwise AND
operation.
BitwiseOr Converts values to unsigned integers and performs bitwise OR
operation.
GetBit Converts the specified number to an unsigned integer and returns
Page 491


6.5.12.1. seed
seed Function
Initializes random number generator.
Syntax
seed(iseed)
Parameters
Parameter Type Description
iseed number Numeric seed value. Should be a positive integer.
Returns
None
Comments
None
Usage
NexScript
seed(1717)
Python
import nex
nex.seed(1717)
See Also
Introduction to NexScript and Python Programming
Function Categories
Page 493

6.5.12.2. expo
expo Function
Generates a random value exponentially distributed with the specified mean.
Syntax
number expo(fmean)
Parameters
Parameter Type Description
fmean number Mean of the exponential distribution.
Returns
None
Comments
None
Usage
NexScript
y = expo(10)
Python
import nex
y = nex.expo(10)
See Also
Introduction to NexScript and Python Programming
Function Categories
Page 494

6.5.12.3. floor
floor Function
Returns the largest integer that is less than or equal to the specified number.
Syntax
number floor(x)
Parameters
Parameter Type Description
x number Numeric value.
Returns
Returns the largest integer that is less than or equal to x.
Comments
None
Usage
NexScript
x = 1.7
y = floor(x)
% y now is equal to 1
Python
import math
x = 1.7
y = math.floor(x)
# y now is equal to 1
See Also
Introduction to NexScript and Python Programming
Function Categories
Page 495

6.5.12.4. ceil
ceil Function
Returns the smallest integer that is greater than or equal to the specified number.
Syntax
number ceil(x)
Parameters
Parameter Type Description
x number Numeric value.
Returns
Returns the smallest integer that is greater than or equal to x.
Comments
None
Usage
NexScript
x = ceil(1.01)
% x now is equal to 2
Python
import math
x = math.ceil(1.01)
# x now is equal to 2
See Also
Introduction to NexScript and Python Programming
Function Categories
Page 496

6.5.12.5. round
round Function
Rounds the specified number to the nearest integer.
Syntax
round(x)
Parameters
Parameter Type Description
x number Numeric value.
Returns
Returns the integer that is closest to x
Comments
None
Usage
NexScript
y = round(1.3)
% y now is 1
y = round(1.6)
% y now is 2
Python
y = round(1.3)
# y now is 1
y = round(1.6)
# y now is 2
See Also
Introduction to NexScript and Python Programming
Function Categories
Page 497

6.5.12.6. abs
abs Function
Returns absolute value of the specified number.
Syntax
number abs(x)
Parameters
Parameter Type Description
x number Numeric value.
Returns
Returns absolute value of x.
Comments
None
Usage
NexScript
% this script tests abs function
x = -2
ax = abs(x)
% ax is equal to 2
Python
# this script tests abs function
x = - 2
ax = abs(x)
# ax is equal to 2
See Also
Introduction to NexScript and Python Programming
Function Categories
Page 498

6.5.12.7. sqrt
sqrt Function
Returns the square root of the specified number.
Syntax
number sqrt(x)
Parameters
Parameter Type Description
x number Numeric value (should be non-negative).
Returns
Returns the square root of x.
Comments
None
Usage
NexScript
y = sqrt(2)
Python
import math
y = math.sqrt(2)
See Also
Introduction to NexScript and Python Programming
Function Categories
Page 499

6.5.12.8. pow
pow Function
Returns x raised to the power of y.
Syntax
number pow(x, y)
Parameters
Parameter Type Description
x number Number to be raised to the specified power.
y number The power.
Returns
Returns x raised to the power of y.
Comments
None
Usage
NexScript
z = pow(2, 3)
% z now is equal to 8
Python
import math
z = math.pow(2, 3)
# z now is equal to 8
See Also
Introduction to NexScript and Python Programming
Function Categories
Page 500

6.5.12.9. exp
exp Function
Returns exponential of x.
Syntax
number exp(x)
Parameters
Parameter Type Description
x number Numeric value.
Returns
Returns exponential of x.
Comments
None
Usage
NexScript
y = exp(2.5)
Python
import math
y = math.exp(2.5)
See Also
Introduction to NexScript and Python Programming
Function Categories
Page 501

6.5.12.10. min
min Function
Returns the minimum of two numbers.
Syntax
number min(x, y)
Parameters
Parameter Type Description
x number Numeric value.
y number Numeric value.
Returns
Returns minimum of x and y.
Comments
None
Usage
NexScript
x = 4
y = 2
z = min(x, y)
Python
x = 4
y = 2
z = min(x, y)
See Also
Introduction to NexScript and Python Programming
Function Categories
Page 502

6.5.12.11. max
max Function
Returns maximum of two numbers.
Syntax
max(x, y)
Parameters
Parameter Type Description
x number Numeric value.
y number Numeric value.
Returns
Returns maximum of x and y.
Comments
None
Usage
NexScript
x = 7
y = max(x, 5)
Python
x = 7
y = max(x, 5)
See Also
Introduction to NexScript and Python Programming
Function Categories
Page 503

6.5.12.12. log
log Function
Returns logarithm of the specified number.
Syntax
log(x)
Parameters
Parameter Type Description
x number Numeric value (the value should be positive).
Returns
Returns logarithm of x.
Comments
None
Usage
NexScript
y = log(2.5)
Python
import math
y = math.log(2.5)
See Also
Introduction to NexScript and Python Programming
Function Categories
Page 504

6.5.12.13. sin
sin Function
Returns sine of the specified number.
Syntax
sin(x)
Parameters
Parameter Type Description
x number Numeric value (sine parameter in radians).
Returns
Returns the sine of x.
Comments
None
Usage
NexScript
x = 10
y = sin(x)
Python
import math
x = 10
y = math.sin(x)
See Also
Introduction to NexScript and Python Programming
Function Categories
Page 505

6.5.12.14. cos
cos Function
Returns cosine of the specified number.
Syntax
number cos(x)
Parameters
Parameter Type Description
x number Numeric value (cosine parameter in radians).
Returns
Returns cosine of x.
Comments
None
Usage
NexScript
y = cos(0.5)
Python
import math
y = math.cos(0.5)
See Also
Introduction to NexScript and Python Programming
Function Categories
Page 506

6.5.12.15. tan
tan Function
Returns tangent of the specified number.
Syntax
tan(x)
Parameters
Parameter Type Description
x number Numeric value (tangent parameter in radians).
Returns
Returns tangent of x.
Comments
None
Usage
NexScript
y = tan(1)
Python
import math
y = math.tan(1)
See Also
Introduction to NexScript and Python Programming
Function Categories
Page 507

6.5.12.16. acos
acos Function
Returns the arccosine (in radians) of the specified number.
Syntax
number acos(x)
Parameters
Parameter Type Description
x number Numeric value (the value should be from -1 to +1).
Returns
Returns y such that x = cos(y).
Comments
None
Usage
NexScript
x = 0.5
y = acos(x)
% y is 1.047197551
Python
import math
x = 0.5
y = math.acos(x)
# y is 1.047197551
See Also
Introduction to NexScript and Python Programming
Function Categories
Page 508

6.5.12.17. asin
asin Function
Returns the arcsine of the specified number.
Syntax
number asin(x)
Parameters
Parameter Type Description
x number Numeric value (the value should be from -1 to +1).
Returns
Returns y such that x = sin(y).
Comments
None
Usage
NexScript
x = 0.5
y = asin(x)
Python
import math
x = 0.5
y = math.asin(x)
See Also
Introduction to NexScript and Python Programming
Function Categories
Page 509

6.5.12.18. atan
atan Function
Returns the arctangent of the specified number.
Syntax
number acos(x)
Parameters
Parameter Type Description
x number Numeric value.
Returns
Returns y such that x = tan(y).
Comments
None
Usage
NexScript
x = 2
y = atan(x)
Python
import math
x = 2
y = math.atan(x)
See Also
Introduction to NexScript and Python Programming
Function Categories
Page 510

6.5.12.19. RoundToTS
RoundToTS Function
Rounds the specified number to the nearest timestamp value.
Syntax
number RoundToTS(doc, time)
Parameters
Parameter Type Description
doc documentReference Reference to the document.
time number The time value (in seconds) to be rounded.
Returns
The document timestamp value (in seconds) nearest to the specified time.
Comments
None
Usage
NexScript
doc = GetActiveDocument()
ts = RoundToTS(doc, 1.234)
Python
import nex
doc = nex.GetActiveDocument()
ts = nex.RoundToTS(doc, 1.234)
See Also
Introduction to NexScript and Python Programming
Function Categories
Page 511

6.5.12.20. GetFirstGE
GetFirstGE Function
Returns the index of the first timestamp in the specified variable that is greater than or equal to the
specified number.
Syntax
number GetFirstGE(var, time)
Parameters
Parameter Type Description
var variableReference Reference to the variable.
time number Time value in seconds.
Returns
Returns the index of the first timestamp in the specified variable that is greater than or equal to the
specified number.
Comments
None
Usage
NexScript
doc = GetActiveDocument()
neuron = GetVarByName(doc, "Neuron04a")
% get the index of the first spike at or after 5.7s
index = GetFirstGE(neuron, 5.7)
Python
import nex
doc = nex.GetActiveDocument()
neuron = nex.GetVarByName(doc, "Neuron04a")
# get the index of the first spike at or after 5.7s
index = nex.GetFirstGE(neuron, 5.7)
See Also
Introduction to NexScript and Python Programming
Function Categories
Page 512

6.5.12.21. GetFirstGT
GetFirstGT Function
Returns the index of the first timestamp in the specified variable that is greater than the specified
number.
Syntax
number GetFirstGT(var, time)
Parameters
Parameter Type Description
var variableReference Reference to the variable.
time number Time value in seconds.
Returns
Returns the index of the first timestamp in the specified variable that is greater than the specified
number.
Comments
None
Usage
NexScript
doc = GetActiveDocument()
neuron = GetVarByName(doc, "Neuron04a")
% get the index of the first spike after 5.7s
index = GetFirstGT(neuron, 5.7)
Python
import nex
doc = nex.GetActiveDocument()
neuron = nex.GetVarByName(doc, "Neuron04a")
# get the index of the first spike after 5.7s
index = nex.GetFirstGT(neuron, 5.7)
See Also
Introduction to NexScript and Python Programming
Function Categories
Page 513

6.5.12.22. GetBinCount
GetBinCount Function
Calculates the number of timestamps in the specified time range.
Syntax
number GetBinCount(var, timeMin, timeMax)
Parameters
Parameter Type Description
var variableReference Reference to a variable. Should be a reference to a
neuron, event, interval or continuous variable.
timeMin number Time range minimum (in seconds).
timeMax number Time range maximum (in seconds).
Returns
The number of timestamps of the specified variable in the specified time range.
Comments
None
Usage
NexScript
doc = GetActiveDocument()
neuron = GetVarByName(doc, "Neuron04a")
% calculate how many timestamps of Neuron04a are in the interval [5.3s, 10.2s]
count = GetBinCount(neuron, 5.3, 10.2)
Python
import nex
doc = nex.GetActiveDocument()
neuron = nex.GetVarByName(doc, "Neuron04a")
# calculate how many timestamps of Neuron04a are in the interval [5.3s, 10.2s]
count = nex.GetBinCount(neuron, 5.3, 10.2)
See Also
Introduction to NexScript and Python Programming
Function Categories
Page 514

6.5.12.23. BitwiseAnd
BitwiseAnd Function
Returns the result of the bitwise AND operation.
Syntax
number BitwiseAnd(value1, value2)
Parameters
Parameter Type Description
value1 number Numeric value.
value2 number Numeric value.
Returns
Result of the bitwise AND operation.
Comments
value1 and value2 are converted to integers and then bitwise AND operation is applied to these integers.
When using Python scripting, use Python bitwise operations (|, & , >>, <<). See
https://wiki.python.org/moin/BitwiseOperators for details.
Usage
NexScript
x = BitwiseAnd(7, 1)
% x now is equal to 1
Python
x = 7 & 1
# x now is equal to 1
See Also
Introduction to NexScript and Python Programming
Function Categories
Page 515

6.5.12.24. BitwiseOr
BitwiseOr Function
Returns the result of the bitwise OR operation.
Syntax
number BitwiseOr(value1, value2)
Parameters
Parameter Type Description
value1 number Numeric value.
value2 number Numeric value.
Returns
Result of the bitwise OR operation.
Comments
value1 and value2 are converted to integers and then the bitwise OR operation is applied to these
integers.
When using Python scripting, use Python bitwise operations (|, & , >>, <<). See
https://wiki.python.org/moin/BitwiseOperators for details.
Usage
NexScript
x = BitwiseOr(2, 1)
% x now is equal to 3
Python
x = 2 | 3
# x now is equal to 3
See Also
Introduction to NexScript and Python Programming
Function Categories
Page 516

6.5.12.25. GetBit
GetBit Function
Returns the value of the specified bit (1 to 32).
Syntax
number GetBit(x, bitNumber)
Parameters
Parameter Type Description
x number Numeric value.
bitNumber number 1-based bin number. 1 is the least significant bit, 32 is
the most significant bit.
Returns
Returns the value (0 or 1) of the specified bit.
Comments
The first parameter is converted to an unsigned 32-bit integer and then the bit value of this unsigned
integer is returned.
Usage
NexScript
% get the second bit of 3
b2 = GetBit(3, 2)
% b2 is now equal to 1
Python
import nex
# get the second bit of 3
b2 = nex.GetBit(3, 2)
# b2 is now equal to 1
See Also
Introduction to NexScript and Python Programming
Function Categories
Page 517
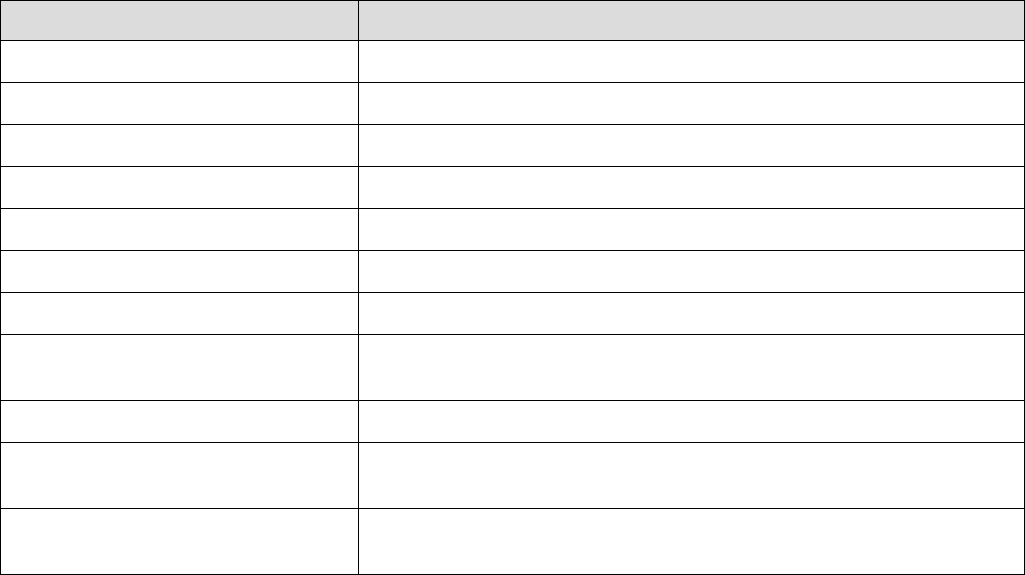
6.5.13. String Functions
The following string functions are available in NexScript and Python
Function Description
Left Extracts substring from the left part of the string, returns string.
Mid Extracts substring from the middle of the string.
Right Extracts substring from the right part of the string.
Find Looks for a substring inside the specified string.
StrLength Calculates the number of characters in the string, returns number.
NumToStr Converts a number to string using optional format, returns string.
StrToNum Converts string to number.
GetNumFields Returns the number of fields in the string. The field is a substring
that does not contain spaces, tabs or commas.
GetField Returns the field with the specified field index.
CharToNum Converts a one-character string to a number (a character's ASCII
code).
NumToChar Converts a number to a one-character string containing the
character with the ASCII code equal to the number.
See Also
Introduction to NexScript and Python Programming
Function Categories
Page 518

6.5.13.1. Left
Left Function
Returns a substring that starts at the beginning of the string.
Syntax
string Left(string, nchar)
Parameters
Parameter Type Description
string string String parameter.
nchar number Number of characters in the substring.
Returns
Returns a substring that starts at the beginning of the string.
Comments
In Python, use string slicing: http://pythoncentral.io/cutting-and-slicing-strings-in-python/
Usage
NexScript
sub = Left("abcdefg", 3)
% sub now is "abc"
Python
s = 'abcdefg'
sub = s[:3]
# sub now is "abc"
See Also
Introduction to NexScript and Python Programming
Function Categories
Page 519

6.5.13.2. Mid
Mid Function
Returns the specified substring.
Syntax
string Mid(string, nstartchar, nchar)
Parameters
Parameter Type Description
string string String parameter.
nstartchar number 1-based index of the start character.
nchar number Number of characters to select.
Returns
Returns the substring that starts at character nstartchar and contains nchar characters.
Comments
In Python, use string slicing: http://pythoncentral.io/cutting-and-slicing-strings-in-python/
Usage
NexScript
sub = Mid("abcdefg", 2, 3)
% sub now is "cde"
Python
s = 'abcdefg'
sub = s[2:2+3]
# sub now is "cde"
See Also
Introduction to NexScript and Python Programming
Function Categories
Page 520

6.5.13.3. Right
Right Function
Returns a substring that ends at the end of the string.
Syntax
string Right(string, nchar)
Parameters
Parameter Type Description
string string String parameter.
nchar number Number of characters in the substring.
Returns
Extracts right nchar characters from string, returns string.
Comments
In Python, use string slicing: http://pythoncentral.io/cutting-and-slicing-strings-in-python/
Usage
NexScript
sub = Right("abcdefg", 3)
% sub now is "efg"
Python
s = 'abcdefg'
sub = s[-3:]
# sub now is "efg"
See Also
Introduction to NexScript and Python Programming
Function Categories
Page 521

6.5.13.4. Find
Find Function
Looks for a substring inside a specified string.
Syntax
number Find(string1, string2)
Parameters
Parameter Type Description
string1 string The string where we look for a substring.
string2 string The substring that we are trying to find.
Returns
Looks for a string string2 inside the string string1, returns a number - 1-based position of the first
character of string2 in the string1. Returns zero is string2 is not found.
Comments
In Python, use find() method of a string object: http://www.tutorialspoint.com/python/string_find.htm.
Usage
NexScript
% this script selects only the neurons that have "05" in their name
doc = GetActiveDocument()
DeselectAll(doc)
for i=1 to GetVarCount(doc, "neuron")
name = GetVarName(doc, i, "neuron")
if Find(name, "05")> 0
SelectVar(doc, i, "neuron")
end
end
Python
import nex
# this script selects only the neurons that have "05" in their name
doc = nex.GetActiveDocument()
nex.DeselectAll(doc)
for i in range( 1, nex.GetVarCount(doc, "neuron") + 1):
name = nex.GetVarName(doc, i, "neuron")
if name.find("05") >= 0:
nex.SelectVar(doc, i, "neuron")
See Also
Introduction to NexScript and Python Programming
Function Categories
Page 522

6.5.13.5. StrLength
StrLength Function
Calculates the number of characters in the string.
Syntax
number StrLength(stringVal)
Parameters
Parameter Type Description
stringVal string The string parameter.
Returns
Returns the number of characters in the string.
Comments
None
Usage
NexScript
n = StrLength("abcd")
Python
import nex
n = nex.StrLength("abcd")
See Also
Introduction to NexScript and Python Programming
Function Categories
Page 523

6.5.13.6. NumToStr
NumToStr Function
Converts number to string using optional format string.
Syntax
string NumToStr(number, formatString)
Parameters
Parameter Type Description
number number Number to be converted to string.
formatString string Optional format string (a standard C/C++ format
specifier). See, for example,
http://www.cplusplus.com/reference/clibrary/cstdio/prin
tf/
Returns
Returns string representing the specified number.
Comments
None
Usage
NexScript
For example, to generate strings:
Event001, Event002, ..., Event016
use the following loop
for i=1 to 16
str = "Event0" + NumToStr(i, "%02.0f")
end
Python
import nex
for i in range( int(1), int(16) + 1):
str = "Event0" + nex.NumToStr(i, "%02.0f")
See Also
Introduction to NexScript and Python Programming
Function Categories
Page 524

6.5.13.7. StrToNum
StrToNum Function
Converts string to number.
Syntax
number StrToNum(stringRepresentingNumber)
Parameters
Parameter Type Description
stringRepresentingNumb
er
string A string containing a valid representation of the
number, for example, "1", "002", "123.456".
Returns
Returns the number corresponding to the specified string.
Comments
None
Usage
NexScript
x = StrToNum("003")
% x now is equal to 3
Python
import nex
x = nex.StrToNum("003")
# x now is equal to 3
See Also
Introduction to NexScript and Python Programming
Function Categories
Page 525

6.5.13.8. GetNumFields
GetNumFields Function
Returns the number of fields in the string. The field is a substring that does not contain spaces, tabs or
commas.
Syntax
GetNumFields(stringWithFields)
Parameters
Parameter Type Description
stringWithFields string The string containing fields. The field is a substring
that does not contain spaces, tabs or commas.
Returns
Returns the number of fields in the string. The field is a substring that does not contain spaces, tabs or
commas.
Comments
In Python, use split() method of string object: http://www.tutorialspoint.com/python/string_split.htm.
Usage
NexScript
numFields = GetNumFields("One two 3 4")
% numFields is now equal to 4
Python
import nex
numFields = nex.GetNumFields("One two 3 4")
# numFields is now equal to 4
See Also
Introduction to NexScript and Python Programming
Function Categories
Page 526

6.5.13.9. GetField
GetField Function
Returns the string field.
Syntax
string GetField(stringWithFields, fieldnumber)
Parameters
Parameter Type Description
stringWithFields string The string containing multiple data fields. The field is a
substring that does not contain spaces, tabs or
commas.
fieldnumber number The field number.
Returns
Returns the field with the specified number as a string. The field is a substring that does not contain
spaces, tabs or commas. For example,
GetField("One two 3 4", 3) returns "3".
Comments
In Python, use split() method of string object: http://www.tutorialspoint.com/python/string_split.htm.
Usage
NexScript
secondField = GetField("Neuro04a Neuron05b", 2)
% secondField now is equal to "Neuron05b"
Python
import nex
secondField = nex.GetField("Neuro04a Neuron05b", 2)
# secondField now is equal to "Neuron05b"
See Also
Introduction to NexScript and Python Programming
Function Categories
Page 527

6.5.13.10. CharToNum
CharToNum Function
Converts a one-character string to a number (a character's ASCII code).
Syntax
number CharToNum(oneCharString)
Parameters
Parameter Type Description
oneCharString string A string of length 1 (for example, "a", "5").
Returns
The string character's ASCII code.
Comments
In Python script, use python function ord().
Usage
NexScript
x = CharToNum("1")
% x now is equal to 49
Python
x = ord("1")
# x now is equal to 49
See Also
Introduction to NexScript and Python Programming
Function Categories
Page 528

6.5.13.11. NumToChar
NumToChar Function
Converts a number to a one-character string containing a character with the ASCII code equal to the
number.
Syntax
string NumToChar(number)
Parameters
Parameter Type Description
number number ASCII code of the character.
Returns
Returns a one-character string containing the character with the ASCII code equal to the specified
number.
Comments
None
Usage
NexScript
oneAsString = NumToChar(49)
% oneAsString now is equal to "1"
Python
import nex
oneAsString = nex.NumToChar(49)
# oneAsString now is equal to "1"
See Also
Introduction to NexScript and Python Programming
Function Categories
Page 529


6.5.14.1. Trace
Trace Function
Prints arguments to the output window.
Syntax
Trace(arg1, arg2, ...)
Parameters
Parameter Type Description
arg1 any type String, number or any other valid NexScript value.
arg2 any type String, number or any other valid NexScript value.
Returns
None
Comments
Converts each parameter to string and the prints the result to the output window. In Python, use print
function instead.
Usage
NexScript
x = 30
% print the value of x
Trace("x=", x)
Python
x = 30
# print the value of x
print("x={}".format(x))
See Also
Introduction to NexScript and Python Programming
Function Categories
Page 531
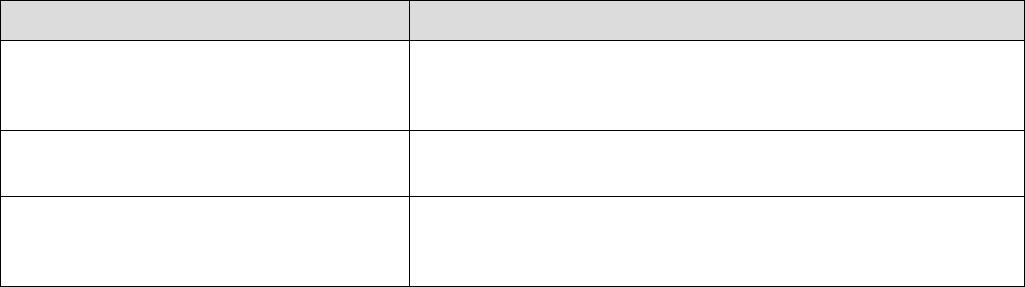
7. COM/ActiveX Interfaces
NeuroExplorer exposes COM (Component Object Model, or ActiveX) interfaces that allow other
applications to launch and control NeuroExplorer.
For example, the following Matlab code starts NeuroExplorer, opens a data file and loads Neuron04a
timestamps into the Matlab workspace:
nex = actxserver('NeuroExplorer.Application');
doc = nex.OpenDocument('C:\Data\MyDataFile.nex');
neuron = doc.Variable('Neuron04a');
timestamps = neuron.Timestamps();
The table below lists the objects that NeuroExplorer exposes via COM methods and properties.
Interface Description
Application NeuroExplorer application interface. Provides methods and
properties for the main application (for example, open
document).
Document Document interface. Provides methods and properties of the
document (for example, lists variables in the document).
Variable Variable interface. Provides methods and properties of a
variable inside a document (for example, gets variable
timestamps).
Page 533
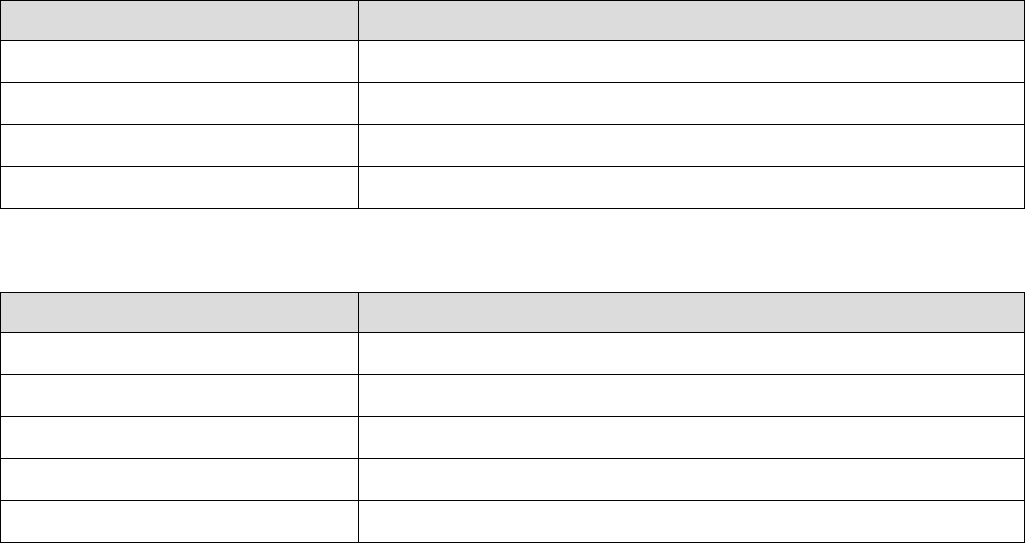
7.1. Application
Application Interface
External applications can open an instance of NeuroExplorer using its Program ID
"NeuroExplorer.Application".
For example, to open NeuroExplorer (or to connect to a running instance of NeuroExplorer) in Matlab ,
you can use the following command:
nex = actxserver('NeuroExplorer.Application');
The object returned by the actxserver command is an Application object. The properties and methods of
this object are listed below.
Properties
Property Description
ActiveDocument Read-only access to the active document
DocumentCount The number of open documents
Version NeuroExplorer version
Visible Controls visibility of the application
Methods
Method Description
OpenDocument Opens a specified document (data file)
Document Returns one of the open documents
Sleep Pauses the program
RunNexScript Runs NexScript saved in a file
RunNexScriptCommands Runs the specified NexScript text
See Also
COM/ActiveX Interfaces
Page 534
7.1.1. ActiveDocument Property
Application.ActiveDocument Property
Read-only property that returns a Document object that represents the active document (the document
corresponding to the active window of the application). Returns null if there are no open documents.
Syntax
Document ActiveDocument
Usage
Matlab
nex = actxserver('NeuroExplorer.Application');
doc = nex.ActiveDocument;
See Also
Application Interface
Document Interface
COM/ActiveX Interfaces
Page 535
7.1.2. DocumentCount Property
Application.DocumentCount Property
Read-only property that returns the number of open documents (data files).
Syntax
int DocumentCount
Usage
Matlab
nex = actxserver('NeuroExplorer.Application');
numDocs = nex.DocumentCount;
See Also
Application Interface
COM/ActiveX Interfaces
Page 536
7.1.3. Version Property
Application.Version Property
Read-only property that returns a string with the current version of NeuroExplorer.
Syntax
string Version
Usage
Matlab
nex = actxserver('NeuroExplorer.Application');
version = nex.Version;
See Also
Application Interface
COM/ActiveX Interfaces
Page 537
7.1.4. Visible Property
Application.Visible Property
Boolean read/write property that controls the visibility of NeuroExplorer.
Syntax
Boolean Visible
Usage
Matlab
nex = actxserver('NeuroExplorer.Application');
isVisible = nex.Visible;
% make sure that NeuroExplorer is visible
nex.Visible = true;
See Also
Application Interface
COM/ActiveX Interfaces
Page 538

7.1.5. OpenDocument Method
Application.OpenDocument Method
Opens the specified data file. Returns Document object if succeeded.
Syntax
Document OpenDocument ( string documentPath )
Parameters
Parameter Type Description
documentPath string Full data file path
Returns
Returns Document object.
Usage
Matlab
nex = actxserver('NeuroExplorer.Application');
doc = nex.OpenDocument('C:\Data\MyDataFile.nex');
See Also
Application Interface
Document Interface
COM/ActiveX Interfaces
Page 539

7.1.6. Document Medhod
Application.Document Method
Returns Document object for the specified document index.
Syntax
Document Document(int documentIndex)
Parameters
Parameter Type Description
documentIndex int 1-based document index
Returns
Returns Document object.
Usage
Matlab
nex = actxserver('NeuroExplorer.Application');
% get the first open document
doc = nex.Document(1);
See Also
Application Interface
Document Interface
COM/ActiveX Interfaces
Page 540

7.1.7. Sleep Method
Application.Sleep Method
Pauses the application.
Syntax
void Sleep ( int millisecondsToSleep )
Parameters
Parameter Type Description
millisecondsToSleep int Number of milliseconds to sleep
Returns
None.
Usage
Matlab
nex = actxserver('NeuroExplorer.Application');
% pause NeuroExplorer for 1 second
nex.Sleep(1000);
See Also
Application Interface
COM/ActiveX Interfaces
Page 541

7.1.8. RunNexScript Method
Application.RunNexScript Method
Runs the specified NexScript. Returns true if succeeded.
Syntax
bool RunNexScript ( string scriptPath )
Parameters
Parameter Type Description
scriptPath string Script path.
Returns
Returns true if script succeeded, otherwise, returns false.
Usage
Matlab
nex = actxserver('NeuroExplorer.Application');
res = nex.RunNexScript('C:\Data\Scripts\TestScript.nsc');
See Also
Application Interface
Document Interface
COM/ActiveX Interfaces
Page 542

7.1.9. RunNexScriptCommands Method
Application.RunNexScriptCommands Method
Runs the specified NexScript text. Returns true if succeeded.
Syntax
bool RunNexScriptCommands ( string script )
Parameters
Parameter Type Description
script string Script text. Script lines should be separated by \n.
Returns
Returns true if script succeeded, otherwise, returns false.
Usage
Matlab
nex = actxserver('NeuroExplorer.Application');
res = nex.RunNexScriptCommands('doc=GetActiveDocument()\ndoc.NewEvent =
Sync(doc["Neuron04a"], doc["Neuron05b"], -0.01, 0.01)')
res =
nex.RunNexScriptCommands('doc=GetActiveDocument()\nApplyTemplate(doc,"AutoCorrelogram
s")');
See Also
Application Interface
Document Interface
COM/ActiveX Interfaces
Page 543
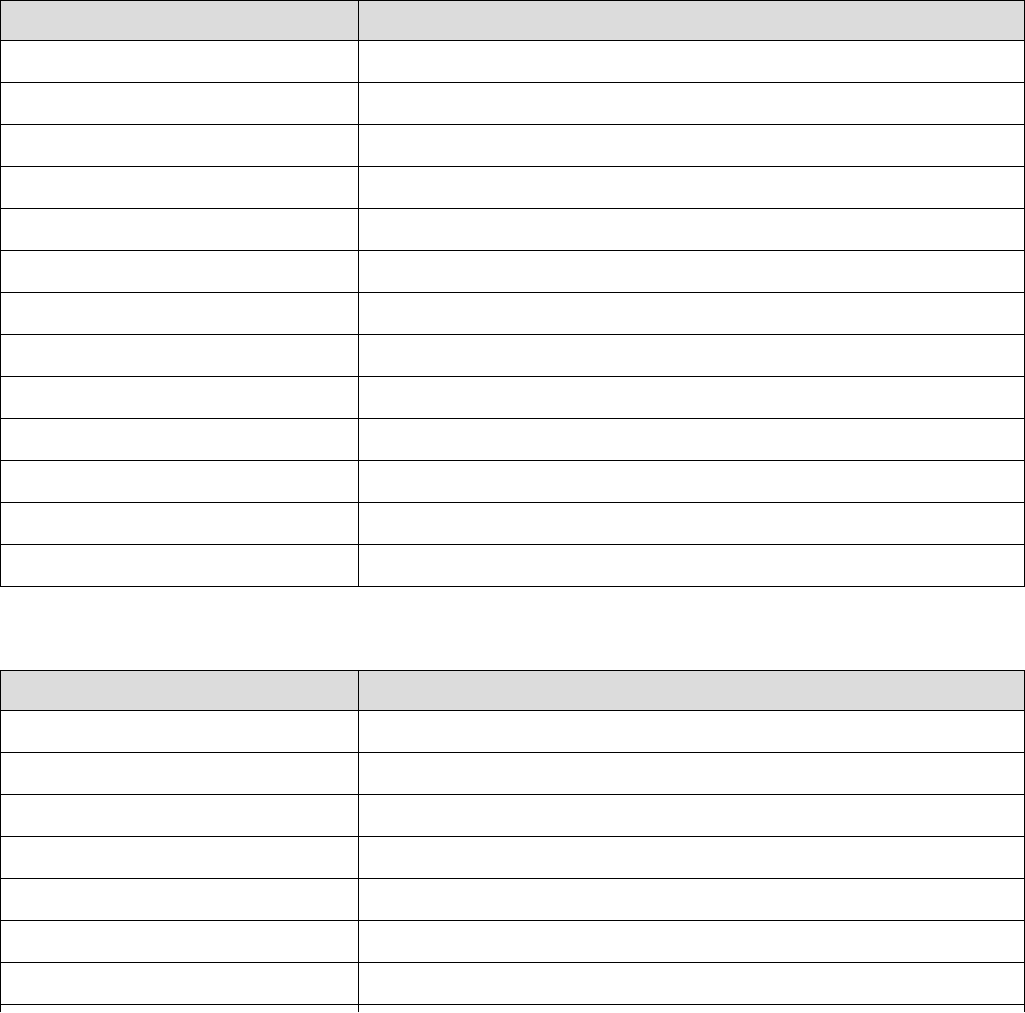
7.2. Document
Document Interface
NeuroExplorer Application object provides access to the open documents. For example, to open a
document in NeuroExplorer in Matlab script, you can use:
nex = actxserver('NeuroExplorer.Application');
doc = nex.OpenDocument('C:\Data\MyDataFile.nex');
Here OpenDocument method returns a Document object corresponding to the specified data file.
The properties and methods of the Document object are listed below.
Properties
Property Description
Path Document file path
FileName Document file name
Comment Document comment
TimestampFrequency Document timestamp frequency
StartTime Document data start time
EndTime Document data end time
VariableCount The number of variables in the document
NeuronCount The number of neuron variables in the document
EventCount The number of event variables in the document
IntervalCount The number of interval variables in the document
MarkerCount The number of marker variables in the document
WaveCount The number of waveform variables in the document
ContinuousCount The number of continuous variables in the document
Methods
Method Description
Variable Returns the specified variable
Neuron Returns the specified neuron variable
Event Returns the specified event variable
Marker Returns the specified marker variable
Interval Returns the specified interval variable
Wave Returns the specified waveform variable
Continuous Returns the specified continuous variable
Page 544
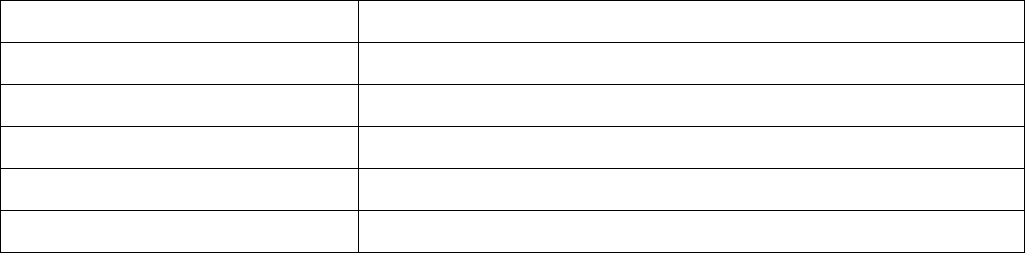
DeselectAll Deselects all the data variables in the document
SelectAllNeurons Selects all the neuron variables in the document
SelectAllContinuous Selects all the continuous variables in the document
ApplyTemplate Runs the analysis specified in the analysis template
GetNumericalResults Returns numerical results for the first graph view of the document
Close Closes the document
See Also
COM/ActiveX Interfaces
Page 545
7.2.1. Path Property
Document.Path Property
Read-only property that returns a string with the full path of the document.
Syntax
string Path
Usage
Matlab
nex = actxserver('NeuroExplorer.Application');
doc = nex.OpenDocument('C:\Data\MyDataFile.nex');
path = doc.Path;
See Also
Document Interface
COM/ActiveX Interfaces
Page 546
7.2.2. FileName Property
Document.FileName Property
Read-only property that returns a string with the file name.
Syntax
string FileName
Usage
Matlab
nex = actxserver('NeuroExplorer.Application');
doc = nex.OpenDocument('C:\Data\MyDataFile.nex');
path = doc.Path;
fileName = doc.FileName;
% path is 'C:\Data\MyDataFile.nex'
% fileName is 'MyDataFile.nex'
See Also
Document Interface
COM/ActiveX Interfaces
Page 547
7.2.3. Comment Property
Document.Comment Property
Read-only property that returns a string with the data file comment.
Syntax
string Comment
Usage
Matlab
nex = actxserver('NeuroExplorer.Application');
doc = nex.OpenDocument('C:\Data\MyDataFile.nex');
comment = doc.Comment;
See Also
Document Interface
COM/ActiveX Interfaces
Page 548
7.2.4. TimestampFrequency Property
Document.TimestampFrequency Property
Read-only property that returns the timestamp frequency of the document in Hertz.
Syntax
double TimestampFrequency
Usage
Matlab
nex = actxserver('NeuroExplorer.Application');
doc = nex.OpenDocument('C:\Data\MyDataFile.nex');
tsFrequency = doc.TimestampFrequency;
See Also
Document Interface
COM/ActiveX Interfaces
Page 549
7.2.5. StartTime Property
Document.StartTime Property
Read-write property that specifies the document data start time (minimum timestamp) in seconds.
Syntax
double StartTime
Usage
Matlab
nex = actxserver('NeuroExplorer.Application');
doc = nex.OpenDocument('C:\Data\MyDataFile.nex');
startTime = doc.StartTime;
See Also
Document Interface
COM/ActiveX Interfaces
Page 550
7.2.6. EndTime Property
Document.EndTime Property
Read-write property that specifies the document data end time (maximum timestamp) in seconds.
Syntax
double EndTime
Usage
Matlab
nex = actxserver('NeuroExplorer.Application');
doc = nex.OpenDocument('C:\Data\MyDataFile.nex');
endTime = doc.EndTime;
See Also
Document Interface
COM/ActiveX Interfaces
Page 551
7.2.7. VariableCount Property
Document.VariableCount Property
Read-only property that returns the number of variables in the document.
Syntax
int VariableCount
Usage
Matlab
nex = actxserver('NeuroExplorer.Application');
doc = nex.OpenDocument('C:\Data\MyDataFile.nex');
numVars = doc.VariableCount;
See Also
Document Interface
COM/ActiveX Interfaces
Page 552
7.2.8. NeuronCount Property
Document.NeuronCount Property
Read-only property that returns the number of neurons in the document.
Syntax
int NeuronCount
Usage
Matlab
nex = actxserver('NeuroExplorer.Application');
doc = nex.OpenDocument('C:\Data\MyDataFile.nex');
numNeurons = doc.NeuronCount;
See Also
Document Interface
COM/ActiveX Interfaces
Page 553
7.2.9. EventCount Property
Document.EventCount Property
Read-only property that returns the number of event variables in the document.
Syntax
int EventCount
Usage
Matlab
nex = actxserver('NeuroExplorer.Application');
doc = nex.OpenDocument('C:\Data\MyDataFile.nex');
numEventVars = doc.EventCount;
See Also
Document Interface
COM/ActiveX Interfaces
Page 554
7.2.10. IntervalCount Property
Document.IntervalCount Property
Read-only property that returns the number of interval variables in the document.
Syntax
int IntervalCount
Usage
Matlab
nex = actxserver('NeuroExplorer.Application');
doc = nex.OpenDocument('C:\Data\MyDataFile.nex');
numIntervalVars = doc.IntervalCount;
See Also
Document Interface
COM/ActiveX Interfaces
Page 555
7.2.11. MarkerCount Property
Document.MarkerCount Property
Read-only property that returns the number of marker variables in the document.
Syntax
int MarkerCount
Usage
Matlab
nex = actxserver('NeuroExplorer.Application');
doc = nex.OpenDocument('C:\Data\MyDataFile.nex');
numMarkerVars = doc.MarkerCount;
See Also
Document Interface
COM/ActiveX Interfaces
Page 556
7.2.12. WaveCount Property
Document.WaveCount Property
Read-only property that returns the number of waveform variables in the document.
Syntax
int WaveCount
Usage
Matlab
nex = actxserver('NeuroExplorer.Application');
doc = nex.OpenDocument('C:\Data\MyDataFile.nex');
numWaveVars = doc.WaveCount;
See Also
Document Interface
COM/ActiveX Interfaces
Page 557
7.2.13. ContinuousCount Property
Document.ContinuousCount Property
Read-only property that returns the number of continuous variables in the document.
Syntax
int ContinuousCount
Usage
Matlab
nex = actxserver('NeuroExplorer.Application');
doc = nex.OpenDocument('C:\Data\MyDataFile.nex');
numContinuousVars = doc.ContinuousCount;
See Also
Document Interface
COM/ActiveX Interfaces
Page 558

7.2.14. Variable Method
Document.Variable Method
Returns Variable object for the specified variable index or name.
Syntax
Variable Variable(object variableIndexOrName)
Parameters
Parameter Type Description
variableIndexOrName int or string 1-based variable index or a string with the variable
name
Returns
Returns Variable object.
Usage
Matlab
nex = actxserver('NeuroExplorer.Application');
doc = nex.OpenDocument('C:\Data\MyDataFile.nex');
% get the first variable
var1 = doc.Variable(1);
% get the variable with the name Neuron04a
neuron = doc.Variable('Neuron04a');
See Also
Variable Interface
Application Interface
Document Interface
COM/ActiveX Interfaces
Page 559

7.2.15. Neuron Method
Document.Neuron Method
Returns Variable object for the specified neuron variable index.
Syntax
Variable Neuron(int neuronIndex)
Parameters
Parameter Type Description
neuronIndex int 1-based neuron variable index
Returns
Returns Variable object.
Usage
Matlab
nex = actxserver('NeuroExplorer.Application');
doc = nex.OpenDocument('C:\Data\MyDataFile.nex');
% get the first neuron variable
neuron1 = doc.Neuron(1);
% get the last neuron variable
neuronLast = doc.Neuron(doc.NeuronCount);
See Also
Variable Interface
Application Interface
Document Interface
COM/ActiveX Interfaces
Page 560

7.2.16. Event Method
Document.Event Method
Returns Variable object for the specified event variable index.
Syntax
Variable Event(int eventIndex)
Parameters
Parameter Type Description
eventIndex int 1-based event variable index
Returns
Returns Variable object.
Usage
Matlab
nex = actxserver('NeuroExplorer.Application');
doc = nex.OpenDocument('C:\Data\MyDataFile.nex');
% get the first event variable
Event1 = doc.Event(1);
% get the last event variable
EventLast = doc.Event(doc.EventCount);
See Also
Variable Interface
Application Interface
Document Interface
COM/ActiveX Interfaces
Page 561

7.2.17. Interval Method
Document.Interval Method
Returns Variable object for the specified interval variable index.
Syntax
Variable Interval(int IntervalIndex)
Parameters
Parameter Type Description
IntervalIndex int 1-based interval variable index
Returns
Returns Variable object.
Usage
Matlab
nex = actxserver('NeuroExplorer.Application');
doc = nex.OpenDocument('C:\Data\MyDataFile.nex');
% get the first interval variable
Interval1 = doc.Interval(1);
% get the last interval variable
IntervalLast = doc.Interval(doc.IntervalCount);
See Also
Variable Interface
Application Interface
Document Interface
COM/ActiveX Interfaces
Page 562

7.2.18. Marker Method
Document.Marker Method
Returns Variable object for the specified marker variable index.
Syntax
Variable Marker(int markerIndex)
Parameters
Parameter Type Description
markerIndex int 1-based marker variable index
Returns
Returns Variable object.
Usage
Matlab
nex = actxserver('NeuroExplorer.Application');
doc = nex.OpenDocument('C:\Data\MyDataFile.nex');
% get the first marker variable
Marker1 = doc.Marker(1);
% get the last marker variable
MarkerLast = doc.Marker(doc.MarkerCount);
See Also
Variable Interface
Application Interface
Document Interface
COM/ActiveX Interfaces
Page 563

7.2.19. Wave Method
Document.Wave Method
Returns Variable object for the specified waveform variable index.
Syntax
Variable Wave(int waveIndex)
Parameters
Parameter Type Description
waveIndex int 1-based waveform variable index
Returns
Returns Variable object.
Usage
Matlab
nex = actxserver('NeuroExplorer.Application');
doc = nex.OpenDocument('C:\Data\MyDataFile.nex');
% get the first waveform variable
Wave1 = doc.Wave(1);
% get the last waveform variable
WaveLast = doc.Wave(doc.WaveCount);
See Also
Variable Interface
Application Interface
Document Interface
COM/ActiveX Interfaces
Page 564

7.2.20. Continuous Method
Document.Continuous Method
Returns Variable object for the specified continuous variable index.
Syntax
Variable Continuous(int continuousIndex)
Parameters
Parameter Type Description
continuousIndex int 1-based continuous variable index
Returns
Returns Variable object.
Usage
Matlab
nex = actxserver('NeuroExplorer.Application');
doc = nex.OpenDocument('C:\Data\MyDataFile.nex');
% get the first continuous variable
Continuous1 = doc.Continuous(1);
% get the last continuous variable
ContinuousLast = doc.Continuous(doc.ContinuousCount);
See Also
Variable Interface
Application Interface
Document Interface
COM/ActiveX Interfaces
Page 565
7.2.21. DeselectAll Method
Document.DeselectAll Method
Deselects all the data variables in the document.
Syntax
void DeselectAll()
Returns
None.
Usage
Matlab
nex = actxserver('NeuroExplorer.Application');
doc = nex.OpenDocument('C:\Data\MyDataFile.nex');
% deselect all variables
doc.DeselectAll();
% select one variable
doc.Variable('Neuron01').Select();
% run Interspike Interval Histogram analysis saved in 'ISI' template
doc.ApplyTemplate('ISI');
% get numerical results
results = doc.GetNumericalResults();
See Also
Variable Interface
Application Interface
Document Interface
COM/ActiveX Interfaces
Page 566
7.2.22. SelectAllNeurons Method
Document.SelectAllNeurons Method
Selects all the neuron variables in the document. Selected variables are used in analysis when
ApplyTemplate document method is called.
Syntax
void SelectAllNeurons()
Returns
None.
Usage
Matlab
nex = actxserver('NeuroExplorer.Application');
doc = nex.OpenDocument('C:\Data\MyDataFile.nex');
% deselect all variables
doc.DeselectAll();
% select all neurons
doc.SelectAllNeurons();
% run Interspike Interval Histogram analysis saved in 'ISI' template
doc.ApplyTemplate('ISI');
% get numerical results
results = doc.GetNumericalResults();
% close NeuroExplorer
nex.delete;
See Also
Variable Interface
Application Interface
Document Interface
COM/ActiveX Interfaces
Page 567
7.2.23. SelectAllContinuous Method
Document.SelectAllContinuous Method
Selects all the continuous variables in the document.
Syntax
void SelectAllContinuous()
Returns
None.
Usage
Matlab
nex = actxserver('NeuroExplorer.Application');
doc = nex.OpenDocument('C:\Data\MyDataFile.nex');
% deselect all variables
doc.DeselectAll();
% select all continuous variables
doc.SelectAllContinuous();
% run Perievent Histogram analysis saved in 'PSTH' template
doc.ApplyTemplate('PSTH');
% get numerical results
results = doc.GetNumericalResults();
See Also
Variable Interface
Application Interface
Document Interface
COM/ActiveX Interfaces
Page 568

7.2.24. ApplyTemplate Method
Document.ApplyTemplate Method
Runs the analysis specified in the analysis template.
Syntax
void ApplyTemplate(string templateName)
Parameters
Parameter Type Description
templateName string template name
Returns
None.
Usage
Matlab
nex = actxserver('NeuroExplorer.Application');
doc = nex.OpenDocument('C:\Data\MyDataFile.nex');
% deselect all variables
doc.DeselectAll();
% select all neurons
doc.SelectAllNeurons();
% run Interspike Interval Histogram analysis saved in 'ISI' template
doc.ApplyTemplate('ISI');
% get numerical results
results = doc.GetNumericalResults();
% close NeuroExplorer
nex.delete;
See Also
Variable Interface
Application Interface
Document Interface
COM/ActiveX Interfaces
Page 569
7.2.25. GetNumericalResults Method
Document.GetNumericalResults Method
Returns 2-dimensional array of numerical results for the first graph view of the document.
Syntax
Array GetNumericalResults()
Returns
Returns 2-dimensional array of numerical results.
Usage
Matlab
nex = actxserver('NeuroExplorer.Application');
doc = nex.OpenDocument('C:\Data\MyDataFile.nex');
% apply AutoCorrelograms analysis template
nex.RunNexScriptCommands('doc=GetActiveDocument()\nApplyTemplate(doc,"AutoCorrelogram
s")');
% get numerical results
results = doc.GetNumericalResults();
See Also
Variable Interface
Application Interface
Document Interface
COM/ActiveX Interfaces
Page 570
7.2.26. Close Method
Document.Close Method
Closes the document.
Syntax
void Close()
Parameters
None.
Returns
None.
Usage
Matlab
nex = actxserver('NeuroExplorer.Application');
doc = nex.OpenDocument('C:\Data\MyDataFile.nex');
% close the document
doc.Close();
See Also
Variable Interface
Application Interface
Document Interface
COM/ActiveX Interfaces
Page 571
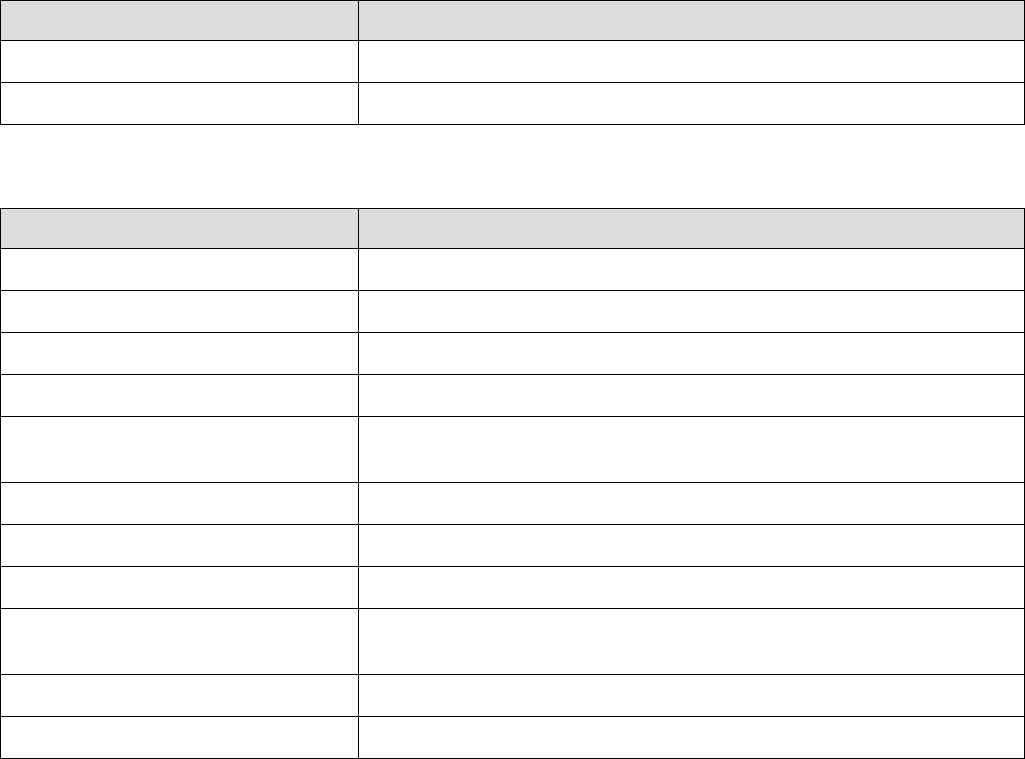
7.3. Variable
Variable Interface
NeuroExplorer Application object provides access to the open files and variables contained in the files.
For example, to open a document in NeuroExplorer and get the first event variable in the document in
Matlab, you can use:
nex = actxserver('NeuroExplorer.Application');
doc = nex.OpenDocument('C:\Data\MyDataFile.nex');
event1 = doc.Event(1);
Here Event() method returns a Variable object corresponding to the first event variable in the file.
The properties and methods of the Variable object are listed below.
Properties
Property Description
Name Variable name
TimestampCount Number of timestamps in the variable
Methods
Method Description
Timestamps Returns all the variable timestamps in an array
IntervalStarts For interval variables, returns all the interval start values
IntervalEnds For interval variables, returns all the interval end values
FragmentTimestamps For continuous variables, returns fragment timestamps
FragmentCounts For continuous variables, returns the number of data points in each
fragment
ContinuousValues For continuous variables, returns A/D values in milliVolts
MarkerValues For marker variables, returns marker string values
WaveformValues For waveform variables, returns waveform values
SamplingRate For continuous and waveform variables, returns sampling rate in
Hz
Select Selects the variable for analysis
Deselect Deselects the variable
See Also
Document Interface
COM/ActiveX Interfaces
Page 572
7.3.1. Name Property
Variable.Name Property
Read-only property that returns a string with the variable name.
Syntax
string Name
Usage
Matlab
nex = actxserver('NeuroExplorer.Application');
doc = nex.OpenDocument('C:\Data\MyDataFile.nex');
% get the first neuron variable
neuron1 = doc.Neuron(1);
neuron1Name = neuron1.Name;
See Also
Variable Interface
Document Interface
COM/ActiveX Interfaces
Page 573
7.3.2. TimestampCount Property
Variable.TimestampCount Property
Read-only property that returns the number of timestamps in the variable. For interval variables, returns
the number of intervals. For waveforms variable, returns the number of waveforms. For continuous
variables, returns the total number of data points.
Syntax
int TimestampCount
Usage
Matlab
nex = actxserver('NeuroExplorer.Application');
doc = nex.OpenDocument('C:\Data\MyDataFile.nex');
% get the first neuron variable
neuron1 = doc.Neuron(1);
numTimestamps = neuron1.TimestampCount;
See Also
Variable Interface
Document Interface
COM/ActiveX Interfaces
Page 574
7.3.3. Timestamps Method
Variable.Timestamps Method
Returns all the timestamps of the variable in seconds. Timestamps are returned as an array (vector) of
double values. For interval variables, returns the interval starts. For waveforms variable, returns the
waveform timestamps. For continuous variables, returns the timestamps corresponding to all the variable
data points.
Syntax
SAFEARRAY(double) Timestamps()
Parameters
None.
Usage
Matlab
nex = actxserver('NeuroExplorer.Application');
doc = nex.OpenDocument('C:\Data\MyDataFile.nex');
% get the first neuron variable
neuron1 = doc.Neuron(1);
% get all the timestamps
ts = neuron1.Timestamps();
% now ts is a vector of timestamps
%
% get the first continuous variable
cont1 = doc.Continuous(1);
% get all the timestamps for continuous variable
cont1_ts = cont1.Timestamps();
See Also
Variable Interface
Document Interface
COM/ActiveX Interfaces
Page 575
7.3.4. IntervalStarts Method
Variable.IntervalStarts Method
For an interval variable, returns the interval start values in seconds. This method is valid only for interval
variables.
Syntax
SAFEARRAY(double) IntervalStarts()
Parameters
None.
Usage
Matlab
nex = actxserver('NeuroExplorer.Application');
doc = nex.OpenDocument('C:\Data\MyDataFile.nex');
% get the first interval variable
int1= doc.Interval(1);
% get all the interval starts
int1Starts = int1.IntervalStarts();
See Also
Variable Interface
Document Interface
COM/ActiveX Interfaces
Page 576
7.3.5. IntervalEnds Method
Variable.IntervalEnds Method
For an interval variable, returns the interval end values in seconds. This method is valid only for interval
variables.
Syntax
SAFEARRAY(double) IntervalEnds()
Parameters
None.
Usage
Matlab
nex = actxserver('NeuroExplorer.Application');
doc = nex.OpenDocument('C:\Data\MyDataFile.nex');
% get the first interval variable
int1= doc.Interval(1);
% get all the interval ends
int1Ends = int1.IntervalEnds();
See Also
Variable Interface
Document Interface
COM/ActiveX Interfaces
Page 577
7.3.6. FragmentTimestamps Method
Variable.FragmentTimestamps Method
For continuous variable, returns the fragment timestamp values in seconds. This method is valid only for
continuous variables.
In general, a continuous variable may contain several fragments of data. Each fragment may be of a
different length. NeuroExplorer does not store the timestamps for all the A/D values since they would use
too much space. Instead, for each fragment, it stores the timestamp of the first A/D value in the fragment
and the index of the first data point in the fragment. The timestamps of the first A/D value in each
fragment are returned by this method.
Syntax
SAFEARRAY(double) FragmentTimestamps()
Parameters
None.
Usage
Matlab
nex = actxserver('NeuroExplorer.Application');
doc = nex.OpenDocument('C:\Data\MyDataFile.nex');
% get the first continuous variable
cont1= doc.Continuous(1);
% get all the fragment timestamps
cont1FragmentTs = cont1.FragmentTimestamps();
See Also
Variable Interface
Document Interface
COM/ActiveX Interfaces
Page 578
7.3.7. FragmentCounts Method
Variable.FragmentCounts Method
For continuous variable, returns the number of data points in fragments. This method is valid only for
continuous variables.
In general, a continuous variable may contain several fragments of data. Each fragment may be of a
different length. NeuroExplorer does not store the timestamps for all the A/D values since they would use
too much space. Instead, for each fragment, it stores the timestamp of the first A/D value in the fragment
and the index of the first data point in the fragment. The number of data points in each fragment are
returned by this method.
Syntax
SAFEARRAY(double) FragmentCounts()
Parameters
None.
Usage
Matlab
nex = actxserver('NeuroExplorer.Application');
doc = nex.OpenDocument('C:\Data\MyDataFile.nex');
% get the first continuous variable
cont1= doc.Continuous(1);
% get all the fragment counts
cont1FragmentCounts = cont1.FragmentCounts();
See Also
Variable Interface
Document Interface
COM/ActiveX Interfaces
Page 579
7.3.8. ContinuousValues Method
Variable.ContinuousValues Method
For continuous variable, returns all the A/D values in milliVolts. This method is valid only for continuous
variables.
Syntax
SAFEARRAY(double) ContinuousValues()
Parameters
None.
Usage
Matlab
nex = actxserver('NeuroExplorer.Application');
doc = nex.OpenDocument('C:\Data\MyDataFile.nex');
% get the first continuous variable
cont1= doc.Continuous(1);
% get all the values
cont1Values = cont1.ContinuousValues();
See Also
Variable Interface
Document Interface
COM/ActiveX Interfaces
Page 580
7.3.9. MarkerValues Method
Variable.MarkerValues Method
For a marker variable, returns all the marker values as strings. The values are returned in a two-
dimensional array. Each row of the array represents all the marker strings for one timestamp.
This method is valid only for marker variables.
Syntax
SAFEARRAY(string) MarkerValues()
Parameters
None.
Usage
Matlab
nex = actxserver('NeuroExplorer.Application');
doc = nex.OpenDocument('C:\Data\MyDataFile.nex');
% get the first markervariable
marker1 = doc.Marker(1);
% get all the marker values
marker1Values = marker1.MarkerValues();
See Also
Variable Interface
Document Interface
COM/ActiveX Interfaces
Page 581
7.3.10. WaveformValues Method
Variable.WaveformValues Method
For waveform variable, returns all the waveform values in milliVolts. The values are returned in a two-
dimensional array. Each row of the array represents one waveform.
This method is valid only for waveform variables.
Syntax
SAFEARRAY(double) WaveformValues()
Parameters
None.
Usage
Matlab
nex = actxserver('NeuroExplorer.Application');
doc = nex.OpenDocument('C:\Data\MyDataFile.nex');
% get the first waveform variable
wave1= doc.Wave(1);
% get all the values
wave1Values = wave1.WaveformValues();
See Also
Variable Interface
Document Interface
COM/ActiveX Interfaces
Page 582
7.3.11. SamplingRate Property
Variable.SamplingRate Property
Read-only property that returns the sampling rate (in Hz) of a continuous or waveform variable. For other
variable types, returns zero.
Syntax
double SamplingRate
Usage
Matlab
nex = actxserver('NeuroExplorer.Application');
doc = nex.OpenDocument('C:\Data\MyDataFile.nex');
% get the first continuous variable
cont1= doc.Continuous(1);
% get sampling rate
samplingRate = cont1.SamplingRate;
See Also
Variable Interface
Document Interface
COM/ActiveX Interfaces
Page 583
7.3.12. Select Method
Variable.Select Method
Selects the variable. Selected variables are used in analysis when ApplyTemplate document method is
called.
Syntax
void Select()
Parameters
None.
Usage
Matlab
nex = actxserver('NeuroExplorer.Application');
doc = nex.OpenDocument('C:\Data\MyDataFile.nex');
% deselect all variables
doc.DeselectAll();
% select variable with the name 'Neuron01'
doc.Variable('Neuron01').Select();
% run Interspike Interval Histogram analysis saved in 'ISI' template
doc.ApplyTemplate('ISI');
% get numerical results
results = doc.GetNumericalResults();
% close NeuroExplorer
nex.delete;
See Also
Variable Interface
Document Interface
COM/ActiveX Interfaces
Page 584
7.3.13. Deselect Method
Variable.Deselect Method
Deselects the variable. Only selected variables are used in analysis when ApplyTemplate document
method is called.
Syntax
void Deselect()
Parameters
None.
Usage
Matlab
nex = actxserver('NeuroExplorer.Application');
doc = nex.OpenDocument('C:\Data\MyDataFile.nex');
% deselect all variables
doc.DeselectAll();
% select all neurons
doc.SelectAllNeurons();
% deselect variable with the name 'Neuron01'
doc.Variable('Neuron01').Deselect();
% run Interspike Interval Histogram analysis saved in 'ISI' template
doc.ApplyTemplate('ISI');
% get numerical results
results = doc.GetNumericalResults();
% close NeuroExplorer
nex.delete;
See Also
Variable Interface
Document Interface
COM/ActiveX Interfaces
Page 585
Index
1
1D Data Viewer 33
3
3D Graphics 215, 217
A
Activity Animation 220
Adjusting Analysis Properties 39
Alpha Omega Engineering 26
Analysis Templates 41
Analyzing Data 34
Application 534
Autocorrelograms 97, 163
Autocorrelograms Versus Time 163
B
Burst Analysis 131
C
CED Spike-2 26
Coherence Analysis 152
COM/ActiveX Interfaces 533
Confidence Limits 89
Continuously Recorded Data 83
Correlations with Continuous
Variable 139
Crosscorrelograms 105, 111
Cumulative Activity Graphs 119
Cumulative Sum Graphs 91
D
Data Acquisition Systems 26
Data Selection 84
Data Types 72
Document 244, 245, 246, 247, 248,
249, 262, 309, 535, 536, 539, 540,
544
E
Epoch Counts 150
Events 75, 370
Excel 50, 88, 418, 424, 481, 482,
483
Expressions 229
F
File Variables 225
Flow Control 230
Functions 232, 233, 262, 309, 359,
373, 404, 431, 474, 481, 484, 487,
491, 518, 530
G
Graphics 44, 205, 206, 207, 209,
215, 217, 378, 389, 390, 485
Graphics Modes 207
H
How to Select Variables 36, 38
I
Importing Data 25, 28, 30, 31
Importing Files 26
Instant Frequency 120
Intan Technologies 26
Interspike Interval Histograms 94
Interspike Intervals vs. Time 121
J
Joint ISI Distribution 161
Joint PSTH 117
L
Lines 213
M
Markers 78, 354
Matlab 31, 48, 87, 474, 475, 476,
477, 478, 479, 480
Multichannel Systems 26
N
Neuralynx 26
NexScript 221, 542, 543
Numerical Results 42, 404
O
Opening Files 25
P
Perievent Histograms 89, 100
Perievent Rasters 114, 165
Perievent Spectrograms 158
Place Cell Analysis 143
Plexon 26
Poincare Maps 122
Population Vectors 80
Post-Processing 85
PowerPoint 45, 389, 484, 485, 486
Power Spectral Densities 127
Principal Component Analysis 135
Programming with Python and
NexScript 221
PSTH Versus Time 137
R
Rasters 113, 114, 165
Rate Histograms 92
Rectangles 214
Regularity Analysis 141
Reverse Correlation 147
S
Saving Graphics 44
Saving Results 45
Screen Elements 13, 58
Script Variables 224
Selecting Variables 35
Sentinel Keys 11
Shift-Predictor 111
Spectrogram 155, 158
Spike Trains 73
Synchrony vs. Time 123
Page 586
T
Text Files 28
Text Labels 211
Trial Bin Counts 125
Tucker-Davis Technologies 26
V
Variable 35, 36, 38, 139, 224, 225,
309, 331, 359, 394, 431, 465, 552,
559, 572
Viewing Multiple Histograms 216
Viewing the Neuronal Activity 218
W
Waveforms 81
Page 587
